前言
在 Android 中,我们知道我们能看到的界面都是 Activity ,但是我们能看到的这些 View 是如何被添加到View中的昵?今天这篇文章我们就通过源码来追踪溯源,看看 View 究竟是如何被添加到手机屏幕上的。本文篇幅较长请大家耐心阅读。
View 被添加到Activity的步骤
我们写一个Activity的时候一般都是如下所示的写法来将资源资源加载到了Activity 。
public class MainActivity extends AppCompatActivity {

    @Override
    protected void onCreate(Bundle savedInstanceState) {
        super.onCreate(savedInstanceState);
        setContentView(R.layout.activity_main);
    }
}
这里我们调用的是 Activity 的 setContentView(@LayoutRes int layoutResID),那么下面我们继续追踪 Activity 的源码,看看它的 setContentView(@LayoutRes int layoutResID)方法。
1、Activity.setContentView(int resourceId)
 public void setContentView(@LayoutRes int layoutResID) {
        getWindow().setContentView(layoutResID);
        initWindowDecorActionBar();
    }
我们这里看到它调用的 getWindow() 获取了一个对象调用了它的 setContentView(layoutResID) 方法。那么我们看下 getWindow() 返回的是什么对象。
  /**
     * Retrieve the current {@link android.view.Window} for the activity.
     * This can be used to directly access parts of the Window API that
     * are not available through Activity/Screen.
     *
     * @return Window The current window, or null if the activity is not
     *         visual.
     */
    public Window getWindow() {
        return mWindow;
    }
我们看到这里直接返回了 mWindow,这里我们看注释它说这个方法返回的是当前的 Activity 的 window ,如果当前Activity是不可见的那么返回的是 null。
我们继续跟踪代码,找到 mWindow 的创建,我们会发现在 attach()方法中,发现对mWindow的赋值。
  final void attach(Context context, ActivityThread aThread,
            Instrumentation instr, IBinder token, int ident,
            Application application, Intent intent, ActivityInfo info,
            CharSequence title, Activity parent, String id,
            NonConfigurationInstances lastNonConfigurationInstances,
            Configuration config, String referrer, IVoiceInteractor voiceInteractor,
            Window window, ActivityConfigCallback activityConfigCallback) {
        attachBaseContext(context);

        mFragments.attachHost(null /*parent*/);

        mWindow = new PhoneWindow(this, window, activityConfigCallback);

       /***********省略部分代码*****************/

}我们这里看到mWindow是一个 PhoneWindow对象,所以这里调用了 PhoneWindow 的 setContentView(layoutResID) 方法。
2、PhoneWindow.setContentView(int layoutResID)
我们接着来看PhoneWindow.setContentView(int layoutResID)的源码:
    @Override
    public void setContentView(int layoutResID) {
        // Note: FEATURE_CONTENT_TRANSITIONS may be set in the process of installing the window
        // decor, when theme attributes and the like are crystalized. Do not check the feature
        // before this happens.
        if (mContentParent == null) {
            installDecor();
        } else if (!hasFeature(FEATURE_CONTENT_TRANSITIONS)) {
            mContentParent.removeAllViews();
        }

        if (hasFeature(FEATURE_CONTENT_TRANSITIONS)) {
            final Scene newScene = Scene.getSceneForLayout(mContentParent, layoutResID,
                    getContext());
            transitionTo(newScene);
        } else {
            mLayoutInflater.inflate(layoutResID, mContentParent);
        }
        mContentParent.requestApplyInsets();
        final Callback cb = getCallback();
        if (cb != null && !isDestroyed()) {
            cb.onContentChanged();
        }
        mContentParentExplicitlySet = true;
}我们从第一行看,首先判断了mContentParent是不是为null,如果为null,执行了indtallDecor()方法,下面我们继续看它的源码。
2.1 installDecor()
    private void installDecor() {
        mForceDecorInstall = false;
        if (mDecor == null) {
            //初始化 DecorView
            mDecor = generateDecor(-1);
            mDecor.setDescendantFocusability(ViewGroup.FOCUS_AFTER_DESCENDANTS);
            mDecor.setIsRootNamespace(true);
            if (!mInvalidatePanelMenuPosted && mInvalidatePanelMenuFeatures != 0) {
                mDecor.postOnAnimation(mInvalidatePanelMenuRunnable);
            }
        } else {
            //给 DecorView 设置 PhoneWindow
            mDecor.setWindow(this);
        }
        if (mContentParent == null) {
            //初始化 mContentParent
            mContentParent = generateLayout(mDecor);

            // Set up decor part of UI to ignore fitsSystemWindows if appropriate.
            //设置 DecorView 忽略fitsSystemWindows
            mDecor.makeOptionalFitsSystemWindows();

         /*************省略部分代码************************/

        }
}这部分代码中我们首先看到在第三行对mDecor做了初始化,这里的mDecor就是DecorView。然后如果mDecor不为null的话将当前的Window设置到 DecorView 。后面判断了 mContentParent 是不是为空,为空则初始化 mContentParent。总结起来这个方法中做了下面几件事:
- 如果 mDevor 为空调用
generateDecor(-1)初始化 DecorView; - 如果 mDecor 不为空则给 DecorView 设置当前 PhoneWindow;
- 如果mContentParent为空则初始化 mContentParent;
下面我们分别来看这我们首先看下generateDecor(-1)方法是如何初始化 DecorView的。
I、初始化DevoreView
    protected DecorView generateDecor(int featureId) {
        Context context;
        if (mUseDecorContext) {
            Context applicationContext = getContext().getApplicationContext();
            if (applicationContext == null) {
                context = getContext();
            } else {
                context = new DecorContext(applicationContext, getContext());
                if (mTheme != -1) {
                    context.setTheme(mTheme);
                }
            }
        } else {
            context = getContext();
        }
        return new DecorView(context, featureId, this, getAttributes());
    }
这里我们看到这个方法比较件单,它的返回值是直接 new 了一个 DecorView 对象。
下面我们来看 mDecor.setWindow(this)。
II、mDecor.setWindow(this)
    void setWindow(PhoneWindow phoneWindow) {
        mWindow = phoneWindow;
        Context context = getContext();
        if (context instanceof DecorContext) {
            DecorContext decorContext = (DecorContext) context;
            decorContext.setPhoneWindow(mWindow);
        }
}这个方法也是非常件单,就是将传入的PhoneWindow对象赋值给DecorView中的window属性。
III、初始化mContentParent
    protected ViewGroup generateLayout(DecorView decor) {

    /****************省略部分代码***************************/

        // Inflate the window decor.
        int layoutResource;
        int features = getLocalFeatures();
        // System.out.println("Features: 0x" + Integer.toHexString(features));
        if ((features & (1 << FEATURE_SWIPE_TO_DISMISS)) != 0) {
            layoutResource = R.layout.screen_swipe_dismiss;
            setCloseOnSwipeEnabled(true);
        } else if ((features & ((1 << FEATURE_LEFT_ICON) | (1 << FEATURE_RIGHT_ICON))) != 0) {
            if (mIsFloating) {
                TypedValue res = new TypedValue();
                getContext().getTheme().resolveAttribute(
                        R.attr.dialogTitleIconsDecorLayout, res, true);
                layoutResource = res.resourceId;
            } else {
                layoutResource = R.layout.screen_title_icons;
            }
            // XXX Remove this once action bar supports these features.
            removeFeature(FEATURE_ACTION_BAR);
            // System.out.println("Title Icons!");
        } else if ((features & ((1 << FEATURE_PROGRESS) | (1 << FEATURE_INDETERMINATE_PROGRESS))) != 0
                && (features & (1 << FEATURE_ACTION_BAR)) == 0) {
            // Special case for a window with only a progress bar (and title).
            // XXX Need to have a no-title version of embedded windows.
            layoutResource = R.layout.screen_progress;
            // System.out.println("Progress!");
        } else if ((features & (1 << FEATURE_CUSTOM_TITLE)) != 0) {
            // Special case for a window with a custom title.
            // If the window is floating, we need a dialog layout
            if (mIsFloating) {
                TypedValue res = new TypedValue();
                getContext().getTheme().resolveAttribute(
                        R.attr.dialogCustomTitleDecorLayout, res, true);
                layoutResource = res.resourceId;
            } else {
                layoutResource = R.layout.screen_custom_title;
            }
            // XXX Remove this once action bar supports these features.
            removeFeature(FEATURE_ACTION_BAR);
        } else if ((features & (1 << FEATURE_NO_TITLE)) == 0) {
            // If no other features and not embedded, only need a title.
            // If the window is floating, we need a dialog layout
            if (mIsFloating) {
                TypedValue res = new TypedValue();
                getContext().getTheme().resolveAttribute(
                        R.attr.dialogTitleDecorLayout, res, true);
                layoutResource = res.resourceId;
            } else if ((features & (1 << FEATURE_ACTION_BAR)) != 0) {
                layoutResource = a.getResourceId(
                        R.styleable.Window_windowActionBarFullscreenDecorLayout,
                        R.layout.screen_action_bar);
            } else {
                layoutResource = R.layout.screen_title;
            }
            // System.out.println("Title!");
        } else if ((features & (1 << FEATURE_ACTION_MODE_OVERLAY)) != 0) {
            layoutResource = R.layout.screen_simple_overlay_action_mode;
        } else {
            // Embedded, so no decoration is needed.
            layoutResource = R.layout.screen_simple;
            // System.out.println("Simple!");
        }

        //////////////////////我是华丽的分隔线////////////////////////////////////////

        mDecor.startChanging();
        mDecor.onResourcesLoaded(mLayoutInflater, layoutResource);

        ViewGroup contentParent = (ViewGroup)findViewById(ID_ANDROID_CONTENT);
        if (contentParent == null) {
            throw new RuntimeException("Window couldn't find content container view");
        }

       /****************省略部分代码***************************/

        return  contentParent;
} 这里我们看到主要有两部分文中的代码,我们可以看到分隔线以上的那一大段if/else是根据不同的条件给layoutResource赋值的。这一大段代码就是根据我们设置的Application的主题去选择对应加载的资源布局 Id。
然后我们看到紧接着调用的DecorView的onResourcesLoaded(mLayoutInflater, layoutResource)方法,那么我们继续看这个方法具体做了哪些事情
onResourcesLoaded
void onResourcesLoaded(LayoutInflater inflater, int layoutResource) {
    /**************省略部分代码**************************/
        final View root = inflater.inflate(layoutResource, null);
       /**************省略部分代码**************************/
            // Put it below the color views.
            addView(root, 0, new ViewGroup.LayoutParams(MATCH_PARENT, MATCH_PARENT));
        }
        mContentRoot = (ViewGroup) root;
        initializeElevation();
}我们这里还是看核心部分的代码,这里我们看到首先将传进来的资源布局进行inflate并把它赋值给root,然后将root添加到DecorView中。一句话来说就是 mDecor.onResourcesLoaded(mLayoutInflater, layoutResource);这句代码是将对应的资源布局文件加载到mDecor。
下面我们继续来看generateLayout(DecorView decor)方法,我们发现下面它对contentParent通过findViewById(ID_ANDROID_CONTENT)进行了赋值。那么我们看下ID_ANDROID_CONTENT对应的 ID 值。
  /**
     * The ID that the main layout in the XML layout file should have.
     */
    public static final int ID_ANDROID_CONTENT = com.android.internal.R.id.content;
注释中说这个 ID 是主布局的 XML 中必须存在的。也就是之前赋值的layoutResource中必须存在的。我们随便找一个上面的 xml 布局文件来来看看.
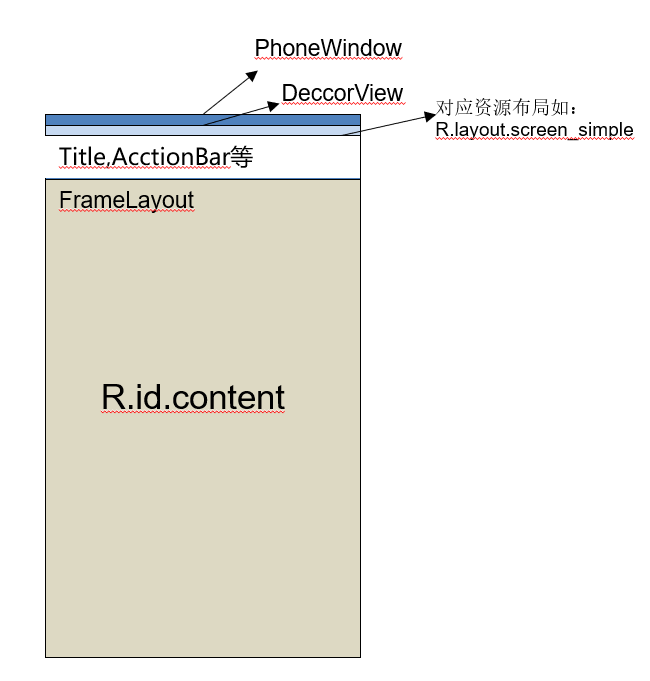
R.layout.screen_simple
我们看到R.id.content确实是存在的,并且它是一个FrameLayout。到这里我们来看下现在前面这些具体做了哪些?
如下图所示,到这里 Activity 持有一个 PhoneWindow 对象,PhoneWindow 中有一个 DecorView ,DecorView 中加载了一个基础的资源布局,里面有 title,ActionBar 等,肯定存在一个 id 为 R.id.ccontent 的资源布局。
看到这里就完了?不不不,还有我们继续往下看!!!
2.2 mLayoutInflater.inflate(layoutResID, mContentParent)
我们继续回到PhoneWiondow的setContentView(int layoutResID),如下:
    @Override
    public void setContentView(int layoutResID) {
        // Note: FEATURE_CONTENT_TRANSITIONS may be set in the process of installing the window
        // decor, when theme attributes and the like are crystalized. Do not check the feature
        // before this happens.
        if (mContentParent == null) {
            installDecor();
        } else if (!hasFeature(FEATURE_CONTENT_TRANSITIONS)) {
            mContentParent.removeAllViews();
        }

        if (hasFeature(FEATURE_CONTENT_TRANSITIONS)) {
            final Scene newScene = Scene.getSceneForLayout(mContentParent, layoutResID,
                    getContext());
            transitionTo(newScene);
        } else {
            mLayoutInflater.inflate(layoutResID, mContentParent);
        }
        mContentParent.requestApplyInsets();
        final Callback cb = getCallback();
        if (cb != null && !isDestroyed()) {
            cb.onContentChanged();
        }
        mContentParentExplicitlySet = true;
}我们前面看完了installDecor()方法,我们继续往下看,我们看到下面紧接着调用了 mLayoutInflater.inflate(layoutResID, mContentParent);将之前 Activity 中从传入的资源布局加载到我们前面初始化的mContentParent中,也就是在资源ID为R.id.ccontent的 Framlayout 中。现在我们来看看我们传进来的资源布局文件被加载到哪里了?
总结
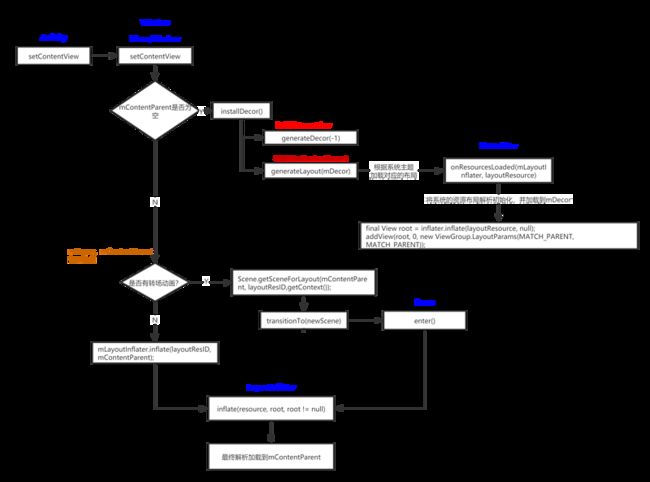
这篇文章我们从 Ativity 的 setContentView(layoutResourceId) 开始,一步步追踪 Android FrameWork 层的源码。探究了我们平时代码中写的资源布局是如何被加载到 Activity 中的。我们根据源码简单画了一个流程图如下:
欢迎在评论区留下你的观点大家一起交流,一起成长。如果今天的这篇文章对你在工作和生活有所帮助,欢迎 转发分享给更多人。同时欢迎大家加入我组建的大前端学习交流群,群里大家一起学习交流 Android、Flutter等知识。从这里出发我们一起讨论,一起交流,一起提升。
群号:872749114
![]()