Linux CCF框架简要分析和API调用
1. 前言
从Linux3.10内核开始就正式的使用CCF框架了,在以前Clock部分,虽然也提供了相应的API根据名字去获取Clock,设置频率,获取父时钟,设置父时钟的函数,但是这些API都是由每个SoC单独实现,导致了代码的差异很大,于是就引入了一个新的通用的时钟框架来解决这个问题。由TI的工程师Mike Turquette提供了Common Clock Framewrok,让具体SoC实现clk_ops成员函数并通过clk_register、clk_register_clkdev注册时钟源以及源与设备对应关系,具体的clock驱动都统一迁移到drivers/clk目录。因此现在的时钟框架就采用CCF方式,使用CCF前提是内核配置了CONFIG_COMMON_CLK。
2.CCF框架简介
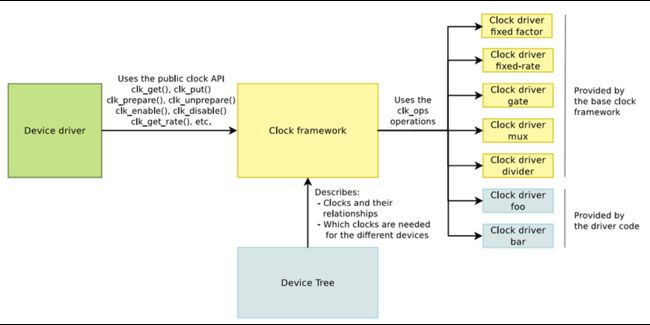
Common Clock Framewrok(CCF)主要就是来管理上面这些Clock相关的器件。并且提供相应的API给driver调用,屏蔽掉其中的硬件特性。
而且从上面这段话就可以大概猜测下,Linux内核支持多种平台(简单来说就是芯片),也就意味着最底层的操作,不同的平台的操作方式肯定不同,那么对于整个CCF框架大概可以猜测到的也分为三层:
实现Soc的底层操作,比如选择哪个时钟源,比如输出的频率等。
实现中间层,向上提供统一的操作接口,向下提供Soc底层操作的接口。
实现通用的上层操作接口,也就是driver调用的API。
3. 硬件时钟种类简介
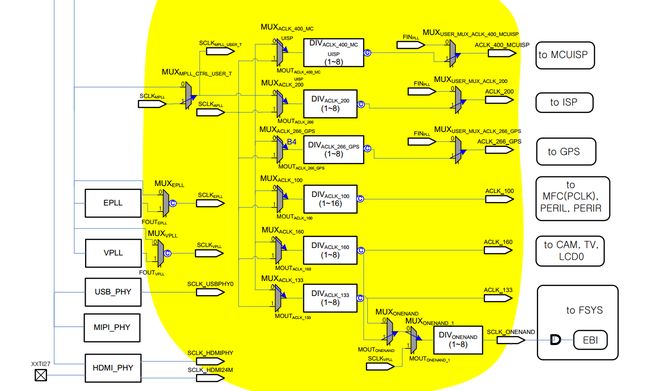
1)提供基础时钟的时钟源,时钟振荡器(晶振)
2)用于倍频的锁相环(PLL)
3)用于多路选择的选择器(MUX)
4)用于分频的分频器(DIV)
5)用于时钟使能的门电路(GATE)
6)用于模块的时钟
对应上面的6类,咱们只需要了解前5类即可。为什么要讲上面这些呢?虽然每个SoC的时钟控制器寄存器的地址空间可能都不一样,但是时钟控制器的组成目前来说,基本都是这个样子的。那么CCF就可以把这些都抽象出来,定义不同的结构体,提供接口去分别实现上面的各个子组件。看起来是不是就简单多了。
事实上,从代码看来也是这样的,那么就来看下都定义了什么结构体?
3.2 时钟种类对应的结构体和函数
其中这些结构体都存放在linux-4.2.6\include\linux\clk-provider.h。顺便看下其对于的注册函数。额,为什么要有对应的注册函数?可以这样想下,咱们把一个完全的时钟域给拆了成一个一个的门、分频器、多路选择器、但是最终他们还是有依赖关系的。就像拼图一样,虽然买回来后拆了,但是拼好的时候得和谐或者完美,不然就搞笑了。废话不说,继续搬砖吧~
3.2.1 struct clk_gate
    struct clk_gate {
        struct clk_hw hw;
        void __iomem    *reg;
        u8      bit_idx;
        u8      flags;
        spinlock_t  *lock;
    };

    struct clk *clk_register_gate(struct device *dev, const char *name,
        const char *parent_name, unsigned long flags,
        void __iomem *reg, u8 bit_idx,
        u8 clk_gate_flags, spinlock_t *lock);
        void clk_unregister_gate(struct clk *clk);
3.2.2 struct clk_mux
    struct clk_mux {
        struct clk_hw   hw;
        void __iomem    *reg;
        u32     *table;
        u32     mask;
        u8      shift;
        u8      flags;
        spinlock_t  *lock;
    };
    struct clk *clk_register_mux(struct device *dev, const char *name,
        const char * const *parent_names, u8 num_parents,
        unsigned long flags,
        void __iomem *reg, u8 shift, u8 width,
        u8 clk_mux_flags, spinlock_t *lock);
3.2.3 struct clk_hw
    struct clk_hw {
        struct clk_core *core;
        struct clk *clk;                //由ccf维护,并且提供给用户使用
        const struct clk_init_data *init;   //描述该clk的静态属性
};
struct clk_init_data {
    const char      *name;     //时钟的名字
    const struct clk_ops    *ops;   //时钟种类的操作函数
    const char      * const *parent_names;  //时钟的父时钟列表
    u8          num_parents;  //父时钟的个数
    unsigned long       flags;
};
/* 操作集合 */
struct clk_ops {
    int     (*prepare)(struct clk_hw *hw);
    void        (*unprepare)(struct clk_hw *hw);
    int     (*is_prepared)(struct clk_hw *hw);
    void        (*unprepare_unused)(struct clk_hw *hw);
    int     (*enable)(struct clk_hw *hw);
    void        (*disable)(struct clk_hw *hw);
    int     (*is_enabled)(struct clk_hw *hw);
    void        (*disable_unused)(struct clk_hw *hw);
    unsigned long   (*recalc_rate)(struct clk_hw *hw,
                    unsigned long parent_rate);
    long        (*round_rate)(struct clk_hw *hw, unsigned long rate,
                    unsigned long *parent_rate);
    int     (*set_parent)(struct clk_hw *hw, u8 index);
    u8      (*get_parent)(struct clk_hw *hw);
    int     (*set_rate)(struct clk_hw *hw, unsigned long rate,
                    unsigned long parent_rate);
    int     (*set_rate_and_parent)(struct clk_hw *hw,
                    unsigned long rate,
                    unsigned long parent_rate, u8 index);
    unsigned long   (*recalc_accuracy)(struct clk_hw *hw,
                       unsigned long parent_accuracy);
    int     (*get_phase)(struct clk_hw *hw);
    int     (*set_phase)(struct clk_hw *hw, int degrees);
    void        (*init)(struct clk_hw *hw);
};
在上面讲到的不同的时钟类型,操作方式或者操作的地址也是不一样的,而这些操作都是底层的操作,在clk_hw结构体下面clk_init_data就提供了底层操作实现的接口,也就是说,不同种类的底层操作都可以通过设置clk_init_data的ops来实现不同种类的操作。
3.3 不同组件的注册和提供给用户的方法
clk_register_mux
    clk_register_mux_table
        if (clk_mux_flags & CLK_MUX_READ_ONLY)  //如果设置了只读标志???暂时不清楚
            init.ops = &clk_mux_ro_ops;
        else
        init.ops = &clk_mux_ops;                //初始化操作
        init.flags = flags | CLK_IS_BASIC;          //设置标志
        init.parent_names = parent_names;       //设置父时钟列表(简单来说就是从哪个时钟源来)
        init.num_parents = num_parents;         //设置父时钟的个数

        /* struct clk_mux assignments */
        mux->reg = reg;                       //设置mux在时钟控制器的偏移地址
        mux->shift = shift;                     //设置当前添加的mux节点控制位的起始位
        mux->mask = mask;
        mux->flags = clk_mux_flags;
        mux->lock = lock;
        mux->table = table;
        mux->hw.init = &init;                   //设置clk_hw中的init成员

        clk = clk_register(dev, &mux->hw);   //注册

        if (IS_ERR(clk))
            kfree(mux);
上面的代码初始化完时钟名字、时钟父设备列表、时钟寄存器偏移地址等等,最终调用了clk_register()注册进去。那么来看下此函数做了什么?
struct clk *clk_register(struct device *dev, struct clk_hw *hw)  //代码有删减
{
    struct clk_core *core;
    core->ops = hw->init->ops;
    if (dev && dev->driver)
        core->owner = dev->driver->owner;
    core->hw = hw;
    core->flags = hw->init->flags;
    core->num_parents = hw->init->num_parents;
    hw->core = core;

    core->parent_names = kcalloc(core->num_parents, sizeof(char *),GFP_KERNEL);

    for (i = 0; i < core->num_parents; i++) {
        core->parent_names[i] = kstrdup_const(hw->init->parent_names[i],GFP_KERNEL);
    }
    INIT_HLIST_HEAD(&core->clks);

    hw->clk = __clk_create_clk(hw, NULL, NULL);
    ret = __clk_init(dev, hw->clk);
}
从上面代码看来,注册过程中,把数据填充到clk_hw中的core成员进去,把时钟名字,父时钟等等到填充到这里,最终创建 __clk_create_clk把时钟放入哈希表中。其中API就是通过core来调用到对应Soc实现的底层操作。
好了,不说上面的,现在都说主要看气质,哪咱们主要看操作集合,init.ops = &clk_mux_ops;
    const struct clk_ops clk_mux_ops = {
        .get_parent = clk_mux_get_parent,            //获取父时钟
        .set_parent = clk_mux_set_parent,            //设置父时钟
        .determine_rate = __clk_mux_determine_rate,  //辅助找到最好的父时钟,记得找到后得设置
    };
同理,其他两个的注册也一样,这里就直接给出操作集合。
    const struct clk_ops clk_divider_ops = {
        .recalc_rate = clk_divider_recalc_rate, //重新计算时钟频率
        .round_rate = clk_divider_round_rate, //又是打辅助的,获取配置最接近的频率,同样记得重新配置
        .set_rate = clk_divider_set_rate,      //设置时钟频率
};

const struct clk_ops clk_gate_ops = {
    .enable = clk_gate_enable,       //使能时钟
    .disable = clk_gate_disable,       //禁止时钟
    .is_enabled = clk_gate_is_enabled, //查看是否使能??
};
因此,上面分析的看来,想要添加自己的时钟还是比较简单的,因为各种时钟的ops已经自带了。所以只需要:
1、创建时钟(一般包括gate mux div三个种类,如果是PLL时钟就另外咯)
2、初始化clk_hw中的struct clk_init_data
i.主要初始化时钟名字
ii.此时钟所在的寄存器
iii.设置此时钟相应的位置和位宽
3、注册gate/div/mux等
好,那么接下直接来看下为driver提供的API,我觉得嘛,看不懂里面的实现,至少得会用会抄,在谈深入比较好。
4.CCF提供的API
说得那么玄,其实不然把API一打开一看,还是一样的包装,还是熟悉的味道,只不过额外又加了几个包装,那么继续搬砖吧。
函数 功能
struct clk *__clk_lookup(const char *name)  通过时钟名找到时钟
static inline int clk_enable(struct clk *clk)   使能时钟,不会睡眠
static inline void clk_disable(struct clk *clk) 禁止时钟,不会睡眠
static inline int clk_prepare_enable(struct clk *clk)   使能时钟,可能会睡眠
static inline void clk_disable_unprepare(struct clk *clk)   禁止时钟,可能会睡眠
static inline unsigned long clk_get_rate(struct clk *clk)   获取时钟频率
static inline int clk_set_rate(struct clk *clk, unsigned long rate) 设置时钟频率
static inline long clk_round_rate(struct clk *clk, unsigned long rate)  获取最接近的时钟频率
static inline int clk_set_parent(struct clk *clk, struct clk *parent)   设置时钟的父时钟
static inline struct clk *clk_get_parent(struct clk *clk)   获取时钟的父时钟
好了,那么在driver中就可以调用上面的函数去操作时钟了。看下例子:
struct clk *fout_mpll = NULL;
struct clk *mout_fimd0 = NULL;
fout_mpll = __clk_lookup("fout_mpll");
mout_fimd0 = __clk_lookup("mout_fimd0");
If(!fout_mpll)
    pr_info(“no clock....\n”);
pr_info("fout_mpll = %ld\n",clk_get_rate(fout_mpll));
ret = clk_set_parent(mout_fimd0,fout_mpll);
if(ret){
    pr_info("clk_set_parent is failed...\n");
}
clk_get_parent(mout_fimd0);
其中,clk_enable的调用过程:clk_enable(clk)—–>clk_core_enable(clk->core)—–>core->ops->enable(core->hw);
好了,其他的在慢慢研究

