Netty入门之创建Maven多模块依赖项目
新学Netty,编译运行时踩了一些坑,记录在此。
essential netty in action中有一个入门demo,EchoServer and EchoClient,用于Netty入门的小demo。
(Essential Netty in Action)
EchoClient主要功能
1、启动客户端,发起连接
public class Client {
private final String host;
private final int port;
public Client(String host, int port) {
this.host = host;
this.port = port;
}
public void start() throws Exception {
EventLoopGroup group = new NioEventLoopGroup();
try{
Bootstrap b = new Bootstrap();
b.group(group)
.channel(NioSocketChannel.class)
.remoteAddress(new InetSocketAddress(host,port))
.handler(new ChannelInitializer() {
@Override
public void initChannel(SocketChannel ch)
throws Exception {
ch.pipeline().addLast(new ClientHandler());
}
});
ChannelFuture f = b.connect().sync();
f.channel().closeFuture().sync();
}finally {
group.shutdownGracefully().sync();
}
}
public static void main(String[] args) throws Exception {
if(args.length != 2){
System.err.println(
"Usage :" + Client.class.getSimpleName()+
"" 2、ClientHandler处理返回到客户端的数据
class ClientHandler extends SimpleChannelInboundHandler<ByteBuf>{

    @Override
    public void channelActive(ChannelHandlerContext ctx){
        ctx.writeAndFlush(Unpooled.copiedBuffer("Netty rocks!",CharsetUtil.UTF_8));
    }
    @Override
    protected void channelRead0(ChannelHandlerContext ctx, ByteBuf in) throws Exception {
        System.out.println("Client received: "+in.toString(CharsetUtil.UTF_8));
    }

    @Override
    public void exceptionCaught(ChannelHandlerContext ctx,
                    Throwable cause) {
        cause.printStackTrace();
        ctx.close();
    }


}
EchoServer主要功能
1、启动服务端,监听连接请求
public class EchoServer {
    public void bind(int port) throws Exception {
        //配置服务端的NIO线程组
        //实际上EventLoopGroup就是Reactor线程组
        //两个Reactor一个用于服务端接收客户端的连接,另一个用于进行SocketChannel的网络读写
        EventLoopGroup bossGroup = new NioEventLoopGroup();
        EventLoopGroup workerGroup = new NioEventLoopGroup();

        try{
            /**
             * 由于我们使用在 NIO 传输,我们
                已指定 NioEventLoopGroup接受和处理新连接,指定 NioServerSocketChannel
                为信道类型。在此之后,我们设置本地地址是 InetSocketAddress 与所选择的端口(6)如。
                服务器将绑定到此地址来监听新的连接请求。
             */
            //ServerBootstrap对象是Netty用于启动NIO服务端的辅助启动类,目的是降低服务端开发的复杂度
            ServerBootstrap b = new ServerBootstrap();
            //Set the EventLoopGroup for the parent (acceptor) and the child (client).
            b.group(bossGroup, workerGroup)
                .channel(NioServerSocketChannel.class)
                .localAddress(new InetSocketAddress(port))
                //绑定I/O事件的处理类ChildChannelHandler,作用类似于Reactor模式中的Handler类
                //主要用于处理网络I/O事件,例如记录日志,对消息进行编解码等
                .childHandler(new ChannelInitializer(){
                //添加ServerHandler到Channel的ChannelPipeline
                    //通过ServerHandler给每一个新来的Channel初始化
                    @Override
                    protected void initChannel(SocketChannel ch) throws Exception {
                        ch.pipeline().addLast(new ServerHandler());
                    }
                });
            //绑定监听端口,调用sync同步阻塞方法等待绑定操作完成,完成后返回ChannelFuture类似于JDK中Future
            ChannelFuture f = b.bind(port).sync();
            //使用sync方法进行阻塞,等待服务端链路关闭之后Main函数才退出
            f.channel().closeFuture().sync();
        }finally {
            //优雅退出,释放线程池资源
            bossGroup.shutdownGracefully();
            workerGroup.shutdownGracefully();
        }


    }
    public static void main(String[] args) throws Exception {
        int port = 8080;
        if(args != null && args.length > 0) {
            try {
                port = Integer.valueOf(args[0]);
            }catch (NumberFormatException e) {
                //采用默认值
            }
        }
        new Server().bind(port);
    }
}
2、ServerHandler处理发送到服务端的数据
private class ServerHandler extends ChannelInboundHandlerAdapter {

        //每个信息入站都会调用
        @Override
        public void channelRead(ChannelHandlerContext ctx, Object msg) throws Exception {
            ByteBuf buf = (ByteBuf) msg;
            System.out.println("The server receive msg :" + buf.toString());
            ctx.write(buf);
        }

        //通知处理器最后的channelread()是当前批处理中的最后一条消息时调用
        @Override
        public void channelReadComplete(ChannelHandlerContext ctx) throws Exception {
            ctx.flush();
        }

        //读操作时捕获到异常时调用
        @Override
        public void exceptionCaught (ChannelHandlerContext ctx, Throwable cause) {
            ctx.close();
        }
    }
在Eclipse中使用maven构建该demo
首先分析该项目中的模块及其依赖关系。
这个项目中有两个模块,Server与Client,它们的依赖库相同,互相之间没有依赖关系。
1、创建包含这两个模块的父项目netty-parent,pom.xml文件配置
<project xmlns="http://maven.apache.org/POM/4.0.0" xmlns:xsi="http://www.w3.org/2001/XMLSchema-instance" xsi:schemaLocation="http://maven.apache.org/POM/4.0.0 http://maven.apache.org/xsd/maven-4.0.0.xsd">
  <modelVersion>4.0.0modelVersion>
  <groupId>nettygroupId>
  <artifactId>netty-parentartifactId>
  <version>0.0.1-SNAPSHOTversion>
  <name>netty-parentname>

  <packaging>pompackaging>

   <dependencies>
       <dependency>
           <groupId>junitgroupId>
           <artifactId>junitartifactId>
           <version>4.10version>
           <scope>testscope>
       dependency>
       <dependency>
           <groupId>org.slf4jgroupId>
           <artifactId>slf4j-simpleartifactId>
           <version>1.6.4version>
           <scope>compilescope>
       dependency>
       <dependency>
           <groupId>io.nettygroupId>
           <artifactId>netty-allartifactId>
           <version>4.1.10.Finalversion>
           <scope>compilescope>
       dependency>

   dependencies>
  project>
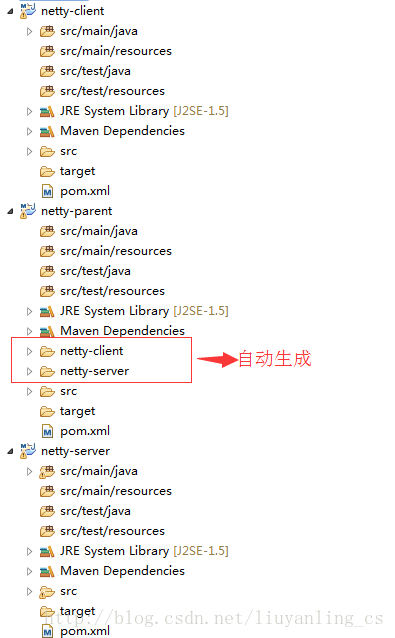
2、以netty-parent为parent project创建新的maven module,分别为netty-client和netty-server,创建完毕之后工程结构如图所示

3、netty-server的pom.xml文件配置为
<project xmlns="http://maven.apache.org/POM/4.0.0" xmlns:xsi="http://www.w3.org/2001/XMLSchema-instance" xsi:schemaLocation="http://maven.apache.org/POM/4.0.0 http://maven.apache.org/xsd/maven-4.0.0.xsd">
  <modelVersion>4.0.0modelVersion>

  <parent>
    <groupId>nettygroupId>
    <artifactId>netty-parentartifactId>
    <version>0.0.1-SNAPSHOTversion>
  parent>
  <artifactId>netty-serverartifactId>

  <packaging>jarpackaging>
  <name>netty-servername>
project>
4、netty-client的pom.xml文件配置为
<project xmlns="http://maven.apache.org/POM/4.0.0" xmlns:xsi="http://www.w3.org/2001/XMLSchema-instance" xsi:schemaLocation="http://maven.apache.org/POM/4.0.0 http://maven.apache.org/xsd/maven-4.0.0.xsd">
  <modelVersion>4.0.0modelVersion>
  <parent>
    <groupId>nettygroupId>
    <artifactId>netty-parentartifactId>
    <version>0.0.1-SNAPSHOTversion>
  parent>
  <artifactId>netty-clientartifactId>
  <packaging>jarpackaging>
  <name>netty-clientname>
project>
5、编译项目并运行Server和Client
5.1 在命令行中进入netty-parent项目目录,运行命令编译项目
D:\workspace\netty-parent>mvn package
[INFO] Scanning for projects...
[INFO] ------------------------------------------------------------------------
[INFO] Reactor Build Order:
[INFO]
[INFO] netty-parent
[INFO] netty-client
[INFO] netty-server
[INFO]
[INFO] ------------------------------------------------------------------------
[INFO] Building netty-parent 0.0.1-SNAPSHOT
[INFO] ------------------------------------------------------------------------
[INFO]
[INFO] ------------------------------------------------------------------------
[INFO] Building netty-client 0.0.1-SNAPSHOT
[INFO] ------------------------------------------------------------------------
…………省略
[INFO] ------------------------------------------------------------------------
[INFO] Building netty-server 0.0.1-SNAPSHOT
…………省略
[INFO] Reactor Summary:
[INFO]
[INFO] netty-parent ....................................... SUCCESS [  0.002 s]
[INFO] netty-client ....................................... SUCCESS [  1.006 s]
[INFO] netty-server ....................................... SUCCESS [  0.501 s]
[INFO] ------------------------------------------------------------------------
[INFO] BUILD SUCCESS
[INFO] ------------------------------------------------------------------------
[INFO] Total time: 1.603 s
[INFO] Finished at: 2017-05-03T15:37:41+08:00
[INFO] Final Memory: 16M/177M
[INFO] ------------------------------------------------------------------------
5.2 在命令行中进入netty-parent/netty-server目录,运行server
D:\workspace\netty-parent\netty-server>mvn exec:java -Dexec.mainClass="Server"
[WARNING]
[WARNING] Some problems were encountered while building the effective settings
[WARNING] expected START_TAG or END_TAG not TEXT (position: TEXT seen ...\ua0\n  262:5)  @ D:\lyl\00-WORK\java&javaweb\tools\apache-mav
en-3.3.9\conf\settings.xml, line 262, column 5
[WARNING]
[INFO] Scanning for projects...
[INFO]
[INFO] ------------------------------------------------------------------------
[INFO] Building netty-server 0.0.1-SNAPSHOT
[INFO] ------------------------------------------------------------------------
[INFO]
[INFO] --- exec-maven-plugin:1.6.0:java (default-cli) @ netty-server ---
5.3 此时Server端已经运行起来了,再打开一个cmd命令窗口,在命令行中进入netty-parent/netty-client目录,运行client
D:\workspace\netty-parent\netty-client>mvn exec:java -Dexec.mainClass="Client" -
Dexec.args="localhost 8080"
[WARNING]
[WARNING] Some problems were encountered while building the effective settings
[WARNING] expected START_TAG or END_TAG not TEXT (position: TEXT seen ...\ua0\n  262:5)  @ D:\lyl\00-WORK\java&javaweb\tools\apache-mav
en-3.3.9\conf\settings.xml, line 262, column 5
[WARNING]
[INFO] Scanning for projects...
[INFO]
[INFO] ------------------------------------------------------------------------
[INFO] Building netty-client 0.0.1-SNAPSHOT
[INFO] ------------------------------------------------------------------------
[INFO]
[INFO] --- exec-maven-plugin:1.6.0:java (default-cli) @ netty-client ---
Client received: Netty rocks! 到此,第一个netty demo运行完毕.
注意mainClass,我demo里没有限定package名,所以mainClass=”Client”。
项目github地址
