scrapy爬虫进阶案例--爬取前程无忧招聘信息
上一次我们进行了scrapy的入门案例讲解,相信大家对此也有了一定的了解,详见新手入门的Scrapy爬虫操作–超详细案例带你入门。接下来我们再来一个案例来对scrapy操作进行巩固。
一、爬取的网站
这里我选择的是杭州数据分析的岗位,网址如下:https://search.51job.com/list/080200,000000,0000,32,9,99,%25E6%2595%25B0%25E6%258D%25AE%25E5%2588%2586%25E6%259E%2590,2,1.html?lang=c&postchannel=0000&workyear=99&cotype=99°reefrom=99&jobterm=99&companysize=99&ord_field=0&dibiaoid=0&line=&welfare=

二、爬取的详细步骤
这里基础的scrapy操作,如创建scrapy项目等就不赘述了。忘记的可以看我上一篇:新手入门的Scrapy爬虫操作–超详细案例带你入门
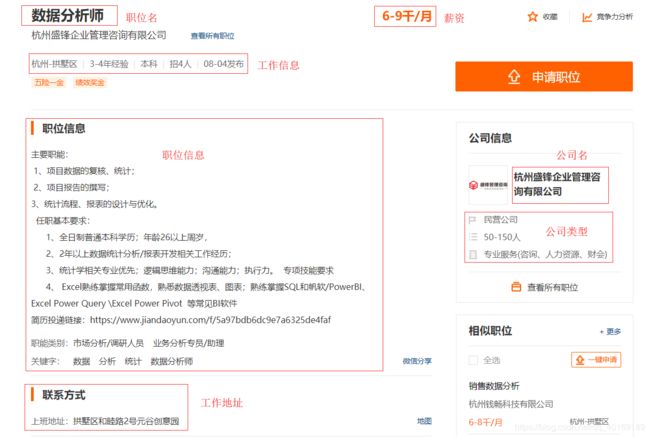
目标:将爬取的职位名,公司名,公司类型,薪资,工作信息(城市,经验,招聘人数,发布日期),职位信息,工作地址,工作详情连接,字段保存到mysql中。
1、爬取信息的分析过程
由于每一个职位的信息都不同,需要我们点击去跳转到职位详情页面去进行爬取。这里我们可以看到每一条岗位信息都对应一个div

点开div具体可以看到工作详情信息的链接,于是想到利用xpath获取到每一个岗位的详情链接然后进行跳转以便获取到所需的信息。
上面黑框是谷歌插件xpath helper,挺好用的,大家可以去下载一下。
这里有个小捷径,就是在你选择的元素上面右键点击复制xpath路径,就会获得该元素的xpath路径,然后再在上面进行修改获取所有的链接。

点击跳转进行到详情页面
对需要爬取的信息进行划分:

2、具体爬取代码
这里再介绍一下scrapy中文件的含义:
scrapy.cfg:项目的配置文件
spiders/:我们写的爬虫文件放置在这个文件夹下面,我这里是job_detail.py
init.py:一般为空文件,但是必须存在,没有__init__.py表明他所在的目录只是目录不是包
items.py:项目的目标文件,定义结构化字段,保存爬取的数据
middlewares.py:项目的中间件
pipelines.py:项目的管道文件
setting.py:项目的设置文件
(1)、编写items.py
需要爬取的字段:
import scrapy

class ScrapyjobItem(scrapy.Item):
    # define the fields for your item here like:
    # name = scrapy.Field()
    # 职位名
    positionName = scrapy.Field()
    # 公司名
    companyName = scrapy.Field()
    # 公司类型
    companyType = scrapy.Field()
    # 薪资
    salary = scrapy.Field()
    # 工作信息(城市,经验,招聘人数,发布日期)
    jobMsg = scrapy.Field()
    # 职位信息
    positionMsg = scrapy.Field()
    # 工作地址
    address = scrapy.Field()
     # 工作详情连接
    link = scrapy.Field()
(2)、编写spider文件夹下的爬虫文件
注意: 这里有一个坑,我之前在写allowed_domains时写的是www.search.51job.com后面发现在爬取数据的时候一直为空,后来百度搜了一下发现是我们从工作详情链接跳转时域名被被过滤了,不是在原来的域名下了,这里改成一级域名。
import scrapy
from scrapy_job.items import ScrapyjobItem

class JobSpiderDetail(scrapy.Spider):
    # 爬虫名称  启动爬虫时必要的参数
    name = 'job_detail'
    allowed_domains = ['51job.com']  # 二次迭代时域名被过滤了  改成一级域名
    # 起始的爬取地址
    start_urls = [
        'https://search.51job.com/list/080200,000000,0000,32,9,99,%25E6%2595%25B0%25E6%258D%25AE%25E5%2588%2586%25E6%259E%2590,2,1.html?lang=c&postchannel=0000&workyear=99&cotype=99°reefrom=99&jobterm=99&companysize=99&ord_field=0&dibiaoid=0&line=&welfare=']

    # 找到详细职位信息的链接 进行跳转
    def parse(self, response):
        # 找到工作的详情页地址,传递给回调函数parse_detail解析
        node_list = response.xpath("//div[2]/div[4]")
        for node in node_list:
            # 获取到详情页的链接
            link = node.xpath("./div/div/a/@href").get()
            print(link)
            if link:
                yield scrapy.Request(link, callback=self.parse_detail)

        # 设置翻页爬取
        # 获取下一页链接地址
        next_page = response.xpath("//li[@class='bk'][last()]/a/@href").get()
        if next_page:
            # 交给schedule调度器进行下一次请求                     开启不屏蔽过滤
            yield scrapy.Request(next_page, callback=self.parse, dont_filter=True)

    # 该函数用于提取详细页面的信息
    def parse_detail(self, response):
        item = ScrapyjobItem()
        # 详细页面的职业信息
        item['positionName'] = response.xpath("//div[@class='cn']/h1/@title").get()
        item['companyName'] = response.xpath("//div[@class='com_msg']//p/text()").get()
        item['companyType'] = response.xpath("//div[@class='com_tag']//p/@title").extract()
        item['salary'] = response.xpath("//div[@class='cn']/strong/text()").get()
        item['jobMsg'] = response.xpath("//p[contains(@class, 'msg')]/@title").extract()
        item['positionMsg'] = response.xpath("//div[contains(@class, 'job_msg')]//text()").extract()
        item['address'] = response.xpath("//p[@class='fp'][last()]/text()").get()
        item['link'] = response.url
        # print(item['positionMsg'])
        yield item
(3)、编写pipelines.py
# 在 pipeline.py 文件中写一个中间件把数据保存在MySQL中
class MysqlPipeline(object):
    # from_crawler 中的参数crawler表示这个项目本身
    # 通过crawler.settings.get可以读取settings.py文件中的配置信息
    @classmethod
    def from_crawler(cls, crawler):
        cls.host = crawler.settings.get('MYSQL_HOST')
        cls.user = crawler.settings.get('MYSQL_USER')
        cls.password = crawler.settings.get('MYSQL_PASSWORD')
        cls.database = crawler.settings.get('MYSQL_DATABASE')
        cls.table_name = crawler.settings.get('MYSQL_TABLE_NAME')
        return cls()

    # open_spider表示在爬虫开启的时候调用此方法(如开启数据库)
    def open_spider(self, spider):
        # 连接数据库
        self.db = pymysql.connect(self.host, self.user, self.password, self.database, charset='utf8')
        self.cursor = self.db.cursor()

    # process_item表示在爬虫的过程中,传入item,并对item作出处理
    def process_item(self, item, spider):
        # 向表中插入爬取的数据  先转化成字典
        data = dict(item)
        table_name = self.table_name
        keys = ','.join(data.keys())
        values = ','.join(['%s'] * len(data))
        sql = 'insert into %s (%s) values (%s)' % (table_name, keys, values)
        self.cursor.execute(sql, tuple(data.values()))
        self.db.commit()
        return item

    # close_spider表示在爬虫结束的时候调用此方法(如关闭数据库)
    def close_spider(self, spider):
        self.db.close()


# 写一个管道中间件StripPipeline清洗空格和空行
class StripPipeline(object):
    def process_item(self, item, job_detail):
        item['positionName'] = ''.join(item['positionName']).strip()
        item['companyName'] = ''.join(item['companyName']).strip()
        item['companyType'] = '|'.join([i.strip() for i in item['companyType']]).strip().split("\n")
        item['salary'] = ''.join(item['salary']).strip()
        item['jobMsg'] = ''.join([i.strip() for i in item['jobMsg']]).strip()
        item['positionMsg'] = ''.join([i.strip() for i in item['positionMsg']]).strip()
        item['address'] = ''.join(item['address']).strip()
        return item
(4)、设置settings.py
# Obey robots.txt rules
ROBOTSTXT_OBEY = False

# 把我们刚写的两个管道文件配置进去,数值越小优先级越高
# Configure item pipelines
# See https://docs.scrapy.org/en/latest/topics/item-pipeline.html
ITEM_PIPELINES = {
    # 'scrapy_qcwy.pipelines.ScrapyQcwyPipeline': 300,
    'scrapy_qcwy.pipelines.MysqlPipeline': 200,
    'scrapy_qcwy.pipelines.StripPipeline': 199,
}

# Mysql 配置
MYSQL_HOST = 'localhost'
MYSQL_USER = 'root'
MYSQL_PASSWORD = 'root'
MYSQL_DATABASE = 'qcwy'
MYSQL_TABLE_NAME = 'job_detail'
查看数据库结果


最后的源码详见:https://github.com/zmk-c/scrapy/tree/master/scrapy_qcwy