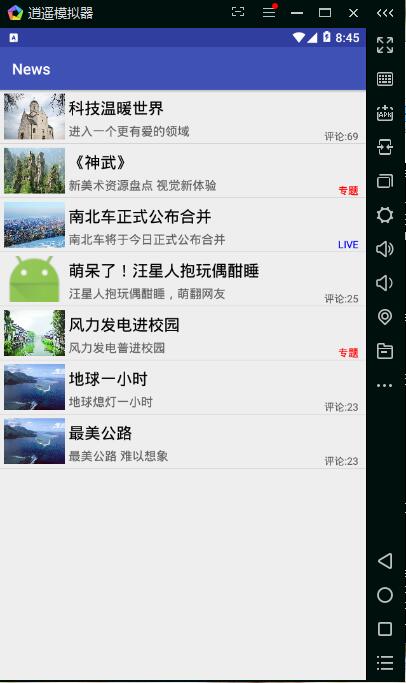
这里介绍新闻客户端的实现过程,附录部分代码,仅供参考,具体细节整理后我会在博文中发出来。
项目介绍:
- 实验项目:新闻客户端。
- 实验需求:Tomcat服务器,Andriod Studio,逍遥安卓模拟器。
- 实验目的:运用所学知识独立实现新闻客户端的设计与运行。
- 实验分析:基于Android开发且使用部分系统自带的组件,免费的开源组件,使用起来灵活方便,简单易用,在技术上体现出了可行性。
新闻客户端实现步骤:
(1)配置服务器,开启Tomcat服务器,将json文件放入到Tomcat的webapps/ROOT文件夹中,并在ROOT文件夹中放置img图片。
(2)创建JSON文件,存放图片路径、新闻标题、新闻描述、新闻类型和评论数量5个属性。
(3)创建程序。
(4)制作布局。整体布局Listview和单条记录的布局items。
(5)网络中获取数据AsyncHttpClient得到字符串json数据。
(6)对获取到的json数据进行解析,解析后放在一个集合中。
(7)创建NewsInfo实体类。
(8)创建工具类,创建JsonParse工具类解析JSON文件内容并设置到相应的实体类中。
(9)编写界面交互代码,用来获取NewsInfo.json文件的解析,并将解析的信息设置到ListView显示在界面上。
(10)添加权限,用于访问网络。
(11)运行程序。
附录部分代码完成:
一、首先完成布局工作
1.activity_main布局页面
android:layout_width="match_parent" android:layout_height="match_parent" android:orientation="vertical" tools:context=".MainActivity"> android:layout_width="match_parent" android:layout_height="match_parent"> android:id="@+id/loading" android:layout_width="match_parent" android:layout_height="match_parent" android:gravity="center" android:orientation="vertical" android:visibility="visible"> android:layout_width="wrap_content" android:layout_height="wrap_content" /> android:layout_width="wrap_content" android:layout_height="wrap_content" android:text="正在加载信息..." /> android:id="@+id/lv_news" android:layout_width="match_parent" android:layout_height="match_parent" />
2.news_item布局页面
参照上诉布局代码,布局页面的代码细节可以根据个人喜好来设置。
二、编写主要界面代码
package com.example.administrator.news;
+import java.util.List;(导包不作详细介绍)
public class MainActivity extends AppCompatActivity {
private LinearLayout loading;
private ListView lvNews;
private List
private TextView tv_title;
private TextView tv_description;
private TextView tv_type;
private NewsInfo newsInfo;
private SmartImageView siv;
protected void onCreate(Bundle savedInstanceState) {
super.onCreate(savedInstanceState);
setContentView(R.layout.activity_main);
initView();
fillData(); }
//初始化控件
private void initView(){
loading=(LinearLayout)findViewById(R.id.loading);
lvNews=(ListView)findViewById(R.id.lv_news); }
//使用AsyncHttpClient访问网络
private void fillData() {
AsyncHttpClient client=new AsyncHttpClient();
client.get(getString(R.string.serverurl), new AsyncHttpResponseHandler() {
public void onSuccess(int i, org.apache.http.Header[] headers, byte[] bytes) {
try{
String json=new String(bytes,"gbk");
newsInfos=JsonParse.getNewsInfo(json);
if (newsInfos==null){
Toast.makeText(MainActivity.this,"解析失败",Toast.LENGTH_SHORT).show(); }
else {
loading.setVisibility(View.INVISIBLE);
lvNews.setAdapter(new NewsAdapter()); }
}catch(Exception e){
e.printStackTrace(); } }
public void onFailure(int i, org.apache.http.Header[] headers, byte[] bytes, Throwable throwable) {
Toast.makeText(MainActivity.this,"请求失败",Toast.LENGTH_SHORT).show(); } });
}
//Listview适配器
private class NewsAdapter extends BaseAdapter {
//ListView的Item数
public int getCount() {
return newsInfos.size(); }
//得到ListView条目视图
public View getView(int position, View convertView, ViewGroup parent) {
View view =View.inflate(MainActivity.this, R.layout. news_item, null);
siv =(SmartImageView) view.findViewById(R.id.siv_icon) ;
tv_title =(TextView)view.findViewById(R.id.tv_title);
tv_description =(TextView) view.findViewById(R.id.tv_description);
tv_type =(TextView) view.findViewById(R.id.tv_type);
newsInfo =newsInfos.get(position);
//SmartImageView加载指定路径图片
siv.setImageUrl(newsInfo.getIcon(),R.mipmap.ic_launcher,R.mipmap.ic_launcher);
//设置新闻标题
tv_title.setText(newsInfo.getTitle());
//设置新闻描述
tv_description.setText(newsInfo.getContent());
//1.一般新闻2.专题3.live
int type=newsInfo.getType();
switch(type){
//不同新闻类型设置不同的颜色和不同的内容
case 1:
tv_type.setText("评论:"+ newsInfo.getComment());
break;
case 2:
tv_type.setTextColor(Color.RED);
tv_type.setText("专题");
break;
case 3:
tv_type.setTextColor(Color.BLUE);
tv_type.setText("LIVE");
break; }
return view; }
//条目对象
public Object getItem(int position){
return position; }
//条目id
public long getItemId(int position){
return 0; } }
}
三、操作方面
1.将json文件放到Tomcat的root文件下,准备图片,注意:要与代码中的图片路径一致。
2.为用户添加权限
实验项目总结:
(1)参考资料:老师上课发的视频资料,来自教师的xml文件以及所需的jar包,教材的部分源代码。
(2)问题: a.代码实现过程中,代码出现标签不匹配情况。
b..json文件相关java程序部分不被识别。
c.部分变量出现未定义。
d.程序运行时一直显示正在加载信息,且提示请求失败
(3)解决方法:a.将老师给的xml文件中的标签名改为与自己代码中的标签一致。
b.在build.gradle中添加com.goole.code.gson:gson:2.6.2来导入库文件。
c.纠正部分变量字母大小写问题。
d. 将所写路径修改一致,统一路径地址。
(4)通过此次实践我更加深刻地体会到了Android开发带来的乐趣与便利,感受到了来自教师的帮助与鼓励,虽然完成的实践作业并不是一个庞大的工程,但是过程中得到的知识和帮助使我收获颇丰。
