完整适配LUCI界面的Openwrt中EC20的QMI拨号
目前4G模块应用已经非常普及,跟之前的3G不同,3G基本使用ppp拨号,usbserial驱动,Linux内核自带支持,此应用非常简单。
4G模块由于速率较高,usbserial驱动性能满足不了,因此4G的拨号方式就发生了变化。基本方式有,PPP,NDIS,QMI等。
此文介绍QMI方式,所谓QMI即Qualcomm Message Interface,因此只限于使用高通芯片的4G模块。
工作主要分为三个方面:Kernel驱动适配,应用层拨号程序,Openwrt拨号适配脚本。
首选,介绍Kernel驱动适配:
主要就是按照EC20官方文档来修改几个地方,interface屏蔽以及RAW IP。
建议在Openwrt中修改,做成patch方式,便于管理。以下是我做好的patch,可直接使用。
--- a/drivers/net/usb/qmi_wwan.c	2018-08-16 00:13:02.000000000 +0800
+++ b/drivers/net/usb/qmi_wwan.c	2019-01-22 10:59:14.000000000 +0800
@@ -76,6 +76,25 @@ struct qmimux_priv {
 	u8 mux_id;
 };

+#if 1 //Added by Quectel
+#include
+struct sk_buff *qmi_wwan_tx_fixup(struct usbnet *dev, struct sk_buff *skb, gfp_t flags)
+{
+	 if (dev->udev->descriptor.idVendor != cpu_to_le16(0x2C7C))
+		return skb;
+	 // Skip Ethernet header from message
+	 if (skb_pull(skb, ETH_HLEN)) {
+		return skb;
+	 } else {
+		dev_err(&dev->intf->dev, "Packet Dropped ");
+	 }
+	 // Filter the packet out, release it
+	 dev_kfree_skb_any(skb);
+	 return NULL;
+}
+#endif
+
+
 static int qmimux_open(struct net_device *dev)
 {
 	struct qmimux_priv *priv = netdev_priv(dev);
@@ -740,6 +759,23 @@ static int qmi_wwan_bind(struct usbnet *
 	}
 	dev->net->netdev_ops = &qmi_wwan_netdev_ops;
 	dev->net->sysfs_groups[0] = &qmi_wwan_sysfs_attr_group;
+
+#if 1 //Added by Quectel
+	 if (dev->udev->descriptor.idVendor == cpu_to_le16(0x2C7C)) {
+	 dev_info(&intf->dev, "Quectel EC25&EC21&EG91&EG95&EG06&EP06&EM06&BG96&AG35 work on RawIP mode\n");
+	 dev->net->flags |= IFF_NOARP;
+
+	 usb_control_msg(
+		 interface_to_usbdev(intf),
+		 usb_sndctrlpipe(interface_to_usbdev(intf), 0),
+		 0x22, //USB_CDC_REQ_SET_CONTROL_LINE_STATE
+		 0x21, //USB_DIR_OUT | USB_TYPE_CLASS | USB_RECIP_INTERFACE
+		 1, //active CDC DTR
+		 intf->cur_altsetting->desc.bInterfaceNumber,
+		 NULL, 0, 100);
+	 }
+#endif
+
 err:
 	return status;
 }
@@ -831,6 +867,9 @@ static const struct driver_info	qmi_wwan
 	.unbind		= qmi_wwan_unbind,
 	.manage_power	= qmi_wwan_manage_power,
 	.rx_fixup       = qmi_wwan_rx_fixup,
+#if 1 //Added by Quectel
+	.tx_fixup = qmi_wwan_tx_fixup,
+#endif
 };

 static const struct driver_info	qmi_wwan_info_quirk_dtr = {
@@ -1250,7 +1289,7 @@ static const struct usb_device_id produc
 	{QMI_FIXED_INTF(0x03f0, 0x9d1d, 1)},	/* HP lt4120 Snapdragon X5 LTE */
 	{QMI_FIXED_INTF(0x22de, 0x9061, 3)},	/* WeTelecom WPD-600N */
 	{QMI_FIXED_INTF(0x1e0e, 0x9001, 5)},	/* SIMCom 7230E */
-	{QMI_QUIRK_SET_DTR(0x2c7c, 0x0125, 4)},	/* Quectel EC25, EC20 R2.0  Mini PCIe */
+	{QMI_FIXED_INTF(0x2c7c, 0x0125, 4)},	/* Quectel EC25, EC20 R2.0  Mini PCIe */
 	{QMI_QUIRK_SET_DTR(0x2c7c, 0x0121, 4)},	/* Quectel EC21 Mini PCIe */
 	{QMI_QUIRK_SET_DTR(0x2c7c, 0x0191, 4)},	/* Quectel EG91 */
 	{QMI_FIXED_INTF(0x2c7c, 0x0296, 4)},	/* Quectel BG96 */
@@ -1284,7 +1323,7 @@ static const struct usb_device_id produc
 	{QMI_GOBI_DEVICE(0x05c6, 0x9225)},	/* Sony Gobi 2000 Modem device (N0279, VU730) */
 	{QMI_GOBI_DEVICE(0x05c6, 0x9245)},	/* Samsung Gobi 2000 Modem device (VL176) */
 	{QMI_GOBI_DEVICE(0x03f0, 0x251d)},	/* HP Gobi 2000 Modem device (VP412) */
-	{QMI_GOBI_DEVICE(0x05c6, 0x9215)},	/* Acer Gobi 2000 Modem device (VP413) */
+	//{QMI_GOBI_DEVICE(0x05c6, 0x9215)},	/* Acer Gobi 2000 Modem device (VP413) */
 	{QMI_FIXED_INTF(0x05c6, 0x9215, 4)},	/* Quectel EC20 Mini PCIe */
 	{QMI_GOBI_DEVICE(0x05c6, 0x9265)},	/* Asus Gobi 2000 Modem device (VR305) */
 	{QMI_GOBI_DEVICE(0x05c6, 0x9235)},	/* Top Global Gobi 2000 Modem device (VR306) */
@@ -1360,7 +1399,7 @@ static int qmi_wwan_probe(struct usb_int

 	/* Quectel EC20 quirk where we've QMI on interface 4 instead of 0 */
 	if (quectel_ec20_detected(intf) && desc->bInterfaceNumber == 0) {
-		dev_dbg(&intf->dev, "Quectel EC20 quirk, skipping interface 0\n");
+		dev_dbg(&intf->dev, "Quectel EC20 05c6:9215 quirk, skipping interface 0\n");
 		return -ENODEV;
 	}
另,除了该patch之外,也请选上usbserial驱动,因为AT命令发送还是要经过usbserial 的。
第二,应用层拨号程序:
既然使用了QMI方式,那么肯定也需要专用的程序来配合QMI,此拨号程序,EC20官方也是提供的。我们直接编译即可。
基本上4G拨号,如果不是专网卡,只需要配个VPN即可,跟3G一样。
最后,重点的Openwrt拨号脚本适配:
为什么要适配?其实如果不需要自动拨号机制,以及LUCI界面控制,那么有应用层拨号程序即可。
首先我们看一下LUCI 拨号界面
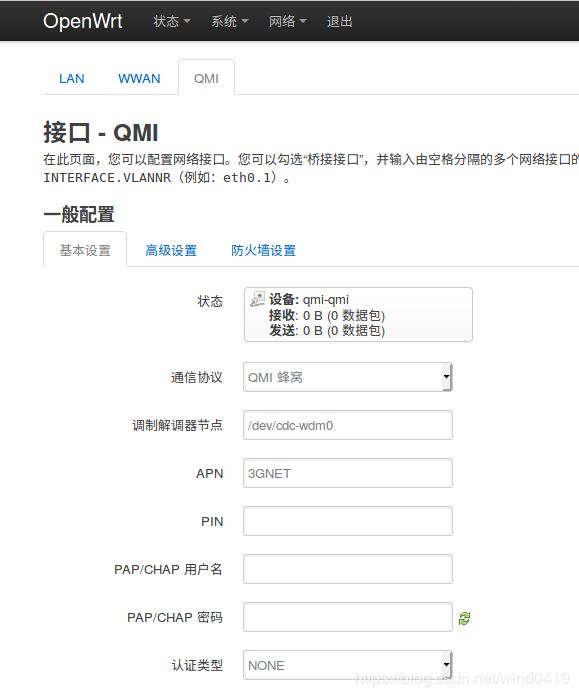
此界面,在LUCI中配置了proto qmi即可显示。
关于适配脚本,主要是openwrt的拨号有自己的一套机制,由netifd来控制。
脚本位于/lib/netifd/proto/
root@OpenWrt:/# ls /lib/netifd/proto/
3g.sh         dhcpv6.sh     qmi.sh        wwan.sh
dhcp.sh       ppp.sh        wireguard.sh
其中qmi.sh即为qmi适配脚本,3g.sh即为ppp拨号的适配脚本。
我们所要做到工作其实就是把应用层的拨号程序集成到qmi中,同时与netifd结合起来即可。
openwrt中uqmi包已经包含有qmi.sh脚本,只是与EC20 适配不太好。
qmi.sh脚本,主要填充3个函数,init_config,setup,teardown。
init_config的作用是从/etc/config/xxx 读取qmi拨号的配置参数,如device_name, VPN,Dialnum等。
setup 其主要拨号作用,一般流程是:先发送AT 查询信号,SIM卡,网络注册状态等,在满足拨号条件后,再调用具体的拨号程序进行拨号。
teardown即终止拨号,做一些清理工作。
这3个函数,会在netifd中根据条件,循环调用,自动拨号即是由它来控制的。
此处贴出主要的setup流程供参考:
proto_qmi_setup() {
	local interface="$1"
	local auth_int=0
	local pincfg
	local exe_cmd="/bin/qmidial"
	local device apn auth username password pincode delay modes pdptype profile dhcpv6 autoconnect plmn $PROTO_DEFAULT_OPTIONS
	local ip_6 ip_prefix_length gateway_6 dns1_6 dns2_6
	json_get_vars device apn auth username password pincode delay modes pdptype profile dhcpv6 autoconnect plmn $PROTO_DEFAULT_OPTIONS

	[ "$metric" = "" ] && metric="0"

	[ -n "$ctl_device" ] && device=$ctl_device

	[ -n "$device" ] || {
		echo "No control device specified"
		proto_notify_error "$interface" NO_DEVICE
		proto_set_available "$interface" 0
		return 1
	}

	device="$(readlink -f $device)"
	[ -c "$device" ] || {
		echo "The specified control device does not exist"
		proto_notify_error "$interface" NO_DEVICE
		proto_set_available "$interface" 0
		return 1
	}

	devname="$(basename "$device")"
	devpath="$(readlink -f /sys/class/usbmisc/$devname/device/)"
	ifname="$( ls "$devpath"/net )"
	[ -n "$ifname" ] || {
		echo "The interface could not be found."
		proto_notify_error "$interface" NO_IFACE
		proto_set_available "$interface" 0
		return 1
	}

	_get_info_status_by_at "/dev/ttyUSB2"
	[ $? != 0 ] && {
		echo "Check AT failed !"
		proto_notify_error "$interface" CALL_FAILED
		proto_set_available "$interface" 0
		return 1
	}

	[ -n "$delay" ] && sleep "$delay"

	#proto_notify_error "$interface" CALL_FAILED

	[ "$auth" = "none" ] && auth_int=0
	[ -n "$auth" -a "$auth" != "none" ] && auth_int=1

	logger -t qmi "Setting up $ifname with APN-$apn [$username-$password] pin-$pincode auth-$auth-$auth_int"

	[ -n "$apn" ] && {
		exe_cmd="$exe_cmd -s $apn"
		[ -n "$username" -a -n "$password" -a -n ${auth_int} ] && exe_cmd="$exe_cmd $username $password $auth_int"
		[ -n "$pincode" ] && exe_cmd="$exe_cmd -p $pincode"
	}
	exe_cmd="$exe_cmd &"
	/bin/pidof qmidial && killall -INT qmidial && sleep 1
	eval ${exe_cmd}
	echo "exec dial: $exe_cmd"
	sleep 1

	/bin/pidof qmidial && {
		json_init
		json_add_string name "${interface}_4"
		json_add_string ifname "@$interface"
		json_add_string proto "dhcp"
		proto_add_dynamic_defaults
		json_close_object
		ubus call network add_dynamic "$(json_dump)"
	}

	proto_init_update "$ifname" 1
	proto_send_update "$interface"

	return 0
}
具体更详细的执行流程,请阅读netifd机制。后续有时间再写一篇关于netifd机制的介绍。
最后,请记得把QMI接口加入防火墙wan组。