JAVA学习之GUI(上篇)
一、基础
GUI:Graphics User Interface 图形用户界面
(1)Component:例如按钮,下拉框
(2)Component必须放在Container中才能显现出来
(3)Container是Component的子类,可以容纳别的Component对象
(4)Container可以使用add()添加其他Component对象
(5)Container可以容纳Container
(6)两种常用Container
Window:自由停泊的顶级窗口
Panel:可以容纳其他Component,不能独立存在,必须添加在其他Container中(如Window,Applet)
Frame:有一些方法可以设置窗口
Panel:可以添加到Frame
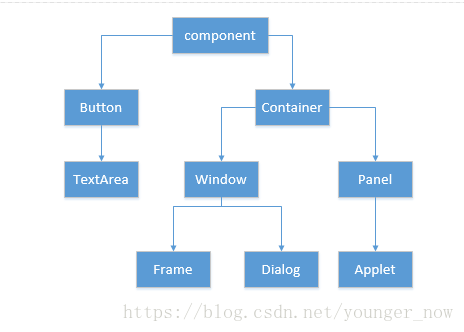
结构图:
简单示例:
Frame1:
public class TestFrame {
	public static void main(String[] args) {
		Frame f = new Frame("my first title");
		f.setBackground(Color.blue);
		f.setVisible(true);
		f.setSize(170, 100);
		f.setLocation(100, 100);
		f.setResizable(false);
	}
}
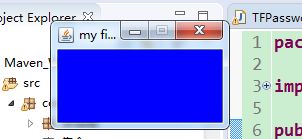
运行结果:
Frame2:
public class TestMultiFrame {
	public static void main(String[] args) {
		MyFrame myFrame1 = new MyFrame(100, 100, 200, 200, Color.blue);
		MyFrame myFrame2 = new MyFrame(300, 100, 200, 200, Color.yellow);
		MyFrame myFrame3 = new MyFrame(100, 300, 200, 200, Color.GREEN);
		MyFrame myFrame4 = new MyFrame(300, 300, 200, 200, Color.magenta);
	}
}

class MyFrame extends Frame{
	static int id = 0;
	public MyFrame(int x,int y,int w,int h,Color color) {
		super("MyFrame"+(++id));
		setVisible(true);
		setLayout(null);
		setBounds(x, y, w, h);
		setBackground(color);
	}

}
运行结果:
Panel1:
public class TestPanel {
	public static void main(String[] args) {
		Frame f = new Frame("java with panel");
		Panel p = new Panel(null);
		f.setLayout(null);
		f.setBounds(300, 300, 500, 500);
		f.setBackground(new Color(0, 0, 102));
		p.setBounds(50, 50, 400, 400);
		p.setBackground(new Color(204, 204, 255));
		f.add(p);
		f.setVisible(true);
	}
}
运行结果:
Panel2:
public class TestMultiPanel {
	public static void main(String[] args) {
		new MyFrame2("MyFrame2", 300, 300, 300, 300);
	}
}

class MyFrame2 extends Frame{
	private Panel p1,p2,p3,p4;
	MyFrame2(String s,int x,int y,int w,int h){
		super(s);
		setLayout(null);
		p1 = new Panel(null);
		p2 = new Panel(null);
		p3 = new Panel(null);
		p4 = new Panel(null);
		p1.setBounds(0, 0, w/2, h/2);
		p2.setBounds(0, h/2, w/2, h/2);
		p3.setBounds(w/2, 0, w/2, h/2);
		p4.setBounds(w/2, h/2, w/2, h/2);
		p1.setBackground(Color.blue);
		p2.setBackground(Color.YELLOW);
		p3.setBackground(Color.green);
		p4.setBackground(Color.magenta);
		add(p1);
		add(p2);
		add(p3);
		add(p4);
		setBounds(x, y, w, h);
		setVisible(true);

	}
}
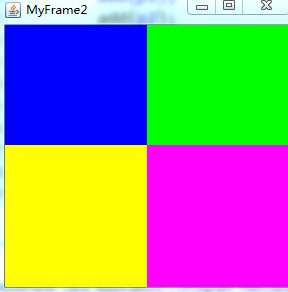
运行结果:
二、布局管理器
管理Component在Container的布局,不必直接设置Component的大小和位置
窗口的大小改变,组件会自动调整位置
Awt提供5种布局管理器类:FlowLayout、BorderLayout、GridLayout、CardLayout、GridBagLayout
(1)FlowLayout:一行一行的,像流水一样,默认对齐是居中
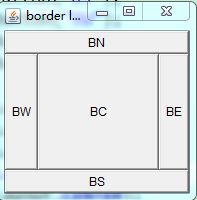
(2)BorderLayout:布局分为东西南北中,每个区域只能加一个组件,如加多个,之前的会被替换掉
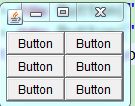
(3)GridLayout:可以分成一个个小格,可以指定行列数
示例:
FlowLayout:
public class TestFlowLayout {
	public static void main(String[] args) {
		Frame f = new Frame("frame flow layout");
		Button b1 = new Button("open");
		Button b2 = new Button("close");
		Button b3 = new Button("ok");
		f.setLayout(new FlowLayout(FlowLayout.LEFT,20,40));
		f.add(b1);
		f.add(b2);
		f.add(b3);
		f.setSize(300, 300);
		f.setVisible(true);
	}
}
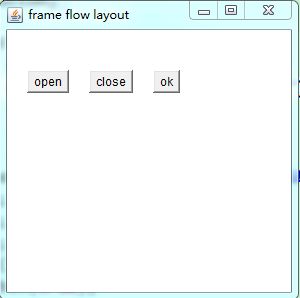
运行结果:
BorderLayout:
public class TestBorderLayout {
	public static void main(String[] args) {
		Frame f = new Frame("border layout");
		Button bn = new Button("BN");
		Button bs = new Button("BS");
		Button bw = new Button("BW");
		Button be = new Button("BE");
		Button bc = new Button("BC");

		f.add(bn, BorderLayout.NORTH);
		f.add(bs, BorderLayout.SOUTH);
		f.add(bw, BorderLayout.WEST);
		f.add(be, BorderLayout.EAST);
		f.add(bc, BorderLayout.CENTER);

		f.setSize(200, 200);
		f.setVisible(true);
	}
}
运行结果:
GridLayout:
public class TestGridLayout {
	public static void main(String[] args) {
		Frame f = new Frame("GridLayout example");
		Button b1 = new Button("Button");
		Button b2 = new Button("Button");
		Button b3 = new Button("Button");
		Button b4 = new Button("Button");
		Button b5 = new Button("Button");
		Button b6 = new Button("Button");
		f.setLayout(new GridLayout(3, 2));
		f.add(b1);
		f.add(b2);
		f.add(b3);
		f.add(b4);
		f.add(b5);
		f.add(b6);
		f.pack();
		f.setVisible(true);
	}
}
运行结果:
三、事件模型
事件监听:
事件源对象:如按钮,下拉框。。。。
实现监听接口的类:监听到后,会执行方法
过程:当某种事件发生时,向监听器传送某种事件对象,接到事件对象后进行某种处理(实现监听接口的类),
事件源对象需要注册(实现监听接口的类)
public class TestActionEvent2 {
	public static void main(String[] args) {
		Frame f = new Frame("test");
		Button b1 = new Button("start");
		Button b2 = new Button("stop");
		Monitor2 m = new Monitor2();
		b1.addActionListener(m);
		b2.addActionListener(m);
		b2.setActionCommand("game over");
		f.add(b1, "North");
		f.add(b2, "Center");
		f.pack();
		f.setVisible(true);

	}
}

class Monitor2 implements ActionListener{

	@Override
	public void actionPerformed(ActionEvent e) {
		System.out.println("进来了"+e.getActionCommand());

	}

}
运行结果:点击start按钮控台输出start,点击stop按钮,控台输出game over
四、TextField类
用来创建文本框对象,敲回车触发事件
示例1:普通输入文本
public class TFActionEvent {
	public static void main(String[] args) {
		new TFFrame();
	}
}

class TFFrame extends Frame{
	TFFrame(){
		TextField tf = new TextField();
		add(tf);
		tf.addActionListener(new TFActionListener());
		pack();
		setVisible(true);
	}
}

class TFActionListener implements ActionListener{

	@Override
	public void actionPerformed(ActionEvent e) {
		TextField tf =(TextField) e.getSource();
		System.out.println(tf.getText());
		tf.setText("");

	}

}
运行结果:回车后触发事件,文本框输入什么,控台显示什么
示例2:输入密码
public class TFPassword {
	public static void main(String[] args) {
		new TFFrame2();
	}
}

class TFFrame2 extends Frame{
	TFFrame2(){
		TextField tf = new TextField();
		add(tf);
		tf.setEchoChar('*');//密码不显示
		tf.addActionListener(new TFActionListener2());
		pack();
		setVisible(true);
	}
}

class TFActionListener2 implements ActionListener{

	@Override
	public void actionPerformed(ActionEvent e) {
		TextField tf =(TextField) e.getSource();
		System.out.println(tf.getText());
		tf.setText("");

	}

}
运行结果:输入文本框显示为****
