Android 进阶——Material Design新控件之AppBarLayout+Toolbar+CollapsingToolbarLayout实现动态变化的头部(八)
文章大纲
- 引言
- 一、Toolbar
- 1、Toolbar概述
- 2、Toolbar的应用
- 1、在XMl中配置Toolbar
- 2、简单使用Toolbar
- 二、AppBarLayout概述
- 1、layout_scrollFlags
- 2、AppBarLayout的方法
- 3、AppBarLayout的使用
- 三、CollapsingToolbarLayout
- 四、AppBarLayout+Toolbar+CollapsingToolbarLayout
- 1、定义布局
- 2、监听对应事件实现动效
引言
前面系列文章总结了Material Design 兼容库提供大部分新控件的使用,如果你看完前一篇关于Android进阶——Material Design新控件之利用CoordinatorLayout协同多控件交互(七)的文章,你会发现Material Design不仅仅是提供了一种统一的设计标准,同时还提供了对应的一套控件,相比于传统的控件增强了交互功能及动画效果,使得原来需要自己用很多代码去实现的效果,现在只需要使用对应的控件即可,而且很多控件都借助了“Behavior”机制,系列文章链接:
- Android进阶——Material Design新控件之初识TabLayout(一)
- Android进阶——Material Design新控件之TabLayout制作可滚动的Tabs页面(二)
- Android进阶——Material Design新控件之Snackbar(三)
- Android进阶——Material Design新控件之TextInputLayout(四)
- Android进阶——Material Design新控件之FloatingActionButton(五)
- Android进阶——Material Design新控件之NavigationView(六)
- Android进阶——Material Design新控件之利用CoordinatorLayout协同多控件交互(七)
- Android 进阶——Material Design新控件之利用AppBarLayout实现动态变化的头部(八)
一、Toolbar
1、Toolbar概述
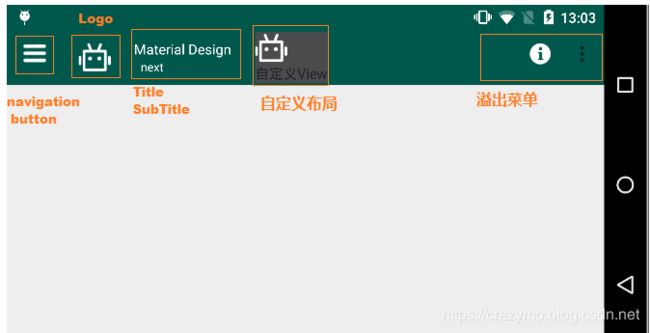
ToolBar直接继承ViewGroup是对原来ActionBar的整合,可以看成ActionBar的升级和替代者,简而言之就是ToolBar 内部支持了更多配置的属性以及设计了这些元素的事件监听接口,以及在ToolBar内部支持以下元素:
2、Toolbar的应用
1、在XMl中配置Toolbar
很多属性都可以直接在xml中配置使用,当然也可以通过对应的方法,只有溢出菜单需要在代码中动态生成。
<android.support.design.widget.CoordinatorLayout xmlns:android="http://schemas.android.com/apk/res/android"
    xmlns:app="http://schemas.android.com/apk/res-auto"
    xmlns:tools="http://schemas.android.com/tools"
    android:layout_width="match_parent"
    android:layout_height="match_parent"
    tools:context=".view.ToolBarActivity">
    <android.support.v7.widget.Toolbar
        android:id="@+id/toolbar"
        android:layout_width="match_parent"
        android:layout_height="55dp"
        android:background="@color/colorPrimaryDark"
        app:logo="@mipmap/ic_logo"
        app:navigationIcon="@mipmap/ic_navig"
        app:subtitle="          next"
        app:titleTextAppearance="@style/AppTheme"
        app:subtitleTextColor="@android:color/white"
        app:title="       Material Design"
        app:titleTextColor="@android:color/white">

        <LinearLayout
            android:layout_width="wrap_content"
            android:layout_height="wrap_content"
            android:layout_marginLeft="32dp"
            android:background="@color/backgroundColor"
            android:orientation="vertical">

            <ImageView
                android:layout_width="wrap_content"
                android:layout_height="wrap_content"
                android:src="@mipmap/ic_logo" />

            <TextView
                android:layout_width="wrap_content"
                android:layout_height="wrap_content"
                android:text="自定义View" />
        LinearLayout>

    android.support.v7.widget.Toolbar>

android.support.design.widget.CoordinatorLayout>
2、简单使用Toolbar
public class ToolBarActivity extends AppCompatActivity {
    private Toolbar toolbar;

    @Override
    protected void onCreate(@Nullable Bundle savedInstanceState) {
        super.onCreate(savedInstanceState);
        setContentView(R.layout.activity_toolbar);
        initToolBar();
    }

    private void initToolBar() {
        toolbar = findViewById(R.id.toolbar);
        //设置溢出菜单
        toolbar.inflateMenu(R.menu.layout_toolbar_menu);
        //设置navigationIcon
        toolbar.setNavigationIcon(getResources().getDrawable(R.mipmap.more));
        //给navigationIcon注册点击时事件
        toolbar.setNavigationOnClickListener(new View.OnClickListener() {
            @Override
            public void onClick(View v) {
                Toast.makeText(ToolBarActivity.this,"点击我啦",Toast.LENGTH_LONG).show();
            }
        });
        //给溢出菜单注册点击事件
        toolbar.setOnMenuItemClickListener(new Toolbar.OnMenuItemClickListener() {
            @Override
            public boolean onMenuItemClick(MenuItem menuItem) {
                switch (menuItem.getItemId()){
                    case R.id.github:
                        Toast.makeText(ToolBarActivity.this,"点击info啦",Toast.LENGTH_LONG).show();
                        break;
                    case R.id.about:
                        Toast.makeText(ToolBarActivity.this,"点击about啦",Toast.LENGTH_LONG).show();
                        break;
                    case R.id.more:
                        Toast.makeText(ToolBarActivity.this,"点击more啦",Toast.LENGTH_LONG).show();
                        break;
                        default:
                            break;
                }
                return false;
            }
        });
    }
}
二、AppBarLayout概述
AppBarLayout继承自LinearLayout,可以看成加强型的竖直线性布局(不支持水平布局),相比传统的线性布局,AppBarLayout 增加了滑动手势的支持以及提供了MD 风格的动画和视觉效果(比如说浮层效果,立体感、交互特效),通过给其子View上app:layout_scrollFlags属性并配合CoordinatorLayout可以使得对应的子View接收到可滚动的View滑动手势改变时的事件,
1、layout_scrollFlags
layout_scrollFlags是AppbarLayout提供给其子View使用的属性(也可以通过setScrollFlags方法设置),其中layout_scrollFlags的值是scroll,enterAlways,enterAlwaysCollapsed,exitUntilCollapsed,snap组合构成五种动效:
-
scroll——子View将会随着可滚动View(如ScrollView、ListView、RecycleView、NestedScrollView等)一起滚动,就好像子View 是属于ScrollView的一部分一样。
-
scroll | enterAlways—— 当ScrollView 向下滑动时,子View 将直接向下滑动,而不管ScrollView 是否在滑动。必须要与scroll 搭配使用,否者是不能滑动的。
-
scroll|enterAlways|enterAlwaysCollapsed_ enterAlwaysCollapsed 是对enterAlways 的补充,当ScrollView 向下滑动的时候,滑动View(也就是设置了enterAlwaysCollapsed 的View)下滑至折叠的高度(是通过View的minimum height (最小高度)指定的),当ScrollView 到达滑动范围的结束值的时候,滑动View剩下的部分开始滑动。
-
exitUntilCollapsed——当ScrollView 滑出屏幕时(即滑出边界时),滑动View先响应滑动事件,滑动至折叠高度,即通过minimum height 设置的最小高度后,就固定不动了,再把滑动事件交给 scrollview 继续滑动。
-
snap——在滚动结束后,如果view只是部分可见,它将滑动到最近的边界。比如view的底部只有25%可见,它将滚动离开屏幕,而如果底部有75%可见,它将滚动到完全显示。
2、AppBarLayout的方法
-
public void addOnOffsetChangedListener——当AppbarLayout 的偏移发生改变的时候回调。
-
public final int getTotalScrollRange——返回AppbarLayout 所有子View的滑动范围
-
public void removeOnOffsetChangedListener——移除监听器
-
public void setExpanded (boolean expanded, boolean animate)——设置AppbarLayout 是展开状态还是折叠状态,animate 参数控制切换到新的状态时是否需要动画
-
public void setExpanded (boolean expanded)——设置AppbarLayout 是展开状态还是折叠状态,默认有动画
3、AppBarLayout的使用
AppBarLayout的布局略。
public class AppbarActivity extends AppCompatActivity {
    private AppBarLayout appbar_layout;

    @Override
    protected void onCreate(@Nullable Bundle savedInstanceState) {
        super.onCreate(savedInstanceState);
        setContentView(R.layout.activity_appbar);
        initView();
    }

    private void initView() {
        appbar_layout = findViewById(R.id.appbar_layout);
        //当AppbarLayout 的偏移发生改变的时候回调,也就是子View滑动
        appbar_layout.addOnOffsetChangedListener(new AppBarLayout.OnOffsetChangedListener() {
            @Override
            public void onOffsetChanged(AppBarLayout appBarLayout, int i) {
                //
            }
        });
        //返回子View的可滑动距离
        appbar_layout.getTotalScrollRange();
        //移除偏移监听器
        appbar_layout.removeOnOffsetChangedListener(null);
    }
}
三、CollapsingToolbarLayout
CollapsingToolbarLayout继承自FrameLayout,顾名思义折叠工具栏布局,常作为AppBarLayout·的子View使用。当Collapsing title布局全部可见的时候,title 是最大的,当布局开始滑出屏幕,title 将变得越来越小,可以通过setTitle(CharSequence) 来设置要显示的标题。
当Toolbar 和CollapsingToolbarLayout 同时设置了title时,不会显示Toolbar中的title,只是显示CollapsingToolbarLayout 的title;但如果要显示Toolbar 的title,可在代码中添加如下代码:collapsingToolbarLayout.setTitle("")。另外必须给CollapsingToolbarLayout设置一个具体值(wrap_parent无效或者toolbar设置一个值来撑大CollapsingToolbarLayout也无效)
-
设置Content scrim(内容纱布)——当CollapsingToolbarLayout滑动到一个确定的阀值时将显示或者隐藏内容纱布,可以通过setContentScrim(Drawable)方法来设置纱布的图片。
-
设置Status bar scrim(状态栏纱布)——当CollapsingToolbarLayout滑动到一个确定的阀值时,状态栏显示或隐藏纱布,你可以通过setStatusBarScrim(Drawable)来设置Status bar scrim(状态栏纱布)。
-
Pinned position children(固定子View的位置)——子View可以固定在全局空间内,这对于实现了折叠并且允许通过滚动布局来固定Toolbar 这种情况非常有用
-
Parallax scrolling children(有视差地滚动子View)——在布局中配置app:layout_collapseMode="parallax"让CollapsingToolbarLayout 的子View 可以有视差的滚动
app:layout_collapseParallaxMultiplier=“0.7” 这个参数是设置视差范围的,0-1,越大视差越大
四、AppBarLayout+Toolbar+CollapsingToolbarLayout
1、定义布局
<android.support.design.widget.CoordinatorLayout
    xmlns:android="http://schemas.android.com/apk/res/android"
    xmlns:app="http://schemas.android.com/apk/res-auto"
    xmlns:tools="http://schemas.android.com/tools"
    android:layout_width="match_parent"
    android:layout_height="match_parent">
    <android.support.design.widget.AppBarLayout
        android:id="@+id/appbar_layout"
        android:layout_width="match_parent"
        android:layout_height="wrap_content">
        <android.support.design.widget.CollapsingToolbarLayout
            android:id="@+id/collapse_layout"
            android:layout_width="match_parent"
            android:layout_height="200dp"
            app:layout_scrollFlags="scroll|exitUntilCollapsed"
            >
            <ImageView
                android:layout_width="match_parent"
                android:layout_height="match_parent"
                android:scaleType="centerCrop"
                android:src="@mipmap/default_header"
                app:layout_collapseMode="parallax"
                />
            <android.support.v7.widget.Toolbar
                android:id="@+id/appbar_layout_toolbar"
                android:layout_width="match_parent"
                android:layout_height="?attr/actionBarSize"
                app:title="AppbarLayout"
                app:titleTextColor="@android:color/white"
                app:navigationIcon="@mipmap/ic_navig"
                app:layout_collapseMode="pin"
                />
        android.support.design.widget.CollapsingToolbarLayout>
    android.support.design.widget.AppBarLayout>
    <android.support.v4.widget.NestedScrollView
        android:layout_width="match_parent"
        android:layout_height="match_parent"
        app:layout_behavior="@string/appbar_scrolling_view_behavior">
        <LinearLayout
            android:layout_width="match_parent"
            android:layout_height="match_parent"
            android:orientation="vertical">
            <View
                android:layout_width="match_parent"
                android:layout_height="88dp"
                android:background="#FF7FFFD4"
                />
            <View
                android:layout_width="match_parent"
                android:layout_height="88dp"
                android:background="#FF458B74"/>
            <View
                android:layout_width="match_parent"
                android:layout_height="88dp"
                android:background="#FF00CED1"/>
            <View
                android:layout_width="match_parent"
                android:layout_height="88dp"
                android:background="#FF7FFF00"/>
            <View
                android:layout_width="match_parent"
                android:layout_height="88dp"
                android:background="#FFCD5C5C"/>
        LinearLayout>
    android.support.v4.widget.NestedScrollView>
android.support.design.widget.CoordinatorLayout>
2、监听对应事件实现动效
/**
 * 折叠控件
 */
public class CollapsingToolbarLayoutActivity extends AppCompatActivity {
    private Toolbar toolbar;
    @Override
    protected void onCreate(@Nullable Bundle savedInstanceState) {
        super.onCreate(savedInstanceState);
        setContentView(R.layout.activity_collapsing_toolbar);
        initView();
    }

    private void initView(){
        initToolBar();
        //设置沉浸式状态栏
        StatusBarUtils.setTranslucentImageHeader(this,0,toolbar);

        AppBarLayout appBarLayout = findViewById(R.id.appbar_layout);
        final CollapsingToolbarLayout collapsingToolbarLayout = findViewById(R.id.collapse_layout);
        collapsingToolbarLayout.setTitle("");
        collapsingToolbarLayout.setCollapsedTitleTextColor(getResources().getColor(R.color.white));
        collapsingToolbarLayout.setExpandedTitleColor(getResources().getColor(R.color.white));
        collapsingToolbarLayout.setExpandedTitleColor(Color.TRANSPARENT);
        //设置纱布
        collapsingToolbarLayout.setContentScrim(getResources().getDrawable(R.mipmap.collapse_header));
        //监听appBarLayout的偏移
        appBarLayout.addOnOffsetChangedListener(new AppBarLayout.OnOffsetChangedListener() {
            @Override
            public void onOffsetChanged(AppBarLayout appBarLayout, int verticalOffset) {
                if(Math.abs(verticalOffset) >= appBarLayout.getTotalScrollRange()){
                    toolbar.setTitleTextColor(getResources().getColor(R.color.white));
                    collapsingToolbarLayout.setTitle("AppbarLayout");
                }else{
                    collapsingToolbarLayout.setTitle("");
                }
            }
        });
    }

    private void initToolBar() {
        toolbar =  findViewById(R.id.appbar_layout_toolbar);
        //设置标题颜色
        toolbar.setTitleTextColor(Color.TRANSPARENT);
        //设置溢出菜单
        toolbar.inflateMenu(R.menu.layout_toolbar_menu);
        //设置navigationIcon
        toolbar.setNavigationIcon(getResources().getDrawable(R.mipmap.more));
        //给navigationIcon注册点击时事件
        toolbar.setNavigationOnClickListener(new View.OnClickListener() {
            @Override
            public void onClick(View v) {
                Toast.makeText(CollapsingToolbarLayoutActivity.this,"点击Navagtion button",Toast.LENGTH_LONG).show();
            }
        });
        //给溢出菜单注册点击事件
        toolbar.setOnMenuItemClickListener(new Toolbar.OnMenuItemClickListener() {
            @Override
            public boolean onMenuItemClick(MenuItem menuItem) {
                switch (menuItem.getItemId()){
                    case R.id.github:
                        Toast.makeText(CollapsingToolbarLayoutActivity.this,"点击info啦",Toast.LENGTH_LONG).show();
                        break;
                    case R.id.about:
                        Toast.makeText(CollapsingToolbarLayoutActivity.this,"点击about啦",Toast.LENGTH_LONG).show();
                        break;
                    case R.id.more:
                        Toast.makeText(CollapsingToolbarLayoutActivity.this,"点击more啦",Toast.LENGTH_LONG).show();
                        break;
                    default:
                        break;
                }
                return false;
            }
        });
    }
}
public class StatusBarUtils {


    public static void setColor(Activity activity, @ColorInt int color, int statusBarAlpha){
        //先设置的全屏模式
        setFullScreen(activity);
        //在透明状态栏的垂直下方放置一个和状态栏同样高宽的view
        addStatusBarBehind(activity,color,statusBarAlpha);
    }
    /**
     * 添加了一个状态栏(实际上是个view),放在了状态栏的垂直下方
     */
    public static void addStatusBarBehind(Activity activity, @ColorInt int color, int statusBarAlpha) {
        //获取windowphone下的decorView
        ViewGroup decorView = (ViewGroup) activity.getWindow().getDecorView();
        int       count     = decorView.getChildCount();
        //判断是否已经添加了statusBarView
        if (count > 0 && decorView.getChildAt(count - 1) instanceof StatusBarView) {
            decorView.getChildAt(count - 1).setBackgroundColor(calculateStatusColor(color, statusBarAlpha));
        } else {
            //新建一个和状态栏高宽的view
            StatusBarView statusView = createStatusBarView(activity, color, statusBarAlpha);
            decorView.addView(statusView);
        }
        setRootView(activity);
    }

    public static void setTranslucentImageHeader(Activity activity, int alpha,View needOffsetView){
        setFullScreen(activity);
        //获取windowphone下的decorView
        ViewGroup decorView = (ViewGroup) activity.getWindow().getDecorView();
        int       count     = decorView.getChildCount();
        //判断是否已经添加了statusBarView
        if (count > 0 && decorView.getChildAt(count - 1) instanceof StatusBarView) {
            decorView.getChildAt(count - 1).setBackgroundColor(Color.argb(alpha, 0, 0, 0));
        } else {
            //新建一个和状态栏高宽的view
            StatusBarView statusView = createTranslucentStatusBarView(activity, alpha);
            decorView.addView(statusView);
        }

        if (needOffsetView != null) {
            ViewGroup.MarginLayoutParams layoutParams = (ViewGroup.MarginLayoutParams) needOffsetView.getLayoutParams();
            layoutParams.setMargins(0, getStatusBarHeight(activity), 0, 0);
        }

    }


    private static StatusBarView createTranslucentStatusBarView(Activity activity, int alpha) {
        // 绘制一个和状态栏一样高的矩形
        StatusBarView statusBarView = new StatusBarView(activity);
        LinearLayout.LayoutParams params =
                new LinearLayout.LayoutParams(ViewGroup.LayoutParams.MATCH_PARENT, getStatusBarHeight(activity));
        statusBarView.setLayoutParams(params);
        statusBarView.setBackgroundColor(Color.argb(alpha, 0, 0, 0));
        return statusBarView;
    }

    /**
     * 设置根布局参数
     */
    private static void setRootView(Activity activity) {
        ViewGroup rootView = (ViewGroup) ((ViewGroup) activity.findViewById(android.R.id.content)).getChildAt(0);
        //rootview不会为状态栏流出状态栏空间
        ViewCompat.setFitsSystemWindows(rootView,true);
        rootView.setClipToPadding(true);
    }
    private static StatusBarView createStatusBarView(Activity activity, int color, int alpha) {
        // 绘制一个和状态栏一样高的矩形
        StatusBarView statusBarView = new StatusBarView(activity);
        LinearLayout.LayoutParams params =
                new LinearLayout.LayoutParams(ViewGroup.LayoutParams.MATCH_PARENT, getStatusBarHeight(activity));
        statusBarView.setLayoutParams(params);
        statusBarView.setBackgroundColor(calculateStatusColor(color, alpha));
        return statusBarView;
    }

    /**
     * 获取状态栏高度
     *
     * @param context context
     * @return 状态栏高度
     */
    private static int getStatusBarHeight(Context context) {
        // 获得状态栏高度
        int resourceId = context.getResources().getIdentifier("status_bar_height", "dimen", "android");
        return context.getResources().getDimensionPixelSize(resourceId);
    }
    /**
     * 计算状态栏颜色
     *
     * @param color color值
     * @param alpha alpha值
     * @return 最终的状态栏颜色
     */
    private static int calculateStatusColor(int color, int alpha) {
        float a = 1 - alpha / 255f;
        int red = color >> 16 & 0xff;
        int green = color >> 8 & 0xff;
        int blue = color & 0xff;
        red = (int) (red * a + 0.5);
        green = (int) (green * a + 0.5);
        blue = (int) (blue * a + 0.5);
        return 0xff << 24 | red << 16 | green << 8 | blue;
    }

    public static  void setFullScreen(Activity activity){
        if (Build.VERSION.SDK_INT >= Build.VERSION_CODES.LOLLIPOP) {
            Window window = activity.getWindow();
            window.clearFlags(WindowManager.LayoutParams.FLAG_TRANSLUCENT_STATUS
                    | WindowManager.LayoutParams.FLAG_TRANSLUCENT_NAVIGATION);
            window.getDecorView().setSystemUiVisibility(View.SYSTEM_UI_FLAG_LAYOUT_FULLSCREEN| View.SYSTEM_UI_FLAG_LAYOUT_STABLE);
            window.addFlags(WindowManager.LayoutParams.FLAG_DRAWS_SYSTEM_BAR_BACKGROUNDS);
            window.setStatusBarColor(Color.TRANSPARENT);
        }else
        if (Build.VERSION.SDK_INT >= Build.VERSION_CODES.KITKAT) {
            // 设置透明状态栏,这样才能让 ContentView 向上
            activity.getWindow().addFlags(WindowManager.LayoutParams.FLAG_TRANSLUCENT_STATUS);
        }
    }

    public static class StatusBarView extends View {

        public StatusBarView(Context context) {
            super(context);
        }

        public StatusBarView(Context context, AttributeSet attrs) {
            super(context, attrs);
        }

        public StatusBarView(Context context, AttributeSet attrs, int defStyleAttr) {
            super(context, attrs, defStyleAttr);
        }
    }
}
理论上Material Design库都是应该放在CoordinatorLayout下才会发挥最大的效果的,因为CoordinatorLayout是相当于给他们提供了交互的能力,核心还是Behavior。
