Netty学习笔记(一)--- 初识Netty
什么是Netty
如果在网络上搜索它,你可以在官网上看到如下内容:
Netty is an asynchronous event-driven network application framework for rapid development of maintainable high performance protocol servers & clients.
简单说,Netty 是一个基于NIO的客户、服务器端编程框架,它支持快速、简单地开发面向协议的服务器和客户端等网络应用程序,简化和流线化了网络应用的编程开发过程,例如:基于TCP和UDP的socket服务开发。
为什么使用Netty
阻塞I/O
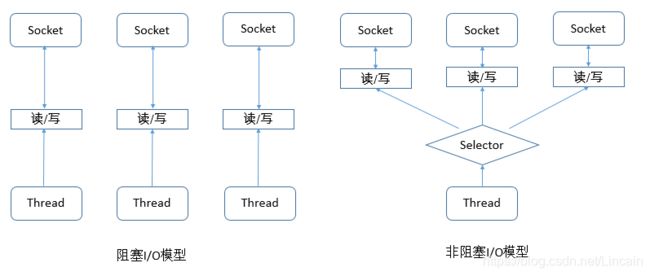
对于早期的网络编程,Java API只支持由本地系统套接字库提供的所谓的阻塞函数,通过它们虽然能实现网络编程,但是问题也随之而来。在这种阻塞的I/O模型中,一个Thread只能同时处理一个连接,要想实现多个并发客户端,就需要为每个客户端创建一个新的Thread。这种并发方案对于支撑中小数量的客户端来说还算可以接受,但是为了支撑 100000 或者更多的并发连接所需要的资源使得它很不理想。
非阻塞I/O
Java 对于非阻塞 I/O 的支持是在 2002 年引入的,位于 JDK 1.4 的 java.nio 包中。该模型使用了事件通知API来确定在一组非阻塞套接字中有哪些通道已经就绪能够进行I/O相关的操作,使得可以在任何的时间检查任意I/O操作的完成情况,然后再交由指定的Thread进行处理,这样就可以使用一个单一的线程处理多个并发的客户端连接。
相对阻塞 I/O 来说,这种模型为网络编程提供了更好的方案,使用较少的线程便可以处理多个连接,减少了内存管理和上下文切换所带来开销,避免了资源的浪费。

尽管我们已经可以通过NIO来进行应用程序的构建,但是NIO的类库和API繁杂,使用麻烦;且编写高质量的NIO程序,你还需要对多线程和网络编程等方面非常熟悉,对于大多数的程序员要做到如此正确和安全并不容易。特别是,在高负载下可靠和高效地处理和调度 I/O 操作是一项繁琐而且容易出错的任务。
于是,使用Netty进行网络编程也就顺理成章了,它封装了网络编程的复杂性,API使用简单,更容易上手,使网络编程和Web技术的最新进展能够被比以往更广泛的开发人员接触到。
Netty的特点
在学习Netty之前,先仔细看看Netty的特点(优势),虽然现在可能对此理解不深,但在后面的学习和使用中,我们将不断验证这些特点,正是这些特点让Netty逐渐成为了Java NIO变成的首选框架。
| 分类 | Netty的特点 |
|---|---|
| 设计 | 统一的API,支持多种传输类型,阻塞的和非阻塞的 简单而强大的线程模型 真正的无连接数据报套接字支持 链接逻辑组件以支持复用 |
| 易于使用 | 翔实的Javaodc和大量的代码实例 不需要超过JDK1.6+的依赖(部分特性可能需要Java1.7+的依赖) |
| 性能 | 拥有比Java核心API更高的吞吐量和更低的延迟 得益于池化和复用,拥有更低的资源消耗 最少的内存复制 |
| 健壮性 | 不会因为慢速、快速或者超载的连接而导致OutOfMemoryError 消除在高速网络中NIO应用程序常见的不公平读/写比 |
| 安全性 | 完整的SSL/TLS和StartTLS支持 可用于受限环境下,如Applet和OSGI |
| 社区驱动 | 发布快速而且频繁 |
Netty入门案例
在了解了Netty的相关知识后,我们通过一个 Echo客户端和服务器应用程序来了解Netty的工作方式(该Demo参考了 第二章的案例,稍微进行了修改)。
本文的Netty版本为4.0.33.Final,下面是maven的配置:
<?xml version="1.0" encoding="UTF-8"?>

<project xmlns="http://maven.apache.org/POM/4.0.0" xmlns:xsi="http://www.w3.org/2001/XMLSchema-instance"
  xsi:schemaLocation="http://maven.apache.org/POM/4.0.0 http://maven.apache.org/xsd/maven-4.0.0.xsd">
  <modelVersion>4.0.0</modelVersion>

  <groupId>com.lincain</groupId>
  <artifactId>maven-parent</artifactId>
  <version>1.0-SNAPSHOT</version>

  <name>maven-parent</name>
  <!-- FIXME change it to the project's website -->
  <url>http://www.example.com</url>

  <properties>
    <project.build.sourceEncoding>UTF-8</project.build.sourceEncoding>
    <maven.compiler.source>1.8</maven.compiler.source>
    <maven.compiler.target>1.8</maven.compiler.target>
  </properties>

  <dependencies>
    <dependency>
      <groupId>junit</groupId>
      <artifactId>junit</artifactId>
      <version>4.11</version>
      <scope>test</scope>
    </dependency>

    <dependency>
      <groupId>io.netty</groupId>
      <artifactId>netty-all</artifactId>
      <version>4.0.33.Final</version>
    </dependency>

    <dependency>
      <groupId>org.apache.commons</groupId>
      <artifactId>commons-lang3</artifactId>
      <version>3.3.2</version>
    </dependency>
  </dependencies>
</project>
1 .Echo服务器
1.1引导服务器
package com.lincain.echo;

import io.netty.bootstrap.ServerBootstrap;
import io.netty.channel.ChannelFuture;
import io.netty.channel.ChannelInitializer;
import io.netty.channel.EventLoopGroup;
import io.netty.channel.nio.NioEventLoopGroup;
import io.netty.channel.socket.SocketChannel;
import io.netty.channel.socket.nio.NioServerSocketChannel;

public class EchoServer {
    private final int port;

    public EchoServer(int port){
        this.port = port;
    }

    public void start() throws  Exception{
        // 创建EventLoopGroup的实现类NioEventLoopGroup对象
        EventLoopGroup bossGroup = new NioEventLoopGroup();
        try {
            // 创建服务器引导ServerBootstrap的示例对象
            ServerBootstrap bootstrap = new ServerBootstrap();
            bootstrap.group(bossGroup);
            // 指定使用NIO的传输Channel
            bootstrap.channel(NioServerSocketChannel.class);
            // 使用指定的端口设置套接字地址
            bootstrap.localAddress(port);
            // 通过ChannelInitializer添加一个EchoServerHandler到子Channel的ChannelPipeLine上
            bootstrap.childHandler(new ChannelInitializer<SocketChannel>() {
                @Override
                protected void initChannel(SocketChannel ch) throws Exception {
                    ch.pipeline().addLast(new EchoServerHandler());
                }
            });
            // 异步地绑定服务器,调用sync()方法阻塞等待直到绑定完成
            ChannelFuture future = bootstrap.bind().sync();
            System.out.println(EchoServer.class.getSimpleName() +
                    " started and listen on " + future.channel().localAddress());
            // 获取Channel的CloseFuture,并阻塞当前线程直至它完成
            future.channel().closeFuture().sync();
        }finally {
            // 关闭EventLoopGroup,并释放所有的资源
            bossGroup.shutdownGracefully().sync();
        }
    }

    public static void main(String[] args) throws Exception{
        // 设置端口号,并调用服务器的start()方法
        new EchoServer(20000).start();
    }
}
1.2 服务器业务处理逻辑
package com.lincain.echo;

import io.netty.buffer.ByteBuf;
import io.netty.buffer.Unpooled;
import io.netty.channel.ChannelFutureListener;
import io.netty.channel.ChannelHandlerContext;
import io.netty.channel.ChannelInboundHandlerAdapter;
import io.netty.util.CharsetUtil;

public class EchoServerHandler extends ChannelInboundHandlerAdapter {
    @Override
    public void channelRead(ChannelHandlerContext ctx, Object msg)
        throws Exception {
        ByteBuf in = (ByteBuf)msg;
        // 将入站的消息打印在控制台
        System.out.println("Server received:" + in.toString(CharsetUtil.UTF_8));
        // 将接收到的消息写给发送者,而不冲刷出站消息
        ctx.write(in);
    }

    @Override
    public void channelReadComplete(ChannelHandlerContext ctx)
        throws Exception {
        // 将未决消息冲刷到远程节点,并且关闭该Channel
        ctx.writeAndFlush(Unpooled.EMPTY_BUFFER).
                addListener(ChannelFutureListener.CLOSE);
    }

    // 打印异常栈跟踪,并关闭该Channel
    @Override
    public void exceptionCaught(ChannelHandlerContext ctx, Throwable cause)
        throws Exception {
        cause.printStackTrace();
        ctx.close();
    }
}
2.1 引导客户端
package com.lincain.echo;

import io.netty.bootstrap.Bootstrap;
import io.netty.channel.ChannelFuture;
import io.netty.channel.ChannelInitializer;
import io.netty.channel.EventLoopGroup;
import io.netty.channel.nio.NioEventLoopGroup;
import io.netty.channel.socket.SocketChannel;
import io.netty.channel.socket.nio.NioSocketChannel;

public class EchoClient {
    private final int port;
    private final String host;

    public EchoClient(int port, String host) {
        this.port = port;
        this.host = host;
    }

    public void start() throws Exception {
        // 创建EventLoopGroup的实现类NioEventLoopGroup对象
        EventLoopGroup workerGroup = new NioEventLoopGroup();
        try {
            // 创建客户端引导Bootstrap的实例对象
            Bootstrap bootstrap = new Bootstrap();
            bootstrap.group(workerGroup);
            // 指定所使用额额NIO传输Channel
            bootstrap.channel(NioSocketChannel.class);
            // 设置需要连接的服务器的IP和端口
            bootstrap.remoteAddress(host,port);
            // 通过ChannelInitializer添加一个EchoClientHandler到子Channel的ChannelPipeLine上
            bootstrap.handler(new ChannelInitializer<SocketChannel>() {
                @Override
                protected void initChannel(SocketChannel ch) throws Exception {
                    ch.pipeline().addLast(new EchoClientHandler());
                }
            });
            // 连接到远程服务器,阻塞等待直到连接完成
            ChannelFuture future = bootstrap.connect().sync();
            // 获取Channel的CloseFuture,并阻塞当前线程直至它完成
            future.channel().closeFuture().sync();
        }finally {
            // 关闭EventLoopGroup,并释放所有的资源
            workerGroup.shutdownGracefully().sync();
        }
    }

    public static void main(String[] args) throws Exception{
        // 设置IP和端口号,并调用客户端的start()方法
        new EchoClient(20000, "localhost").start();
    }
}
2.2 客户端业务处理逻辑
package com.lincain.echo;

import io.netty.buffer.ByteBuf;
import io.netty.buffer.Unpooled;
import io.netty.channel.ChannelHandlerContext;
import io.netty.channel.SimpleChannelInboundHandler;
import io.netty.util.CharsetUtil;

public class EchoClientHandler extends SimpleChannelInboundHandler<ByteBuf>{
    @Override
    protected void channelRead0(ChannelHandlerContext ctx, ByteBuf msg)
        throws Exception {
        // 将服务端应答的消息打印在控制台上
        System.out.println("Client received:" + msg.toString(CharsetUtil.UTF_8));
    }

    @Override
    public void channelActive(ChannelHandlerContext ctx)
        throws Exception {
        // 当被通知Channel是活跃的时候,发送一条消息
        ctx.writeAndFlush(Unpooled.copiedBuffer("Netty rocks!",
                CharsetUtil.UTF_8));
    }

    // 打印异常栈跟踪,并关闭该Channel
    @Override
    public void exceptionCaught(ChannelHandlerContext ctx, Throwable cause)
        throws Exception {
        cause.printStackTrace();
        ctx.close();
    }
}
3. 运行程序
首先运行EchoServer让服务端先启动,然后运行EchoClient让客户端启动。
服务端控制台的打印内容:
EchoServer started and listen on /0:0:0:0:0:0:0:0:20000
Server received:Netty rocks!
客户端控制台的打印内容:
Client received:Netty rocks!
通过上面代码,即实现了运用Netty完成Echo服务端和客户端的交互。Echo 客户端和服务器之间的交互是非常简单的;在客户端建立一个连接之后,它会向服务器发送一个或多个消息,反过来,服务器又会将每个消息回送给客户端。虽然它本身看起来好像用处不大,但它充分地体现了客户端/服务器系统中典型的请求-响应交互模式。