Android LayoutInflater.inflate详解
1. 作用
官方释义
Inflate a new view hierarchy from the specified xml resource
大概意思就是从给定的xml中加载view树。
2. 用法
2.1 四种重载
1. public View inflate(@LayoutRes int resource, @Nullable ViewGroup root);
2. public View inflate(@LayoutRes int resource, @Nullable ViewGroup root, boolean attachToRoot);
3. public View inflate(XmlPullParser parser, @Nullable ViewGroup root)
4. public View inflate(XmlPullParser parser, @Nullable ViewGroup root, boolean attachToRoot);
对外暴露的有四种重载,但是另外两种需要自行传入XmlPullParser,也就是说需要自行解析xml dom,属于高端操作,一般使用较少。
其中,方法1也是使用了方法2,只不过在root非空的情况下,默认attachToRoot=true,故本文主要对方法2进行分析。
2.2 三个参数一个返回值
2.2.1 resource
resource顾名思义,资源,从给定的注解来看,要求为layout资源。故参数一般为R.layout.my_layout。
2.2.2 root
root顾名思义,根布局,这里的根布局可以为空。
当根部局为空时,attachToRoot不生效且生成的view树根节点的LayoutParams为空,即你在layout中定义的根部局的什么宽啊高啊内边距外边距相对位置等一切以layout_为前缀的属性都会失效。为什么呢?我们来看看LayoutParam的定义:
LayoutParams are used by views to tell their parents how they want to be laid out
意思是,LayoutParams是被用来告诉父布局他想要怎么被摆放的。
如果给定的root为空,那么加载出来的view就没有父布局,当然也没必要拥有LayoutParams了!
2.2.3 attachToRoot
attachToRoot,即是否要将创建的view树附加(连接)到给定的根布局下。
2.2.4 返回值View
当不附加到根部局下时,返回的为给定layout的根节点。
当附加到根部局下时,返回的为根部局。
2.3 使用案例
所谓实践出真知,下面来看一组栗子。
首先是一个根布局,我们叫他root_layout
<?xml version="1.0" encoding="utf-8"?>
<FrameLayout xmlns:android="http://schemas.android.com/apk/res/android"
    android:id="@+id/fl_root"
    android:layout_width="300dp"
    android:layout_height="300dp"
    android:background="@android:color/holo_red_light">

    <TextView
        android:layout_width="wrap_content"
        android:layout_height="wrap_content"
        android:text="Hello World!"
        android:layout_gravity="center" />

</FrameLayout>
接着是一个我们想要加载的布局inflate_layout
<?xml version="1.0" encoding="utf-8"?>
<LinearLayout xmlns:android="http://schemas.android.com/apk/res/android"
    android:id="@+id/ll_inflate_root"
    android:layout_width="200dp"
    android:layout_height="200dp"
    android:background="@android:color/holo_blue_light">

    <TextView
        android:layout_width="wrap_content"
        android:layout_height="wrap_content"
        android:layout_gravity="center"
        android:text="im inflated" />

</LinearLayout>
之后我们找个Activity简单实验一下,这里只给出了onCreate方法
    @Override
    protected void onCreate(Bundle savedInstanceState) {
        super.onCreate(savedInstanceState);
        Log.d(TAG, "onCreate");
         // activity content部分的根部局,实际上也是使用了LayoutInflater.inflate
         // 将布局加载到了contentParent下,感兴趣的可以看下PhoneWindow下的实现
        setContentView(R.layout.root_layout);
        FrameLayout rootView = findViewById(R.id.fl_root);  // 首先拿到root_layout的view树根
        // 之后我们对inflateView进行测试,对应下面三种情况
        View inflateView = LayoutInflater.from(this).inflate(R.layout.inflate_layout, rootView, true);
//      View inflateView = LayoutInflater.from(this).inflate(R.layout.inflate_layout, rootView, false);
//      View inflateView = LayoutInflater.from(this).inflate(R.layout.inflate_layout, rootView);
        ViewGroup.LayoutParams rootLayoutParams = rootView.getLayoutParams();
        ViewGroup.LayoutParams inflateLayoutParams = inflateView.getLayoutParams();
        Log.d(TAG, "rootView=" + rootView + " rootView LayoutParams - " + rootLayoutParams);
        Log.d(TAG, "inflateView=" + inflateView + "inflateView LayoutParams -" + inflateLayoutParams);
    }
2.3.1 根布局非空
2.3.3.1 attachToRoot=true
D/MainActivity: rootView=android.widget.FrameLayout{6f919a1 V.E...... ......ID 0,0-0,0 #7f07003c app:id/fl_root} rootView LayoutParams - android.widget.FrameLayout$LayoutParams@16527c6
D/MainActivity: inflateView=android.widget.FrameLayout{6f919a1 V.E...... ......ID 0,0-0,0 #7f07003c app:id/fl_root}inflateView LayoutParams -android.widget.FrameLayout$LayoutParams@16527c6
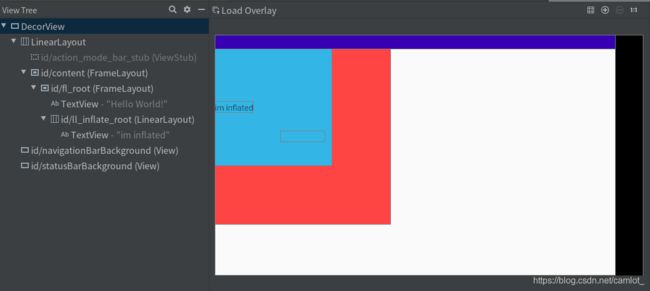
当attachToRoot为true时,返回的为root根节点。且将我们的inflate_layout解析出的view树连接到了给的root下。

2.3.3.1 attachToRoot=false
D/MainActivity: rootView=android.widget.FrameLayout{6f919a1 V.E...... ......ID 0,0-0,0 #7f07003c app:id/fl_root} rootView LayoutParams - android.widget.FrameLayout$LayoutParams@16527c6
D/MainActivity: inflateView=android.widget.LinearLayout{3547387 V.E...... ......ID 0,0-0,0 #7f07004f app:id/ll_inflate_root}inflateView LayoutParams -android.widget.FrameLayout$LayoutParams@79282b4
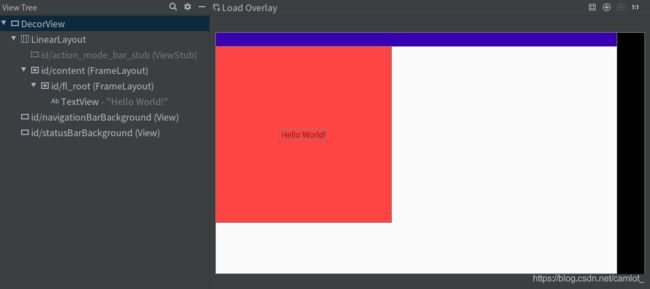
当attachToRoot为false时,返回的为inflate_layout的根view,且根据给定的rootView生成了自己的LayoutParam。但view并未被插入到给定根节点的view树中。

2.3.1 根布局为空
D/MainActivity: rootView=android.widget.FrameLayout{6f919a1 V.E...... ......ID 0,0-0,0 #7f07003c app:id/fl_root} rootView LayoutParams - android.widget.FrameLayout$LayoutParams@16527c6
D/MainActivity: inflateView=android.widget.LinearLayout{3547387 V.E...... ......ID 0,0-0,0 #7f07004f app:id/ll_inflate_root}inflateView LayoutParams -null
根部局为空时,也未将生成的view插入到view树中(也不知道要往哪插)。并且与之前不同的是,LayoutParams为空!

3. 源码解析
public View inflate(XmlPullParser parser, @Nullable ViewGroup root, boolean attachToRoot) {
synchronized (mConstructorArgs) {
// .....
if (TAG_MERGE.equals(name)) {
// merge标签的解析
// 必须要attach到根节点
if (root == null || !attachToRoot) {
throw new InflateException(" /**
* Adds a child view with the specified layout parameters.
*
* Note: do not invoke this method from
* {@link #draw(android.graphics.Canvas)}, {@link #onDraw(android.graphics.Canvas)},
* {@link #dispatchDraw(android.graphics.Canvas)} or any related method.
*
* @param child the child view to add
* @param index the position at which to add the child or -1 to add last
* @param params the layout parameters to set on the child
*/
public void addView(View child, int index, LayoutParams params) {
// .....
addViewInner(child, index, params, false);
}
    private void addViewInner(View child, int index, LayoutParams params,
            boolean preventRequestLayout) {
        // .....
        // 如果给定的params是空,则为其创建一个,这个具体的实现在各个父亲那,看他们想咋摆孩子
        if (!checkLayoutParams(params)) {
            params = generateLayoutParams(params);
        }

        if (preventRequestLayout) {
        	// 设置布局时不进行requestLayout,即只设置参数不进行刷新,一般用在正在onLayout时
            child.mLayoutParams = params;
        } else {
            child.setLayoutParams(params);
        }
        // .....
    }
大概就是酱紫,简单来说就是有无root决定加载出来的孩子是否是健全(知不知道自己多大应该在哪儿)的孩子,是否attachToRoot就是这孩子是要跟着他爹还是要自己单飞。
最后推荐一篇讲LayoutParams讲的不错的博客自定义控件知识储备-LayoutParams的那些事