InputManagerService分析一:IMS的启动与事件传递
从这一节里面,我们开始介绍InputManagerService部分的知识。它用于管理整个系统的输入部分,包括键盘、鼠标、触摸屏等等。这一章里面我们主要就要介绍IMS。首先从IMS的启动来分析:
        HandlerThread wmHandlerThread = new HandlerThread("WindowManager");
        wmHandlerThread.start();
        Handler wmHandler = new Handler(wmHandlerThread.getLooper());

            inputManager = new InputManagerService(context, wmHandler);
            wm = WindowManagerService.main(context, power, display, inputManager,
                    wmHandler, factoryTest != SystemServer.FACTORY_TEST_LOW_LEVEL,
                    !firstBoot, onlyCore);
            ServiceManager.addService(Context.WINDOW_SERVICE, wm);
            ServiceManager.addService(Context.INPUT_SERVICE, inputManager);

            inputManager.setWindowManagerCallbacks(wm.getInputMonitor());
            inputManager.start();
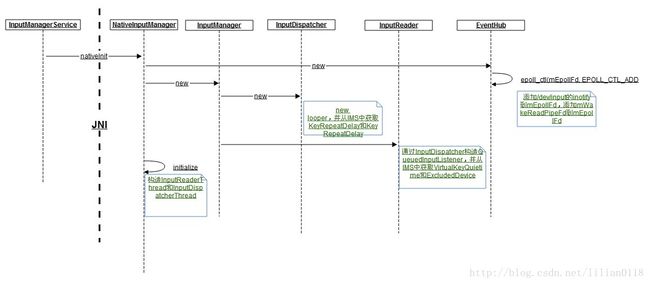
因为 在Android系统中,按键事件是由InputManager来收集并由WindowManagerService服务来分发给各个Activity处理的,所以在介绍WMS的启动时,我们也一起来介绍一下InputManager的启动,首先来看InputManagerService的构造函数:
InputManagerService的启动
    public InputManagerService(Context context, Handler handler) {
        this.mContext = context;
        this.mHandler = new InputManagerHandler(handler.getLooper());

        mUseDevInputEventForAudioJack =
                context.getResources().getBoolean(R.bool.config_useDevInputEventForAudioJack);
        mPtr = nativeInit(this, mContext, mHandler.getLooper().getQueue());
}static jint nativeInit(JNIEnv* env, jclass clazz,
jobject serviceObj, jobject contextObj, jobject messageQueueObj) {
sp messageQueue = android_os_MessageQueue_getMessageQueue(env, messageQueueObj);
NativeInputManager* im = new NativeInputManager(contextObj, serviceObj,
messageQueue->getLooper());
im->incStrong(0);
return reinterpret_cast(im);
} NativeInputManager::NativeInputManager(jobject contextObj,
jobject serviceObj, const sp& looper) :
mLooper(looper) {
JNIEnv* env = jniEnv();
mContextObj = env->NewGlobalRef(contextObj);
mServiceObj = env->NewGlobalRef(serviceObj);
{
AutoMutex _l(mLock);
mLocked.systemUiVisibility = ASYSTEM_UI_VISIBILITY_STATUS_BAR_VISIBLE;
mLocked.pointerSpeed = 0;
mLocked.pointerGesturesEnabled = true;
mLocked.showTouches = false;
}
sp eventHub = new EventHub();
mInputManager = new InputManager(eventHub, this, this);
} 
EventHub::EventHub(void) :
        mBuiltInKeyboardId(NO_BUILT_IN_KEYBOARD), mNextDeviceId(1), mControllerNumbers(),
        mOpeningDevices(0), mClosingDevices(0),
        mNeedToSendFinishedDeviceScan(false),
        mNeedToReopenDevices(false), mNeedToScanDevices(true),
        mPendingEventCount(0), mPendingEventIndex(0), mPendingINotify(false) {
    acquire_wake_lock(PARTIAL_WAKE_LOCK, WAKE_LOCK_ID);

    mEpollFd = epoll_create(EPOLL_SIZE_HINT);
    LOG_ALWAYS_FATAL_IF(mEpollFd < 0, "Could not create epoll instance.  errno=%d", errno);

    mINotifyFd = inotify_init();
    int result = inotify_add_watch(mINotifyFd, DEVICE_PATH, IN_DELETE | IN_CREATE);
    LOG_ALWAYS_FATAL_IF(result < 0, "Could not register INotify for %s.  errno=%d",
            DEVICE_PATH, errno);

    struct epoll_event eventItem;
    memset(&eventItem, 0, sizeof(eventItem));
    eventItem.events = EPOLLIN;
    eventItem.data.u32 = EPOLL_ID_INOTIFY;
    result = epoll_ctl(mEpollFd, EPOLL_CTL_ADD, mINotifyFd, &eventItem);
    LOG_ALWAYS_FATAL_IF(result != 0, "Could not add INotify to epoll instance.  errno=%d", errno);

    int wakeFds[2];
    result = pipe(wakeFds);
    LOG_ALWAYS_FATAL_IF(result != 0, "Could not create wake pipe.  errno=%d", errno);

    mWakeReadPipeFd = wakeFds[0];
    mWakeWritePipeFd = wakeFds[1];

    result = fcntl(mWakeReadPipeFd, F_SETFL, O_NONBLOCK);
    LOG_ALWAYS_FATAL_IF(result != 0, "Could not make wake read pipe non-blocking.  errno=%d",
            errno);

    result = fcntl(mWakeWritePipeFd, F_SETFL, O_NONBLOCK);
    LOG_ALWAYS_FATAL_IF(result != 0, "Could not make wake write pipe non-blocking.  errno=%d",
            errno);

    eventItem.data.u32 = EPOLL_ID_WAKE;
    result = epoll_ctl(mEpollFd, EPOLL_CTL_ADD, mWakeReadPipeFd, &eventItem);
    LOG_ALWAYS_FATAL_IF(result != 0, "Could not add wake read pipe to epoll instance.  errno=%d",
            errno);
}
首先是对一些成员变量做初始化,这些变量等到我们用到时再来一一介绍。然后调用inotify机制对/dev/input文件目录下的增和删操作做监听,/dev/input目录就是所有的input设备文件。并调用epoll机制EPOLL_CTL_ADD命令对上面的inotify的句柄和mWakeReadPipeFd句柄加入到epoll的句柄mEpollFd中。我们可以看到当有/dev/input下面的增删操作或者在mWakeWritePipeFd中写数据时,epoll_wait将会返回。再来看InputManager的构造函数:
InputManager::InputManager(
        const sp& eventHub,
        const sp& readerPolicy,
        const sp& dispatcherPolicy) {
    mDispatcher = new InputDispatcher(dispatcherPolicy);
    mReader = new InputReader(eventHub, readerPolicy, mDispatcher);
    initialize();
}

void InputManager::initialize() {
    mReaderThread = new InputReaderThread(mReader);
    mDispatcherThread = new InputDispatcherThread(mDispatcher);
} InputDispatcher::InputDispatcher(const sp& policy) :
mPolicy(policy),
mPendingEvent(NULL), mAppSwitchSawKeyDown(false), mAppSwitchDueTime(LONG_LONG_MAX),
mNextUnblockedEvent(NULL),
mDispatchEnabled(false), mDispatchFrozen(false), mInputFilterEnabled(false),
mInputTargetWaitCause(INPUT_TARGET_WAIT_CAUSE_NONE) {
mLooper = new Looper(false);
mKeyRepeatState.lastKeyEntry = NULL;
policy->getDispatcherConfiguration(&mConfig);
} InputReader::InputReader(const sp& eventHub,
const sp& policy,
const sp& listener) :
mContext(this), mEventHub(eventHub), mPolicy(policy),
mGlobalMetaState(0), mGeneration(1),
mDisableVirtualKeysTimeout(LLONG_MIN), mNextTimeout(LLONG_MAX),
mConfigurationChangesToRefresh(0) {
mQueuedListener = new QueuedInputListener(listener);
{ // acquire lock
AutoMutex _l(mLock);
refreshConfigurationLocked(0);
updateGlobalMetaStateLocked();
} // release lock
} 
    private WindowManagerService(Context context, PowerManagerService pm,
            DisplayManagerService displayManager, InputManagerService inputManager,
            boolean haveInputMethods, boolean showBootMsgs, boolean onlyCore) {

        ......

        mInputManager = inputManager; // Must be before createDisplayContentLocked.

        mPointerEventDispatcher = new PointerEventDispatcher(mInputManager.monitorInput(TAG));

        .....
    }
在WMS的构造函数中,首先在mInputManager中保存InputManagerService对象,然后构造PointerEventDispatcher对用于分析点击事件。首先来看InputManagerService的monitorInput方法:
    public InputChannel monitorInput(String inputChannelName) {
        InputChannel[] inputChannels = InputChannel.openInputChannelPair(inputChannelName);
        nativeRegisterInputChannel(mPtr, inputChannels[0], null, true);
        inputChannels[0].dispose(); // don't need to retain the Java object reference
        return inputChannels[1];
    }
InputChannel用于从InputDispatcher中后去所有的input消息,所以这里构造一对InputChannel,一个注册到底层的InputDispatcher中,一个用于PointerEventDispatcher给activity分发消息。先来看InputChannel的openInputChannelPair函数:
    public static InputChannel[] openInputChannelPair(String name) {
        return nativeOpenInputChannelPair(name);
    }

static jobjectArray android_view_InputChannel_nativeOpenInputChannelPair(JNIEnv* env,
        jclass clazz, jstring nameObj) {
    const char* nameChars = env->GetStringUTFChars(nameObj, NULL);
    String8 name(nameChars);
    env->ReleaseStringUTFChars(nameObj, nameChars);

    sp serverChannel;
    sp clientChannel;
    status_t result = InputChannel::openInputChannelPair(name, serverChannel, clientChannel);

    if (result) {
        String8 message;
        message.appendFormat("Could not open input channel pair.  status=%d", result);
        jniThrowRuntimeException(env, message.string());
        return NULL;
    }

    jobjectArray channelPair = env->NewObjectArray(2, gInputChannelClassInfo.clazz, NULL);
    if (env->ExceptionCheck()) {
        return NULL;
    }

    jobject serverChannelObj = android_view_InputChannel_createInputChannel(env,
            new NativeInputChannel(serverChannel));
    if (env->ExceptionCheck()) {
        return NULL;
    }

    jobject clientChannelObj = android_view_InputChannel_createInputChannel(env,
            new NativeInputChannel(clientChannel));
    if (env->ExceptionCheck()) {
        return NULL;
    }

    env->SetObjectArrayElement(channelPair, 0, serverChannelObj);
    env->SetObjectArrayElement(channelPair, 1, clientChannelObj);
    return channelPair;
}
android_view_InputChannel_nativeOpenInputChannelPair函数首先调用Native层的InputChannel的openInputChannelPair函数创建一对socket,先来看openInputChannelPair的实现:
status_t InputChannel::openInputChannelPair(const String8& name,
        sp& outServerChannel, sp& outClientChannel) {
    int sockets[2];
    if (socketpair(AF_UNIX, SOCK_SEQPACKET, 0, sockets)) {
        status_t result = -errno;
        ALOGE("channel '%s' ~ Could not create socket pair.  errno=%d",
                name.string(), errno);
        outServerChannel.clear();
        outClientChannel.clear();
        return result;
    }

    int bufferSize = SOCKET_BUFFER_SIZE;
    setsockopt(sockets[0], SOL_SOCKET, SO_SNDBUF, &bufferSize, sizeof(bufferSize));
    setsockopt(sockets[0], SOL_SOCKET, SO_RCVBUF, &bufferSize, sizeof(bufferSize));
    setsockopt(sockets[1], SOL_SOCKET, SO_SNDBUF, &bufferSize, sizeof(bufferSize));
    setsockopt(sockets[1], SOL_SOCKET, SO_RCVBUF, &bufferSize, sizeof(bufferSize));

    String8 serverChannelName = name;
    serverChannelName.append(" (server)");
    outServerChannel = new InputChannel(serverChannelName, sockets[0]);

    String8 clientChannelName = name;
    clientChannelName.append(" (client)");
    outClientChannel = new InputChannel(clientChannelName, sockets[1]);
    return OK;
} 回到InputManagerService的monitorInput方法中,InputChannel的openInputChannelPair返回一对InputChannel对象,其中index为0的代表server端,index为1的代表client端。接着调用nativeRegisterInputChannel把InputChannel[0]到InputDispatcher,用于从InputDispatcher获取触摸事件:
static void nativeRegisterInputChannel(JNIEnv* env, jclass clazz,
        jint ptr, jobject inputChannelObj, jobject inputWindowHandleObj, jboolean monitor) {
    NativeInputManager* im = reinterpret_cast(ptr);

    sp inputChannel = android_view_InputChannel_getInputChannel(env,
            inputChannelObj);
    if (inputChannel == NULL) {
        throwInputChannelNotInitialized(env);
        return;
    }

    sp inputWindowHandle =
            android_server_InputWindowHandle_getHandle(env, inputWindowHandleObj);

    status_t status = im->registerInputChannel(
            env, inputChannel, inputWindowHandle, monitor);
    if (status) {
    }
}

status_t NativeInputManager::registerInputChannel(JNIEnv* env,
        const sp& inputChannel,
        const sp& inputWindowHandle, bool monitor) {
    return mInputManager->getDispatcher()->registerInputChannel(
            inputChannel, inputWindowHandle, monitor);
} status_t InputDispatcher::registerInputChannel(const sp& inputChannel,
const sp& inputWindowHandle, bool monitor) {
{ // acquire lock
AutoMutex _l(mLock);
if (getConnectionIndexLocked(inputChannel) >= 0) {
ALOGW("Attempted to register already registered input channel '%s'",
inputChannel->getName().string());
return BAD_VALUE;
}
sp connection = new Connection(inputChannel, inputWindowHandle, monitor);
int fd = inputChannel->getFd();
mConnectionsByFd.add(fd, connection);
if (monitor) {
mMonitoringChannels.push(inputChannel);
}
mLooper->addFd(fd, 0, ALOOPER_EVENT_INPUT, handleReceiveCallback, this);
} // release lock
// Wake the looper because some connections have changed.
mLooper->wake();
return OK;
} 最后因为在Java层不再需要Native层的inputChannels[0]引用,所以调用inputChannels[0]的dispose方法用于释放Java层对Native层的inputChannels[0]的引用。最后来看WMS中的PointerEventDispatcher构造函数:
    public PointerEventDispatcher(InputChannel inputChannel) {
        super(inputChannel, UiThread.getHandler().getLooper());
    }

    public InputEventReceiver(InputChannel inputChannel, Looper looper) {
        if (inputChannel == null) {
            throw new IllegalArgumentException("inputChannel must not be null");
        }
        if (looper == null) {
            throw new IllegalArgumentException("looper must not be null");
        }

        mInputChannel = inputChannel;
        mMessageQueue = looper.getQueue();
        mReceiverPtr = nativeInit(new WeakReference(this),
                inputChannel, mMessageQueue);

        mCloseGuard.open("dispose");
    }
传入的参数为前面创造的inputChannel[1];UiThread为管理UI的一个单例Thread。这里主要调用nativeInit方法:
static jint nativeInit(JNIEnv* env, jclass clazz, jobject receiverWeak,
        jobject inputChannelObj, jobject messageQueueObj) {
    sp inputChannel = android_view_InputChannel_getInputChannel(env,
            inputChannelObj);
    if (inputChannel == NULL) {
        jniThrowRuntimeException(env, "InputChannel is not initialized.");
        return 0;
    }

    sp messageQueue = android_os_MessageQueue_getMessageQueue(env, messageQueueObj);
    if (messageQueue == NULL) {
        jniThrowRuntimeException(env, "MessageQueue is not initialized.");
        return 0;
    }

    sp receiver = new NativeInputEventReceiver(env,
            receiverWeak, inputChannel, messageQueue);
    status_t status = receiver->initialize();
    if (status) {

    }

    receiver->incStrong(gInputEventReceiverClassInfo.clazz); // retain a reference for the object
    return reinterpret_cast(receiver.get());
} NativeInputEventReceiver::NativeInputEventReceiver(JNIEnv* env,
jobject receiverWeak, const sp& inputChannel,
const sp& messageQueue) :
mReceiverWeakGlobal(env->NewGlobalRef(receiverWeak)),
mInputConsumer(inputChannel), mMessageQueue(messageQueue),
mBatchedInputEventPending(false), mFdEvents(0) {
}
status_t NativeInputEventReceiver::initialize() {
setFdEvents(ALOOPER_EVENT_INPUT);
return OK;
}
void NativeInputEventReceiver::setFdEvents(int events) {
if (mFdEvents != events) {
mFdEvents = events;
int fd = mInputConsumer.getChannel()->getFd();
if (events) {
mMessageQueue->getLooper()->addFd(fd, 0, events, this, NULL);
} else {
mMessageQueue->getLooper()->removeFd(fd);
}
}
} 
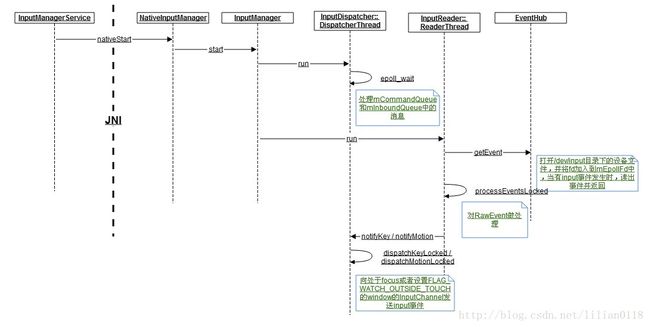
回到systemServer当中,接着调用inputManager.setWindowManagerCallbacks(wm.getInputMonitor())方法用于想WMS通知InputManager的状态变化以及错误通知。最后在systemServer中调用inputManager.start()方法让InputManagerService启动:
    public void start() {
        Slog.i(TAG, "Starting input manager");
        nativeStart(mPtr);

        // Add ourself to the Watchdog monitors.
        Watchdog.getInstance().addMonitor(this);

        registerPointerSpeedSettingObserver();
        registerShowTouchesSettingObserver();

        mContext.registerReceiver(new BroadcastReceiver() {
            @Override
            public void onReceive(Context context, Intent intent) {
                updatePointerSpeedFromSettings();
                updateShowTouchesFromSettings();
            }
        }, new IntentFilter(Intent.ACTION_USER_SWITCHED), null, mHandler);

        updatePointerSpeedFromSettings();
        updateShowTouchesFromSettings();
    }
首先调用nativeStart让Native层的InputManager启动:
status_t InputManager::start() {
    status_t result = mDispatcherThread->run("InputDispatcher", PRIORITY_URGENT_DISPLAY);
    if (result) {
        ALOGE("Could not start InputDispatcher thread due to error %d.", result);
        return result;
    }

    result = mReaderThread->run("InputReader", PRIORITY_URGENT_DISPLAY);
    if (result) {
        ALOGE("Could not start InputReader thread due to error %d.", result);

        mDispatcherThread->requestExit();
        return result;
    }

    return OK;
}
InputManager的start方法让在initialize函数中创建的两个thread跑起来,我们首先来看InputDispatcherThread的threadLoop方法:
bool InputDispatcherThread::threadLoop() {
    mDispatcher->dispatchOnce();
    return true;
}

void InputDispatcher::dispatchOnce() {
    nsecs_t nextWakeupTime = LONG_LONG_MAX;
    { // acquire lock
        AutoMutex _l(mLock);
        mDispatcherIsAliveCondition.broadcast();

        // Run a dispatch loop if there are no pending commands.
        // The dispatch loop might enqueue commands to run afterwards.
        if (!haveCommandsLocked()) {
            dispatchOnceInnerLocked(&nextWakeupTime);
        }

        // Run all pending commands if there are any.
        // If any commands were run then force the next poll to wake up immediately.
        if (runCommandsLockedInterruptible()) {
            nextWakeupTime = LONG_LONG_MIN;
        }
    } // release lock

    // Wait for callback or timeout or wake.  (make sure we round up, not down)
    nsecs_t currentTime = now();
    int timeoutMillis = toMillisecondTimeoutDelay(currentTime, nextWakeupTime);
    mLooper->pollOnce(timeoutMillis);
}
dispatchOnce处理函数中,首先检查是否有缓存的命令未执行,如果有,就先执行这些命令;如果没有,就调用dispatchOnceInnerLocked方法去检查是否有新的input事件发生,如果有则分发,我们后面再来分析dispatchOnceInnerLocked函数。这里是第一次启动,所以InputDispatcherThread的threadLoop方法调用Looper的pollOnce陷入等待。
接着在InputManager的start方法中启动InputReaderThread:
bool InputReaderThread::threadLoop() {
    mReader->loopOnce();
    return true;
}

void InputReader::loopOnce() {
    int32_t oldGeneration;
    int32_t timeoutMillis;
    bool inputDevicesChanged = false;
    Vector inputDevices;
    { // acquire lock
        AutoMutex _l(mLock);

        oldGeneration = mGeneration;
        timeoutMillis = -1;

        uint32_t changes = mConfigurationChangesToRefresh;
        if (changes) {
            mConfigurationChangesToRefresh = 0;
            timeoutMillis = 0;
            refreshConfigurationLocked(changes);
        } else if (mNextTimeout != LLONG_MAX) {
            nsecs_t now = systemTime(SYSTEM_TIME_MONOTONIC);
            timeoutMillis = toMillisecondTimeoutDelay(now, mNextTimeout);
        }
    } // release lock

    size_t count = mEventHub->getEvents(timeoutMillis, mEventBuffer, EVENT_BUFFER_SIZE);

    { // acquire lock
        AutoMutex _l(mLock);
        mReaderIsAliveCondition.broadcast();

        if (count) {
            processEventsLocked(mEventBuffer, count);
        }

        if (mNextTimeout != LLONG_MAX) {
            nsecs_t now = systemTime(SYSTEM_TIME_MONOTONIC);
            if (now >= mNextTimeout) {
#if DEBUG_RAW_EVENTS
                ALOGD("Timeout expired, latency=%0.3fms", (now - mNextTimeout) * 0.000001f);
#endif
                mNextTimeout = LLONG_MAX;
                timeoutExpiredLocked(now);
            }
        }

        if (oldGeneration != mGeneration) {
            inputDevicesChanged = true;
            getInputDevicesLocked(inputDevices);
        }
    } // release lock

    // Send out a message that the describes the changed input devices.
    if (inputDevicesChanged) {
        mPolicy->notifyInputDevicesChanged(inputDevices);
    }

    mQueuedListener->flush();
} size_t EventHub::getEvents(int timeoutMillis, RawEvent* buffer, size_t bufferSize) {
ALOG_ASSERT(bufferSize >= 1);
AutoMutex _l(mLock);
struct input_event readBuffer[bufferSize];
RawEvent* event = buffer;
size_t capacity = bufferSize;
bool awoken = false;
for (;;) {
nsecs_t now = systemTime(SYSTEM_TIME_MONOTONIC);
// 重新reopen所有的input device
if (mNeedToReopenDevices) {
}
// 处理要关闭的input device
while (mClosingDevices) {
}
if (mNeedToScanDevices) {
mNeedToScanDevices = false;
scanDevicesLocked();
mNeedToSendFinishedDeviceScan = true;
}在getEvents函数中,首先检查是否要重新reopen所有的input device设备,然后检查是否有待关闭的input设备。如果这是第一次调用getEvents函数,则需要调用scanDevicesLocked函数去扫描/dev/input目录下的设备文件并打开这些设备:
void EventHub::scanDevicesLocked() {
    status_t res = scanDirLocked(DEVICE_PATH);
    if(res < 0) {
        ALOGE("scan dir failed for %s\n", DEVICE_PATH);
    }
    if (mDevices.indexOfKey(VIRTUAL_KEYBOARD_ID) < 0) {
        createVirtualKeyboardLocked();
    }
}

status_t EventHub::scanDirLocked(const char *dirname)
{
    char devname[PATH_MAX];
    char *filename;
    DIR *dir;
    struct dirent *de;
    dir = opendir(dirname);
    if(dir == NULL)
        return -1;
    strcpy(devname, dirname);
    filename = devname + strlen(devname);
    *filename++ = '/';
    while((de = readdir(dir))) {
        if(de->d_name[0] == '.' &&
           (de->d_name[1] == '\0' ||
            (de->d_name[1] == '.' && de->d_name[2] == '\0')))
            continue;
        strcpy(filename, de->d_name);
        openDeviceLocked(devname);
    }
    closedir(dir);
    return 0;
}
scanDirLocked函数依次调用openDeviceLocked函数去打开/dev/input下面的文件:
status_t EventHub::openDeviceLocked(const char *devicePath) {
    char buffer[80];

    ALOGV("Opening device: %s", devicePath);

    int fd = open(devicePath, O_RDWR | O_CLOEXEC);
    if(fd < 0) {
        ALOGE("could not open %s, %s\n", devicePath, strerror(errno));
        return -1;
    }

    InputDeviceIdentifier identifier;

    // Get device name.
    if(ioctl(fd, EVIOCGNAME(sizeof(buffer) - 1), &buffer) < 1) {

    } else {
        buffer[sizeof(buffer) - 1] = '\0';
        identifier.name.setTo(buffer);
    }

    // Check to see if the device is on our excluded list
    for (size_t i = 0; i < mExcludedDevices.size(); i++) {
        const String8& item = mExcludedDevices.itemAt(i);
        if (identifier.name == item) {

        }
    }

    // Get device driver version.
    int driverVersion;
    if(ioctl(fd, EVIOCGVERSION, &driverVersion)) {
    }

    // Get device identifier.
    struct input_id inputId;
    if(ioctl(fd, EVIOCGID, &inputId)) {
    }
    identifier.bus = inputId.bustype;
    identifier.product = inputId.product;
    identifier.vendor = inputId.vendor;
    identifier.version = inputId.version;

    // Get device physical location.
    if(ioctl(fd, EVIOCGPHYS(sizeof(buffer) - 1), &buffer) < 1) {

    } else {
        buffer[sizeof(buffer) - 1] = '\0';
        identifier.location.setTo(buffer);
    }

    // Get device unique id.
    if(ioctl(fd, EVIOCGUNIQ(sizeof(buffer) - 1), &buffer) < 1) {

    } else {
        buffer[sizeof(buffer) - 1] = '\0';
        identifier.uniqueId.setTo(buffer);
    }

    // Fill in the descriptor.
    setDescriptor(identifier);

    // Make file descriptor non-blocking for use with poll().
    if (fcntl(fd, F_SETFL, O_NONBLOCK)) {

    }

    int32_t deviceId = mNextDeviceId++;
    Device* device = new Device(fd, deviceId, String8(devicePath), identifier);

    // Load the configuration file for the device.
    loadConfigurationLocked(device);

    .......

    if ((device->classes & INPUT_DEVICE_CLASS_TOUCH)) {
        status_t status = loadVirtualKeyMapLocked(device);
        if (!status) {
            device->classes |= INPUT_DEVICE_CLASS_KEYBOARD;
        }
    }
    status_t keyMapStatus = NAME_NOT_FOUND;
    if (device->classes & (INPUT_DEVICE_CLASS_KEYBOARD | INPUT_DEVICE_CLASS_JOYSTICK)) {
        // Load the keymap for the device.
        keyMapStatus = loadKeyMapLocked(device);
    }

    // Register with epoll.
    struct epoll_event eventItem;
    memset(&eventItem, 0, sizeof(eventItem));
    eventItem.events = EPOLLIN;
    eventItem.data.u32 = deviceId;
    if (epoll_ctl(mEpollFd, EPOLL_CTL_ADD, fd, &eventItem)) {
        ALOGE("Could not add device fd to epoll instance.  errno=%d", errno);
        delete device;
        return -1;
    }

    bool usingSuspendBlockIoctl = !ioctl(fd, EVIOCSSUSPENDBLOCK, 1);

    int clockId = CLOCK_MONOTONIC;
    bool usingClockIoctl = !ioctl(fd, EVIOCSCLOCKID, &clockId);

    addDeviceLocked(device);
    return 0;
}
首先打开/dev/input/**文件,然后通过ioctl获取这个input设备的信息,并构造一个Device对象来表示它。然后调用loadConfigurationLocked去加载这个设备的 idc(Input Device Configuration)配置文件(一般情况下会不存在idc文件),查找idc文件的顺序是:
如果在上面的目录中找到对象的idc文件,则调用PropertyMap将它加载并保存在Device的configuration成员中。接着在openDeviceLocked根据input设备的不同类型分别调用不同的case来加载设备相关的文件:例如对于touch设备,调用loadVirtualKeyMapLocked去加载虚拟keyMap;对于keyboard调用loadKeyMapLocked函数加载它的keyMap,这里调用KeyMapd对象的load方法去加载:
status_t KeyMap::load(const InputDeviceIdentifier& deviceIdenfifier,
        const PropertyMap* deviceConfiguration) {
    if (deviceConfiguration) {

    }

    // Try searching by device identifier.
    if (probeKeyMap(deviceIdenfifier, String8::empty())) {
        return OK;
    }

    // Fall back on the Generic key map.
    // TODO Apply some additional heuristics here to figure out what kind of
    //      generic key map to use (US English, etc.) for typical external keyboards.
    if (probeKeyMap(deviceIdenfifier, String8("Generic"))) {
        return OK;
    }

    // Try the Virtual key map as a last resort.
    if (probeKeyMap(deviceIdenfifier, String8("Virtual"))) {
        return OK;
    }

    // Give up!
    ALOGE("Could not determine key map for device '%s' and no default key maps were found!",
            deviceIdenfifier.name.string());
    return NAME_NOT_FOUND;
}
在load函数中,首先尝试使用idc文件中的"keyboard.layout"和"keyboard.characterMap"两个选项去加载keyboard的layout和characterMap文件。如果没有idc文件,则调用probeKeyMap函数分别从下面几个目录查找keyboard的layout和characterMap文件,查找layout文件的顺序如下:
void EventHub::addDeviceLocked(Device* device) {
    mDevices.add(device->id, device);
    device->next = mOpeningDevices;
    mOpeningDevices = device;
}
接着来看scanDevicesLocked函数中,mDevices.indexOfKey(VIRTUAL_KEYBOARD_ID)这句代码用于判断当前设备列表中是否存在虚拟键盘,如果不存在,则调用createVirtualKeyboardLocked去创建一个:
void EventHub::createVirtualKeyboardLocked() {
    InputDeviceIdentifier identifier;
    identifier.name = "Virtual";
    identifier.uniqueId = "";
    setDescriptor(identifier);

    Device* device = new Device(-1, VIRTUAL_KEYBOARD_ID, String8(""), identifier);
    device->classes = INPUT_DEVICE_CLASS_KEYBOARD
            | INPUT_DEVICE_CLASS_ALPHAKEY
            | INPUT_DEVICE_CLASS_DPAD
            | INPUT_DEVICE_CLASS_VIRTUAL;
    loadKeyMapLocked(device);
    addDeviceLocked(device);
}
这时回到getEvents函数中,mDevices和 mOpeningDevices至少存在两个input设备了,一个是触摸屏,另一个是虚拟键盘。接着往下看getEvents函数:
        while (mOpeningDevices != NULL) {
            Device* device = mOpeningDevices;
            ALOGV("Reporting device opened: id=%d, name=%s\n",
                 device->id, device->path.string());
            mOpeningDevices = device->next;
            event->when = now;
            event->deviceId = device->id == mBuiltInKeyboardId ? 0 : device->id;
            event->type = DEVICE_ADDED;
            event += 1;
            mNeedToSendFinishedDeviceScan = true;
            if (--capacity == 0) {
                break;
            }
        }

        if (mNeedToSendFinishedDeviceScan) {
            mNeedToSendFinishedDeviceScan = false;
            event->when = now;
            event->type = FINISHED_DEVICE_SCAN;
            event += 1;
            if (--capacity == 0) {
                break;
            }
        }

        // Grab the next input event.
        bool deviceChanged = false;
        while (mPendingEventIndex < mPendingEventCount) {
            const struct epoll_event& eventItem = mPendingEventItems[mPendingEventIndex++];
            if (eventItem.data.u32 == EPOLL_ID_INOTIFY) {
                if (eventItem.events & EPOLLIN) {  //在/dev/input目录下有delete、add的inotify
                    mPendingINotify = true;
                } else {
                }
                continue;
            }

            if (eventItem.data.u32 == EPOLL_ID_WAKE) {
                if (eventItem.events & EPOLLIN) {
                    ALOGV("awoken after wake()");
                    awoken = true;
                    char buffer[16];
                    ssize_t nRead;
                    do {
                        nRead = read(mWakeReadPipeFd, buffer, sizeof(buffer));
                    } while ((nRead == -1 && errno == EINTR) || nRead == sizeof(buffer));
                } else {
                    ALOGW("Received unexpected epoll event 0x%08x for wake read pipe.",
                            eventItem.events);
                }
                continue;
            }

            ssize_t deviceIndex = mDevices.indexOfKey(eventItem.data.u32);
            if (deviceIndex < 0) {

            }

            Device* device = mDevices.valueAt(deviceIndex);
            if (eventItem.events & EPOLLIN) {
                int32_t readSize = read(device->fd, readBuffer,
                        sizeof(struct input_event) * capacity);
                if (readSize == 0 || (readSize < 0 && errno == ENODEV)) {

                } else if (readSize < 0) {

                } else if ((readSize % sizeof(struct input_event)) != 0) {
                    ALOGE("could not get event (wrong size: %d)", readSize);
                } else {
                    int32_t deviceId = device->id == mBuiltInKeyboardId ? 0 : device->id;

                    size_t count = size_t(readSize) / sizeof(struct input_event);
                    for (size_t i = 0; i < count; i++) {
                        struct input_event& iev = readBuffer[i];
                        if (iev.type == EV_MSC) {
                            if (iev.code == MSC_ANDROID_TIME_SEC) {
                                device->timestampOverrideSec = iev.value;
                                continue;
                            } else if (iev.code == MSC_ANDROID_TIME_USEC) {
                                device->timestampOverrideUsec = iev.value;
                                continue;
                            }
                        }
                        if (device->timestampOverrideSec || device->timestampOverrideUsec) {
                            iev.time.tv_sec = device->timestampOverrideSec;
                            iev.time.tv_usec = device->timestampOverrideUsec;
                            if (iev.type == EV_SYN && iev.code == SYN_REPORT) {
                                device->timestampOverrideSec = 0;
                                device->timestampOverrideUsec = 0;
                            }
                            ALOGV("applied override time %d.%06d",
                                    int(iev.time.tv_sec), int(iev.time.tv_usec));
                        }

#ifdef HAVE_POSIX_CLOCKS

#else
                        event->when = now;
#endif
                        event->deviceId = deviceId;
                        event->type = iev.type;
                        event->code = iev.code;
                        event->value = iev.value;
                        event += 1;
                        capacity -= 1;
                    }
                    if (capacity == 0) {
                        mPendingEventIndex -= 1;
                        break;
                    }
                }
            } else if (eventItem.events & EPOLLHUP) {

            }
        }

        //处理/dev/input目录下有delete、add的inotify
        if (mPendingINotify && mPendingEventIndex >= mPendingEventCount) {
            mPendingINotify = false;
            readNotifyLocked();
            deviceChanged = true;
        }

        if (deviceChanged) {
            continue;
        }

        if (event != buffer || awoken) {
            break;
        }

        mPendingEventIndex = 0;

        mLock.unlock(); // release lock before poll, must be before release_wake_lock
        release_wake_lock(WAKE_LOCK_ID);

        int pollResult = epoll_wait(mEpollFd, mPendingEventItems, EPOLL_MAX_EVENTS, timeoutMillis);

        acquire_wake_lock(PARTIAL_WAKE_LOCK, WAKE_LOCK_ID);
        mLock.lock(); // reacquire lock after poll, must be after acquire_wake_lock

        if (pollResult == 0) {
            // Timed out.
            mPendingEventCount = 0;
            break;
        }

        if (pollResult < 0) {

        } else {
            mPendingEventCount = size_t(pollResult);
        }
    }

    return event - buffer;
}void InputReader::processEventsLocked(const RawEvent* rawEvents, size_t count) {
for (const RawEvent* rawEvent = rawEvents; count;) {
int32_t type = rawEvent->type;
size_t batchSize = 1;
if (type < EventHubInterface::FIRST_SYNTHETIC_EVENT) {
} else {
switch (rawEvent->type) {
case EventHubInterface::DEVICE_ADDED:
addDeviceLocked(rawEvent->when, rawEvent->deviceId);
break;
case EventHubInterface::DEVICE_REMOVED:
removeDeviceLocked(rawEvent->when, rawEvent->deviceId);
break;
case EventHubInterface::FINISHED_DEVICE_SCAN:
handleConfigurationChangedLocked(rawEvent->when);
break;
default:
ALOG_ASSERT(false); // can't happen
break;
}
}
count -= batchSize;
rawEvent += batchSize;
}
}首先来看addDeviceLocked函数:
void InputReader::addDeviceLocked(nsecs_t when, int32_t deviceId) {
    ssize_t deviceIndex = mDevices.indexOfKey(deviceId);
    if (deviceIndex >= 0) {
        ALOGW("Ignoring spurious device added event for deviceId %d.", deviceId);
        return;
    }

    InputDeviceIdentifier identifier = mEventHub->getDeviceIdentifier(deviceId);
    uint32_t classes = mEventHub->getDeviceClasses(deviceId);
    int32_t controllerNumber = mEventHub->getDeviceControllerNumber(deviceId);

    InputDevice* device = createDeviceLocked(deviceId, controllerNumber, identifier, classes);
    device->configure(when, &mConfig, 0);
    device->reset(when);

    if (device->isIgnored()) {
        ALOGI("Device added: id=%d, name='%s' (ignored non-input device)", deviceId,
                identifier.name.string());
    } else {
        ALOGI("Device added: id=%d, name='%s', sources=0x%08x", deviceId,
                identifier.name.string(), device->getSources());
    }

    mDevices.add(deviceId, device);
    bumpGenerationLocked();
}
首先通过mEventHub的获取deviceId所对应的InputDeviceIdentifier、classes、controllerNumber信息,然后调用createDeviceLocked方法构造一个InputDevice对象代表一个input设备:
InputDevice* InputReader::createDeviceLocked(int32_t deviceId, int32_t controllerNumber,
        const InputDeviceIdentifier& identifier, uint32_t classes) {
    InputDevice* device = new InputDevice(&mContext, deviceId, bumpGenerationLocked(),
            controllerNumber, identifier, classes);

    // External devices.
    if (classes & INPUT_DEVICE_CLASS_EXTERNAL) {
        device->setExternal(true);
    }

    // Switch-like devices.
    if (classes & INPUT_DEVICE_CLASS_SWITCH) {
        device->addMapper(new SwitchInputMapper(device));
    }

    // Vibrator-like devices.
    if (classes & INPUT_DEVICE_CLASS_VIBRATOR) {
        device->addMapper(new VibratorInputMapper(device));
    }

    // Keyboard-like devices.
    uint32_t keyboardSource = 0;
    int32_t keyboardType = AINPUT_KEYBOARD_TYPE_NON_ALPHABETIC;
    if (classes & INPUT_DEVICE_CLASS_KEYBOARD) {
        keyboardSource |= AINPUT_SOURCE_KEYBOARD;
    }
    if (classes & INPUT_DEVICE_CLASS_ALPHAKEY) {
        keyboardType = AINPUT_KEYBOARD_TYPE_ALPHABETIC;
    }
    if (classes & INPUT_DEVICE_CLASS_DPAD) {
        keyboardSource |= AINPUT_SOURCE_DPAD;
    }
    if (classes & INPUT_DEVICE_CLASS_GAMEPAD) {
        keyboardSource |= AINPUT_SOURCE_GAMEPAD;
    }

    if (keyboardSource != 0) {
        device->addMapper(new KeyboardInputMapper(device, keyboardSource, keyboardType));
    }

    // Cursor-like devices.
    if (classes & INPUT_DEVICE_CLASS_CURSOR) {
        device->addMapper(new CursorInputMapper(device));
    }

    // Touchscreens and touchpad devices.
    if (classes & INPUT_DEVICE_CLASS_TOUCH_MT) {
        device->addMapper(new MultiTouchInputMapper(device));
    } else if (classes & INPUT_DEVICE_CLASS_TOUCH) {
        device->addMapper(new SingleTouchInputMapper(device));
    }

    // Joystick-like devices.
    if (classes & INPUT_DEVICE_CLASS_JOYSTICK) {
        device->addMapper(new JoystickInputMapper(device));
    }

    return device;
}
createDeviceLocked方法中首先创建一个InputDevice对象,然后根据input设备的不同属性设置不同的Mapper事件转换器,我们以virtual keyboard和触摸屏为例来分析。首先在virtual keyboard的属性为INPUT_DEVICE_CLASS_KEYBOARD | INPUT_DEVICE_CLASS_ALPHAKEY | INPUT_DEVICE_CLASS_DPAD | INPUT_DEVICE_CLASS_VIRTUAL,通过上面的代码,我们知道会调用device->addMapper(new KeyboardInputMapper(device, keyboardSource, keyboardType))会构建一个 KeyboardInputMapper对象并设置到InputDevice的mMappers成员中,这里的keyboardSource为AINPUT_SOURCE_KEYBOARD | AINPUT_SOURCE_DPAD,keyboardType为AINPUT_KEYBOARD_TYPE_ALPHABETIC:
KeyboardInputMapper::KeyboardInputMapper(InputDevice* device,
        uint32_t source, int32_t keyboardType) :
        InputMapper(device), mSource(source),
        mKeyboardType(keyboardType) {
}
触摸屏的属性为INPUT_DEVICE_CLASS_TOUCH_MT | INPUT_DEVICE_CLASS_TOUCH,所以会调用到device->addMapper(new MultiTouchInputMapper(device))去构建一个MultiTouchInputMapper对象并设置到InputDevice的mMappers成员中。

void InputDevice::configure(nsecs_t when, const InputReaderConfiguration* config, uint32_t changes) {
    mSources = 0;

    if (!isIgnored()) {
        if (!changes) { // first time only
            mContext->getEventHub()->getConfiguration(mId, &mConfiguration);
        }

        if (!changes || (changes & InputReaderConfiguration::CHANGE_KEYBOARD_LAYOUTS)) {
            if (!(mClasses & INPUT_DEVICE_CLASS_VIRTUAL)) {
                sp keyboardLayout =
                        mContext->getPolicy()->getKeyboardLayoutOverlay(mIdentifier.descriptor);
                if (mContext->getEventHub()->setKeyboardLayoutOverlay(mId, keyboardLayout)) {
                    bumpGeneration();
                }
            }
        }

        if (!changes || (changes & InputReaderConfiguration::CHANGE_DEVICE_ALIAS)) {
            if (!(mClasses & INPUT_DEVICE_CLASS_VIRTUAL)) {
                String8 alias = mContext->getPolicy()->getDeviceAlias(mIdentifier);
                if (mAlias != alias) {
                    mAlias = alias;
                    bumpGeneration();
                }
            }
        }

        size_t numMappers = mMappers.size();
        for (size_t i = 0; i < numMappers; i++) {
            InputMapper* mapper = mMappers[i];
            mapper->configure(when, config, changes);
            mSources |= mapper->getSources();
        }
    }
} void InputReader::handleConfigurationChangedLocked(nsecs_t when) {
// Reset global meta state because it depends on the list of all configured devices.
updateGlobalMetaStateLocked();
// Enqueue configuration changed.
NotifyConfigurationChangedArgs args(when);
mQueuedListener->notifyConfigurationChanged(&args);
}void InputDispatcher::notifyConfigurationChanged(const NotifyConfigurationChangedArgs* args) {
bool needWake;
{ // acquire lock
AutoMutex _l(mLock);
ConfigurationChangedEntry* newEntry = new ConfigurationChangedEntry(args->eventTime);
needWake = enqueueInboundEventLocked(newEntry);
} // release lock
if (needWake) {
mLooper->wake();
}
}enqueueInboundEventLocked将newEntry添加到mInboundQueue中,然后调用Looper的wake方法让pollOnce返回,此时再进入到InputDispatcher的dispatchOnce方法中,这里会调用dispatchOnceInnerLocked去分发事件:
void InputDispatcher::dispatchOnceInnerLocked(nsecs_t* nextWakeupTime) {
    nsecs_t currentTime = now();

    if (!mPolicy->isKeyRepeatEnabled()) {
        resetKeyRepeatLocked();
    }

    if (mDispatchFrozen) {

    }

    bool isAppSwitchDue = mAppSwitchDueTime <= currentTime;
    if (mAppSwitchDueTime < *nextWakeupTime) {
        *nextWakeupTime = mAppSwitchDueTime;
    }

    if (! mPendingEvent) {
        if (mInboundQueue.isEmpty()) {

        } else {
            mPendingEvent = mInboundQueue.dequeueAtHead();
            traceInboundQueueLengthLocked();
        }

        if (mPendingEvent->policyFlags & POLICY_FLAG_PASS_TO_USER) {
        }

        resetANRTimeoutsLocked();
    }

    bool done = false;
    DropReason dropReason = DROP_REASON_NOT_DROPPED;
    if (!(mPendingEvent->policyFlags & POLICY_FLAG_PASS_TO_USER)) {
        dropReason = DROP_REASON_POLICY;
    } else if (!mDispatchEnabled) {
        dropReason = DROP_REASON_DISABLED;
    }

    if (mNextUnblockedEvent == mPendingEvent) {
        mNextUnblockedEvent = NULL;
    }

    switch (mPendingEvent->type) {
    case EventEntry::TYPE_CONFIGURATION_CHANGED: {
        ConfigurationChangedEntry* typedEntry =
                static_cast(mPendingEvent);
        done = dispatchConfigurationChangedLocked(currentTime, typedEntry);
        dropReason = DROP_REASON_NOT_DROPPED; // configuration changes are never dropped
        break;
    }

    }

    if (done) {
        if (dropReason != DROP_REASON_NOT_DROPPED) {
            dropInboundEventLocked(mPendingEvent, dropReason);
        }

        releasePendingEventLocked();
        *nextWakeupTime = LONG_LONG_MIN;  // force next poll to wake up immediately
    }
}
bool InputDispatcher::dispatchConfigurationChangedLocked(
        nsecs_t currentTime, ConfigurationChangedEntry* entry) {
    resetKeyRepeatLocked();

    CommandEntry* commandEntry = postCommandLocked(
            & InputDispatcher::doNotifyConfigurationChangedInterruptible);
    commandEntry->eventTime = entry->eventTime;
    return true;
}bool InputDispatcher::runCommandsLockedInterruptible() {
if (mCommandQueue.isEmpty()) {
return false;
}
do {
CommandEntry* commandEntry = mCommandQueue.dequeueAtHead();
Command command = commandEntry->command;
(this->*command)(commandEntry); // commands are implicitly 'LockedInterruptible'
commandEntry->connection.clear();
delete commandEntry;
} while (! mCommandQueue.isEmpty());
return true;
}void InputDispatcher::doNotifyConfigurationChangedInterruptible(
CommandEntry* commandEntry) {
mLock.unlock();
mPolicy->notifyConfigurationChanged(commandEntry->eventTime);
mLock.lock();
}doNotifyConfigurationChangedInterruptible用于向NativeInputManager通知config变化,并最后会通知到Java层的InputMonitor。关于IMS的启动就介绍到这里,来简单总结下IMS的start流程:
触屏事件的分发
struct RawEvent {
    nsecs_t when;  //发生的时间
    int32_t deviceId;  //事件发生的deviceId
    int32_t type;     //事件类型:按键、touch等等
    int32_t code;    //input事件code码
    int32_t value;   //input事件值
};Input event: device=2 type=0x0003 code=0x0039 value=0x00000000 when=119077136000
Input event: device=2 type=0x0001 code=0x014a value=0x00000001 when=119077153000
Input event: device=2 type=0x0003 code=0x0035 value=0x0000015f when=119077175000
Input event: device=2 type=0x0003 code=0x0036 value=0x00000323 when=119077192000
Input event: device=2 type=0x0000 code=0x0002 value=0x00000000 when=119077208000
Input event: device=2 type=0x0000 code=0x0000 value=0x00000000 when=119077221000
void InputReader::processEventsForDeviceLocked(int32_t deviceId,
        const RawEvent* rawEvents, size_t count) {
    ssize_t deviceIndex = mDevices.indexOfKey(deviceId);
    if (deviceIndex < 0) {
        ALOGW("Discarding event for unknown deviceId %d.", deviceId);
        return;
    }

    InputDevice* device = mDevices.valueAt(deviceIndex);
    if (device->isIgnored()) {
        //ALOGD("Discarding event for ignored deviceId %d.", deviceId);
        return;
    }

    device->process(rawEvents, count);
}
这里主要调用首先通过deviceId找到对象的InputDevice,然后调用InputDevice的process方法:
void InputDevice::process(const RawEvent* rawEvents, size_t count) {
    size_t numMappers = mMappers.size();
    for (const RawEvent* rawEvent = rawEvents; count--; rawEvent++) {
        if (mDropUntilNextSync) {

        } else if (rawEvent->type == EV_SYN && rawEvent->code == SYN_DROPPED) {

        } else {
            for (size_t i = 0; i < numMappers; i++) {
                InputMapper* mapper = mMappers[i];
                mapper->process(rawEvent);
            }
        }
    }
}void MultiTouchInputMapper::process(const RawEvent* rawEvent) {
TouchInputMapper::process(rawEvent);
mMultiTouchMotionAccumulator.process(rawEvent);
}
void TouchInputMapper::process(const RawEvent* rawEvent) {
mCursorButtonAccumulator.process(rawEvent);
mCursorScrollAccumulator.process(rawEvent);
mTouchButtonAccumulator.process(rawEvent);
if (rawEvent->type == EV_SYN && rawEvent->code == SYN_REPORT) {
sync(rawEvent->when);
}
} case ABS_MT_TOUCH_MAJOR:
slot->mInUse = true;
slot->mAbsMTTouchMajor = rawEvent->value;
break;Input event: device=2 type=0x0003 code=0x0039 value=0x00000000 when=119077136000处理代码在MultiTouchMotionAccumulator::process中:
            case ABS_MT_TRACKING_ID:
                if (mUsingSlotsProtocol && rawEvent->value < 0) {
;
                } else {
                    slot->mInUse = true;
                    slot->mAbsMTTrackingId = rawEvent->value;
                }
Input event: device=2 type=0x0001 code=0x014a value=0x00000001 when=119077153000处理代码在TouchButtonAccumulator::process中:
        case BTN_TOUCH:
            mBtnTouch = rawEvent->value;
            break;
Input event: device=2 type=0x0003 code=0x0035 value=0x0000015f when=119077175000处理代码在MultiTouchMotionAccumulator::process中:
            case ABS_MT_POSITION_X:
                slot->mInUse = true;
                slot->mAbsMTPositionX = rawEvent->value;
                break;
Input event: device=2 type=0x0003 code=0x0036 value=0x00000323 when=119077192000处理代码在MultiTouchMotionAccumulator::process中:
            case ABS_MT_POSITION_Y:
                slot->mInUse = true;
                slot->mAbsMTPositionY = rawEvent->value;
                break;
Input event: device=2 type=0x0000 code=0x0002 value=0x00000000 when=119077208000处理代码在MultiTouchMotionAccumulator::process中,这里表示一次触摸事件完成:
    } else if (rawEvent->type == EV_SYN && rawEvent->code == SYN_MT_REPORT) {
        mCurrentSlot += 1;
    }
Input event: device=2 type=0x0000 code=0x0000 value=0x00000000 when=119077221000处理代码在TouchInputMapper::process中,当收到type=EV_SYN,code= SYN_REPORT后,需要去对这次按键做处理:
    if (rawEvent->type == EV_SYN && rawEvent->code == SYN_REPORT) {
        sync(rawEvent->when);
    }
这里调用sync函数去处理这次的按键事件,这个函数比较长,我们分段来分析:
void TouchInputMapper::sync(nsecs_t when) {.
    mCurrentButtonState = mTouchButtonAccumulator.getButtonState()
            | mCursorButtonAccumulator.getButtonState();

    // Sync scroll state.
    mCurrentRawVScroll = mCursorScrollAccumulator.getRelativeVWheel();
    mCurrentRawHScroll = mCursorScrollAccumulator.getRelativeHWheel();
    mCursorScrollAccumulator.finishSync();

    // Sync touch state.
    bool havePointerIds = true;
    mCurrentRawPointerData.clear();
syncTouch(when, &havePointerIds);void MultiTouchInputMapper::syncTouch(nsecs_t when, bool* outHavePointerIds) {
size_t inCount = mMultiTouchMotionAccumulator.getSlotCount();
size_t outCount = 0;
BitSet32 newPointerIdBits;
for (size_t inIndex = 0; inIndex < inCount; inIndex++) {
const MultiTouchMotionAccumulator::Slot* inSlot =
mMultiTouchMotionAccumulator.getSlot(inIndex);
if (!inSlot->isInUse()) {
continue;
}
RawPointerData::Pointer& outPointer = mCurrentRawPointerData.pointers[outCount];
outPointer.x = inSlot->getX();
outPointer.y = inSlot->getY();
outPointer.pressure = inSlot->getPressure();
outPointer.touchMajor = inSlot->getTouchMajor();
outPointer.touchMinor = inSlot->getTouchMinor();
outPointer.toolMajor = inSlot->getToolMajor();
outPointer.toolMinor = inSlot->getToolMinor();
outPointer.orientation = inSlot->getOrientation();
outPointer.distance = inSlot->getDistance();
outPointer.tiltX = 0;
outPointer.tiltY = 0;
outPointer.toolType = inSlot->getToolType();
if (outPointer.toolType == AMOTION_EVENT_TOOL_TYPE_UNKNOWN) {
outPointer.toolType = mTouchButtonAccumulator.getToolType();
if (outPointer.toolType == AMOTION_EVENT_TOOL_TYPE_UNKNOWN) {
outPointer.toolType = AMOTION_EVENT_TOOL_TYPE_FINGER;
}
}
bool isHovering = mTouchButtonAccumulator.getToolType() != AMOTION_EVENT_TOOL_TYPE_MOUSE
&& (mTouchButtonAccumulator.isHovering()
|| (mRawPointerAxes.pressure.valid && inSlot->getPressure() <= 0));
outPointer.isHovering = isHovering;
if (*outHavePointerIds) {
int32_t trackingId = inSlot->getTrackingId();
int32_t id = -1;
if (trackingId >= 0) {
for (BitSet32 idBits(mPointerIdBits); !idBits.isEmpty(); ) {
uint32_t n = idBits.clearFirstMarkedBit();
if (mPointerTrackingIdMap[n] == trackingId) {
id = n;
}
}
if (id < 0 && !mPointerIdBits.isFull()) {
id = mPointerIdBits.markFirstUnmarkedBit();
mPointerTrackingIdMap[id] = trackingId;
}
}
if (id < 0) {
*outHavePointerIds = false;
mCurrentRawPointerData.clearIdBits();
newPointerIdBits.clear();
} else {
outPointer.id = id;
mCurrentRawPointerData.idToIndex[id] = outCount;
mCurrentRawPointerData.markIdBit(id, isHovering);
newPointerIdBits.markBit(id);
}
}
outCount += 1;
}
mCurrentRawPointerData.pointerCount = outCount;
mPointerIdBits = newPointerIdBits;
mMultiTouchMotionAccumulator.finishSync();
}mCurrentRawPointerData这个数据结构中保存此次input事件的个数,并通过其成员pointers数组保存所有的input的信息。并将driver发送过来的trackingId保存在mPointerTrackingIdMap对应的id上,以便后面跟踪使用。对于上面我们介绍的7个event,它们共同促成一个input事件,所以这里的outCount为1。接着来看sync函数:
    mCurrentFingerIdBits.clear();
    mCurrentStylusIdBits.clear();
    mCurrentMouseIdBits.clear();
    mCurrentCookedPointerData.clear();

    if (mDeviceMode == DEVICE_MODE_DISABLED) {

    } else {
        if (!havePointerIds) {
        }

        uint32_t policyFlags = 0;
        bool initialDown = mLastRawPointerData.pointerCount == 0
                && mCurrentRawPointerData.pointerCount != 0;
        bool buttonsPressed = mCurrentButtonState & ~mLastButtonState;
        if (initialDown || buttonsPressed) {
            if (mDeviceMode == DEVICE_MODE_DIRECT) {
                getContext()->fadePointer();
            }
        }

        //处理button事件,此次触摸事件中并没有touch
        synthesizeButtonKeys(getContext(), AKEY_EVENT_ACTION_DOWN, when, getDeviceId(), mSource,
                policyFlags, mLastButtonState, mCurrentButtonState);

        if (consumeRawTouches(when, policyFlags)) {
            mCurrentRawPointerData.clear();
} cookPointerData();
if (mDeviceMode == DEVICE_MODE_POINTER) {
} else {
if (mDeviceMode == DEVICE_MODE_DIRECT
&& mConfig.showTouches && mPointerController != NULL) {
mPointerController->setPresentation(PointerControllerInterface::PRESENTATION_SPOT);
mPointerController->fade(PointerControllerInterface::TRANSITION_GRADUAL);
mPointerController->setButtonState(mCurrentButtonState);
mPointerController->setSpots(mCurrentCookedPointerData.pointerCoords,
mCurrentCookedPointerData.idToIndex,
mCurrentCookedPointerData.touchingIdBits);
}
dispatchHoverExit(when, policyFlags);
dispatchTouches(when, policyFlags);
dispatchHoverEnterAndMove(when, policyFlags);
}
// 处理button事件,此次触摸事件中并没有touch
synthesizeButtonKeys(getContext(), AKEY_EVENT_ACTION_UP, when, getDeviceId(), mSource,
policyFlags, mLastButtonState, mCurrentButtonState);
}
mLastRawPointerData.copyFrom(mCurrentRawPointerData);
mLastCookedPointerData.copyFrom(mCurrentCookedPointerData);
mLastButtonState = mCurrentButtonState;
mLastFingerIdBits = mCurrentFingerIdBits;
mLastStylusIdBits = mCurrentStylusIdBits;
mLastMouseIdBits = mCurrentMouseIdBits;
// Clear some transient state.
mCurrentRawVScroll = 0;
mCurrentRawHScroll = 0;
}cookPointerData函数用于保存此次input事件,因为当前屏幕是touch screen,所以直接调用dispatchHoverExit、dispatchTouches和dispatchHoverEnterAndMove三个方法来分发事件,如果在Settings中打开了showTouch选项,则调用PointerController去绘制相应的坐标位置。我们首先来看dispatchHoverExit方法:
void TouchInputMapper::dispatchHoverExit(nsecs_t when, uint32_t policyFlags) {
    if (mSentHoverEnter &&
            (mCurrentCookedPointerData.hoveringIdBits.isEmpty()
                    || !mCurrentCookedPointerData.touchingIdBits.isEmpty())) {

        mSentHoverEnter = false;
    }
}void TouchInputMapper::dispatchTouches(nsecs_t when, uint32_t policyFlags) {
BitSet32 currentIdBits = mCurrentCookedPointerData.touchingIdBits;
BitSet32 lastIdBits = mLastCookedPointerData.touchingIdBits;
int32_t metaState = getContext()->getGlobalMetaState();
int32_t buttonState = mCurrentButtonState;
if (currentIdBits == lastIdBits) {
if (!currentIdBits.isEmpty()) {
// No pointer id changes so this is a move event.
// The listener takes care of batching moves so we don't have to deal with that here.
dispatchMotion(when, policyFlags, mSource,
AMOTION_EVENT_ACTION_MOVE, 0, metaState, buttonState,
AMOTION_EVENT_EDGE_FLAG_NONE,
mCurrentCookedPointerData.pointerProperties,
mCurrentCookedPointerData.pointerCoords,
mCurrentCookedPointerData.idToIndex,
currentIdBits, -1,
mOrientedXPrecision, mOrientedYPrecision, mDownTime);
}
} else {
// There may be pointers going up and pointers going down and pointers moving
// all at the same time.
BitSet32 upIdBits(lastIdBits.value & ~currentIdBits.value);
BitSet32 downIdBits(currentIdBits.value & ~lastIdBits.value);
BitSet32 moveIdBits(lastIdBits.value & currentIdBits.value);
BitSet32 dispatchedIdBits(lastIdBits.value);
// Update last coordinates of pointers that have moved so that we observe the new
// pointer positions at the same time as other pointers that have just gone up.
bool moveNeeded = updateMovedPointers(
mCurrentCookedPointerData.pointerProperties,
mCurrentCookedPointerData.pointerCoords,
mCurrentCookedPointerData.idToIndex,
mLastCookedPointerData.pointerProperties,
mLastCookedPointerData.pointerCoords,
mLastCookedPointerData.idToIndex,
moveIdBits);
if (buttonState != mLastButtonState) {
moveNeeded = true;
}
// Dispatch pointer up events.
while (!upIdBits.isEmpty()) {
uint32_t upId = upIdBits.clearFirstMarkedBit();
dispatchMotion(when, policyFlags, mSource,
AMOTION_EVENT_ACTION_POINTER_UP, 0, metaState, buttonState, 0,
mLastCookedPointerData.pointerProperties,
mLastCookedPointerData.pointerCoords,
mLastCookedPointerData.idToIndex,
dispatchedIdBits, upId,
mOrientedXPrecision, mOrientedYPrecision, mDownTime);
dispatchedIdBits.clearBit(upId);
}
// Dispatch move events if any of the remaining pointers moved from their old locations.
// Although applications receive new locations as part of individual pointer up
// events, they do not generally handle them except when presented in a move event.
if (moveNeeded) {
ALOG_ASSERT(moveIdBits.value == dispatchedIdBits.value);
dispatchMotion(when, policyFlags, mSource,
AMOTION_EVENT_ACTION_MOVE, 0, metaState, buttonState, 0,
mCurrentCookedPointerData.pointerProperties,
mCurrentCookedPointerData.pointerCoords,
mCurrentCookedPointerData.idToIndex,
dispatchedIdBits, -1,
mOrientedXPrecision, mOrientedYPrecision, mDownTime);
}
// Dispatch pointer down events using the new pointer locations.
while (!downIdBits.isEmpty()) {
uint32_t downId = downIdBits.clearFirstMarkedBit();
dispatchedIdBits.markBit(downId);
if (dispatchedIdBits.count() == 1) {
// First pointer is going down. Set down time.
mDownTime = when;
}
dispatchMotion(when, policyFlags, mSource,
AMOTION_EVENT_ACTION_POINTER_DOWN, 0, metaState, buttonState, 0,
mCurrentCookedPointerData.pointerProperties,
mCurrentCookedPointerData.pointerCoords,
mCurrentCookedPointerData.idToIndex,
dispatchedIdBits, downId,
mOrientedXPrecision, mOrientedYPrecision, mDownTime);
}
}
}dispatchTouches从CurrentCookedPointerData和LastCookedPointerData分别取出touchingIdBits,对两者进行一系列操作获取到当前事件是up、down还是move事件,并分别调用不同的dispatchMotion去分发AMOTION_EVENT_ACTION_POINTER_UP、AMOTION_EVENT_ACTION_POINTER_DOWN和AMOTION_EVENT_ACTION_MOVE事件。我们此次只看AMOTION_EVENT_ACTION_POINTER_DOWN事件的分发:
void TouchInputMapper::dispatchMotion(nsecs_t when, uint32_t policyFlags, uint32_t source,
        int32_t action, int32_t flags, int32_t metaState, int32_t buttonState, int32_t edgeFlags,
        const PointerProperties* properties, const PointerCoords* coords,
        const uint32_t* idToIndex, BitSet32 idBits,
        int32_t changedId, float xPrecision, float yPrecision, nsecs_t downTime) {
    PointerCoords pointerCoords[MAX_POINTERS];
    PointerProperties pointerProperties[MAX_POINTERS];
    uint32_t pointerCount = 0;
    while (!idBits.isEmpty()) {
        uint32_t id = idBits.clearFirstMarkedBit();
        uint32_t index = idToIndex[id];
        pointerProperties[pointerCount].copyFrom(properties[index]);
        pointerCoords[pointerCount].copyFrom(coords[index]);

        if (changedId >= 0 && id == uint32_t(changedId)) {
            action |= pointerCount << AMOTION_EVENT_ACTION_POINTER_INDEX_SHIFT;
        }

        pointerCount += 1;
    }

    ALOG_ASSERT(pointerCount != 0);

    if (changedId >= 0 && pointerCount == 1) {
        if (action == AMOTION_EVENT_ACTION_POINTER_DOWN) {
            action = AMOTION_EVENT_ACTION_DOWN;
        } else if (action == AMOTION_EVENT_ACTION_POINTER_UP) {
            action = AMOTION_EVENT_ACTION_UP;
        } else {
            // Can't happen.
            ALOG_ASSERT(false);
        }
    }

    NotifyMotionArgs args(when, getDeviceId(), source, policyFlags,
            action, flags, metaState, buttonState, edgeFlags,
            mViewport.displayId, pointerCount, pointerProperties, pointerCoords,
            xPrecision, yPrecision, downTime);
    getListener()->notifyMotion(&args);
}void InputDispatcher::notifyMotion(const NotifyMotionArgs* args) {
if (!validateMotionEvent(args->action, args->pointerCount, args->pointerProperties)) {
return;
}
uint32_t policyFlags = args->policyFlags;
policyFlags |= POLICY_FLAG_TRUSTED;
mPolicy->interceptMotionBeforeQueueing(args->eventTime, /*byref*/ policyFlags);
bool needWake;
{ // acquire lock
mLock.lock();
if (shouldSendMotionToInputFilterLocked(args)) {
mLock.unlock();
MotionEvent event;
event.initialize(args->deviceId, args->source, args->action, args->flags,
args->edgeFlags, args->metaState, args->buttonState, 0, 0,
args->xPrecision, args->yPrecision,
args->downTime, args->eventTime,
args->pointerCount, args->pointerProperties, args->pointerCoords);
policyFlags |= POLICY_FLAG_FILTERED;
if (!mPolicy->filterInputEvent(&event, policyFlags)) {
return; // event was consumed by the filter
}
mLock.lock();
}
// Just enqueue a new motion event.
MotionEntry* newEntry = new MotionEntry(args->eventTime,
args->deviceId, args->source, policyFlags,
args->action, args->flags, args->metaState, args->buttonState,
args->edgeFlags, args->xPrecision, args->yPrecision, args->downTime,
args->displayId,
args->pointerCount, args->pointerProperties, args->pointerCoords);
needWake = enqueueInboundEventLocked(newEntry);
mLock.unlock();
} // release lock
if (needWake) {
mLooper->wake();
}
}在InputDispatcher的notifyMotion函数中,首先检查NotifyMotionArgs是否合法。然后对policyFlags添加上POLICY_FLAG_TRUSTED,并调用NativeInputManager的interceptMotionBeforeQueueing方法对这个input事件提前做处理:
void NativeInputManager::interceptMotionBeforeQueueing(nsecs_t when, uint32_t& policyFlags) {
    if ((policyFlags & POLICY_FLAG_TRUSTED) && !(policyFlags & POLICY_FLAG_INJECTED)) {
        if (isScreenOn()) {
            policyFlags |= POLICY_FLAG_PASS_TO_USER;

            if (!isScreenBright()) {
                policyFlags |= POLICY_FLAG_BRIGHT_HERE;
            }
        } else {

        }
    } else {

    }
}void InputDispatcher::dispatchOnceInnerLocked(nsecs_t* nextWakeupTime) {
nsecs_t currentTime = now();
bool isAppSwitchDue = mAppSwitchDueTime <= currentTime;
if (mAppSwitchDueTime < *nextWakeupTime) {
*nextWakeupTime = mAppSwitchDueTime;
}
if (! mPendingEvent) {
if (mInboundQueue.isEmpty()) {
} else {
mPendingEvent = mInboundQueue.dequeueAtHead();
traceInboundQueueLengthLocked();
}
if (mPendingEvent->policyFlags & POLICY_FLAG_PASS_TO_USER) {
pokeUserActivityLocked(mPendingEvent);
}
resetANRTimeoutsLocked();
}
ALOG_ASSERT(mPendingEvent != NULL);
bool done = false;
DropReason dropReason = DROP_REASON_NOT_DROPPED;
if (!(mPendingEvent->policyFlags & POLICY_FLAG_PASS_TO_USER)) {
} else if (!mDispatchEnabled) {
}
if (mNextUnblockedEvent == mPendingEvent) {
mNextUnblockedEvent = NULL;
}
switch (mPendingEvent->type) {
case EventEntry::TYPE_MOTION: {
MotionEntry* typedEntry = static_cast(mPendingEvent);
if (dropReason == DROP_REASON_NOT_DROPPED && isAppSwitchDue) {
}
if (dropReason == DROP_REASON_NOT_DROPPED
&& isStaleEventLocked(currentTime, typedEntry)) {
}
if (dropReason == DROP_REASON_NOT_DROPPED && mNextUnblockedEvent) {
}
done = dispatchMotionLocked(currentTime, typedEntry,
&dropReason, nextWakeupTime);
break;
}
default:
ALOG_ASSERT(false);
break;
}
if (done) {
if (dropReason != DROP_REASON_NOT_DROPPED) {
dropInboundEventLocked(mPendingEvent, dropReason);
}
releasePendingEventLocked();
*nextWakeupTime = LONG_LONG_MIN; // force next poll to wake up immediately
}
} 这里首先从mInboundQueue中获取前面添加的MotionEntry对象,然后调用dispatchMotionLocked去分发:
bool InputDispatcher::dispatchMotionLocked(
        nsecs_t currentTime, MotionEntry* entry, DropReason* dropReason, nsecs_t* nextWakeupTime) {
    if (! entry->dispatchInProgress) {
        entry->dispatchInProgress = true;
    }

    if (*dropReason != DROP_REASON_NOT_DROPPED) {

    }

    bool isPointerEvent = entry->source & AINPUT_SOURCE_CLASS_POINTER;

    Vector inputTargets;

    bool conflictingPointerActions = false;
    int32_t injectionResult;
    if (isPointerEvent) {
        injectionResult = findTouchedWindowTargetsLocked(currentTime,
                entry, inputTargets, nextWakeupTime, &conflictingPointerActions);
    } else {

    }
    if (injectionResult == INPUT_EVENT_INJECTION_PENDING) {

    }

    setInjectionResultLocked(entry, injectionResult);
    if (injectionResult != INPUT_EVENT_INJECTION_SUCCEEDED) {
        return true;
    }

    if (isMainDisplay(entry->displayId)) {
        addMonitoringTargetsLocked(inputTargets);
    }

    // Dispatch the motion.
    if (conflictingPointerActions) {
        CancelationOptions options(CancelationOptions::CANCEL_POINTER_EVENTS,
                "conflicting pointer actions");
        synthesizeCancelationEventsForAllConnectionsLocked(options);
    }
    dispatchEventLocked(currentTime, entry, inputTargets);
    return true;
}
在dispatchMotionLocked中,首先调用findTouchedWindowTargetsLocked去找到有focus的window窗口,并把这些创建保存在inputTargets数组中。并且还记得我们前面有注册一个monitor的InputChannel吗?这里也会调用addMonitoringTargetsLocked把mMonitoringChannels中所有的InputChannel添加到inputTargets数组中。然后调用dispatchEventLocked去向这些窗口一个个分发事件。我们先来看findTouchedWindowTargetsLocked方法:
int32_t InputDispatcher::findTouchedWindowTargetsLocked(nsecs_t currentTime,
        const MotionEntry* entry, Vector& inputTargets, nsecs_t* nextWakeupTime,
        bool* outConflictingPointerActions) {
    enum InjectionPermission {
        INJECTION_PERMISSION_UNKNOWN,
        INJECTION_PERMISSION_GRANTED,
        INJECTION_PERMISSION_DENIED
    };

    nsecs_t startTime = now();
    bool screenWasOff = false;

    int32_t displayId = entry->displayId;
    int32_t action = entry->action;
    int32_t maskedAction = action & AMOTION_EVENT_ACTION_MASK;

    // Update the touch state as needed based on the properties of the touch event.
    int32_t injectionResult = INPUT_EVENT_INJECTION_PENDING;
    InjectionPermission injectionPermission = INJECTION_PERMISSION_UNKNOWN;
    sp newHoverWindowHandle;

    bool isSplit = mTouchState.split;
    bool switchedDevice = mTouchState.deviceId >= 0 && mTouchState.displayId >= 0
            && (mTouchState.deviceId != entry->deviceId
                    || mTouchState.source != entry->source
                    || mTouchState.displayId != displayId);
    bool isHoverAction = (maskedAction == AMOTION_EVENT_ACTION_HOVER_MOVE
            || maskedAction == AMOTION_EVENT_ACTION_HOVER_ENTER
            || maskedAction == AMOTION_EVENT_ACTION_HOVER_EXIT);
    bool newGesture = (maskedAction == AMOTION_EVENT_ACTION_DOWN
            || maskedAction == AMOTION_EVENT_ACTION_SCROLL
            || isHoverAction);
    bool wrongDevice = false;
    if (newGesture) {
        bool down = maskedAction == AMOTION_EVENT_ACTION_DOWN;
        if (switchedDevice && mTouchState.down && !down) {

        }
        mTempTouchState.reset();
        mTempTouchState.down = down;
        mTempTouchState.deviceId = entry->deviceId;
        mTempTouchState.source = entry->source;
        mTempTouchState.displayId = displayId;
        isSplit = false;
    } else {

    }

    if (newGesture || (isSplit && maskedAction == AMOTION_EVENT_ACTION_POINTER_DOWN)) {
        int32_t pointerIndex = getMotionEventActionPointerIndex(action);
        int32_t x = int32_t(entry->pointerCoords[pointerIndex].
                getAxisValue(AMOTION_EVENT_AXIS_X));
        int32_t y = int32_t(entry->pointerCoords[pointerIndex].
                getAxisValue(AMOTION_EVENT_AXIS_Y));
        sp newTouchedWindowHandle;
        sp topErrorWindowHandle;
        bool isTouchModal = false;

        size_t numWindows = mWindowHandles.size();
        for (size_t i = 0; i < numWindows; i++) {
            sp windowHandle = mWindowHandles.itemAt(i);
            const InputWindowInfo* windowInfo = windowHandle->getInfo();
            if (windowInfo->displayId != displayId) {
                continue; // wrong display
            }

            int32_t flags = windowInfo->layoutParamsFlags;
            if (windowInfo->visible) {
                if (! (flags & InputWindowInfo::FLAG_NOT_TOUCHABLE)) {
                    isTouchModal = (flags & (InputWindowInfo::FLAG_NOT_FOCUSABLE
                            | InputWindowInfo::FLAG_NOT_TOUCH_MODAL)) == 0;
                    if (isTouchModal || windowInfo->touchableRegionContainsPoint(x, y)) {
                        if (! screenWasOff
                                || (flags & InputWindowInfo::FLAG_TOUCHABLE_WHEN_WAKING)) {
                            newTouchedWindowHandle = windowHandle;
                        }
                        break; // found touched window, exit window loop
                    }
                }
            }
        }

        if (newTouchedWindowHandle != NULL
                && newTouchedWindowHandle->getInfo()->supportsSplitTouch()) {
            isSplit = true;
        } else if (isSplit) {
        }

        int32_t targetFlags = InputTarget::FLAG_FOREGROUND | InputTarget::FLAG_DISPATCH_AS_IS;
        if (isSplit) {
            targetFlags |= InputTarget::FLAG_SPLIT;
        }
        if (isWindowObscuredAtPointLocked(newTouchedWindowHandle, x, y)) {
            targetFlags |= InputTarget::FLAG_WINDOW_IS_OBSCURED;
        }

        BitSet32 pointerIds;
        if (isSplit) {
            uint32_t pointerId = entry->pointerProperties[pointerIndex].id;
            pointerIds.markBit(pointerId);
        }
        mTempTouchState.addOrUpdateWindow(newTouchedWindowHandle, targetFlags, pointerIds);
    } else {

    }

    {
        bool haveForegroundWindow = false;
        for (size_t i = 0; i < mTempTouchState.windows.size(); i++) {
            const TouchedWindow& touchedWindow = mTempTouchState.windows[i];
            if (touchedWindow.targetFlags & InputTarget::FLAG_FOREGROUND) {
                haveForegroundWindow = true;
                if (! checkInjectionPermission(touchedWindow.windowHandle,
                        entry->injectionState)) {
                    injectionResult = INPUT_EVENT_INJECTION_PERMISSION_DENIED;
                    injectionPermission = INJECTION_PERMISSION_DENIED;
                    goto Failed;
                }
            }
        }

        injectionPermission = INJECTION_PERMISSION_GRANTED;
    }

    if (maskedAction == AMOTION_EVENT_ACTION_DOWN) {
        sp foregroundWindowHandle =
                mTempTouchState.getFirstForegroundWindowHandle();
        const int32_t foregroundWindowUid = foregroundWindowHandle->getInfo()->ownerUid;
        for (size_t i = 0; i < mTempTouchState.windows.size(); i++) {
            const TouchedWindow& touchedWindow = mTempTouchState.windows[i];
            if (touchedWindow.targetFlags & InputTarget::FLAG_DISPATCH_AS_OUTSIDE) {
                sp inputWindowHandle = touchedWindow.windowHandle;
                if (inputWindowHandle->getInfo()->ownerUid != foregroundWindowUid) {
                    mTempTouchState.addOrUpdateWindow(inputWindowHandle,
                            InputTarget::FLAG_ZERO_COORDS, BitSet32(0));
                }
            }
        }
    }

    if (maskedAction == AMOTION_EVENT_ACTION_DOWN) {
        sp foregroundWindowHandle =
                mTempTouchState.getFirstForegroundWindowHandle();
        if (foregroundWindowHandle->getInfo()->hasWallpaper) {
            for (size_t i = 0; i < mWindowHandles.size(); i++) {
                sp windowHandle = mWindowHandles.itemAt(i);
                const InputWindowInfo* info = windowHandle->getInfo();
                if (info->displayId == displayId
                        && windowHandle->getInfo()->layoutParamsType
                                == InputWindowInfo::TYPE_WALLPAPER) {
                    mTempTouchState.addOrUpdateWindow(windowHandle,
                            InputTarget::FLAG_WINDOW_IS_OBSCURED
                                    | InputTarget::FLAG_DISPATCH_AS_IS,
                            BitSet32(0));
                }
            }
        }
    }

    injectionResult = INPUT_EVENT_INJECTION_SUCCEEDED;

    for (size_t i = 0; i < mTempTouchState.windows.size(); i++) {
        const TouchedWindow& touchedWindow = mTempTouchState.windows.itemAt(i);
        addWindowTargetLocked(touchedWindow.windowHandle, touchedWindow.targetFlags,
                touchedWindow.pointerIds, inputTargets);
    }

    mTempTouchState.filterNonAsIsTouchWindows();
    return injectionResult;
}
findTouchedWindowTargetsLocked方法首先根据我们这次触摸事件去判断是down、up还是move,然后调用不同的处理方法来处理。我们来只看一次down事件,首先从mWindowHandles找到当前focus焦点的window、获取点击区域在window中的窗口或者InputWindowInfo设置了FLAG_WATCH_OUTSIDE_TOUCH的所有窗口,并把这些窗口全部放在mTempTouchState的windows中。然后对这些创建做权限检查以及这个窗口是否处于paused状态,并从mTempTouchState中移除这些窗口。最后把检查过的所有window的inputChannel全部放到inputTargets数组中。
void InputDispatcher::dispatchEventLocked(nsecs_t currentTime,
        EventEntry* eventEntry, const Vector& inputTargets) {
    pokeUserActivityLocked(eventEntry);

    for (size_t i = 0; i < inputTargets.size(); i++) {
        const InputTarget& inputTarget = inputTargets.itemAt(i);

        ssize_t connectionIndex = getConnectionIndexLocked(inputTarget.inputChannel);
        if (connectionIndex >= 0) {
            sp connection = mConnectionsByFd.valueAt(connectionIndex);
            prepareDispatchCycleLocked(currentTime, connection, eventEntry, &inputTarget);
        } else {

        }
    }
}
我们前面介绍InputManagerService的monitorInput方法时讲解过,在向InputDispatcher注册InputChannel时,会构造一个Connection对象并保存InputChannel,这个Connection对象是通过Fd值保存在mConnectionsByFd数组中。这里getConnectionIndexLocked首先获取window所注册的InputChannel,然后调用prepareDispatchCycleLocked去准备分发:
void InputDispatcher::prepareDispatchCycleLocked(nsecs_t currentTime,
        const sp& connection, EventEntry* eventEntry, const InputTarget* inputTarget) {
    enqueueDispatchEntriesLocked(currentTime, connection, eventEntry, inputTarget);
}

void InputDispatcher::enqueueDispatchEntriesLocked(nsecs_t currentTime,
        const sp& connection, EventEntry* eventEntry, const InputTarget* inputTarget) {
    bool wasEmpty = connection->outboundQueue.isEmpty();

    // Enqueue dispatch entries for the requested modes.
    enqueueDispatchEntryLocked(connection, eventEntry, inputTarget,
            InputTarget::FLAG_DISPATCH_AS_HOVER_EXIT);
    enqueueDispatchEntryLocked(connection, eventEntry, inputTarget,
            InputTarget::FLAG_DISPATCH_AS_OUTSIDE);
    enqueueDispatchEntryLocked(connection, eventEntry, inputTarget,
            InputTarget::FLAG_DISPATCH_AS_HOVER_ENTER);
    enqueueDispatchEntryLocked(connection, eventEntry, inputTarget,
            InputTarget::FLAG_DISPATCH_AS_IS);
    enqueueDispatchEntryLocked(connection, eventEntry, inputTarget,
            InputTarget::FLAG_DISPATCH_AS_SLIPPERY_EXIT);
    enqueueDispatchEntryLocked(connection, eventEntry, inputTarget,
            InputTarget::FLAG_DISPATCH_AS_SLIPPERY_ENTER);

    // If the outbound queue was previously empty, start the dispatch cycle going.
    if (wasEmpty && !connection->outboundQueue.isEmpty()) {
        startDispatchCycleLocked(currentTime, connection);
    }
}
prepareDispatchCycleLocked主要调用enqueueDispatchEntriesLocked把当前EventEntry添加到connection的outboundQueue中。enqueueDispatchEntryLocked函数会根据inputTarget的flags和dispatchMode比较,如果两者没有交集,就不将EventEntry添加到outboundQueue。最后调用startDispatchCycleLocked去分发这个这个事件:
void InputDispatcher::startDispatchCycleLocked(nsecs_t currentTime,
        const sp& connection) {
    while (connection->status == Connection::STATUS_NORMAL
            && !connection->outboundQueue.isEmpty()) {
        DispatchEntry* dispatchEntry = connection->outboundQueue.head;
        dispatchEntry->deliveryTime = currentTime;

        status_t status;
        EventEntry* eventEntry = dispatchEntry->eventEntry;
        switch (eventEntry->type) {
        case EventEntry::TYPE_MOTION: {
            MotionEntry* motionEntry = static_cast(eventEntry);

            PointerCoords scaledCoords[MAX_POINTERS];
            const PointerCoords* usingCoords = motionEntry->pointerCoords;

            float xOffset, yOffset, scaleFactor;
            if ((motionEntry->source & AINPUT_SOURCE_CLASS_POINTER)
                    && !(dispatchEntry->targetFlags & InputTarget::FLAG_ZERO_COORDS)) {
                scaleFactor = dispatchEntry->scaleFactor;
                xOffset = dispatchEntry->xOffset * scaleFactor;
                yOffset = dispatchEntry->yOffset * scaleFactor;
                if (scaleFactor != 1.0f) {
                    for (size_t i = 0; i < motionEntry->pointerCount; i++) {
                        scaledCoords[i] = motionEntry->pointerCoords[i];
                        scaledCoords[i].scale(scaleFactor);
                    }
                    usingCoords = scaledCoords;
                }
            } else {
                xOffset = 0.0f;
                yOffset = 0.0f;
                scaleFactor = 1.0f;

                // We don't want the dispatch target to know.
                if (dispatchEntry->targetFlags & InputTarget::FLAG_ZERO_COORDS) {
                    for (size_t i = 0; i < motionEntry->pointerCount; i++) {
                        scaledCoords[i].clear();
                    }
                    usingCoords = scaledCoords;
                }
            }

            status = connection->inputPublisher.publishMotionEvent(dispatchEntry->seq,
                    motionEntry->deviceId, motionEntry->source,
                    dispatchEntry->resolvedAction, dispatchEntry->resolvedFlags,
                    motionEntry->edgeFlags, motionEntry->metaState, motionEntry->buttonState,
                    xOffset, yOffset,
                    motionEntry->xPrecision, motionEntry->yPrecision,
                    motionEntry->downTime, motionEntry->eventTime,
                    motionEntry->pointerCount, motionEntry->pointerProperties,
                    usingCoords);
            break;
        }

        default:
            ALOG_ASSERT(false);
            return;
        }

        // Re-enqueue the event on the wait queue.
        connection->outboundQueue.dequeue(dispatchEntry);
        traceOutboundQueueLengthLocked(connection);
        connection->waitQueue.enqueueAtTail(dispatchEntry);
        traceWaitQueueLengthLocked(connection);
    }
}
在startDispatchCycleLocked函数中调用inputPublisher的publishMotionEvent将这次触摸事件发送出去,并把dispatchEntry从outboundQueue中移除并添加到waitQueue中。inputPublisher的publishMotionEvent方法最终会调用到InputChannel的sendMessage方法通过socket发送给client端。到这里InputReader和InputDispatcher就成功了处理了一次input事件,并通过InputChannel发送给了client端。
int NativeInputEventReceiver::handleEvent(int receiveFd, int events, void* data) {
    if (events & ALOOPER_EVENT_INPUT) {
        JNIEnv* env = AndroidRuntime::getJNIEnv();
        status_t status = consumeEvents(env, false /*consumeBatches*/, -1);
        mMessageQueue->raiseAndClearException(env, "handleReceiveCallback");
        return status == OK || status == NO_MEMORY ? 1 : 0;
    }
}

status_t NativeInputEventReceiver::consumeEvents(JNIEnv* env,
        bool consumeBatches, nsecs_t frameTime) {
    ScopedLocalRef receiverObj(env, NULL);
    bool skipCallbacks = false;
    for (;;) {
        uint32_t seq;
        InputEvent* inputEvent;
        status_t status = mInputConsumer.consume(&mInputEventFactory,
                consumeBatches, frameTime, &seq, &inputEvent);
        if (!skipCallbacks) {
            if (!receiverObj.get()) {
                receiverObj.reset(jniGetReferent(env, mReceiverWeakGlobal));
            }

            jobject inputEventObj;
            switch (inputEvent->getType()) {

            case AINPUT_EVENT_TYPE_MOTION:
                inputEventObj = android_view_MotionEvent_obtainAsCopy(env,
                        static_cast(inputEvent));
                break;

            default:
                assert(false); // InputConsumer should prevent this from ever happening
                inputEventObj = NULL;
            }

            if (inputEventObj) {
                env->CallVoidMethod(receiverObj.get(),
                        gInputEventReceiverClassInfo.dispatchInputEvent, seq, inputEventObj);
                if (env->ExceptionCheck()) {

                }
                env->DeleteLocalRef(inputEventObj);
            } else {

            }
        }
    }
}
在handleEvent调用consumeEvents来消化这个event事件,consumeEvents首先调用InputConsumer的consume方法去获取这次触摸事件到InputEvent中:
status_t InputConsumer::consume(InputEventFactoryInterface* factory,
        bool consumeBatches, nsecs_t frameTime, uint32_t* outSeq, InputEvent** outEvent) {
    *outSeq = 0;
    *outEvent = NULL;

    while (!*outEvent) {
        if (mMsgDeferred) {

        } else {
            status_t result = mChannel->receiveMessage(&mMsg);
        }

        switch (mMsg.header.type) {
        case AINPUT_EVENT_TYPE_MOTION: {
            MotionEvent* motionEvent = factory->createMotionEvent();
            if (! motionEvent) return NO_MEMORY;

            updateTouchState(&mMsg);
            initializeMotionEvent(motionEvent, &mMsg);
            *outSeq = mMsg.body.motion.seq;
            *outEvent = motionEvent;
            break;
        }
    }
    return OK;
} public void onInputEvent(InputEvent event) {
try {
if (event instanceof MotionEvent
&& (event.getSource() & InputDevice.SOURCE_CLASS_POINTER) != 0) {
final MotionEvent motionEvent = (MotionEvent)event;
PointerEventListener[] listeners;
synchronized (mListeners) {
if (mListenersArray == null) {
mListenersArray = new PointerEventListener[mListeners.size()];
mListeners.toArray(mListenersArray);
}
listeners = mListenersArray;
}
for (int i = 0; i < listeners.length; ++i) {
listeners[i].onPointerEvent(motionEvent);
}
}
} finally {
finishInputEvent(event, false);
}
}PointerEventDispatcher继承于InputEventReceiver,在它的onInputEvent中会回调所有listeners的onPointerEvent方法,并调用finishInputEvent去通知InputDispatch这个消息有没有被处理:
    public final void finishInputEvent(InputEvent event, boolean handled) {
            int index = mSeqMap.indexOfKey(event.getSequenceNumber());
            if (index < 0) {
            } else {
                int seq = mSeqMap.valueAt(index);
                mSeqMap.removeAt(index);
                nativeFinishInputEvent(mReceiverPtr, seq, handled);
            }
        event.recycleIfNeededAfterDispatch();
    }

static void nativeFinishInputEvent(JNIEnv* env, jclass clazz, jint receiverPtr,
        jint seq, jboolean handled) {
    sp receiver =
            reinterpret_cast(receiverPtr);
    status_t status = receiver->finishInputEvent(seq, handled);
    if (status && status != DEAD_OBJECT) {

    }
}
这里通过JNI调用到NativeInputEventReceiver的finishInputEvent方法:
status_t NativeInputEventReceiver::finishInputEvent(uint32_t seq, bool handled) {
    status_t status = mInputConsumer.sendFinishedSignal(seq, handled);
    return status;
}

status_t InputConsumer::sendFinishedSignal(uint32_t seq, bool handled) {
    size_t seqChainCount = mSeqChains.size();
    if (seqChainCount) {

    }
    return sendUnchainedFinishedSignal(seq, handled);
}

status_t InputConsumer::sendUnchainedFinishedSignal(uint32_t seq, bool handled) {
    InputMessage msg;
    msg.header.type = InputMessage::TYPE_FINISHED;
    msg.body.finished.seq = seq;
    msg.body.finished.handled = handled;
    return mChannel->sendMessage(&msg);
}
这里最终会调用client端的InputChannel向server发送个一个InputMessage,用于通知InputDispatcher当前消息的处理结果,我们回到InputDihandleReceiveCallbackspatcher当中,来看它如何处理收到的处理结果:
int InputDispatcher::handleReceiveCallback(int fd, int events, void* data) {
    InputDispatcher* d = static_cast(data);
    { // acquire lock
        AutoMutex _l(d->mLock);
        ssize_t connectionIndex = d->mConnectionsByFd.indexOfKey(fd);

        bool notify;
        sp connection = d->mConnectionsByFd.valueAt(connectionIndex);
        if (!(events & (ALOOPER_EVENT_ERROR | ALOOPER_EVENT_HANGUP))) {
            nsecs_t currentTime = now();
            bool gotOne = false;
            status_t status;
            for (;;) {
                uint32_t seq;
                bool handled;
                status = connection->inputPublisher.receiveFinishedSignal(&seq, &handled);
                if (status) {
                    break;
                }
                d->finishDispatchCycleLocked(currentTime, connection, seq, handled);
                gotOne = true;
            }
            if (gotOne) {
                d->runCommandsLockedInterruptible();
                if (status == WOULD_BLOCK) {
                    return 1;
                }
            }
handleReceiveCallback从InputChannel循环的读取消息,直到遇到WOULD_BLOCK的错误才退出。finishDispatchCycleLocked用于处理接收到的InputMessage:
void InputDispatcher::finishDispatchCycleLocked(nsecs_t currentTime,
        const sp& connection, uint32_t seq, bool handled) {
    connection->inputPublisherBlocked = false;

    // Notify other system components and prepare to start the next dispatch cycle.
    onDispatchCycleFinishedLocked(currentTime, connection, seq, handled);
}

void InputDispatcher::onDispatchCycleFinishedLocked(
        nsecs_t currentTime, const sp& connection, uint32_t seq, bool handled) {
    CommandEntry* commandEntry = postCommandLocked(
            & InputDispatcher::doDispatchCycleFinishedLockedInterruptible);
    commandEntry->connection = connection;
    commandEntry->eventTime = currentTime;
    commandEntry->seq = seq;
    commandEntry->handled = handled;
}
这里向mCommandQueue中post一个doDispatchCycleFinishedLockedInterruptible消息。回到handleReceiveCallback中,后面会调用runCommandsLockedInterruptible来执行这个消息:
void InputDispatcher::doDispatchCycleFinishedLockedInterruptible(
        CommandEntry* commandEntry) {
    sp connection = commandEntry->connection;
    nsecs_t finishTime = commandEntry->eventTime;
    uint32_t seq = commandEntry->seq;
    bool handled = commandEntry->handled;

    DispatchEntry* dispatchEntry = connection->findWaitQueueEntry(seq);
    if (dispatchEntry) {
        nsecs_t eventDuration = finishTime - dispatchEntry->deliveryTime;

        bool restartEvent;
        if (dispatchEntry->eventEntry->type == EventEntry::TYPE_KEY) {

        } else if (dispatchEntry->eventEntry->type == EventEntry::TYPE_MOTION) {
            MotionEntry* motionEntry = static_cast(dispatchEntry->eventEntry);
            restartEvent = afterMotionEventLockedInterruptible(connection,
                    dispatchEntry, motionEntry, handled);
        } else {
        }

        if (dispatchEntry == connection->findWaitQueueEntry(seq)) {
            connection->waitQueue.dequeue(dispatchEntry);
            traceWaitQueueLengthLocked(connection);
            if (restartEvent && connection->status == Connection::STATUS_NORMAL) {

            } else {
                releaseDispatchEntryLocked(dispatchEntry);
            }
        }

        // Start the next dispatch cycle for this connection.
        startDispatchCycleLocked(now(), connection);
    }
}
doDispatchCycleFinishedLockedInterruptible首先从connection的waitQueue中移除前面发送过程中添加进去的InputEvent,然后调用startDispatchCycleLocked接着发送connection的outboundQueue中的InputEvent。
Keyboard事件的分发
Input event: device=1 type=0x0000 code=0x0000 value=0x00000000 when=97560822161000
松开:
Input event: device=1 type=0x0001 code=0x0074 value=0x00000000 when=97560974224000
Input event: device=1 type=0x0000 code=0x0000 value=0x00000000 when=97560974234000
void InputReader::processEventsForDeviceLocked(int32_t deviceId,
        const RawEvent* rawEvents, size_t count) {
    ssize_t deviceIndex = mDevices.indexOfKey(deviceId);
    if (deviceIndex < 0) {
        ALOGW("Discarding event for unknown deviceId %d.", deviceId);
        return;
    }

    InputDevice* device = mDevices.valueAt(deviceIndex);
    if (device->isIgnored()) {
        //ALOGD("Discarding event for ignored deviceId %d.", deviceId);
        return;
    }

    device->process(rawEvents, count);
}
这里主要调用首先通过deviceId找到对象的InputDevice,然后调用InputDevice的process方法:
void InputDevice::process(const RawEvent* rawEvents, size_t count) {
    size_t numMappers = mMappers.size();
    for (const RawEvent* rawEvent = rawEvents; count--; rawEvent++) {
        if (mDropUntilNextSync) {

        } else if (rawEvent->type == EV_SYN && rawEvent->code == SYN_DROPPED) {

        } else {
            for (size_t i = 0; i < numMappers; i++) {
                InputMapper* mapper = mMappers[i];
                mapper->process(rawEvent);
            }
        }
    }
}void KeyboardInputMapper::process(const RawEvent* rawEvent) {
switch (rawEvent->type) {
case EV_KEY: {
int32_t scanCode = rawEvent->code;
int32_t usageCode = mCurrentHidUsage;
mCurrentHidUsage = 0;
if (isKeyboardOrGamepadKey(scanCode)) {
int32_t keyCode;
uint32_t flags;
if (getEventHub()->mapKey(getDeviceId(), scanCode, usageCode, &keyCode, &flags)) {
keyCode = AKEYCODE_UNKNOWN;
flags = 0;
}
processKey(rawEvent->when, rawEvent->value != 0, keyCode, scanCode, flags);
}
break;
}
case EV_MSC: {
if (rawEvent->code == MSC_SCAN) {
mCurrentHidUsage = rawEvent->value;
}
break;
}
case EV_SYN: {
if (rawEvent->code == SYN_REPORT) {
mCurrentHidUsage = 0;
}
}
}
}这里首先调用当前Input设备的KeyCharacterMap和Keylayout文件去将RawEvent(Linux Key Code)转换为Android KeyCode。在隐射按键时,会经历两次转换:
status_t EventHub::mapKey(int32_t deviceId, int32_t scanCode, int32_t usageCode,
        int32_t* outKeycode, uint32_t* outFlags) const {
    AutoMutex _l(mLock);
    Device* device = getDeviceLocked(deviceId);

    if (device) {
        // Check the key character map first.
        sp kcm = device->getKeyCharacterMap();
        if (kcm != NULL) {
            if (!kcm->mapKey(scanCode, usageCode, outKeycode)) {
                *outFlags = 0;
                return NO_ERROR;
            }
        }

        // Check the key layout next.
        if (device->keyMap.haveKeyLayout()) {
            if (!device->keyMap.keyLayoutMap->mapKey(
                    scanCode, usageCode, outKeycode, outFlags)) {
                return NO_ERROR;
            }
        }
    }

    *outKeycode = 0;
    *outFlags = 0;
    return NAME_NOT_FOUND;
}
从mapKey的实现来看,首先调用KeyCharacterMap去隐射按键,如果没有隐射成功,就再调用Keylayout去隐射按键。从上面的RawEvent的code=0x0074,我们可以从Generic.kl中看到:
key 116 POWER WAKE 然后在KeycodeLabel中可以看到:
{ "POWER", 26 },所以KeyboardInputMapper的process中的keyCode就是26。接着调用processKey来处理:
void KeyboardInputMapper::processKey(nsecs_t when, bool down, int32_t keyCode,
        int32_t scanCode, uint32_t policyFlags) {

    if (down) {
        if (mParameters.orientationAware && mParameters.hasAssociatedDisplay) {
            keyCode = rotateKeyCode(keyCode, mOrientation);
        }

        // Add key down.
        ssize_t keyDownIndex = findKeyDown(scanCode);
        if (keyDownIndex >= 0) {

        } else {
            // key down
            if ((policyFlags & POLICY_FLAG_VIRTUAL)
                    && mContext->shouldDropVirtualKey(when,
                            getDevice(), keyCode, scanCode)) {
                return;
            }

            mKeyDowns.push();
            KeyDown& keyDown = mKeyDowns.editTop();
            keyDown.keyCode = keyCode;
            keyDown.scanCode = scanCode;
        }

        mDownTime = when;
    } else {

    }

    bool metaStateChanged = false;
    int32_t oldMetaState = mMetaState;
    int32_t newMetaState = updateMetaState(keyCode, down, oldMetaState);
    if (oldMetaState != newMetaState) {
        mMetaState = newMetaState;
        metaStateChanged = true;
        updateLedState(false);
    }

    nsecs_t downTime = mDownTime;
    if (down && getDevice()->isExternal()
            && !(policyFlags & (POLICY_FLAG_WAKE | POLICY_FLAG_WAKE_DROPPED))) {
        policyFlags |= POLICY_FLAG_WAKE_DROPPED;
    }

    if (metaStateChanged) {
        getContext()->updateGlobalMetaState();
    }

    if (down && !isMetaKey(keyCode)) {
        getContext()->fadePointer();
    }

    NotifyKeyArgs args(when, getDeviceId(), mSource, policyFlags,
            down ? AKEY_EVENT_ACTION_DOWN : AKEY_EVENT_ACTION_UP,
            AKEY_EVENT_FLAG_FROM_SYSTEM, keyCode, scanCode, newMetaState, downTime);
    getListener()->notifyKey(&args);
}
processKey根据是按下还是松开分开处理,我们首先来看按下的处理流程:首先构造一个KeyDown对象,并填充它的keyCode和scanCode值。然后向InputDispatch通知AKEY_EVENT_ACTION_DOWN事件:
void InputDispatcher::notifyKey(const NotifyKeyArgs* args) {
    uint32_t policyFlags = args->policyFlags;
    int32_t flags = args->flags;
    int32_t metaState = args->metaState;
    if ((policyFlags & POLICY_FLAG_VIRTUAL) || (flags & AKEY_EVENT_FLAG_VIRTUAL_HARD_KEY)) {
        policyFlags |= POLICY_FLAG_VIRTUAL;
        flags |= AKEY_EVENT_FLAG_VIRTUAL_HARD_KEY;
    }

    policyFlags |= POLICY_FLAG_TRUSTED;

    KeyEvent event;
    event.initialize(args->deviceId, args->source, args->action,
            flags, args->keyCode, args->scanCode, metaState, 0,
            args->downTime, args->eventTime);

    mPolicy->interceptKeyBeforeQueueing(&event, /*byref*/ policyFlags);

    if (policyFlags & POLICY_FLAG_WOKE_HERE) {
        flags |= AKEY_EVENT_FLAG_WOKE_HERE;
    }

    bool needWake;
    { // acquire lock
        mLock.lock();

        if (shouldSendKeyToInputFilterLocked(args)) {
            mLock.unlock();

            policyFlags |= POLICY_FLAG_FILTERED;
            if (!mPolicy->filterInputEvent(&event, policyFlags)) {
                return; // event was consumed by the filter
            }

            mLock.lock();
        }

        int32_t repeatCount = 0;
        KeyEntry* newEntry = new KeyEntry(args->eventTime,
                args->deviceId, args->source, policyFlags,
                args->action, flags, args->keyCode, args->scanCode,
                metaState, repeatCount, args->downTime);

        needWake = enqueueInboundEventLocked(newEntry);
        mLock.unlock();
    } // release lock

    if (needWake) {
        mLooper->wake();
    }
}
notifyKey函数中首先调用NativeInputManager的interceptKeyBeforeQueueing做提前处理,这里主要是截取一些系统key发送给相应的service处理(例如power key)。然后再构造KeyEntry对象并添加到mInboundQueue中:
void NativeInputManager::interceptKeyBeforeQueueing(const KeyEvent* keyEvent,
        uint32_t& policyFlags) {
    if ((policyFlags & POLICY_FLAG_TRUSTED)) {
        nsecs_t when = keyEvent->getEventTime();
        bool isScreenOn = this->isScreenOn();
        bool isScreenBright = this->isScreenBright();

        JNIEnv* env = jniEnv();
        jobject keyEventObj = android_view_KeyEvent_fromNative(env, keyEvent);
        jint wmActions;
        if (keyEventObj) {
            wmActions = env->CallIntMethod(mServiceObj,
                    gServiceClassInfo.interceptKeyBeforeQueueing,
                    keyEventObj, policyFlags, isScreenOn);
            if (checkAndClearExceptionFromCallback(env, "interceptKeyBeforeQueueing")) {
                wmActions = 0;
            }
            android_view_KeyEvent_recycle(env, keyEventObj);
            env->DeleteLocalRef(keyEventObj);
        } else {

        }

        if (!(policyFlags & POLICY_FLAG_INJECTED)) {
            if (!isScreenOn) {
                policyFlags |= POLICY_FLAG_WOKE_HERE;
            }

            if (!isScreenBright) {
                policyFlags |= POLICY_FLAG_BRIGHT_HERE;
            }
        }

        handleInterceptActions(wmActions, when, /*byref*/ policyFlags);
    } else {
        policyFlags |= POLICY_FLAG_PASS_TO_USER;
    }
}
interceptKeyBeforeQueueing首先通过Native的KeyEvent对象构造一个Java层的KeyEvent对象,然后调用InputManagerService的interceptKeyBeforeQueueing去通知WMS相应的input事件:
    private int interceptKeyBeforeQueueing(KeyEvent event, int policyFlags, boolean isScreenOn) {
        return mWindowManagerCallbacks.interceptKeyBeforeQueueing(
                event, policyFlags, isScreenOn);
    }

    public int interceptKeyBeforeQueueing(
            KeyEvent event, int policyFlags, boolean isScreenOn) {
        return mService.mPolicy.interceptKeyBeforeQueueing(event, policyFlags, isScreenOn);
    }
这里的mService.mPolicy是一个PhoneWindowManager对象,我们来看它的interceptKeyBeforeQueueing方法:
    public int interceptKeyBeforeQueueing(KeyEvent event, int policyFlags, boolean isScreenOn) {
        final boolean down = event.getAction() == KeyEvent.ACTION_DOWN;
        final boolean canceled = event.isCanceled();
        final int keyCode = event.getKeyCode();

        final boolean isInjected = (policyFlags & WindowManagerPolicy.FLAG_INJECTED) != 0;

        if (keyCode == KeyEvent.KEYCODE_POWER) {
            policyFlags |= WindowManagerPolicy.FLAG_WAKE;
        }
        final boolean isWakeKey = (policyFlags & (WindowManagerPolicy.FLAG_WAKE
                | WindowManagerPolicy.FLAG_WAKE_DROPPED)) != 0;

        int result;
        if ((isScreenOn && !mHeadless) || (isInjected && !isWakeKey)) {
            result = ACTION_PASS_TO_USER;
        } else {
            result = 0;
            if (down && isWakeKey && isWakeKeyWhenScreenOff(keyCode)) {
                result |= ACTION_WAKE_UP;
            }
        }

        switch (keyCode) {
            case KeyEvent.KEYCODE_POWER: {
                result &= ~ACTION_PASS_TO_USER;
                if (down) {

                }
                else {
                    if (interceptPowerKeyUp(canceled || mPendingPowerKeyUpCanceled)) {
                        result = (result & ~ACTION_WAKE_UP) | ACTION_GO_TO_SLEEP;
                    }
                    mPendingPowerKeyUpCanceled = false;
                }
                break;
            }
        return result;
}void NativeInputManager::handleInterceptActions(jint wmActions, nsecs_t when,
uint32_t& policyFlags) {
if (wmActions & WM_ACTION_GO_TO_SLEEP) {
android_server_PowerManagerService_goToSleep(when);
}
if (wmActions & WM_ACTION_WAKE_UP) {
android_server_PowerManagerService_wakeUp(when);
}
if (wmActions & WM_ACTION_PASS_TO_USER) {
policyFlags |= POLICY_FLAG_PASS_TO_USER;
} else {
}
}这里会根据PhoneWindowManager的处理结果wmActions来设置来调用不同的处理函数。假设这是处于黑屏状态,就会调用android_server_PowerManagerService_wakeUp去调用PowerManagerService去点亮屏幕;如果当前是screen on状态,这里会调用android_server_PowerManagerService_goToSleep去让手机待机。关于PMS的这两个函数,我们这里就不介绍了。