SpringBoot
SpringBoot
1.什么是SpringBoot?
pringBoot是Spring团队在2014年,伴随Spring4.0版本推出的一个新的框架。就是帮助我们快速的创建出基于Spring的应用程序。
2.SpringBoot的优点
2.1快速创建独立运行的Spring项目以及与主流框架集成
2.2使用嵌入式的Servlet容器,应用无需打成WAR包
2.3 starters自动依赖与版本控制
2.4大量的自动配置,简化开发,也可修改默认值
2.5无需配置XML,无代码生成,开箱即用
2.6准生产环境的运行时应用监控
2.7 与云计算的天然集成
3.什么是微服务?
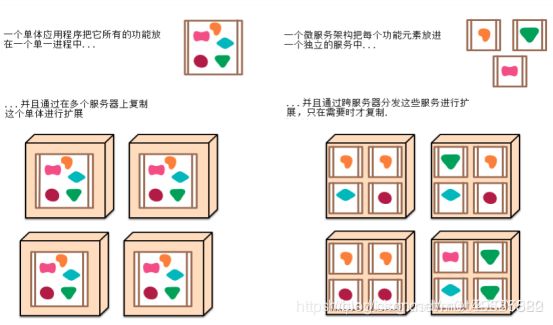
微服务其实是一种架构风格,提倡一个应用应该是一组小型服务组成;可以通过HTTP的方式进行互通。
在没有微服务之前我们软件架构方式称为单体应用:ALL IN ONE。就是所有的内容统一集中在一个应用程序中。

这种单体应用的优点:开发测试简单,不会涉及多个应用之间的互联互调,应用部署也简单,只需要一个war包就OK,不会对运维造成太大负担,还有就是应用程序的水平扩展也简单,就是新增模块简单。当并发量高的时候,我们可以将这个单体应用多复制几份部署在多个服务器上,通过负载均衡机制控制运行,可以提高并发访问。
他的缺点也很明显,那就是到我们需要对程序进行修改的时候就需要重新打包,重新部署,重新运行,这就是一个牵一发动全身的情况,当然更大的挑战是来自于日益增长的软件需求。

微服务:每一个功能元素最终都是一个可独立替换和独立升级的软件单元;
4.通过SpringBoot快速创建Spring项目
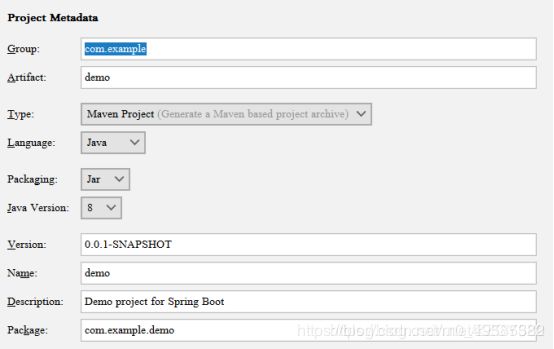
IDE都支持使用Spring的项目创建向导快速创建一个Spring Boot项目;
选择我们需要的模块;向导会联网创建Spring Boot项目;
默认生成的Spring Boot项目;
1主程序已经生成好了,我们只需要我们自己的逻辑
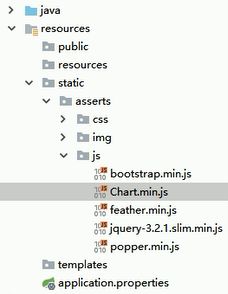
2.resources文件夹中目录结构
·static:保存所有的静态资源; js css images;
·templates:保存所有的模板页面;(Spring Boot默认jar包使用嵌入式的Tomcat,默认不支持JSP页面);可以使用模板引擎(freemarker、thymeleaf);
·application.properties:Spring Boot应用的配置文件;可以修改一些默认设置;
例如:设置修改服务器的访问端口号就可以修改这个文件【server.port=9090】


5.SpringBoot中的启动器【常见的启动器】
Spring Boot将所有的功能都抽取出来,做成一个个的starters(启动器),只需要在项目里面引入这些starter 那么相关功能的所有依赖都会导入进来。要用什么功能就导入什么场景的启动器 。
Spring Boot应用启动器基本的一共有44种,具体如下:
1)spring-boot-starter:这是Spring Boot的核心启动器,包含了自动配置、日志和YAML。
2)spring-boot-starter-actuator:帮助监控和管理应用。
3)spring-boot-starter-amqp:通过spring-rabbit来支持AMQP协议(Advanced Message Queuing Protocol)。
4)spring-boot-starter-aop:支持面向方面的编程即AOP,包括spring-aop和AspectJ。
5)spring-boot-starter-artemis:通过Apache Artemis支持JMS的API(Java Message Service API)。
6)spring-boot-starter-batch:支持Spring Batch,包括HSQLDB数据库。
7)spring-boot-starter-cache:支持Spring的Cache抽象。
8)spring-boot-starter-cloud-connectors:支持Spring Cloud Connectors,简化了在像Cloud Foundry或Heroku这样的云平台上连接服务。
9)spring-boot-starter-data-elasticsearch:支持ElasticSearch搜索和分析引擎,包括spring-data-elasticsearch。
10)spring-boot-starter-data-gemfire:支持GemFire分布式数据存储,包括spring-data-gemfire。
11)spring-boot-starter-data-jpa:支持JPA(Java Persistence API),包括spring-data-jpa、spring-orm、Hibernate。
12)spring-boot-starter-data-mongodb:支持MongoDB数据,包括spring-data-mongodb。
13)spring-boot-starter-data-rest:通过spring-data-rest-webmvc,支持通过REST暴露Spring Data数据仓库。
14)spring-boot-starter-data-solr:支持Apache Solr搜索平台,包括spring-data-solr。
15)spring-boot-starter-freemarker:支持FreeMarker模板引擎。
16)spring-boot-starter-groovy-templates:支持Groovy模板引擎。
17)spring-boot-starter-hateoas:通过spring-hateoas支持基于HATEOAS的RESTful Web服务。
18)spring-boot-starter-hornetq:通过HornetQ支持JMS。
19)spring-boot-starter-integration:支持通用的spring-integration模块。
20)spring-boot-starter-jdbc:支持JDBC数据库。
21)spring-boot-starter-jersey:支持Jersey RESTful Web服务框架。
22)spring-boot-starter-jta-atomikos:通过Atomikos支持JTA分布式事务处理。
23)spring-boot-starter-jta-bitronix:通过Bitronix支持JTA分布式事务处理。
24)spring-boot-starter-mail:支持javax.mail模块。
25)spring-boot-starter-mobile:支持spring-mobile。
26)spring-boot-starter-mustache:支持Mustache模板引擎。
27)spring-boot-starter-redis:支持Redis键值存储数据库,包括spring-redis。
28)spring-boot-starter-security:支持spring-security。
29)spring-boot-starter-social-facebook:支持spring-social-facebook
30)spring-boot-starter-social-linkedin:支持pring-social-linkedin
31)spring-boot-starter-social-twitter:支持pring-social-twitter
32)spring-boot-starter-test:支持常规的测试依赖,包括JUnit、Hamcrest、Mockito以及spring-test模块。
33)spring-boot-starter-thymeleaf:支持Thymeleaf模板引擎,包括与Spring的集成。
34)spring-boot-starter-velocity:支持Velocity模板引擎。
35)spring-boot-starter-web:支持全栈式Web开发,包括Tomcat和spring-webmvc。
36)spring-boot-starter-websocket:支持WebSocket开发。
37)spring-boot-starter-ws:支持Spring Web Services。
Spring Boot应用启动器面向生产环境的还有2种,具体如下:
1)spring-boot-starter-actuator:增加了面向产品上线相关的功能,比如测量和监控。
2)spring-boot-starter-remote-shell:增加了远程ssh shell的支持。
最后,Spring Boot应用启动器还有一些替换技术的启动器,具体如下:
1)spring-boot-starter-jetty:引入了Jetty HTTP引擎(用于替换Tomcat)。
2)spring-boot-starter-log4j:支持Log4J日志框架。
3)spring-boot-starter-logging:引入了Spring Boot默认的日志框架Logback。
4)spring-boot-starter-tomcat:引入了Spring Boot默认的HTTP引擎Tomcat。
5)spring-boot-starter-undertow:引入了Undertow HTTP引擎(用于替换Tomcat)。
6.SpringBoot的自动配置自动导入的原理
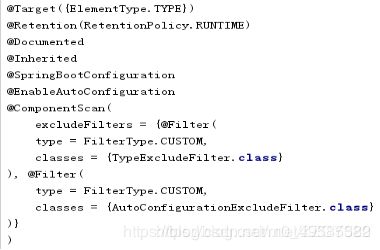
@SpringBootApplication: Spring Boot应用标注在某个类上说明这个类是SpringBoot的主配置类,SpringBoot 就应该运行这个类的main方法来启动SpringBoot应用;

@SpringBootConfifiguration:Spring Boot的配置类;
标注在某个类上,表示这是一个Spring Boot的配置类;
@Confifiguration:配置类上来标注这个注解;
配置类-----配置文件;配置类也是容器中的一个组件;@Component
@EnableAutoConfifiguration:开启自动配置功能;
以前我们需要配置的东西,Spring Boot帮我们自动配置;@EnableAutoConfifiguration告诉SpringBoot开启自动配置功能,这样自动配置才能生效;
@AutoConfigurationPackage
@Import(EnableAutoConfigurationImportSelector.class)
public @interface EnableAutoConfiguration {
@AutoConfifigurationPackage:自动配置包
@Import(AutoConfifigurationPackages.Registrar.class):
Spring的底层注解@Import,给容器中导入
一个组件;导入的组件由
AutoConfifigurationPackages.Registrar.class;
将主配置类(@SpringBootApplication标注的类)的所在包及下面所有子包里面的所有组件扫描到Spring容器;
@Import(EnableAutoConfifigurationImportSelector.class);
7.SpringBoot的全局配置文件,表现形式
SpringBoot使用一个全局的配置文件,配置文件名是固定的;
•application.properties
•application.yml
配置文件放在src/main/resources目录或者类路径/config下
配置文件的作用:SpringBoot在底层都给我们自动配置好应用程序需要的所有配置内容,如果我们觉得不满意可以修改SpringBoot自动配置的默认值。
YAML(YAML Ain’t Markup Language)
YAML A Markup Language:是一个标记语言
YAML isn’t Markup Language:不是一个标记语言;
标记语言:
以前的配置文件;大多都使用的是 xxxx.xml文件;
YAML:以数据为中心,比json、xml等更适合做配置文件;
YAML:配置例子
server:
port: 9090
XML: 配置列子
<server>
<port>8081</port>
</server>
YAML语法:
1、基本语法
k:(空格)v:表示一对键值对(空格必须有);
以空格的缩进来控制层级关系;只要是左对齐的一列数据,都是同一个层级的
例如:
server:
port: 8081
path: /hello
属性和值也是大小写敏感。
2.属性值得写法
2.1普通的值(数字,字符串,布尔)
字符串默认不用加上单引号或者双引号;
“”:双引号;不会转义字符串里面的特殊字符;特殊字符会作为本身想表示的意思
name: “zhangsan \n lisi” ——>输出;zhangsan 换行 lisi
‘’:单引号;会转义特殊字符,特殊字符最终只是一个普通的字符串数据
name: ‘zhangsan \n lisi’ ——>输出;zhangsan \n lisi
2.2对象、Map(属性和值)(键值对):
k: v:在下一行来写对象的属性和值的关系,注意缩进,对象还是k: v的方式
friends:
lastName: zhangsan
age: 20
行内写法:
friends: {lastName: zhangsan,age: 18}
2.3数组(List、Set):
用”- 空格” 值表示数组中的一个元素
pets:
‐ cat
‐ dog
‐ pig
行内写法
pets: [cat,dog,pig]
8.SpringBoot对静态资源配置
如果我们需用给web项目中添加css/js/html文件的话,我们会发现此时没有webapp目录。
由于springboot是以jar包的方式打包程序的因此是没有webapp目录的。
那么我们的css/js/html文件要保存在什么地方啊???
我们要了解一个Java类“WebMvcAuotConfiguration”,因为与web开发相关的自动配置都是由这个类完成的。
public void addResourceHandlers(ResourceHandlerRegistry registry) {
    if (!this.resourceProperties.isAddMappings()) {
        logger.debug("Default resource handling disabled");
    } else {
        Duration cachePeriod = this.resourceProperties.getCache().getPeriod();
        CacheControl cacheControl = this.resourceProperties.getCache().getCachecontrol().toHttpCacheControl();
        if (!registry.hasMappingForPattern("/webjars/**")) {
            this.customizeResourceHandlerRegistration(registry.addResourceHandler(new String[]{"/webjars/**"}).addResourceLocations(new String[]{"classpath:/META-INF/resources/webjars/"}).setCachePeriod(this.getSeconds(cachePeriod)).setCacheControl(cacheControl));
        }
		//静态资源文件夹映射
        String staticPathPattern = this.mvcProperties.getStaticPathPattern();
        if (!registry.hasMappingForPattern(staticPathPattern)) {
            this.customizeResourceHandlerRegistration(registry.addResourceHandler(new String[]{staticPathPattern}).addResourceLocations(WebMvcAutoConfiguration.getResourceLocations(this.resourceProperties.getStaticLocations())).setCachePeriod(this.getSeconds(cachePeriod)).setCacheControl(cacheControl));
        }
	}
}
2.默认静态资源文件的位置
this.resourceProperties.getStaticLocations()
private static final String[] CLASSPATH_RESOURCE_LOCATIONS = new String[]{"classpath:/META-INF/resources/", "classpath:/resources/", "classpath:/static/", "classpath:/public/"};
"classpath:/META‐INF/resources/",
"classpath:/resources/",
"classpath:/static/",
"classpath:/public/",
“/”:当前项目的根路径
classpath就是java目录/resources目录

3)欢迎页; 静态资源文件夹下的所有index.html页面;
4)页面图标; 静态资源文件夹下的所有favicon.ico 图标;
可以在全局配置文件中配置修改静态资源文件夹路径。
@ConfigurationProperties(prefix = “spring.resources”, ignoreUnknownFields = false)
public class ResourceProperties implements ResourceLoaderAware {
//可以设置和静态资源有关的参数,缓存时间等
application.properties
spring.resources.static-locations=classpath:/test/,classpath:/hello/