Docker-Compose部署Nexus
Docker-Compose部署Nexus
- 修改静态 IP 、DNS和主机名
- 修改 静态IP
- 修改DNS
- 修改主机名
- 安装Docker
- 卸载旧版本
- 使用 APT 安装
- 验证安装是否成功
- 配置 Docker 镜像加速器
- 阿里云加速器(推荐)
- 官方提供中国区镜像
- 配置加速器
- 验证配置是否成功
- 安装 Docker Compose
- 验证安装是否成功
- 部署 Nexus
- 查找docker镜像库中的gitlab镜像
- 创建docker-compose本机目录
- 在docker-compose.yml目录下构建并且启动docker容器
- 常用docker-compose的命令
- 浏览器访问Nexus
- Nexus私服仓库设置
- 修改密码
- Maven 仓库介绍
- 代理仓库(Proxy Repository)
- 宿主仓库(Hosted Repository)
- 仓库组(Repository Group)
- 熟悉nexus结构
- 建立仓库
- 创建文件存储目录
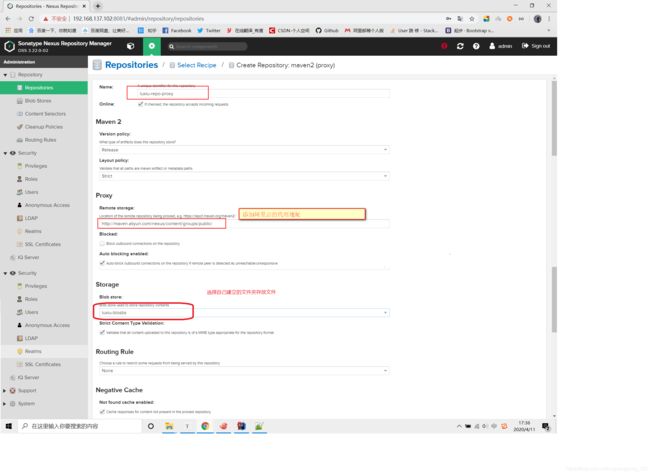
- 创建 `Proxy Repository` 代理仓库
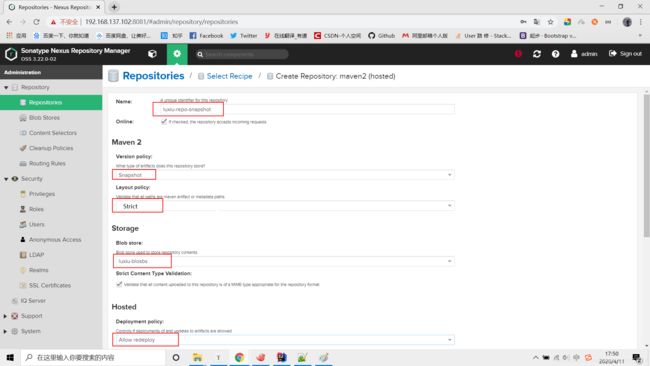
- 创建 `hosted Repository` 本地仓库
- 创建Snapshot格式的本地仓库
- 创建Snapshot格式的本地仓库
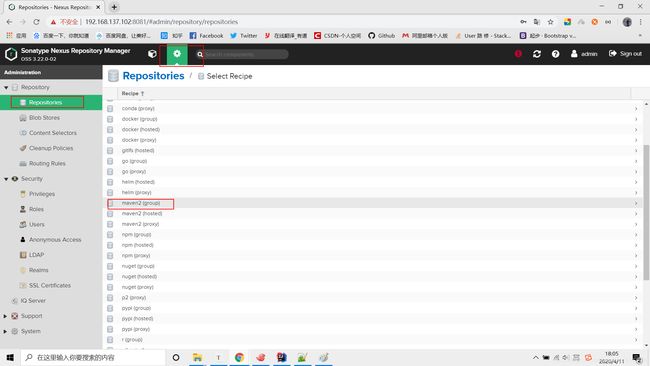
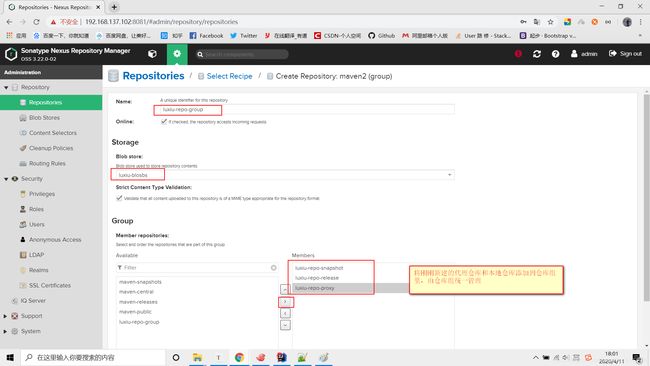
- 创建 `group repository` 仓库组
- 在项目中使用 Nexus
- 配置认证信息
- Snapshots 与 Releases 的区别
- 配置代理仓库
- 配置自动化部署
- 部署到仓库
- 扩展阅读
- 手动上传第三方依赖
- Nexus3.x批量导入本地库
- 压缩本地仓库后上传到nexus服务器上
- 在nexus服务器上创建目录
- 解压压缩文件到luxiu-repo下
- 在/usr/local/docker/nexus/luxiu-repo创建mavenimport.sh
- 执行命令
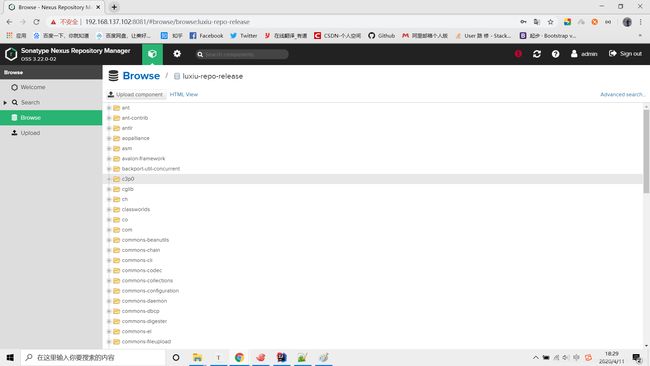
- 查看宿主仓库
修改静态 IP 、DNS和主机名
修改 静态IP
编辑 vi /etc/netplan/50-cloud-init.yaml 配置文件,修改内容如下
network:
  version: 2
  ethernets:
    ens33:
      dhcp4: no
      dhcp6: no
      addresses: [192.168.137.102/24]
      gateway4: 192.168.137.1
      nameservers:
        addresses: [114.114.114.114, 8.8.8.8]
使用 netplan apply 命令让配置生效
修改DNS
-
# 取消 DNS 行注释,并增加 DNS 配置如:114.114.114.114,8.8.8.8修改后重启下计算机 -
vi /etc/systemd/resolved.confDNS=[114.114.114.114, 8.8.8.8]
修改主机名
修改 cloud.cfg 防止重启后主机名还原
vi /etc/cloud/cloud.cfg- ``
# 该配置默认为 false,修改为 true 即可preserve_hostname: true
修改主机名
# 修改主机名hostnamectl set-hostname nexus- ``
# 配置 hostsvim /etc/hosts192.168.137.102 nexus
安装Docker
卸载旧版本
apt-get remove docker docker-engine docker.io containerd runc
使用 APT 安装
# 更新数据源
apt-get update
# 安装所需依赖
apt-get -y install apt-transport-https ca-certificates curl software-properties-common
# 安装 GPG 证书
curl -fsSL http://mirrors.aliyun.com/docker-ce/linux/ubuntu/gpg | sudo apt-key add -
# 新增数据源
add-apt-repository "deb [arch=amd64] http://mirrors.aliyun.com/docker-ce/linux/ubuntu $(lsb_release -cs) stable"
# 更新并安装 Docker CE
apt-get update && apt-get install -y docker-ce
验证安装是否成功
docker version
# 输出如下
Client:
 Version:           18.09.6
 API version:       1.39
 Go version:        go1.10.8
 Git commit:        481bc77
 Built:             Sat May  4 02:35:57 2019
 OS/Arch:           linux/amd64
 Experimental:      false
Server: Docker Engine - Community
 Engine:
  Version:          18.09.6
  API version:      1.39 (minimum version 1.12)
  Go version:       go1.10.8
  Git commit:       481bc77
  Built:            Sat May  4 01:59:36 2019
  OS/Arch:          linux/amd64
  Experimental:     false
配置 Docker 镜像加速器
阿里云加速器(推荐)
点击链接获取
官方提供中国区镜像
https://registry.docker-cn.com
配置加速器
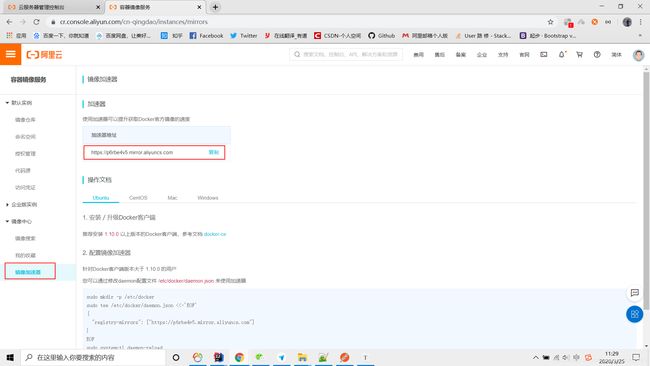
以配置阿里云加速器为例,首先 [登录阿里云(没有账号请先注册) ),搜索 容器镜像服务
找到你的专属加速器
通过修改 daemon 配置文件 /etc/docker/daemon.json 来使用加速器
-
vim /etc/docker/daemon.json -
{ -
"registry-mirrors": ["https://xxxxxxxx.mirror.aliyuncs.com"] -
} -
# 重启 Docker -
systemctl daemon-reload -
systemctl restart docker验证配置是否成功
docker info- ``
# 输出如下Containers: 38Running: 18Paused: 0Stopped: 20Images: 10Server Version: 18.09.6Storage Driver: overlay2Backing Filesystem: extfsSupports d_type: trueNative Overlay Diff: trueLogging Driver: json-fileCgroup Driver: cgroupfsPlugins:Volume: localNetwork: bridge host macvlan null overlayLog: awslogs fluentd gcplogs gelf journald json-file local logentries splunk syslogSwarm: inactiveRuntimes: runcDefault Runtime: runcInit Binary: docker-initcontainerd version: bb71b10fd8f58240ca47fbb579b9d1028eea7c84runc version: 2b18fe1d885ee5083ef9f0838fee39b62d653e30init version: fec3683Security Options:apparmorseccompProfile: defaultKernel Version: 4.15.0-51-genericOperating System: Ubuntu 18.04.2 LTSOSType: linuxArchitecture: x86_64CPUs: 2Total Memory: 1.924GiBName: kubernetes-masterID: PJ4H:7AF2:P5UT:6FMR:W4DI:SSWR:IQQR:J6QO:ARES:BOAC:ZVMO:SV2YDocker Root Dir: /var/lib/dockerDebug Mode (client): falseDebug Mode (server): falseRegistry: https://index.docker.io/v1/Labels:Experimental: falseInsecure Registries:127.0.0.0/8## 这里是你配置的镜像加速器Registry Mirrors:https://xxxxxxxx.mirror.aliyuncs.com/Live Restore Enabled: falseProduct License: Community Engine- ``
WARNING: No swap limit support
安装 Docker Compose
Compose 支持 Linux、macOS、Windows 10 三大平台。在 Linux 上的也安装十分简单,从 官方 GitHub Release 处直接下载编译好的二进制文件即可。
curl -L https://github.com/docker/compose/releases/download/1.25.4/docker-compose-`uname -s`-`uname -m` > /usr/local/bin/docker-compose
chmod +x /usr/local/bin/docker-compose
验证安装是否成功
docker-compose version- ``
# 输出如下docker-compose version 1.24.0, build 0aa59064docker-py version: 3.7.2CPython version: 3.6.8OpenSSL version: OpenSSL 1.1.0j 20 Nov 2018
部署 Nexus
查找docker镜像库中的gitlab镜像
docker search nexus
sonatype/nexus3                              Sonatype Nexus Repository Manager 3             779
sonatype/nexus                               Sonatype Nexus                                  431
选择安装汉化版的sonatype/nexus3
docker pull sonatype/nexus3
创建docker-compose本机目录
mkdir -p /usr/local/docker/nexus
cd /usr/local/docker/nexus
touch docker-compose.yml
vi docker-compose.yml
version: '3.1'
services:
  nexus:
    restart: always
    image: sonatype/nexus3
    container_name: nexus
    ports:
      - 8081:8081
    volumes:
      - data:/nexus-data
volumes:
  data:
在docker-compose.yml目录下构建并且启动docker容器
docker-compose up -d
常用docker-compose的命令
docker-compose stop 停止容器
docker-compose start 启动容器
docker-compose logs 查看容器日志
docker-compose logs -f 查看容器实时日志
docker-compose down 停止后删除容器
浏览器访问Nexus
http://192.168.137.102:8081
Nexus私服仓库设置
修改密码
新版本密码在 cat /var/lib/docker/volumes/nexus_data/_data/admin.password
修改密码为:admin123
Maven 仓库介绍
代理仓库(Proxy Repository)
- 第三方仓库
- maven-central
- nuget.org-proxy
- 版本策略(Version Policy)
- Release: 正式版本
- Snapshot: 快照版本
- Mixed: 混合模式
- 布局策略(Layout Policy)
- Strict: 严格
- Permissive: 宽松
宿主仓库(Hosted Repository)
- 存储本地上传的组件和资源的
- maven-releases
- maven-snapshots
- nuget-hosted
- 部署策略(Deployment Policy)
- Allow Redeploy: 允许重新部署
- Disable Redeploy: 禁止重新部署
- Read-Only: 只读
仓库组(Repository Group)
通常包含了多个代理仓库和宿主仓库,在项目中只要引入仓库组就可以下载到代理仓库和宿主仓库中的包
-
maven-public
-
nuget-group
熟悉nexus结构
-
进入nexus的docker容器
root@nexus:~# docker ps CONTAINER ID IMAGE COMMAND CREATED STATUS PORTS NAMES 8eb3cf5377bd sonatype/nexus3 "sh -c ${SONATYPE_DI…" 13 days ago Up 11 minutes 0.0.0.0:8081->8081/tcp nexus root@nexus:~# docker exec -it 8eb3cf5377bd /bin/bash bash-4.4$ cd /nexus-data/ bash-4.4$ ls blobs db etc instances kar keystores log port tmp cache elasticsearch generated-bundles javaprefs karaf.pid lock orient restore-from-backup bash-4.4$ -
目录说明
- blobs/ 创建blob的默认路径,当然也可以重新指定
- cache/ 当前缓存的karaf包的信息
- db/ OrientDB数据库的数据,用于存储nexus的元数据的数据库
- elasticsearch/ 当前配置的Elasticsearch状态
- etc/ 大概是运行时配置状态和关于资源库的自定义的相关的东西
- health-check/ 看目录,健康检查的相关报告的存储目录吧
- keystores/ 自动生成的关于资源库的ID主键
- log/ 运行实例生成的日志文件,也有日志文件的压缩包,貌似是每天都会生成日志文件,你可以定期删除老的日志文件
- tmp/ 用于存储临时文件的目录
具体每个目录下的各个配置文件的作用,还可参考官方文档说明:
建立仓库
【代理资源库】:就是配置了外网的maven远程仓库地址的资源库,本地找不到,就会通过代理资源库中的地址,找到远程仓库,从远程仓库中下载所需要的jar。

【托管资源库】:就是放在本地的资源库,零零散散的jar,从远程仓库中下不到,只能自己在网上找,找到jar下载下来,放在托管资源库中,交给nexus统一管理。不然哪天想去用连接数据库的jar包,还得自己翻磁盘,多麻烦。

【组资源库】 :从上面代理资源库+托管资源库看出来,其实组资源库中并没有jar包,而是把代理资源库和托管资源库统一配置到组资源库中,然后组资源库作为一个唯一的public提供给所有人使用。就像工人1+工人2把自己的账单统一给包工头,让包工头去跟老板结账是一个道理。
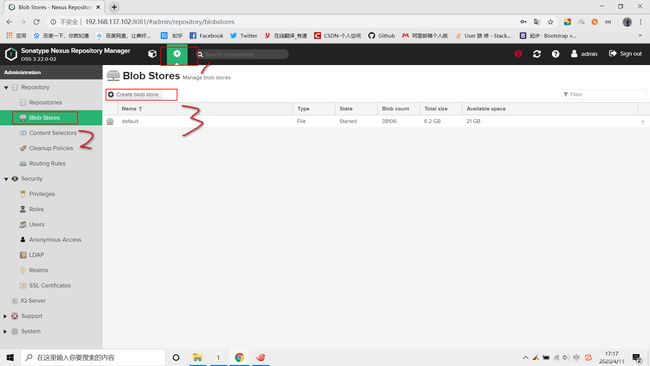
创建文件存储目录
在创建 repository之前,还是需要先设定一个指定的文件存储目录,便于统一管理。在创建 repository之前,还是需要先设定一个指定的文件存储目录,便于统一管理。nexus3 使用了Blob Stores来保存仓库文件。因此创建仓库前,可以先创建 Blob Stores。当然你也可以不创建,那么将会使用默认的路径:./sonatype-work/nexus3/blobs
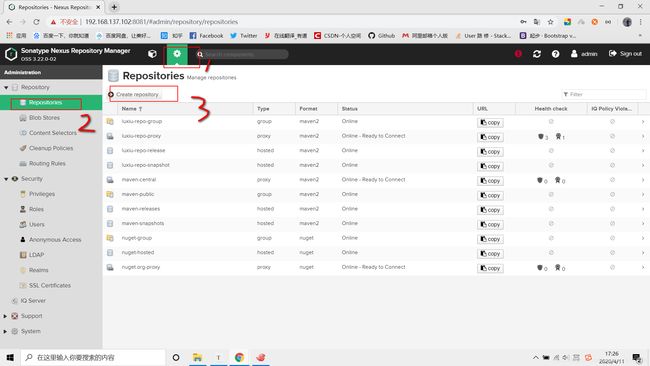
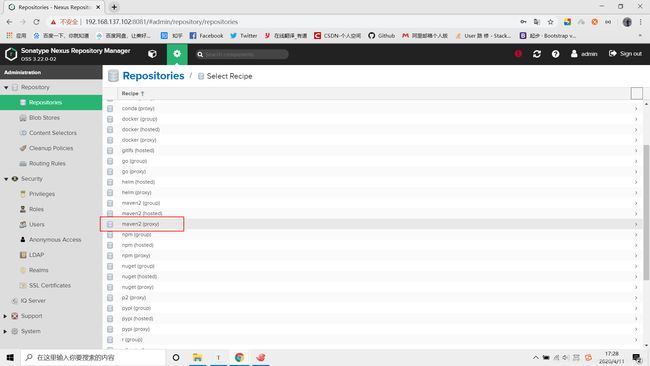
创建 Proxy Repository 代理仓库
创建 hosted Repository 本地仓库
Hosted有三种方式:Releases、Snapshot、Mixed

Releases: 一般是已经发布的Jar包
Snapshot: 未发布的版本
Mixed:混合的
创建Snapshot格式的本地仓库
创建Snapshot格式的本地仓库
创建 group repository 仓库组
在项目中使用 Nexus
配置认证信息
在 Maven 中settings.xml 中添加 Nexus 认证信息 (servers 节点下)
   <servers>
		<server>
		  <id>luxiu-repo-groupid>
		  <username>adminusername>
		  <password>admin123password>
	    server>
	    <server>
		  <id>luxiu-repo-releaseid>
		  <username>adminusername>
		  <password>admin123password>
		server>
		<server>
		  <id>luxiu-repo-snapshotid>
		  <username>adminusername>
		  <password>admin123password>
		server>
    servers>
Snapshots 与 Releases 的区别
- nexus-releases: 用于发布 Release 版本
- nexus-snapshots: 用于发布 Snapshot 版本(快照版)
Release 版本与 Snapshot 定义
Release: 1.0.0/1.0.0-RELEASESnapshot: 1.0.0-SNAPSHOT
- 在项目
pom.xml中设置的版本号添加SNAPSHOT标识的都会发布为SNAPSHOT版本,没有SNAPSHOT标识的都会发布为RELEASE版本。 SNAPSHOT版本会自动加一个时间作为标识,如:1.0.0-SNAPSHOT发布后为变成1.0.0-SNAPSHOT-20180522.123456-1.jar
配置代理仓库
在 Maven 中settings.xml 中添加下面信息
<mirrors>
   <mirror>
		<id>nexusid>
		<mirrorOf>*mirrorOf>
		<url>http://192.168.137.102:8081/repository/luxiu-repo-group/url>
     mirror>
	 <mirror>
      <id>alimavenid>
      <name>aliyun mavenname>
      <url>http://maven.aliyun.com/nexus/content/groups/public/url>
      <mirrorOf>centralmirrorOf>
    mirror>
	<mirror>
      <id>clouderaid>
      <name>cloudera mavenname>
      <url>https://repository.cloudera.com/artifactory/cloudera-repos/url>
      <mirrorOf>centralmirrorOf>
    mirror>
mirrors>
<profiles>
	  <profile>
		  <id>nexusid>


		  <repositories>
			<repository>
				<id>nexusid>
				<name>local private nexusname>
				<url>http://192.168.137.102:8081/repository/luxiu-repo-group/url>
				<releases><enabled>trueenabled><updatePolicy>alwaysupdatePolicy>
				<checksumPolicy>warnchecksumPolicy>releases>
				<snapshots><enabled>falseenabled>snapshots>
			repository>
		  repositories>
		  <pluginRepositories>
			<pluginRepository>
				<id>nexusid>
				<name>local private nexusname>
				<url>http://192.168.137.102:8081/repository/luxiu-repo-group/url>
				<releases><enabled>trueenabled><updatePolicy>alwaysupdatePolicy>
				<checksumPolicy>warnchecksumPolicy>releases>
				<snapshots><enabled>falseenabled>snapshots>
			pluginRepository>
		   pluginRepositories>
		profile>
		<profile>
			<repositories>
				<repository>
					<id>nexus-aliyunid>
					<name>Nexus aliyunname>
					<layout>defaultlayout>
					<url>http://maven.aliyun.com/nexus/content/groups/publicurl>
				<snapshots>
					<enabled>falseenabled>
					snapshots>
					<releases>
				<enabled>trueenabled>
				releases>
				repository>
			repositories>
		profile>
		<profile>
			<repositories>
			<repository>
				<id>clouderaid>
				<url>https://repository.cloudera.com/artifactory/cloudera-repos/url>
			repository>
			<repository>
				<id>centralid>
				<url>http://repo1.maven.org/maven2/url>
				<releases>
					<enabled>trueenabled>
				releases>
				<snapshots>
					<enabled>falseenabled>
				snapshots>
			repository>
		repositories>
	profile>
 profiles>
 <activeProfiles>
    <activeProfile>nexusactiveProfile>
  activeProfiles>
配置自动化部署
在 项目中的pom.xml 中添加如下代码
  <distributionManagement>
      <repository>
          <id>luxiu-repo-releaseid>
          <name>Nexus Release Repositoryname>
          <url>http://192.168.137.102:8081/repository/luxiu-repo-release/url>
      repository>
      <snapshotRepository>
          <id>luxiu-repo-snapshotid>
          <name>Nexus Snapshot Repositoryname>
          <url>http://192.168.137.102:8081/repository/luxiu-repo-snapshot/url>
      snapshotRepository>
  distributionManagement>
注意事项
- ID 名称必须要与
settings.xml中 Servers 配置的 ID 名称保持一致 - 项目版本号中有
SNAPSHOT标识的,会发布到 Nexus Snapshots Repository, 否则发布到 Nexus Release Repository,并根据 ID 去匹配授权账号
部署到仓库
mvn deploy
扩展阅读
手动上传第三方依赖
Nexus 3.1.x 开始支持页面上传第三方依赖功能,以下为手动上传命令
# 如第三方JAR包:aliyun-sdk-oss-2.2.3.jarmvn deploy:deploy-file-DgroupId=com.aliyun.oss-DartifactId=aliyun-sdk-oss-Dversion=2.2.3-Dpackaging=jar-Dfile=D:\aliyun-sdk-oss-2.2.3.jar-Durl=http://127.0.0.1:8081/repository/maven-3rd/-DrepositoryId=nexus-releases
注意事项
- 建议在上传第三方 JAR 包时,创建单独的第三方 JAR 包管理仓库,便于管理有维护。(maven-3rd)
-DrepositoryId=nexus-releases对应的是settings.xml中 Servers 配置的 ID 名称。(授权)
Nexus3.x批量导入本地库
压缩本地仓库后上传到nexus服务器上
在nexus服务器上创建目录
mkdir -p /usr/local/docker/nexus/luxiu-repo
解压压缩文件到luxiu-repo下
解压文件后将所有的文件都移动到luxiu-repo目录下
在/usr/local/docker/nexus/luxiu-repo创建mavenimport.sh
#!/bin/bash
while getopts ":r:u:p:" opt; do
	case $opt in
		r) REPO_URL="$OPTARG"
		;;
		u) USERNAME="$OPTARG"
		;;
		p) PASSWORD="$OPTARG"
		;;
	esac
done

find . -type f -not -path './mavenimport\.sh*' -not -path '*/\.*' -not -path '*/\^archetype\-catalog\.xml*' -not -path '*/\^maven\-metadata\-local*\.xml' -not -path '*/\^maven\-metadata\-deployment*\.xml' | sed "s|^\./||" | xargs -I '{}' curl -u "$USERNAME:$PASSWORD" -X PUT -v -T {} ${REPO_URL}/{} ;
赋权
chmod 777 mavenimport.sh
chmod 777 -R /usr/local/docker/nexus/luxiu-repo
一定要给所有的jar包赋值其他用户的操作权限,不然执行shell脚本后文件上传不到服务器中
执行命令
该命令只能上传hosted类型的仓库,proxy和group的上传不了
./mavenimport.sh -u admin -p admin123 -r http://192.168.137.102:8081/repository/luxiu-repo-release/
