Spark Streaming+kafka+spring boot+elasticsearch实时项目(canal)
在本次实验中,利用spark、elasticsearch、kafka等相关框架搭建一个实时计算系统。
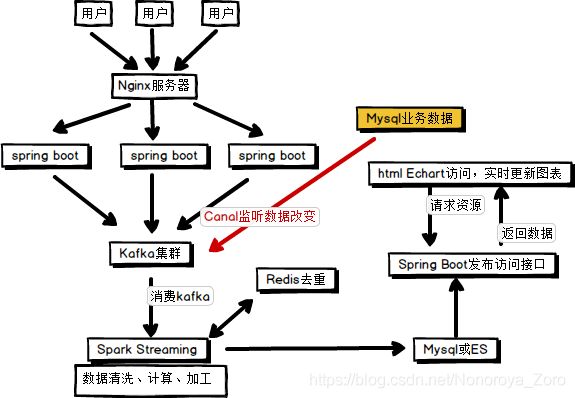
具体流程如下图所示,
- 用户访问对应服务,由nginx服务器进行负载均衡访问具体的主机上的服务,访问过程中将产生用户具体的操作日志,该操作日志将由具体服务发送保存到Kafka集群(或者可以写到具体文件,可以通过Flume对日志文件进行采集,发送到Kafka集群)。
- 数据缓存到kafka集群后,利用Spark Streaming对Kafka进行具体时间间隔的消费(批处理),对消费的数据进行业务去重,计算,加工,完成后,将数据写到Mysql数据库或者ES(用于对数据的检索和分析)。
- 数据保存到ES后,编写Spring boot程序,将es中数据读取,并按照一定的业务逻辑进行处理,将需求数据以json格式返回。在本次实验中,编写的改spring boot程序主要用于发布接口,由另外一个前端程序请求该接口,返回相应数据,当然也可以写到一个web工程中,本次例程中主要是偏向于基础。
- 另外一个web工程访问具体业务接口,返回json数据,解析响应数据,利用echart.js绘制相应图表,并设置时间间隔进行请求,实时更新图表内容。
注:另外,还可以通过canal监控对应的业务数据,对更改的业务数据进行抓取,发送给kafka。主要利用的是mysql的主从备份的原理,将canal伪装成一台mysql slave服务器,从主节点请求数据。
一、环境搭建
集群搭建可以参考
三台虚拟机,分别为hadoop1、hadoop2、hadoop3,本次例程中使用的是centos 6.8。
分配的内存为:(当然内存足够可以多分配)
| 主机 | 内存 | 处理器 |
|---|---|---|
| hadoop1 | 4G | 2 |
| hadoop2 | 2G | 1 |
| hadoop3 | 2G | 1 |
- hadoop集群,(可选,方便查看具体job 日志)hadoop版本 hadoop-2.7.2
- zookeeper集群,版本:zookeeper-3.4.10
- kafka集群,版本 kafka_2.11-0.11.0.2
- spark集群(可选),版本spark-2.1.1-bin-hadoop2.7 将项目部署到集群上可以考虑搭建spark集群,测试则不需要,在idea测试即可。
- elasticsearch集群,版本 elasticsearch-6.6.0 ,可以再安装一个es的可视化平台,kibana 版本kibana-6.6.0-linux-x86_64
- redis 可单机可集群,版本redis-5.0.6
- nginx
二、项目搭建
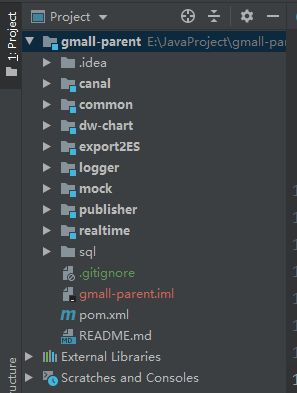
如下图所示,为本项目的功能文件目录结构。
- canal模块为利用canal API将mysql数据库修改的数据发送到kafka集群。
- common模块 是公用的依赖和工具类。
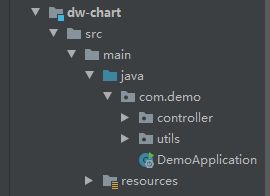
- dw-chart模块是web项目,负责向对应接口请求数据,并绘制图表,前端展示。
- export2ES模块 (可忽略),将hive数据导入到es。
- logger模块,是用户请求的对应服务的spring boot工程,负责将用户操作日志发送给kafka。
- mock模块,是模拟用户操作日志,负责向logger模块发起请求。
- publisher模块,spring boot功能,负责发布访问接口,由dw-chart请求相应数据。
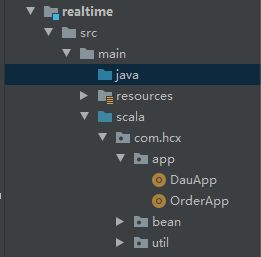
- realtime模块,spark streaming计算,负责消费kafka数据,并保存到es中。
- sql文件夹中 是对应的order_info 模拟生成数据的存储过程和部分模拟数据,用于cannal监控,和统计销售额。
三、分析过程
- kafka集群中topic有以下三个,GMALL_STARTUP(用于统计每日活跃度)、GMALL_EVENT(暂时未使用)、GMALL_ORDER(用于统计销售额)。
- es集群中index有以下三个,gmall_dau(保存计算每日活跃度的结果数据)、gmall_order(保存计算后的销售额数据)、gmall_sale_detail(保存从hive中导入到es的数据)。
日志数据格式如下,一条json数据表示用户做的一次操作,当type为startup为登录,可以记录当前app的每日活跃度。
{
    "area": "guangdong",   //地址
    "uid": "186",
    "itemid": 17,          //主题id
    "npgid": 14,
    "evid": "addCart",     //时间id
    "os": "andriod",       //用户操作系统
    "pgid": 43,
    "appid": "gmall_hcx",    //appid
    "mid": "mid_74",         //用户唯一id
    "type": "event",         //用户操作类型
    "ts": 1574325528404      //时间戳
}
mysql中的order_info表中数据如下,记录着用户下单产生的业务数据,由canal监控mysql数据库的这个表的变化,并将数据写入kafka集群中,便于之后统计销售额。
以下为spark streaming代码,进行每日活跃度的统计。首先从kafka中读取数据为inputDstream,再将输入流转换为泛型为具体样例类的输入流。利用redis对数据进行去重,因为统计用户活跃度,当一个用户多次登录后,只取这个用户的一次有效登录记录。利用redis去重后,还需要考虑到当一个批次读取的数据中有重复数据时,redis未能去重,则需要再对过滤后的数据进一步去重,去重思路是将想用mid的数据分为同一组,即一个用户的登录记录分为一组,只取其中一条作为有效数据,其余的去除。
val sparkConf: SparkConf = new SparkConf().setMaster("local[*]").setAppName("dau_app")
    val ssc = new StreamingContext(sparkConf,Seconds(5))

    val inputDstream: InputDStream[ConsumerRecord[String, String]] = MyKafkaUtil.getKafkaStream(GmallConstant.KAFKA_TOPIC_STARTUP,ssc)

    //转换操作
    val startuplogStream: DStream[Startuplog] = inputDstream.map {
      record =>
        val jsonStr: String = record.value()
        val startuplog: Startuplog = JSON.parseObject(jsonStr, classOf[Startuplog])
        val date = new Date(startuplog.ts)
        val DateStr: String = new SimpleDateFormat("yyyy-MM-dd HH:mm").format(date)
        val splits: Array[String] = DateStr.split(" ")
        startuplog.logDate = splits(0)
        startuplog.logHour = splits(1).split(":")(0)
        startuplog.logHourMinute = splits(1)
        startuplog
    }
    //利用redis进行去重过滤
    val filteredDstream: DStream[Startuplog] = startuplogStream.transform {
      rdd =>
        //driver  周期性执行
        val curdate: String = new SimpleDateFormat("yyyy-MM-dd").format(new Date())
        val jedis: Jedis = RedisUtil.getJedisClient
        val key = "dau:" + curdate
        val dauSet: util.Set[String] = jedis.smembers(key)
        val dauBC: Broadcast[util.Set[String]] = ssc.sparkContext.broadcast(dauSet)
        val filteredRDD: RDD[Startuplog] = rdd.filter {
          startuplog =>
            //executor
            val dauSet: util.Set[String] = dauBC.value
            !dauSet.contains(startuplog.mid)
        }
        filteredRDD
    }
    val groupbyMidDstram: DStream[(String, Iterable[Startuplog])] = filteredDstream.map {
      startiplog => (startiplog.mid, startiplog)
    }.groupByKey()
    //去重思路,把相同mid的数据分成一组,每组取一个
    val distinctDstream: DStream[Startuplog] = groupbyMidDstram.flatMap {
      case (mid, startuplogItr) =>
        startuplogItr.take(1)
    }
    //保存到redis中
    distinctDstream.foreachRDD{rdd=>
      //driver
      //redis   type  set
      //key  dau:2019-06-03  value:mids
      rdd.foreachPartition{startuplogItr =>
        //executor
        val jedis: Jedis = RedisUtil.getJedisClient
        val list: List[Startuplog] = startuplogItr.toList
        for (startuplog<- list){
          val key = "dau:" + startuplog.logDate
          val value = startuplog.mid
          jedis.sadd(key,value)
          println(startuplog)
        }
        MyEsUtil.indexBulk(GmallConstant.ES_INDEX_DAU,list)
        jedis.close()
      }
    }
    ssc.start()
    ssc.awaitTermination()
以下为canal API 部分代码,负责监听mysql数据库的order_info表的数据变化,将改变后的数据发送到kafka集群。
CanalConnector canalConnector = CanalConnectors.newSingleConnector(new InetSocketAddress("hadoop1", 11111), "example", "", "");
        while (true){
            //连接、订阅表、获取数据
            canalConnector.connect();
            canalConnector.subscribe("gmall.order_info");
            Message message = canalConnector.get(100);
            int size = message.getEntries().size();
            if (size == 0){
                try {
                    System.out.println("no Data...");
                    Thread.sleep(5000);
                } catch (InterruptedException e) {
                    e.printStackTrace();
                }
            }else {
                for (CanalEntry.Entry entry : message.getEntries()) {

                    //判断时间类型,只处理行变化业务
                    if (entry.getEntryType().equals(CanalEntry.EntryType.ROWDATA)){
                        //将数据集进行反序列化
                        ByteString storeValue = entry.getStoreValue();
                        CanalEntry.RowChange rowChange = null;
                        try {
                             rowChange = CanalEntry.RowChange.parseFrom(storeValue);

                        } catch (InvalidProtocolBufferException e) {
                            e.printStackTrace();
                        }
                        // 获取行集
                        List<CanalEntry.RowData> rowDatasList = rowChange.getRowDatasList();
                        //操作类
                        CanalEntry.EventType eventType = rowChange.getEventType();
                        //表名
                        String tableName = entry.getHeader().getTableName();
                        CanalHandler.handle(tableName,eventType,rowDatasList);
                    }
                }
            }
        }
四、项目运行
1、首先启动zookeeper集群和kafka集群、nginx。
nginx配置文件内容如下:
#user  nobody;
worker_processes  1;
#error_log  logs/error.log;
#error_log  logs/error.log  notice;
#error_log  logs/error.log  info;
#pid        logs/nginx.pid;
events {
    worker_connections  1024;
}
http {
    upstream logserver{
        server   hadoop1:8080  weight=1;
        server   hadoop2:8080  weight=1;
        server   hadoop3:8080  weight=1;
}
    include       mime.types;
    default_type  application/octet-stream;
    sendfile        on;
    #tcp_nopush     on;
    #keepalive_timeout  0;
    keepalive_timeout  65;
    #gzip  on;

    server {
        listen       80;
        server_name  logserver;
        #charset koi8-r;
        #access_log  logs/host.access.log  main;
        location / {
            root   html;
            index  index.html index.htm;
            proxy_pass http://logserver;
            proxy_connect_timeout 10;
        }
        #error_page  404              /404.html;
        # redirect server error pages to the static page /50x.html
        #
        error_page   500 502 503 504  /50x.html;
        location = /50x.html {
            root   html;
        }
    }
}
zookeeper配置文件内容如下:
# The number of milliseconds of each tick
tickTime=2000
# The number of ticks that the initial
# synchronization phase can take
initLimit=10
# The number of ticks that can pass between
# sending a request and getting an acknowledgement
syncLimit=5
# the directory where the snapshot is stored.
# do not use /tmp for storage, /tmp here is just
# example sakes.

server.1=hadoop1:2888:3888
server.2=hadoop2:2888:3888
server.3=hadoop3:2888:3888
dataDir=/home/hadoop/zookeeper-3.4.10/zkData
# the port at which the clients will connect
clientPort=2181
# the maximum number of client connections.
# increase this if you need to handle more clients
#maxClientCnxns=60
#
# Be sure to read the maintenance section of the
# administrator guide before turning on autopurge.
#
# http://zookeeper.apache.org/doc/current/zookeeperAdmin.html#sc_maintenance
#
# The number of snapshots to retain in dataDir
#autopurge.snapRetainCount=3
# Purge task interval in hours
# Set to "0" to disable auto purge feature
#autopurge.purgeInterval=1
kafka集群配置主节点配置文件内容如下:(slave节点的配置文件内容也需要修改,具体可参考网上内容)
boker.id=0
zookeeper.connect=hadoop1:2181,hadoop2:2181,hadoop3:2181
listeners=PLAINTEXT://hadoop1:9092
advertised.listeners=PLAINTEXT://hadoop1:9092
delete.topic.enable=true   #用于删除topic
2、将logger模块打包上传到三台虚拟机,并每台都启动。
可以在hadoop1主机编写一个启动脚本来启动三台主机的服务。脚本内容如下,具体需要修改java路径和jar包路径。
#!/bin/bash
JAVA_BIN=/home/hadoop/jdk1.8/bin/java
PROJECT=gmall
APPNAME=logger-0.0.1-SNAPSHOT.jar
SERVER_PORT=8080

case $1 in
"start")
{
  for i in hadoop1 hadoop2 hadoop3
  do
  echo "=======启动日志服务:$i"
  ssh $i "$JAVA_BIN -Xms32m -Xmx64m -jar gmall/$APPNAME --server.port=$SERVER_PORT >/home/hadoop/gmall/boot.log 2>&1 &"
  done
};;

"stop")
{
 for i in hadoop1 hadoop2 hadoop3
  do
   echo "=========关闭日志服务:$i=========="
   ssh $i "ps -ef | grep $APPNAME | grep -v grep | awk '{print \$2}' |xargs kill" >/dev/null 2>&1 &
  done
};;

esac
3、启动JsonMocker程序,发送请求到nginx服务器,访问三台主机的具体服务,并将日志保存到kafka集群中。(可以直接在IDEA中启动,发送请求,看到终端输出200返回结果,并kafka对应topic有数据即成功)
4、启动spark streaming程序 DauApp,从kafka读取数据进行计算处理,并将结果保存到es中。(可以直接在IDEA中启动,通过查看es-head或kibana查询有数据 来查看,如果有数据即成功)
5、启动发布接口spring-boot程序,读取es中数据,按照对应的业务逻辑处理数据,并以json形式返回。(可以在IDEA中启动,也可以打包部署到集群,浏览器访问对应接口地址,返回json数据即成功)
6、启动前端展示web项目,通过请求对应接口,得到返回的json数据,将数据解析后利用echart绘制图表。(可以在IDEA中启动,也可以打包部署到集群,浏览器输入地址后,看到对应图表,并且图表按照规律时间变化及成功)
效果图:(每日活跃度完成显示,显示昨天和今天两天的对比图)
7、销售额统计部分,首先需要配置canal,监听对应的mysql,canal的配置文件内容如下,启动canal bin/startup.sh
conf/example/instance.properties 主要配置slaveId和mysql地址,还有canal的用户和密码,这个需要在mysql中配置一个用户和密码,用于canal操作mysql中的表。
#################################################
## mysql serverId , v1.0.26+ will autoGen
canal.instance.mysql.slaveId=3

# enable gtid use true/false
canal.instance.gtidon=false

# position info
canal.instance.master.address=hadoop1:3306
canal.instance.master.journal.name=
canal.instance.master.position=
canal.instance.master.timestamp=
canal.instance.master.gtid=

# rds oss binlog
canal.instance.rds.accesskey=
canal.instance.rds.secretkey=
canal.instance.rds.instanceId=

# table meta tsdb info
canal.instance.tsdb.enable=true
#canal.instance.tsdb.url=jdbc:mysql://127.0.0.1:3306/canal_tsdb
#canal.instance.tsdb.dbUsername=canal
#canal.instance.tsdb.dbPassword=canal

#canal.instance.standby.address =
#canal.instance.standby.journal.name =
#canal.instance.standby.position =
#canal.instance.standby.timestamp =
#canal.instance.standby.gtid=

# username/password
canal.instance.dbUsername=canal
canal.instance.dbPassword=canal
canal.instance.connectionCharset = UTF-8
canal.instance.defaultDatabaseName =test
# enable druid Decrypt database password
canal.instance.enableDruid=false
#canal.instance.pwdPublicKey=MFwwDQYJKoZIhvcNAQEBBQADSwAwSAJBALK4BUxdDltRRE5/zXpVEVPUgunvscYFtEip3pmLlhrWpacX7y7GCMo2/JM6LeHmiiNdH1FWgGCpUfircSwlWKUCAwEAAQ==

# table regex
canal.instance.filter.regex=.*\\..*
# table black regex
canal.instance.filter.black.regex=

# mq config
canal.mq.topic=example
canal.mq.partition=0
# hash partition config
#canal.mq.partitionsNum=3
#canal.mq.partitionHash=mytest.person:id,mytest.role:id
#################################################
8、启动canal API程序,将mysql业务表的修改数据保存到kafka对应topic,启动程序后,需要利用sql文件夹中的sql脚本,在对应mysql数据库中创建存储过程和表,并利用存储过程修改order_info表,此时canal监听到数据发生改变,就会读取bin文件,将数据发送到kafka集群。
利用下列存储过程修改表中数据,具体含义可查看存储过程。
call init_data(varchar do_date_string, int order_incr_num, int user_incr_num, tinyint if_truncate);
call init_data('2019-11-22', 10, 5, false)
9、启动spark streaming程序的orderApp,读取kafka数据,并进行处理后保存到es对应index中。(可以直接在IDEA中运行,查看es中idnex中有数据增加即成功)
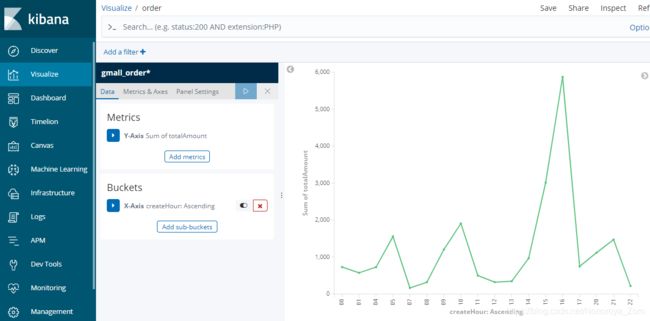
10、启动publisher模块和dw-chart模块,输入访问地址,可以查看到以下效果图。当然也可以通过kibana的图表工具绘制对应的图,如下第二张图所示,设置对应的index和字段后也可以查看到自己需要的图。
五、总结
本次的例程主要是针对基础,完成一个完整的从数据模拟、数据采集到传输、计算、结果展示的流程。这样的一个简单实时系统还有很多需要完善的地方,也有很多更优选择,可以在后期完善,该例程用于记录学习过程,也希望能帮到想学习大数据的同学。
完整工程github:https://github.com/HeCCXX/gmall-parent.git
