《SpringBoot》Springboot整合kafka示例demo
了解了kafka,做了一个简单的例子。
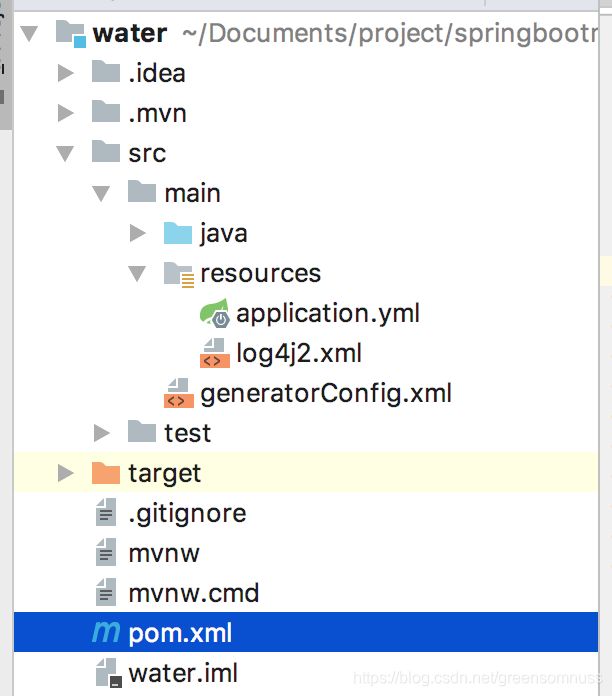
先来看一下项目的结构:
这里的geneatorConfig是mybatis自动生成dao,mapper文件的。
一、工程整体:
项目类型:Dynamic Web Project
开发环境:
Intellij IDEA
JDK版本:
jdk1.8
1,项目的依赖:pom.xml
    4.0.0

        org.springframework.boot
        spring-boot-starter-parent
        1.5.6.RELEASE


    com.example
    water
    0.0.1-SNAPSHOT
    water
    Demo project for Spring Boot


        1.8


            org.springframework.boot
            spring-boot-starter-web


                    org.springframework.boot
                    spring-boot-starter-logging


            org.springframework.boot
            spring-boot-starter


                    org.springframework.boot
                    spring-boot-starter-logging


            org.slf4j
            slf4j-api
            1.7.25


            org.projectlombok
            lombok
            1.18.0


            org.mybatis.spring.boot
            mybatis-spring-boot-starter
            1.3.0


            com.alibaba
            fastjson
            1.2.47


            org.springframework.boot
            spring-boot-starter-amqp


            org.springframework.boot
            spring-boot-starter-test
            test


            junit
            junit
            4.12


            commons-collections
            commons-collections


            org.springframework.boot
            spring-boot-test
            1.4.0.RELEASE
            compile


            com.alibaba
            druid
            1.1.0


            mysql
            mysql-connector-java
            5.1.25


            org.jetbrains
            annotations
            RELEASE


            org.apache.ibatis
            ibatis-core
            3.0


            com.github.pagehelper
            pagehelper-spring-boot-starter
            1.2.5


            org.springframework.kafka
            spring-kafka
            1.1.1.RELEASE


            org.springframework.boot
            spring-boot-starter-log4j2


                src/main/java

                    **/*.xml


                org.springframework.boot
                spring-boot-maven-plugin


                org.mybatis.generator
                mybatis-generator-maven-plugin
                1.3.0

                    true
                    src/main/generatorConfig.xml
                     true


                        org.mybatis.generator
                        mybatis-generator-core
                        1.3.2


                        mysql
                        mysql-connector-java
                        5.1.25
kafka 依赖的就是:
    org.springframework.kafka
    spring-kafka
    1.1.1.RELEASE
2,application.yml
server:
  port: 8088
  address: 127.0.0.1
  sessionTimeout: 30
  contextPath: /

spring:
  rabbitmq:
    host: 127.0.0.1
    username: admin
    password: admin
    port: 5672
  kafka:
    bootstrap-servers: 127.0.0.1:9092
    producer:
      key-serializer: org.apache.kafka.common.serialization.StringSerializer
      value-serializer: org.apache.kafka.common.serialization.StringSerializer
    consumer:
      group-id: test
      enable-auto-commit: true
      auto-commit-interval: 1000
      key-deserializer: org.apache.kafka.common.serialization.StringDeserializer
      value-deserializer: org.apache.kafka.common.serialization.StringDeserializer

    #配置数据源
  datasource:
    driver-class-name: com.mysql.jdbc.Driver
    url: jdbc:mysql://localhost:3306/government
    username: root
    password: Cx@520520

  redis:
    host: 127.0.0.1
    port: 6379
    pool:
      max-active: 8
      max-wait: 1
      max-idle: 8
      min-idle: 0
    timeout: 0

logging:
  level:
    com.example.water: DEBUG
  config: classpath:log4j2.xml

#app config 全局变量的设置
msg:
  name: 127.0.0.1
  notify:
    url: http://${msg.name}/msg/notify
application.xml里面配置了mybatis和log4j2.(这里注意下你的springboot的版本,新的版本是用的log4j2,之前的用的是log4,区别就是log4j2是xml格式的配置)
3,log4j.xml
        /Users/chenqincheng/Documents/logs
        water
        info
这里的就是配置就是你日志输出的路径和级别/Users/chenqincheng/Documents/logs water info
4,generatorConfig.xml(不需要的可以不用)
注意下:数据库驱动那里的mysql jar包的位置,记得改成绝对路径,之前一直因为这个找不到jar包,生成不了文件
二,编程
1,创建一个KafkaSender.java
package com.example.water.controller.kafka;

import org.springframework.beans.factory.annotation.Autowired;
import org.springframework.kafka.core.KafkaTemplate;
import org.springframework.stereotype.Component;

@Component
public class KafkaSender {
    @Autowired
    private KafkaTemplate kafkaTemplate;


    public String send(String msg){
        kafkaTemplate.send("test_topic", msg);
        return "success";
    }

}
发送msg消息到topic:test_topic
2,创建一个消费者TestKafkaConsumer.java
package com.example.water.controller.kafka;


import org.apache.kafka.clients.consumer.ConsumerRecord;
import org.springframework.kafka.annotation.KafkaListener;
import org.springframework.stereotype.Component;

/**
 * kafka消费者测试
 */
@Component
public class TestKafkaConsumer {
    @KafkaListener(id = "GroupId" ,topics = "test_topic")
    public void listen (ConsumerRecord record) throws Exception {
        System.out.printf("topic = %s, offset = %d, value = %s \n", record.topic(), record.offset(), record.value());
    }
3,创建一个controller,TestKafkaProducerController.java
package com.example.water.controller.kafka;

import org.springframework.beans.factory.annotation.Autowired;
import org.springframework.web.bind.annotation.RequestMapping;
import org.springframework.web.bind.annotation.RestController;

/**
 * 测试kafka生产者
 */
@RestController
@RequestMapping("kafka")
public class TestKafkaProducerController {

    @Autowired
    private KafkaSender kafkaSender;

    @RequestMapping("send")
    public String send(String msg){
        kafkaSender.send(msg);
        return "success";
    }

}
(这里安装kafka的时候需要创建一个topic,也就是上面的test_topic,不然启动的时候会抛出没有这个topic的异常)
kafka依赖zookeeper,所以要先启动zookeeper
mac安装kafka的命令是:
brew install kafka
kafaka依赖zookeeper
注意:安装目录:/usr/local/Cellar/kafka/0.10.2.0
/usr/local/etc/kafka/server.properties
/usr/local/etc/kafka/zookeeper.properties
启动zookeeper:(到bin目录下面执行命令,或者你可以配置环境变量可以在任何地方执行)
zookeeper-server-start /usr/local/etc/kafka/zookeeper.properties
启动kafka:
kafka-server-start /usr/local/etc/kafka/server.properties
创建topic
kafka-topics --create --zookeeper localhost:2181 --replication-factor 1 --partitions 1 --topic test
查看创建的topic
kafka-topics --list --zookeeper localhost:2181
发送一些消息
kafka-console-producer.sh --broker-list localhost:9092 --topic test
消费消息
kafka-console-consumer --bootstrap-server localhost:9092 --topic test --from-beginning
4,WaterApplication.java
package com.example.water;

import lombok.extern.slf4j.Slf4j;
import org.springframework.amqp.core.*;
import org.springframework.boot.SpringApplication;
import org.springframework.boot.autoconfigure.SpringBootApplication;
import org.springframework.context.annotation.Bean;

import javax.annotation.PostConstruct;

@Slf4j
@SpringBootApplication
public class WaterApplication {
    final static String queueName = "hello";

    @Bean
    public Queue helloQueue() {
        return new Queue("hello");
    }

    @Bean
    public Queue userQueue() {
        return new Queue("user");
    }

    //===============以下是验证topic Exchange的队列==========
    @Bean
    public Queue queueMessage() {
        return new Queue("topic.message");
    }

    @Bean
    public Queue queueMessages() {
        return new Queue("topic.messages");
    }
    //===============以上是验证topic Exchange的队列==========


    //===============以下是验证Fanout Exchange的队列==========
    @Bean
    public Queue AMessage() {
        return new Queue("fanout.A");
    }

    @Bean
    public Queue BMessage() {
        return new Queue("fanout.B");
    }

    @Bean
    public Queue CMessage() {
        return new Queue("fanout.C");
    }
    //===============以上是验证Fanout Exchange的队列==========


    @Bean
    TopicExchange exchange() {
        return new TopicExchange("exchange");
    }
    @Bean
    FanoutExchange fanoutExchange() {
        return new FanoutExchange("fanoutExchange");
    }

    /**
     * 将队列topic.message与exchange绑定,binding_key为topic.message,就是完全匹配
     * @param queueMessage
     * @param exchange
     * @return
     */
    @Bean
    Binding bindingExchangeMessage(Queue queueMessage, TopicExchange exchange) {
        return BindingBuilder.bind(queueMessage).to(exchange).with("topic.message");
    }

    /**
     * 将队列topic.messages与exchange绑定,binding_key为topic.#,模糊匹配
     * @param queueMessage
     * @param exchange
     * @return
     */
    @Bean
    Binding bindingExchangeMessages(Queue queueMessages, TopicExchange exchange) {
        return BindingBuilder.bind(queueMessages).to(exchange).with("topic.#");
    }

    @Bean
    Binding bindingExchangeA(Queue AMessage,FanoutExchange fanoutExchange) {
        return BindingBuilder.bind(AMessage).to(fanoutExchange);
    }

    @Bean
    Binding bindingExchangeB(Queue BMessage, FanoutExchange fanoutExchange) {
        return BindingBuilder.bind(BMessage).to(fanoutExchange);
    }

    @Bean
    Binding bindingExchangeC(Queue CMessage, FanoutExchange fanoutExchange) {
        return BindingBuilder.bind(CMessage).to(fanoutExchange);
    }


    @PostConstruct
    private void init(){
        log.info("application started-------");
    }

    public static void main(String[] args) throws Exception {
        SpringApplication.run(WaterApplication.class, args);
    }
}
(main方法以上的是我手动创建mq的,可以不要,只保留main)
5,启动项目:
启动成功以后访问:(像kafka的test_topic里面发送消息)
http://localhost:8088/kafka/send?msg=kafka
可以看到控制台输出
已经被消费。
(用springboot开发以后使用kafka会相对简单的多)

