jQuery笔记
jQuery笔记
一、 jQuery入门
目标:
- 能够说出什么是jQuery
- 能够说出jquery的优点
- 能够简单使用jquery
- 能够说出dom对象和jquery对象的区别
1、jQuery概述
1-1 JavaScript库
仓库:可以把很多东西放到这个库里面。找东西只需要到仓库里面查找就可以了。
JavaScript库:就是library,是一个封装好的特定的集合(方法和函数)。从封装一大堆函数的角度理解库,就是在这个库中,封装了很多预先定义好的函数在里面,比如:动画animate、hide、show,比如获取元素等。
简单理解:就是一个js文件,里面对我们原生js代码进行了封装,存放到里面。这样我们就可以快速高效的使用这些封装好的功能了。
比如jQuery,就是为了快速方便的操作dom,里面基本都是函数(方法)。
常见的JavaScript库:
jQuery、Prototype、YUI、Dojo、Ext JS、移动端的zepto
这些库都是对原生js的封装,内部都是用js实现的,我们主要学习的是jQuery。
1-2 jQuery的概念
jQuery是一个快速、简洁的js库,其设计的宗旨是“write less,do more”,即倡导写更少的代码,做更多的事情。
j就是javascript;Query查询;意思是查询js,把js中的dom操作做了封装,我们可以快速的查询使用里面的功能。
jQuery封装了js常用的功能代码,优化了dom操作、事件处理、动画设计和Ajax交互。
学习 jQuery本质:就是学习调用这些函数(方法)。
jQuery出现的目的就是加快前端人员的开发速度,我们可以非常方便的调用和使用它,从而提高开发效率。
jQuery的优点:
-
轻量级,核心文件才几十kb,不会影响加载速度。
-
跨浏览器兼容,基本兼容了现在主流的浏览器
-
链式编程、隐式迭代
-
对事件、样式、动画支持,大大简化了dom操作
-
支持插件扩展开发,有着丰富的第三方的插件,例如:树形菜单、日期控件、轮播图等
-
免费、开源
2、jQuery的基本使用
2-1 jQuery的下载
官网地址:https://jquery.com
版本:
- 1x:兼容ie678等低版本浏览器,官网不再更新
- 2x:不兼容ie678等低版本浏览器,官网不再更新
- 3x:不兼容ie678等低版本浏览器,是官方主要更新维护的版本
各个版本的下载:http://code.jquery.com
2-2 jQuery的使用步骤
- 引入 jQuery文件
- 使用即可
2-3 jQuery的入口函数
$(function(){
	```//此处是页面dom加载完成的入口
})
//还有一种方法
$(document).ready(function(){
	```//此处是页面dom加载完成的入口
})
- 等着dom结构渲染完毕即可执行内部代码,不必等到所有外部资源加载完成, jQuery帮我们完成了封装。
- 相当于原生js中的DOMContentLoaded。
- 不同于原生js中的load事件是等页面文档、外部的js文件、css文件、图片加载完毕才执行内部代码。
- 更推荐使用第一种方式
<script>
			//1.等着页面dom加载之后再去执行js
			/*$(document).ready(function(){
				$("div").hide();
			})*/
			//2.等着dom加载完毕之后再去执行js 同样的效果  推荐使用这个
			$(function(){
				$("div").hide();
			})
script>
2-4 jQuery的顶级对象$
是 j Q u e r y 的 别 称 , 在 代 码 中 可 以 使 用 j Q u e r y 代 替 是 jQuery的别称,在代码中可以使用 jQuery代替 是jQuery的别称,在代码中可以使用jQuery代替,但一般为了方便,通常都直接使用$.
是 j Q u e r y 的 顶 级 对 象 , 相 当 于 原 生 j s 中 的 w i n d o w 。 把 元 素 利 用 是 jQuery的顶级对象,相当于原生js中的window。把元素利用 是jQuery的顶级对象,相当于原生js中的window。把元素利用包装成 jQuery对象,就可以调用 jQuery的方法。
<body>
		<div>div>
		<script>
			//1.$是jquery的别称
			/*$(function(){
				$("div").hide();
			})*/
			jQuery(function(){
				jQuery("div").hide();
			})
			//这两种写法的效果是相同的,一般我们还是喜欢用$,比较简单
			//2.$也同时是jquery的顶级对象
		script>
body>
2-5 jQuery对象和DOM对象
- 用原生js获取来的对象就是dom对象
- jQuery方法获取的元素就是jQuery对象
- jQuery对象的本质是:利用$对DOM对象包装后产生的对象(伪数组形式存储)。
<html>
	<head>
		<meta charset="UTF-8">
		<title>title>
		<script src="js/jquery.min.js" >script>
		<style>
			div{
				width:200px;
				height:200px;
				background-color: pink;
			}
		style>
	head>
	<body>
		<div>div>
		<span>span>
		<script>
			//dom对象: 用原生js获取过来的对象就是dom对象
			var myDiv=document.querySelector("div");//myDiv就是DOM对象
			var mySpan=document.querySelector("span");//mySpan就是DOM对象
			console.dir(myDiv);
			//jquery对象: 用jqery方式获取过来的就是jquery的对象 本质:通过$把dom元素进行了包裹
			$("div");//$("div")是一个jquery的对象
			$("span");//$("span")是一个jquery的对象
			console.dir($("div"));
			//jquery对象只能使用j的方法,dom对象只能使用原生js的方法和属性
			myDiv.style.display="none";
			//myDiv.hide();报错
			$("span").hide();
			$("span").style.display="none";//报错
		script>
	body>
html>
dom对象与jQuery对象之间是可以相互转换的。
因为原生js比jQuery更大,原生的一些属性和方法jQuery没有给我们封装,要想使用这些属性和方法需要把jQuery对象转换为dom对象才能使用。
-
dom对象转换为jQuery对象:$(DOM对象)
$('div') -
jQuery对象转换为dom对象(两种方式)
$('div')[index]   index是索引号
$('div').get(index)
<html>
	<head>
		<meta charset="UTF-8">
		<title>title>
		<script src="js/jquery.min.js" >script>
		<style>
			div{
				width: 200px;
				height: 200px;
				background-color: pink;
			}
		style>
	head>
	<body>
		<div>div>
		<script>
			//1.用原生js获取dom对象
			//var div=document.querySelector("div");
			//dom对象转化为jquery对象
			/*$(div).hide();
			console.log($(div));*/
			//2.用jQuery方式获取
			$("div");
			//把j转换为dom对象
			$("div")[0].style.backgroundColor="purple";
			$("div").get(0).style.width="500px";
		script>
	body>
html>
二、jQuery常用API
目标:
- 能够写出常用的jQuery选择器
- 能够操作jQuery样式
- 能够写出常用的jQuery动画
- 能够操作jQuery属性
- 能够操作jQuery元素
- 能够操作jQuery元素尺寸、位置
1、jQuery选择器
1-1 jQuery基础选择器
原生js获取元素方式很多,很杂,而且兼容性情况不不一致,因此jQuery给我们做了封装,是获取元素统一标准。
$('选择器')//里面选择器直接写css选择器即可,但是要加引号
| 名称 | 用法 | 描述 |
|---|---|---|
| ID选择器 | $(’#id’) | 获取指定id的元素 |
| 全选选择器 | $("*") | 匹配所有元素 |
| 类选择器 | $(’.class’) | 获取同一类class的元素 |
| 标签选择器 | $(‘div’) | 获取同一类标签的所有元素 |
| 并集选择器 | $(‘div,p,li’) | 选取多个元素 |
| 交集选择器 | $(‘li.current’) | 交集元素 |
1-2 jQuery层级选择器
| 名称 | 用法 | 描述 |
|---|---|---|
| 子代选择器 | $(‘ul>li’) | 使用>号,获取亲儿子层级的元素;注意,并不会获取孙子层级的元素 |
| 后代选择器 | $(‘ul li’) | 使用空格,代表后代选择器,获取ul下的所有li元素,包括孙子等 |
<html>
	<head>
		<meta charset="UTF-8">
		<title>title>
		<script src="js/jquery.min.js" >script>
	head>
	<body>
		<div id="head">我是divdiv>
		<div class="nav">我是nav divdiv>
		<p>我是pp>
		<ol>
			<li>我是ol的li>
			<li>我是ol的li>
			<li>我是ol的li>
			<li>我是ol的li>
		ol>
		<ul>
			<li>我是ul的li>
			<li>我是ul的li>
			<li>我是ul的li>
			<li>我是ul的li>
		ul>
		<script>
			$(function(){
				//选取class为nav的div
				$(".nav");
				console.log($(".nav"));
				//获取id为head的div
				$("#head");
				console.log($("#head"))
				//获取p标签
				$("p");
				//获取ul下所有的li
				console.log($("ul li"))
			})

		script>
	body>
html>
1-3隐式迭代(重要)
jQuery设置样式
$("div").css("属性","值")
遍历内部dom元素(伪数组形式存储)的过程就叫做隐式迭代。
简单理解:给匹配到的所有元素进行循环遍历,执行相应的方法,而不用我们再进行循环,简化我们的操作,方便我们调用。
<body>
		<div>惊喜不,意外不div>
		<div>惊喜不,意外不div>
		<div>惊喜不,意外不div>
		<div>惊喜不,意外不div>
		<ul>
			<li>相同的操作li>
			<li>相同的操作li>
			<li>相同的操作li>
			<li>相同的操作li>
		ul>
		<script>
			$(function(){
				//1.获取4个div元素
				console.log($("div"))
				//2.给4个div的背景颜色设置成粉色
				$("div").css("background","pink");
				$("ul li").css("color","red");
				//3.隐式迭代就是把匹配的所有元素内部进行遍历循环,给每一个元素添加css这个方法
			})
		script>
body>
1-4 筛选选择器
| 语法 | 用法 | 描述 |
|---|---|---|
| :first | $(“li:first”) | 获取第一个li元素 |
| :last | $(“li:last”) | 获取最后一个li元素 |
| :eq(index) | $(“li:eq(2)”) | 获取到的li元素中,选择索引号为2的元素,索引号index从0开始 |
| :odd | $(“li:odd”) | 获取到的li元素中,选择索引号为奇数的元素 |
| :even | $(“li:even”) | 获取到的li元素中,选择索引号为偶数 |
<html>
	<head>
		<meta charset="UTF-8">
		<title>title>
		<script src="js/jquery.min.js">script>
	head>
	<body>
		<ul>
			<li>今天天气太冷了吧li>
			<li>今天天气太冷了吧li>
			<li>今天天气太冷了吧li>
			<li>今天天气太冷了吧li>
			<li>今天天气太冷了吧li>
			<li>今天天气太冷了吧li>
		ul>
		<ol>
			<li>今天天气太冷了吧li>
			<li>今天天气太冷了吧li>
			<li>今天天气太冷了吧li>
			<li>今天天气太冷了吧li>
			<li>今天天气太冷了吧li>
			<li>今天天气太冷了吧li>
		ol>
		<script>
			$(function(){
				//选取的第一个元素
				$("ul li:first").css("color","red");
				//选取最后一个元素
				$("ul li:last").css("color","burlywood");
				//选取第四个元素,索引号从0开始,所以索引号3是元素的第四个元素
				$("ul li:eq(3)").css("font-size","20px");
				//给ol的奇数元素添加样式 索引号为 1,3,5
				$("ol li:odd").css("color","pink")
				//给ol的偶数元素添加样式 索引号为 0,2,4
				$("ol li:even").css("color","blue")
			})
		script>
	body>
html>
1-5 jQuery筛选方法(重点)
重点记住这几个方法:parent()、children()、find()、siblings()、eq()
| 语法 | 用法 | 说明 |
|---|---|---|
| parent() | $(“li”).parent() | 查找父级 |
| children(selector) | $(“ul”).children(“li”) | 相当于$(“ul>li”),最近一级(亲儿子) |
| find(selector) | $(“ul”).find(“li”) | 相当于$(“ul li”),后代选择器 |
| siblings(selector) | $(".first").siblings(“li”) | 查找兄弟节点,不包括自己本身 |
| nextAll([expr]) | $(".first").nextAll() | 查找当前元素之后所有的同辈元素 |
| prevtAll([expr]) | $(".first").prevtAll() | 查找当前元素之前所有的同辈元素 |
| hasClass(class) | $(“div”.hasClass(‘protected’) | 检查当前元素是否含有某个特定的类,如果有,则返回true |
| eq(index) | $(“li”).eq(2) | 相当于$(“li:eq(2)”),index从0开始 |
<html>
	<head>
		<meta charset="UTF-8">
		<title>title>
		<script src="js/jquery.min.js" >script>
	head>
	<body>
		<div class="head">
			<div class="father">
				<div class="son">div>
			div>
		div>

		<div class="nav">
			<p>我是pp>
			<div>
				<p>我是div的pp>
			div>
		div>
		<script>
			$(function(){
				//1.获取父亲元素parent() 获取的是最近的父元素,就是亲爸爸
				console.log($(".son").parent());
				//2.获取子元素
				//(1)选取亲儿子 chilren(),代表的是亲儿子,相当于ul>li 子代选择器
				$(".nav").children("p").css("color","red");
				//(2)find()选取所有的孩子和孙子  相当于后代选择器ul li
				$(".nav").find("p").css("background","blue");
			})
		script>
	body>
html>
<html>
	<head>
		<meta charset="UTF-8">
		<title>title>
		<script type="text/javascript" src="js/jquery.min.js" >script>
		<style>
			.current{
				background-color: red;
			}
		style>
	head>
	<body>
		<ol>
			<li>我是ol的li>
			<li>我是ol的li>
			<li class="item">我是ol的li>
			<li>我是ol的li>
			<li>我是ol的li>
			<li>我是ol的li>
		ol>
		<ul>
			<li>我是ul的li>
			<li>我是ul的li>
			<li>我是ul的2li>
			<li>我是ul的li>
			<li>我是ul的li>
			<li>我是ul的li>
		ul>
		<div class="current">我有current类名div>
		<div>我没有类名div>
		<script>
			$(function(){
				//1.兄弟元素siblings()  除了自身以外的所有亲兄弟
				//$("ol .item").siblings("li").css("color","pink")
				//2.prevAll()当前元素之前的同辈元素
				$("ol .item").prevAll().css("color","pink");
				//3.nextAll() 当前元素之后的同辈元素
				$("ol .item").nextAll().css("color","blue");
				//4.第几个元素
				//利用选择器
				//$("ul li:eq(2)").css("color","pink")
				//利用选择选择方法   更推荐这个方法
				$("ul li").eq(2).css("color","pink")
				//5.判断是否有类名
				console.log($("div:first").hasClass("current"));//true
				console.log($("div").eq(1).hasClass("current"));//false
			})
		script>
	body>
html>
<html>
	<head>
		<meta charset="UTF-8">
		<title>title>
		<script type="text/javascript" src="js/jquery.min.js" >script>
		<style>
			ul,li,a{
				padding:0;
				margin:0;
			}
			li{
				list-style: none;
			}
			a{
				text-decoration: none;
			}
			.nav{
				width:500px;
				height:30px;
				margin:100px auto;
			}
			.list{
				float: left;
				position: relative;
			}
			.list a{
				display: block;
				width:70px;
				height:30px;
				line-height: 30px;
				text-align: center;
				color:#4c4c4c;
				font-weight: 400;
				font-size:14px;

			}
			.list a:hover{
				background-color: #ccc;

			}
			.itme{
				position: absolute;
				left:0;
				top: 30px;
				display: none;
			}
			.itme li{
				border:1px solid orange;
				border-top:none;
			}
			.itme li a{
				background-color: #fff;
			}
			.itme li a:hover{
				background-color: orange;
				color:#fff;
			}
		style>
	head>
	<body>
		<ul class="nav">
			<li class="list">
				<a href="#">微博a>
				<ul class="itme">
					<li><a href="#">私信a>li>
					<li><a href="#">评论a>li>
					<li><a href="#">@我a>li>
				ul>
			li>
			<li class="list">
				<a href="#">博客a>
				<ul class="itme">
					<li><a href="#">博客评论a>li>
					<li><a href="#">未读提醒a>li>
				ul>
			li>
			<li class="list">
				<a href="#">邮箱a>
				<ul class="itme">
					<li><a href="#">免费邮箱a>li>
					<li><a href="#">企业邮箱a>li>
					<li><a href="#">vip邮箱a>li>
					<li><a href="#">新浪邮箱a>li>
				ul>
			li>
			<li class="list">
				<a href="#">网站导航a>
			li>
		ul>
		<script>
			$(function(){
				$(".nav>li").mouseover(function(){
					//$(this)当前元素  this不加引号
					$(this).children("ul").show()
				})
				$(".nav .list").mouseout(function(){
					$(this).children("ul").hide()
				})
			})
		script>
	body>
html>
1-6 jQuery里面的排他思想
想要多选一的效果,排他思想:当前元都设置样式,其他的兄弟元素清除样式。
<html>
	<head>
		<meta charset="UTF-8">
		<title>title>
		<script src="jquery.min.js" >script>
	head>
	<body>
		<button>点击button>
		<button>点击button>
		<button>点击button>
		<button>点击button>
		<button>点击button>
		<button>点击button>
		<button>点击button>
		<script>
			$(function(){
				//运用隐式迭代 给所有的按钮绑定事件
				$("button").click(function(){
					//当前的元素变换背景颜色
					$(this).css("background","red");
					//其他的元素的背景元素不变
					$(this).siblings("button").css("background","")
				})
			})
		script>
	body>
html>
<html>

<head lang="en">
    <meta charset="UTF-8">
    <title>title>
    <script src="js/jquery.min.js" >script>
    <style type="text/css">
        * {
            margin: 0;
            padding: 0;
            font-size: 12px;
        }

        ul {
            list-style: none;
        }

        a {
            text-decoration: none;
        }

        .wrapper {
            width: 250px;
            height: 248px;
            margin: 100px auto 0;
            border: 1px solid pink;
            border-right: 0;
            overflow: hidden;
        }

        #left,
        #content {
            float: left;
        }
        #left li a {
            display: block;
            width: 48px;
            height: 27px;
            border-bottom: 1px solid pink;
            line-height: 27px;
            text-align: center;
            color: black;
        }
        #left li a:hover{
        	background-color: red;
        }
        #content {
            border-left: 1px solid pink;
            border-right: 1px solid pink;
        }
    style>
    <script>
        $(function() {
            // 1. 鼠标经过左侧的小li
            $("#left li").mouseover(function() {
                // 2. 得到当前小li 的索引号
                var index = $(this).index();
                console.log(index);
                // 3. 让我们右侧的盒子相应索引号的图片显示出来就好了
                // $("#content div").eq(index).show();
                // 4. 让其余的图片(就是其他的兄弟)隐藏起来
                // $("#content div").eq(index).siblings().hide();
                // 链式编程
                $("#content div").eq(index).show().siblings().hide();

            })
        })
    script>
head>

<body>
    <div class="wrapper">
        <ul id="left">
            <li><a href="#">女靴a>li>
            <li><a href="#">雪地靴a>li>
            <li><a href="#">冬裙a>li>
            <li><a href="#">呢大衣a>li>
            <li><a href="#">毛衣a>li>
            <li><a href="#">棉服a>li>
            <li><a href="#">女裤a>li>
            <li><a href="#">羽绒服a>li>
            <li><a href="#">牛仔裤a>li>
        ul>
        <div id="content">
            <div>
                <a href="#"><img src="img/冬靴.png" width="200" height="250" />a>
            div>
            <div>
                <a href="#"><img src="img/雪地靴.png" width="200" height="250" />a>
            div>
            <div>
                <a href="#"><img src="img/冬裙.png" width="200" height="250" />a>
            div>
            <div>
                <a href="#"><img src="img/毛呢大衣.png" width="200" height="250" />a>
            div>
            <div>
                <a href="#"><img src="img/毛衣.png" width="200" height="250" />a>
            div>
            <div>
                <a href="#"><img src="img/棉服.png" width="200" height="250" />a>
            div>
            <div>
                <a href="#"><img src="img/女裤.png" width="200" height="250" />a>
            div>
            <div>
                <a href="#"><img src="img/羽绒服.png" width="200" height="250" />a>
            div>
            <div>
                <a href="#"><img src="img/牛仔裤.png" width="200" height="250" />a>
            div>
        div>
    div>
body>

html>
1-7 链式编程
链式编程是为了节省代码量,看起来更优雅。
$(this).css('color','red').sibling().css('color','');
使用链式编程一定注意是哪个对象执行样式
<body>
		<button>点击button>
		<button>点击button>
		<button>点击button>
		<button>点击button>
		<button>点击button>
		<button>点击button>
		<button>点击button>
		<script>
			$(function(){
				$("button").click(function(){
					//让当前的元素变色
					/*$(this).css("background","pink");
					//让其他的兄弟不变色
					$(this).siblings().css("background","");*/
					//链式编程
					$(this).css("color","pink").siblings().css("color","");
					//这句话的意思是:当前的元素变颜色,其他的兄弟不变颜色
				})
			})
		script>
body>
2、jQuery样式操作
2-1 操作css方法
jQuery可以使用css方法来修改简单元素样式;也可以操作类,修改多个样式。
-
参数只写属性名,则是返回属性值
$(this).css(‘color’); -
参数是属性名,属性值,逗号分隔,是设置一组样式,属性必须加引号,只如果是数字可以不加引号和单位。
$(this).css('color','red') -
参数可以是对象形式,方便设置多组样式。属性名和属性值使用冒号隔开,属性可以不用加引号
$(this).css({
	'color':'red',
	'font-size':'20px'
})
<html>
	<head>
		<meta charset="UTF-8">
		<title>title>
		<script src="js/jquery.min.js">script>
		<style>
			div{
				width:200px;
				height:200px;
				background-color: pink;
			}
			p{
				width:100px;
				height:100px;
				background-color: blue;
				color:red;
			}
		style>
	head>
	<body>
		<div>1243div>
		<p>我是pp>
		<script>
			$(function(){

				//参数只写属性名,则返回属性值
				$("div").css("width");
				console.log($("div").css("width"));//200px
				//$("div").css("width","300px")
				//$("div").css("width",300);//属性名一定要加引号,属性值如果是数字的话可以不加引号
				$("div").css({
					"width": 300,
					"height":300,
					"font-size":"30px",
					"background-color": "blue"//属性名如果加了引号,可以不用驼峰命名法
					//backgroundColor:"red"
					//属性名可以不加引号,但是复合属性需要用驼峰命名法,属性值不是数字需要加引号,
				})
				$("p").css({
					width:"500px",
					height:"400px",
					backgroundColor:"purple",
					fontSize:"30px",
					color:"#fff"
				})
			})
		script>
	body>
html>
2-2 设置类样式方法
作用等同于以前的classList,可以操作类样式,注意操作类里面的参数不要加点。
1.添加类
$("div).addClass('current');
2.移动类
$('div').removeClass('current')
3.切换类
$('div').toggleClass('current')
<html>
	<head>
		<meta charset="UTF-8">
		<title>title>
		<script src="js/jquery.min.js" >script>
		<style>
			div{
				width:150px;
				height:150px;
				background-color: pink;
				margin:100px auto;
				transition: all 0.5s;
			}
			.current{
				background-color: red;
				transform: rotate(360deg);
			}
		style>
	head>
	<body>
		<div class="current">div>
		<script>
			$(function(){
				$("div").click(function(){
					//1.添加类 addClass()
					//$(this).addClass("current");
					//2.删除类removeClass()
					//$(this).removeClass("current");
					//3.切换类 toggleClass()
					$(this).toggleClass("current")
				})
			})
		script>
	body>
html>
tab栏切换案例
<html>
	<head>
		<meta charset="UTF-8">
		<title>title>
		<script src="js/jquery.min.js">script>
		<style>
			ul,li{
				padding:0;
				margin:0;
			}
			.tab{
				width:988px;
				margin:100px auto;
			}

			ul{
				width:988px;
				height:40px;
				background-color: gainsboro;
				border:1px solid #ccc;
			}

			li{
				height:40px;
				list-style: none;
				float: left;
				padding:0 10px;
				line-height: 40px;
				cursor: pointer;
			}
			.tab_list .current{
				background-color: red;
				color:#fff;
			}
			.tab_con{
				padding-top:1px;
			}
			.item{
				display: none;
			}
		style>
	head>
	<body>
		<div class="tab">
			<div class="tab_list">
				<ul>
					<li class="current">商品介绍li>
					<li>规格与包装li>
					<li>售后保障li>
					<li>商品评价(5000)li>
					<li>手机社区li>
				ul>
			div>
			<div class="tab_con">
				<div class="item" style="display: block;">
					商品介绍模块
				div>
				<div class="item">
					规格与包装模块
				div>
				<div class="item">
					售后保障模块
				div>
				<div class="item">
					商品评价(5000)模块
				div>
				<div class="item">
					手机社区模块
				div>
			div>
		div>
		<script>
			$(function(){
				//链式编程
				$(".tab_list li").click(function(){
					//点击上面的li,当前的li添加current类,其余的li移除类名。
					$(this).addClass("current").siblings().removeClass("current");
					//点击的同时,得到当前的li的索引号
					var index=$(this).index();
					//让下部里卖弄相应的索引号的item显示,其余的item隐藏
					$(".tab_con div").eq(index).show().siblings().hide()
				})
			})
		script>
	body>
html>
2-3 类操作与className区别
原生js中className会覆盖元素原先里面的类名。
jquery里面类操作只是对指定类进行操作(追加或删除),不影响原先的类名。
<body>
		<div class="one">div>
		<script>
			$("div").addClass("two");//one two
			$("div").removeClass("one");//one
		script>
body>
3、jQuery效果
jQuery给我们封装了很多动画效果,最常见的如下:
显示与隐藏: show() hide() toggle()
滑动: slideDown() slideUp() slideToggle()
淡入淡出:fadeIn() fadeOut() fadeToggle() fadeTo()
自定义动画:animate()
3-1 显示隐藏效果
显示语法:
-
显示语法规范
show(speed,easeing,fn) -
显示参数
- 参数都可以省略,无动画直接显示
- speed:三种预定速度之一的字符串(‘show’,‘normal’,or’fast’)或表示动画时长的毫秒数值(如:1000)。
- easeing:用来指定切换效果,默认是‘swing’,可用参数‘liear’
- fn:回调函数,在动画完成时执行的函数,每个元素执行一次。
隐藏语法:
隐藏语法规范
hide(speed,easeing,fn) 参数如上
切换效果语法:
toggle(speed,easeing,fn);
//参数和以上一样
<html>
	<head>
		<meta charset="UTF-8">
		<title>title>
		<script src="js/jquery.min.js">script>
		<style>
			div{
				width:138px;
				height:300px;
				background-color: pink;
				display: none;
			}
		style>
	head>
	<body>
		<button>显示button>
		<button>隐藏button>
		<button>切换button>
		<div>div>
		<script>
			$(function(){
				$("button").eq(0).click(function(){
					$("div").show(1000);
				})
				$("button").eq(1).click(function(){
					$("div").hide(1000);
				})
				$("button").eq(2).click(function(){
					$("div").toggle(1000);
				})
			})
			//一般情况下,我们不加参数,直接使用
		script>
	body>
html>
3-2 滑动效果
- 下滑效果语法规范 slideDown(speed,easeing,fn)
- 上滑效果语法规范 slideUp(speed,easeing,fn)
- 滑动切换效果 slideToggle((speed,easeing,fn)
参数都可以省略,无动画直接显示
speed:三种预定速度之一的字符串(‘show’,‘normal’,or’fast’)或表示动画时长的毫秒数值(如:1000)。
easeing:用来指定切换效果,默认是‘swing’,可用参数‘liear’
fn:回调函数,在动画完成时执行的函数,每个元素执行一次
<html>
	<head>
		<meta charset="UTF-8">
		<title>title>
		<script src="js/jquery.min.js">script>
		<style>
			div{
				width:138px;
				height:300px;
				background-color: pink;
				display: none;
			}
		style>
	head>
	<body>
		<button>下拉滑动button>
		<button>上拉滑动button>
		<button>切换滑动button>
		<div>div>
		<script>
			$(function(){
				$("button").eq(0).click(function(){
					//下滑动slideDown()
					$("div").slideDown()
				})
				$("button").eq(1).click(function(){
					//上滑动slideUp()
					$("div").slideUp()
				})
				$("button").eq(2).click(function(){
					//滑动切换 slideToggle()
					$("div").slideToggle()
				})
			})

		script>
	body>
html>
3-3 事件切换
hover(over,out)
- over:鼠标移到元素上要触发的函数(相当于mouseenter)
- out:鼠标移除元素要触发的函数(相当于mouseleave)
//新浪下拉菜单案例,详细的案例在上面的内容中,以下只是script的部分
		<script>
			$(function(){
				/*$(".nav>li").mouseover(function(){
					//$(this)当前元素  this不加引号
					$(this).children("ul").slideDown();
				})
				$(".nav>li").mouseout(function(){
					$(this).children("ul").slideUp()
				})*/
				//时间切换 hover 就是鼠标经过和离开的复合写法
				/*$(".nav>li").hover(function(){
					$(this).children("ul").slideDown(200);
				},function(){
					$(this).children("ul").slideUp(200)
				})*/
				//事件切换 hover 如果只写一个函数,那么鼠标经过和鼠标离开都会触发
				$(".nav>li").hover(function(){
					$(this).children("ul").slideToggle(200)
				})
			})
	script>
3-4 动画列队及其停止排队方法
-
动画或效果列队
动画或者效果一旦触发就会执行,如果多次触发,就造成多个动画或者效果排队执行。
-
停止排队 stop()
stop()方法用于停止动画或效果。
注意:stop()写到动画或者效果的前面,相当于停止结束上一次的动画。
//以上面的案例为例
$(".nav>li").hover(function(){
	$(this).children("ul").stop().slideToggle(200)
})
3-5 淡出淡入效果
1.淡出效果:fadeOut(speed,easeing,fn)
2.淡入效果:fadeIn(speed,easeing,fn)
3.淡入淡出切换效果:fadeToggle(speed,easeing,fn)
注意:括号里面的参数都是相同的
-
参数都可以省略,无动画直接显示
-
speed:三种预定速度之一的字符串(‘show’,‘normal’,or’fast’)或表示动画时长的毫秒数值(如:1000)。
-
easeing:用来指定切换效果,默认是‘swing’,可用参数‘liear’
-
fn:回调函数,在动画完成时执行的函数,每个元素执行一次
4.渐进方式调整到指定的不透明度:fadeTo(speed,opacity,easeing,fn)
注意:
- opacity透明度必须写,取值0-1之间。
- speed:三种预定速度之一的字符串(‘show’,‘normal’,or’fast’)或表示动画时长的毫秒数值(如:1000),必须要写。
- easeing:用来指定切换效果,默认是‘swing’,可用参数‘liear’
- fn:回调函数,在动画完成时执行的函数,每个元素执行一次
<html>
	<head>
		<meta charset="UTF-8">
		<title>title>
		<script src="js/jquery.min.js">script>
		<style>
			div{
				width:200px;
				height:300px;
				background-color: pink;
				display:none;
			}
		style>
	head>
	<body>
		<button>淡入效果button>
		<button>淡出效果button>
		<button>淡入淡出效果button>
		<button>修改透明度button>
		<div>div>
		<script>
			$(function(){
				//淡入效果fadeIn()
				$("button").eq(0).click(function(){
					$("div").fadeIn(1000);
				})
				//淡出效果fadeOut()
				$("button").eq(1).click(function(){
					$("div").fadeOut(1000);
				})
				//淡入淡出效果fadeToggle()
				$("button").eq(2).click(function(){
					$("div").fadeToggle(1000);
				})
				//修改透明度fadeTo(),时间和速度必须要写
				$("button").eq(3).click(function(){
					$("div").fadeTo(1000,0.5);
				})
			})
		script>
	body>
html>
<html>
	<head>
		<meta charset="UTF-8">
		<title>title>
		<script src="js/jquery.min.js">script>
		<style>
			*{
				padding:0;
				margin:0;
			}
			li{
				list-style: none;
			}
			ul{
				padding:4px;
				width:612px;
				height:308px;
				margin:100px auto;
				background-color: #000;
			}
			ul li{
				width:200px;
				height:150px;
				float: left;
				margin:2px;
			}
			ul img{
				width:200px;
				height:150px;

			}
		style>
	head>
	<body>
		<div class="wrap">
			<ul>
				<li><img src="img/冬裙.png"/>li>
				<li><img src="img/冬靴.png"/>li>
				<li><img src="img/雪地靴.png"/>li>
				<li><img src="img/羽绒服.png"/>li>
				<li><img src="img/女裤.png"/>li>
				<li><img src="img/棉服.png"/>li>
			ul>
		div>
		<script>
			$(function(){
				$("ul li").hover(function(){
					//鼠标移入的时候,其他的li的透明度为0.5
					$(this).siblings().stop().fadeTo(400,0.5)
				},function(){
					//鼠标移出的时候,其他的li的透明度为1
					$(this).siblings().stop().fadeTo(400,1)
				})
			})
		script>
	body>
html>
3-6 自定义动画animate
语法:animate(params,[speed],[easing],[fn])
参数:
- params:想要更改的样式属性,以对象形式传递,必须要。属性名可以不用带引号,如果是复合属性则需要采用驼峰命名法borderleft。其余参数可以省略。
- speed:三种预定速度之一的字符串(‘show’,‘normal’,or’fast’)或表示动画时长的毫秒数值(如:1000),必须要写。
- easeing:用来指定切换效果,默认是‘swing’,可用参数‘liear’
- fn:回调函数,在动画完成时执行的函数,每个元素执行一次
<html>
	<head>
		<meta charset="UTF-8">
		<title>title>
		<script src="js/jquery.min.js" >script>
		<style>
			div{
				position: absolute;
				width:200px;
				height:200px;
				background-color: pink;
			}
		style>
	head>
	<body>
		<button>动起来button>
		<div>div>
		<script>
			$("button").click(function(){
				$("div").animate({
					left:500,
					top:300,
					width:500,
					opacity:0.3
				},500)
			})
		script>
	body>
html>
- 鼠标经过某个小li有两步操作
- 当前小li宽度变为224px,同时里面的小图片淡出,大图片淡入
- 其余兄弟小li宽度变为69px,小图片淡入,大图片淡出
<html>
	<head>
		<meta charset="UTF-8">
		<title>title>
		<script src="js/jquery.min.js" >script>
		<style type="text/css">
	        * {
	            margin: 0;
	            padding: 0;
	        }

	        img {
	        	display: block;
	        }

	        ul {
	            list-style: none;
	        }

	        .king {
	            width: 852px;
	            margin: 100px auto;
	            background: pink;
	            overflow: hidden;
	            padding: 10px;
	        }

	        .king ul {
	            overflow: hidden;
	        }

	        .king li {
	            position: relative;
	            float: left;
	            width: 69px;
	            height: 69px;
	            margin-right: 10px;
	        }

	        .king li.current {
	            width: 224px;
	        }

	        .king li.current .big {
	            display: block;
	        }

	        .king li.current .small {
	            display: none;
	        }

	        .big {
	            width: 224px;
	            display: none;
	        }

	        .small {
	            position: absolute;
	            top: 0;
	            left: 0;
	            width: 69px;
	            height: 69px;
	            border-radius: 5px;
	        }
    style>
	head>
	<body>
		<div class="king">
			<ul>
				<li class="current">
					<a href="#">
						<img src="img/a1.png" class="small"/>
						<img src="img/a2.png" class="big"/>
					a>
				li>
				<li>
					<a href="#">
						<img src="img/b1.png" class="small"/>
						<img src="img/b2.png" class="big"/>
					a>
				li>
				<li>
					<a href="#">
						<img src="img/c1.png" class="small"/>
						<img src="img/c2.png" class="big"/>
					a>
				li>
				<li>
					<a href="#">
						<img src="img/d1.png" class="small"/>
						<img src="img/d2.png" class="big"/>
					a>
				li>
				<li>
					<a href="#">
						<img src="img/e1.png" class="small"/>
						<img src="img/e2.png" class="big"/>
					a>
				li>
				<li>
					<a href="#">
						<img src="img/f1.png" class="small"/>
						<img src="img/f2.png" class="big"/>
					a>
				li>
				<li>
					<a href="#">
						<img src="img/g1.png" class="small"/>
						<img src="img/g2.png" class="big"/>
					a>
				li>
			ul>
		div>
		<script>
			$(function(){
				$(".king li").mouseenter(function(){
					$(this).stop().animate({
						width:224
					}).find(".small").stop().fadeOut().siblings(".big").stop().fadeIn();
					$(this).siblings("li").stop().animate({
						width:69
					}).find(".small").stop().fadeIn().siblings(".big").stop().fadeOut();
				})
			})
		script>
	body>
html>
4、jQuery属性操作
4-1 设置或获取元素固有属性值 prop()
所谓元素固有属性就是元素本身自带的属性,比如元素里面的href,比如input里面的type。
- 获取属性语法 prop(“属性”)
- 设置属性语法 prop(“属性”,“属性值”)
4-2 设置或获取元素自定义属性值 attr()
用户自己给元素添加的属性,我们成为自定义属性。比如div添加index=“1”
- 获取属性语法 attr(“属性”) //类似原生getAttribute()
- 设置属性语法 attr(“属性”,“属性值”) //类似原生setAttribute()
该方法也可以获取h5自定义属性
4-3 数据缓存 data()
data()方法可以在指定的元素上存取数据,并不会修改dom元素结构。一旦页面刷新,之前存放的数据都将被移除。
- 附加数据语法 data(“name”,“value”) //向被选元素附加数据
- 获取数据语法 data(“name”) //向被选元素获取数据
同时,还可以读取html5自定义属性data-index,得到的是数字型。
<html>
	<head>
		<meta charset="UTF-8">
		<title>title>
		<script src="js/jquery.min.js" >script>
	head>
	<body>
		<a href="http://www.baidu.com" title="你好">都挺好a>
		<input type="checkbox" checked/>
		<div data-index="1">我是divdiv>
		<span>123span>
		<script>
			$(function(){
				//1.element.pro("属性名"),获取固有的属性方法
				console.log($("a").prop("href"));
				console.log($("a").prop("title"));
				//设置属性
				//$("a").prop("title","都挺好");
				$("input").change(function(){
					console.log($(this).prop("checked"))
				})
				//2.获取自定义的属性  attr()
				console.log($("div").attr("data-index"));
				$("div").attr("index",4)
				//3.数据缓存data() 这里面的数据是存放在元素的内存里面
				$("span").data("uname","andy");
				console.log($("span").data("uname"));
				//这个方法和data-index h5自定义属性 第一个 不用写data- 而且返回的是数字型
				console.log($("div").data("index"));
			})
		script>
	body>
html>
5、jQuery文本属性值
主要针对元素的内容还有表单的值操作。
-
普通元素内容html() (相当于原生的innerHTML)
html()//获取元素的内容 html("内容")//设置元素的内容 -
普通元素文本内容text() (相当于与原生innerText)
text() //获取元素的文本内容 text("文本内容) //设置元素的文本内容 -
表单的值 val() (相当于原生value)
<html>
<head>
<meta charset="UTF-8">
<title>title>
<script src="js/jquery.min.js">script>
head>
<body>
<div>
<span>我是内容span>
div>
<input type="text" value="请输入内容">
<script>
$(function(){
//获取设置元素内容 html()
console.log($("div").html());
/*$("div").html("123
")*/
//获取设置元素文本内容 text()
console.log($("div").text());
$("div").text("123")
//获取设置表单值 val()
console.log($("input").val());
$("input").val("123");
})
script>
body>
html>
追加知识点:返回祖先元素方法 parents()
<html>
	<head>
		<meta charset="UTF-8">
		<title>title>
		<script src="js/jquery.min.js">script>
	head>
	<body>
		<div class="one">
			<div class="two">
				<div class="three">
					<div class="four">
						我不容易
					div>
				div>
			div>
		div>
		<script>
			var one=$(".four").parent().parent().parent();
			//利用parents()查找上级
			var one=$(".four").parents();//parents()括号里为空返回的是他所有的上级
			//parents(选择器)是查找的某一个上级
			var one=$(".four").parents(".one");
			console.log(one);
		script>
	body>
html>
6、jQuery元素操作
主要是遍历、创建、添加、删除元素操作。
6-1 遍历元素
jquery隐式迭代是对同一类元素做了同样的操作。如果想要给同一类元素做不同操作,就需要用到遍历。
语法1:
$("div).each(function(index,domEle){...})
1.each()方法遍历匹配的每一个元素。主要用dom处理。each每一个
2.里面的回调函数有2个参数:index是每个元素的索引号;domele是每个dom元素对象,不是jquery对象。
3.所以要想使用jquery方法,需要给这个dom元素转换为juqery对象 $(domEle)
语法2:
$.each(object,function(index,element){....})
1.$.each()方法可用于遍历任何对象。主要用于数据处理,比如数组,对象
2.里面的函数有2个参数:index是每个元素的索引号;element遍历内容
这两个语法的代码验证
<html>
	<head>
		<meta charset="UTF-8">
		<title>title>
		<script src="js/jquery.min.js">script>
	head>
	<body>
		<div>1div>
		<div>2div>
		<div>3div>
		<script>
			$(function(){
				var sum=0;
				//$("div").css("color","pink");
				//如果针对于同一类元素做不同的操作,需要用到遍历元素(类似for,但是比for更强大)
				var arr=["pink","red","blue"]
				//1.each()方法
				$("div").each(function(index,domEle){
					//回调函数第一个参数一定是索引号,可以自己指定索引号名称
					/*console.log(index);
					 * 回调函数第二个参数一定是dom元素对象,要使用jueqry方法要转换成jquery对象
					console.log(domEle);*/
					$(domEle).css("color",arr[index]);
					sum=sum+parseInt($(domEle).text());
				})
				console.log(sum);
				//2.$.each()方法遍历元素,主要用于遍历数据,处理数据
				/*$.each($("div"),function(i,ele){
					console.log(i);
					console.log(ele);
				})*/
				/*$.each(arr,function(i,ele){
					console.log(i);
					console.log(ele);
				})*/
				$.each({
					name:"andy",
					age:18
				},function(i,ele){
					console.log(i);//输出的是name age属性名
					console.log(ele);//输出的是andy 18属性值
				})
			})

		script>
	body>
html>
6-2 创建元素
语法:$('
')
动态的创建了一个li
6-3 添加元素
内部添加
-
element.append(“内容”)
把内容放入匹配元素内部最后面,类似原生appendChild。
-
element.prepend(“内容”)
把内容放入匹配元素内部最前面,类似原生insertBefore。
外部添加
element.after("内容");//把内容放入目标元素后面
element.before("内容");//把内容放入目标元素前面
注意:内部添加元素,生成之后,他们是父子关系;外部添加元素,生成之后,他们是兄弟关系。
6-4 删除元素
element.remove();//删除匹配的元素(本身)
element.empty();//删除匹配的元素集合中所有的子节点
element.html("");//清空匹配的元素内容
创建、添加、删除知识的代码验证
<html>
<head>
<meta charset="UTF-8">
<title>title>
<script type="text/javascript" src="js/jquery.min.js" >script>
head>
<body>
<ul>
<li>原来的lili>
ul>
<div class="text">我是原来的divdiv>
<script>
$(function(){
//1.创建元素
var li=$("我是后来创建的li ")
//2.添加元素
//(1)内部添加
//$("ul").append(li);//element.append()是内部添加并且追加到内容的最后面
$("ul").prepend(li)//element.prepend()是内部添加到内容的最前面
//(2)外部添加
var div=$("我是后来添加的div");
//$(".text").after(div);//after()在指定的元素后面添加元素
$(".text").before(div);//before()在指定的元素前面添加元素
//删除元素
//$("ul").remove();//删除元素本身
$("ul").empty();//删除元素的所有子节点
$("ul").html("");//删除该元素的所有内容
})
script>
body>
html>
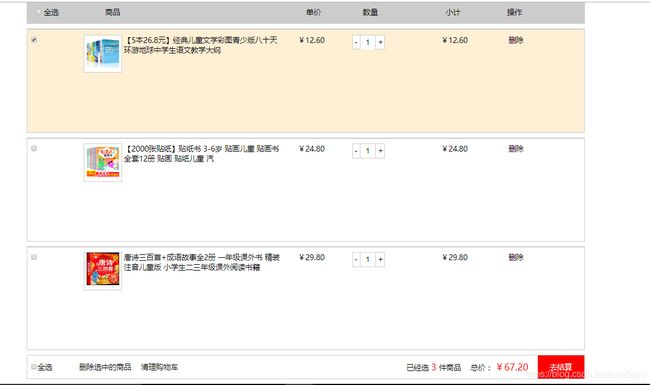
6-5 购物车综合案例
知识点包括:属性操作、文本属性、元素操作等
<head>
    <meta charset="UTF-8">
    <title>我的购物车-品优购title>

    <link rel="stylesheet" href="index.css">

    <script src="../js/jquery.min.js">script>

    <script src="index.js">script>
head>
<body>
    <div class="c-container">
        <div class="w">
            <div class="cart-filter-bar">
                <em>全部商品em>
            div>

            <div class="cart-warp">

                <div class="cart-thead">
                    <div class="t-checkbox" >
                        <input type="checkbox" name="" id="" class="checkall"> 全选
                    div>
                    <div class="t-goods" >商品div>
                    <div class="t-price" >单价div>
                    <div class="t-num">数量div>
                    <div class="t-sum" >小计div>
                    <div class="t-action">操作div>
                div>

                <div class="cart-item-list">
                    <div class="cart-item check-cart-item">
                        <div class="p-checkbox">
                            <input type="checkbox" name="" id="" checked class="j-checkbox">
                        div>
                        <div class="p-goods">
                            <div class="p-img">
                                <img src="img/p1.png" alt="">
                            div>
                            <div class="p-msg">【5本26.8元】经典儿童文学彩图青少版八十天环游地球中学生							语文教学大纲
                            div>
                        div>
                        <div class="p-price">¥12.60div>
                        <div class="p-num">
                            <div class="quantity-form">
                                <a href="javascript:;" class="decrement">-a>
                                <input type="text" class="itxt" value="1">
                                <a href="javascript:;" class="increment">+a>
                            div>
                        div>
                        <div class="p-sum">¥12.60div>
                        <div class="p-action"><a href="javascript:;">删除a>div>
                    div>
                    <div class="cart-item">
                        <div class="p-checkbox">
                            <input type="checkbox" name="" id="" class="j-checkbox">
                        div>
                        <div class="p-goods">
                            <div class="p-img">
                                <img src="img/p2.png" alt="">
                            div>
                            <div class="p-msg">【2000张贴纸】贴纸书 3-6岁 贴画儿童 贴画书全套12册 贴画 贴纸儿童 汽div>
                        div>
                        <div class="p-price">¥24.80div>
                        <div class="p-num">
                            <div class="quantity-form">
                                <a href="javascript:;" class="decrement">-a>
                                <input type="text" class="itxt" value="1">
                                <a href="javascript:;" class="increment">+a>
                            div>
                        div>
                        <div class="p-sum">¥24.80div>
                        <div class="p-action"><a href="javascript:;">删除a>div>
                    div>
                    <div class="cart-item">
                        <div class="p-checkbox">
                            <input type="checkbox" name="" id="" class="j-checkbox">
                        div>
                        <div class="p-goods">
                            <div class="p-img">
                                <img src="img/p3.png" alt="">
                            div>
                            <div class="p-msg">唐诗三百首+成语故事全2册 一年级课外书 精装注音儿童版 小学生二三年级课外阅读书籍div>
                        div>
                        <div class="p-price">¥29.80div>
                        <div class="p-num">
                            <div class="quantity-form">
                                <a href="javascript:;" class="decrement">-a>
                                <input type="text" class="itxt" value="1">
                                <a href="javascript:;" class="increment">+a>
                            div>
                        div>
                        <div class="p-sum">¥29.80div>
                        <div class="p-action"><a href="javascript:;">删除a>div>
                    div>
                div>


                <div class="cart-floatbar">
                    <div class="select-all">
                        <input type="checkbox" name="" id="" class="checkall">全选
                    div>
                    <div class="operation">
                        <a href="javascript:;" class="remove-batch"> 删除选中的商品a>
                        <a href="javascript:;" class="clear-all">清理购物车a>
                    div>
                    <div class="toolbar-right">
                        <div class="amount-sum">已经选<em>1em>件商品div>
                        <div class="price-sum">总价: <em>¥12.60em>div>
                        <div class="btn-area">去结算div>
                    div>
                div>
            div>
        div>
    div>
body>
html>
附:css
*{
	padding:0;
	margin:0;
}
a{
	text-decoration: none;
	color:#000;
}
.w{
	width:1200px;
	margin:0 auto;
}
.check-cart-item{
	background-color: papayawhip;
}
.w em{
	color:red;
	font-style:normal;
	font-size:20px;
	border-bottom: 3px solid red;
}
.cart-thead{
	margin-top:3px;
	padding-left:20px;
	height:50px;
	background-color: rgba(0,0,0,0.2);
	line-height: 50px;
}
.cart-thead div{
	float: left;
	margin-right:100px;
}
.cart-thead .t-price{
	margin-right:90px
}
.cart-thead .t-num{
	margin-right:146px
}
.cart-thead .t-goods{
	margin-right:400px;
}
.cart-item{
	margin-top:10px;
	height:200px;
	border-top:3px solid #ccc;
	padding:10px;
	border-left:1px solid #ccc;
	border-right:1px solid #ccc;
	border-bottom:1px solid #ccc;
}

.cart-item div{
	float: left;
	margin-right:60px;
}

.cart-item .p-checkbox{
	margin-right:100px;
}
.cart-item .p-goods{
	width:400px;
	position: relative;
}
.p-goods{
	position: relative;
}
.p-img{
	width:80px;
	height:80px;
	border:1px solid #ccc;
	background-color:#fff;
	text-align: center;
	line-height: 60px;
}
.p-goods img{
	width:70px;
	height:70px;

}
.p-goods .p-msg{
	position: relative;
	right:-86px;
	top:-82px;
}
.quantity-form{
	padding: 0 3px;
	border:1px solid #ccc;
	height:30px;
	background-color: #fff;
}
.p-num input{
	border:0;
	width:32px;
	height:30px;
	border-left:1px solid #ccc;
	border-right:1px solid #ccc;
	text-align: center;
}
.p-action{
	padding-left:28px;
}
.cart-floatbar{
	margin:10px 0;
	height:50px;
	border:1px solid #ccc;
	line-height: 50px;
}
.cart-floatbar div{
	float: left;
}
.select-all{
	margin-left:10px;
	margin-right:50px;
}
.operation{
	margin-right:400px;
}
.operation a{
	margin:8px;
}
.cart-floatbar .toolbar-right{
	float: right;
}
.toolbar-right em{
	border:0;
}
.amount-sum em{
	margin:0 5px;
}
.btn-area{
	width:100px;
	height:50px;
	background-color: red;
	color:#fff;
	text-align: center;
}
.price-sum{
	margin:0 20px;
}

附:js
$(function(){
	//1.全选和全不选
	//就是把全选(checkall)的状态赋值给三个小的按钮(j-checkbox)就可以了
	$(".checkall").change(function(){
		//console.log($(this).prop("checked"))
		$(".j-checkbox,.checkall").prop("checked",$(this).prop("checked"));
		if($(this).prop("checked")){
			//让所有的商品都操作check-cart-item类名增加
			$(".cart-item").addClass("check-cart-item");
		}else{
			//check-cart-item类名删除
			$(".cart-item").removeClass("check-cart-item");
		}
	})
	//2.如果小复选框被选中的个数等于3,就应该把全选按钮选上,否则全选按钮不选。
	$(".j-checkbox").change(function(){
		/*if(被选中的小复选框的个数等于3){
			就要选中全选按钮
		}else{
			不要选中全选按钮
		}*/
		//console.log($(".j-checkbox:checked").length);
		//$(".j-checkbox").length这个是所有的小复选框的个数
		if($(".j-checkbox:checked").length===$(".j-checkbox").length){
			$(".checkall").prop("checked",true)
		}else{
			$(".checkall").prop("checked",false)
		}
		if($(this).prop("checked")){
			//让当前商品操作check-cart-item类名增加
			$(this).parents(".cart-item").addClass("check-cart-item");
		}else{
			//check-cart-item类名删除
			$(this).parents(".cart-item").removeClass("check-cart-item");
		}
	})
	//3增减商品数量模块,首先声明一个变量,当我们点击+号(increment),就让这个值++,然后赋值给文本框
	$(".increment").click(function(){
		//得到当前兄弟文本框的值
		var n=$(this).siblings(".itxt").val();
		n++;
		$(this).siblings(".itxt").val(n);
		//4.每次点击+号或者-号,根据文本框的值乘以当前商品的价格就是商品的小计
		var p=$(this).parents(".p-num").siblings(".p-price").html();
		p=p.substr(1);
		console.log(p);
		//toFixed(2) 保留两位小数
		var price=(p*n).toFixed(2);
		$(this).parents(".p-num").siblings(".p-sum").html("¥"+price);
		getSum();
	})
	$(".decrement").click(function(){
		//得到当前兄弟文本框的值
		var n=$(this).siblings(".itxt").val();
		if(n==1){
			return false;
		}
		n--;
		$(this).siblings(".itxt").val(n);
		var p=$(this).parents(".p-num").siblings(".p-price").html();
		p=p.substr(1);//把¥去掉
		var price=(p*n).toFixed(2);
		$(this).parents(".p-num").siblings(".p-sum").html("¥"+price);
		getSum();
	})
	//4.用户修改文本框的值,计算小计模块
	$(".itxt").change(function(){
		var n=$(this).val();
		var p=$(this).parents(".p-num").siblings(".p-price").html();
		p=p.substr(1);//把¥去掉
		$(this).parents(".p-num").siblings(".p-sum").html("¥"+(p*n).toFixed(2));
		getSum();
	})
	getSum();
	//5.总计和总额
	function getSum(){
		//总的数量count
		var count=0;
		//总的钱数money
		var money=0;
		$(".itxt").each(function(i,ele){
			count=count+parseInt($(ele).val());
		})
		$(".amount-sum em").text(count);
		$(".p-sum").each(function(i,ele){
			money+=parseFloat($(ele).text().substr(1));
		})
		$(".price-sum em").text("¥"+money.toFixed(2))
	}
	//6.删除商品模块
	//商品后面的删除按钮
	$(".p-action a").click(function(){
		$(this).parents(".cart-item").remove();
		getSum();
	})
	//删除选中的商品
	$(".remove-batch").click(function(){
		//console.log($(".j-checkbox:checked"));//被选中的小复选框
		$(".j-checkbox:checked").parents(".cart-item").remove();
		getSum();
	})
	//清空购物车
	$(".clear-all").click(function(){
		$(".cart-item").remove();
		getSum();
	})
})
7、jQuery尺寸、位置操作
7-1 jquery尺寸
| 语法 | 用法 |
|---|---|
| width() /height() | 取得匹配元素宽度和高度值,只算width/height |
| innerWidth()/innerHeight() | 取得匹配元素宽度和高度值,包含padding |
| outerWidth()/outerHeight() | 取得匹配元素宽度和高度值,包含padding、border |
| outerWidth(true)/outerHeight(true) | 取得匹配元素宽度和高度值,包含padding、border、margin |
- 以上参数为空,则是获取相应值,返回的是数字型。
- 如果参数为数字,则是修改相应值。
- 参数可以不必写单位
<html>
	<head>
		<meta charset="UTF-8">
		<title>title>
		<script type="text/javascript" src="js/jquery.min.js" >script>
		<style>
			div{
				width:200px;
				height:200px;
				background-color: pink;
				padding:10px;
				border:1px solid red;
				margin:20px;
			}
		style>
	head>
	<body>
		<div>div>
		<script>
			$(function(){
				//获取值
				console.log($("div").width());//200
				//设置值
				//$("div").width(300);
				console.log($("div").innerWidth());//220包含padding
				console.log($("div").outerWidth());//222包含padding、border
				console.log($("div").outerWidth(true));//262包括padding、border、margin
			})
		script>
	body>
html>
7-2 jquery位置
位置主要有三个:offset()、position()、scrollTop()/scrollHeight
1.offset()设置或获取元素偏移
- offset()方法或返回被选元素相对于文档的偏移坐标,跟父级没有关系。
- 该方法有2个属性left、top。offset().top用于获取距离文档顶部的距离,offset().left()用于获取文档左侧的距离。
- 可以设置元素的偏移: offset({top:200,left:200})
2.position()获取距离带有定位父级元素(偏移)
- 如果没有定位,则以文档为准
- 不能设置内容
<html>
	<head>
		<meta charset="UTF-8">
		<title>title>
		<script type="text/javascript" src="js/jquery.min.js">script>
		<style>
			*{
				padding:0;
				margin:0;
			}
			.father{
				width:400px;
				height:400px;
				background-color: pink;
				margin:100px;
				overflow:hidden;
				position:relative;
			}
			.son{
				width:150px;
				height:150px;
				background-color: purple;
				position:absolute;
				left:10px;
				top:10px;
			}
		style>
	head>
	<body>
		<div class="father">
			<div class="son">div>
		div>
		<script>
			$(function(){
				//1.获取设置距离文档的位置(偏移)offset()
				console.log($(".son").offset());//返回的是一个对象,里面包含top和left值
				console.log($(".son").offset().top);//返回100的top值
				/*$(".son").offset({
					top:200,
					left:200
				})*///和父亲盒子没有关系,就算加了定位也没关系,是相对于文档。
				//2.获取距离带有定位父级元素(偏移),注意:不能设置  position() 如果没有定位,则以文档为准
				console.log($(".son").position());//返回的都是10
				console.log($(".son").position().top);//10
			})
		script>
	body>
html>
3.scrollTop()/scrollHeight() 设置或获取元素被卷去的头部和左侧
<html>
	<head>
		<meta charset="UTF-8">
		<title>title>
		<script type="text/javascript" src="js/jquery.min.js" >script>
		<style>
			*{
				padding:0;
				margin:0;
			}
			body{
				height:2000px;
			}
			.container{
				width:900px;
				margin:400px auto;
				height:500px;
				background-color: skyblue;
			}
			.back{
				width:50px;
				height:50px;
				background-color: pink;
				position: fixed;
				bottom:100px;
				right:30px;
				display: none;
			}
		style>
	head>
	<body>
		<div class="back">返回顶部div>
		<div class="container">div>
		<script>
			$(function(){
				//$(document).scrollTop(100);//赋值操作
				//scrollTop()
				//$(window).scroll() 页面滚动事件
				var boxTop=$(".container").offset().top;
				console.log(boxTop)
				$(window).scroll(function(){
					if($(document).scrollTop()>=boxTop){
						$(".back").fadeIn()
					}else{
						$(".back").fadeOut()
					}
				})
				//返回顶部
				$(".back").click(function(){
					//$(document).scrollTop(0)
					/*$(document).stop().animate({
						scrollTop:0
					})*///不能是文档,而是html和body做动画
                    //animate()里面有个scrollTop属性
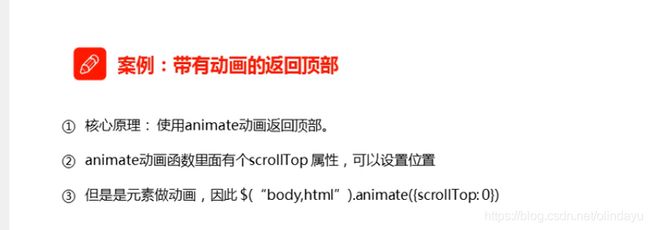
					$("body,html").stop().animate({
						scrollTop:0
					})
				})
			})
		script>
	body>
html>
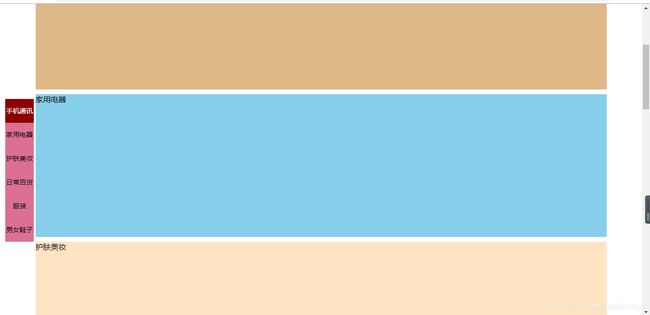
7-3 电梯导航案例
<html>
	<head>
		<meta charset="UTF-8">
		<title>title>
		<style>
			*{
				padding: 0;
				margin: 0;
			}
			body{
				height:3000px;
			}
			.w{
				width:1200px;
				margin: 10px auto;
			}
			.sj{
				height:300px;
				background-color: pink;
			}
			.tj{
				height:200px;
				background-color: burlywood;
				margin-top:5px;
			}
			.dq{
				height:300px;
				background-color: skyblue;
			}
			.hfmz{
				height:400px;
				background-color: bisque;
			}
			.rsbh{
				height:300px;
				background-color: rosybrown;
			}
			.fz{
				height:500px;
				background-color: burlywood;
			}
			.xz{
				height:400px;
				background-color: yellowgreen;
			}
			.fixedtool{
				width:60px;
				height:300px;
				background-color: palevioletred;
				font-size:14px;
				position: fixed;
				top:200px;
				left:11px;
				display: none;
			}
			ul li{
				text-align: center;
				list-style: none;
				width:100%;
				height:50px;
				line-height: 50px;
				color:#000;
			}
			.current{
				background-color: darkred;
				color:#fff;
			}
		style>
		<script type="text/javascript" src="js/jquery.min.js" >script>
	head>
	<body>
		<div class="container">
			<div class="head w">
				<div class="sj">手机通讯div>
				<div class="tj">今日推荐div>
			div>
			<div class="dq w">家用电器div>
			<div class="hfmz w">护肤美妆div>
			<div class="rsbh w">日常百货div>
			<div class="fz w">服装div>
			<div class="xz w">男女鞋子div>
		div>

		<div class="fixedtool">
			<ul>
				<li class="current">手机通讯li>
				<li>家用电器li>
				<li>护肤美妆li>
				<li>日常百货li>
				<li>服装li>
				<li>男女鞋子li>
			ul>
		div>
		<script>
			//console.log($(".container>div").eq(0))
			$(function(){
				//当我们点击了小li 此时不需要执行页面滚动事件里面的li的背景选择添加类名current,可以使用节流阀(互斥锁)
				var flag=true;
				//1.当页面滚动到今日推荐,电梯导航栏就显示出来
				var tjTop=$(".tj").offset().top;
				toggleTool();
				function toggleTool(){
					if($(document).scrollTop()>=tjTop){
						$(".fixedtool").fadeIn();
					}else{
						$(".fixedtool").fadeOut();
					}
				}
				$(window).scroll(function(){
					toggleTool();
					//3.页面滚动到某个内容区域,左侧电梯导肮小li相应添加和删除current类名
					if(flag){
						$(".container .w").each(function(i,ele){
							if($(document).scrollTop() >= $(ele).offset().top){
								$(".fixedtool li").eq(i).addClass("current").siblings().removeClass("current")
							}
						})
					}
				})
				//2.点击电梯导航显示相应的内容
				$(".fixedtool li").click(function(){
					flag=false;
					//当我们每次点击小li,就需要计算出页面要去往的位置
					//旋选出对应索引号的内容区的盒子,计算它的offset().top
					var index=$(this).index();
					var top=$(".container .w").eq(index).offset().top;
					//页面动画滚动效果
					$("body,html").stop().animate({
						scrollTop:top
					},function(){
						flag=true;
					})
					//点击之后,让当前的小li加上类名current,其他兄弟移除类名
					$(this).addClass("current").siblings("li").removeClass("current")
				})
			})
		script>
	body>
html>
三、 jquery事件
目标:
- 能够说出四种常见的注册事件
- 能够说出on绑定事件的优势
- 能够说出jquery事件委派的优点以及方式
- 能够说出绑定事件与解绑事件
1、 jquery事件注册
单个事件注册
语法:
elelment.事件(function(){})
$('div').click(function(){事件处理程序})
其他事件和原生基本一致,比如:mouseover、mouseout、blur、focus、change、keydown、keyup、resize、scroll等
2、 jquery事件处理
2-1 事件处理 on()绑定事件
on方法在匹配元素上绑定一个或者多个事件的事件处理函数
语法:element.on(events,[selector],fn)
- events:一个或者多个空格分隔的事件类型,如‘click’或‘keydown’。
- [selector]:元素的子元素选择器
- fn:回调函数即绑定在元素身上的侦听函数
on()方法优势1:
可以绑定多个事件,多个处理事件处理程序。
$("div").on({
	mouseover:function(){},
	mouseout:function(){},
	click:function(){}
})
//如果事件处理程序相同
$('div').on('mouseover mouseout',function(){
	$(this).toggleClass('current')
})
on()方法优势2:
可以事件委派操作。事件委派的定义就是把原来加给子元素身上的事件绑定在父元素身上,就是把事件委派给父元素。
$('ul').on('click','li',function(){
	alert(11)
})
在此之前有bind(),live(),delegate()等方法来处理事件绑定或者事件委派,最新版本是用on替代他们。
on()方法优势3:
动态创建的元素,click()没有办法绑定事件,on()可以给动态生成的元素绑定事件。
<html>
<head>
<meta charset="UTF-8">
<title>title>
<script src="js/jquery.min.js">script>
<style>
div{
width:100px;
height:100px;
background-color: pink;
}
.current{
background-color: purple;
}
style>
head>
<body>
<div>div>
<ul>
<li>我们都是好孩子li>
<li>我们都是好孩子li>
<li>我们都是好孩子li>
<li>我们都是好孩子li>
<li>我们都是好孩子li>
ul>
<ol>
ol>
<script>
$(function(){
//1.单个事件注册
/*$("div").click(function(){
$(this).css("background","blue")
})
$("div").mouseenter(function(){
$(this).css("background","red")
})
*/
//2.事件处理on
/*$("div").on({
mouseenter:function(){
$(this).css("background","red")
},
click:function(){
$(this).css("background","purple")
},
mouseleave:function(){
$(this).css("background","blue")
}
});*/
$("div").on("mouseenter mouseleave",function(){
$(this).toggleClass("current")
});
//(1)on可以实现事件委派
$("ul li").click()
$("ul").on("click","li",function(){
alert(11)
})
//click绑定在ul上,但是触发的对象是ul的li
//(2)on可以给未来动态创建的元素绑定事件
/*$("ol li").click(function(){
alert(22);
})*/
$("ol").on("click","li",function(){
alert(22);
});
var li=$("我是未来创建的 ")
$("ol").append(li);
})
script>
body>
html>
<html>
	<head>
		<meta charset="UTF-8">
		<title>title>
		<script src="js/jquery.min.js">script>
		<style>
			*{
				padding:0;
				margin:0;
			}
			li{
				list-style: none;
			}
			a{
				text-decoration: none;
			}
			.box{
				width:500px;
				margin:100px auto;
				padding:10px;
				box-sizing: border-box;
				border: 1px solid #000;
			}
			.text{
				width:370px;
				height:100px;
				resize:none;
				outline: none;
			}
			ul{
				margin-top:10px;
				width:200px;
				margin-left:68px;
			}
			ul li{
				width:370px;
				height:26px;
				border-bottom: 1px dashed #ccc;
				line-height:26px;
			}
			ul li a{
				float: right;
			}
		style>
	head>
	<body>
		<div class="box" id="weibo">
			<span>微博发布span>
			<textarea class="text">textarea>
			<button>发布button>
			<ul>
			ul>
		div>
		<script>
			$(function(){
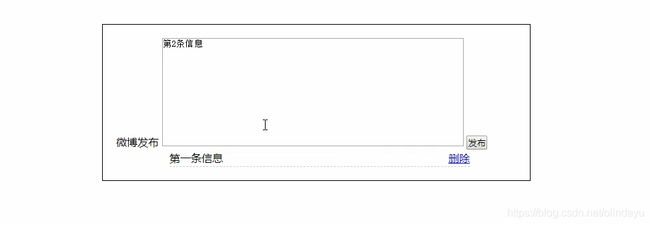
				//点击发布按钮,动态创建一个li,放入文本框的内容和删除按钮,并且添加到ul中
				$("button").on("click",function(){
					var li=$("")
					li.html($(".text").val()+"删除")
					$("ul").prepend(li);
					li.slideDown();
					$(".text").val("");

				})
				//2.点击的删除按钮,可以删除当前的微博留言li
				/*$("ul li a").click(function(){//此时的click不能给动态创建的a添加事件
						$(this).parent().remove();
					})*/
				//on可以给动态创建的元素绑定事件
				$("ul").on("click","a",function(){
						$(this).parent().slideUp(function(){
							$(this).remove();
						});
					})
			})
		script>
	body>
html>
2-2 事件处理 off()解绑事件
off()方法可以移除通过on()方法添加的事件处理程序。
补充知识:元素.one() 只能触发一次
$('p').off();//解绑p元素所有事件处理程序
$('p').off('click');//解绑p元素上面的点击事件
$('ul').off('click','li');//解除事件委托
<html>
	<head>
		<meta charset="UTF-8">
		<title>title>
		<script type="text/javascript" src="js/jquery.min.js" >script>
		<style>
			div{
				width:100px;
				height:100px;
				background-color: pink;
			}
		style>
	head>
	<body>
		<div>div>
		<ul>
			<li>我们都是好孩子li>
			<li>我们都是好孩子li>
			<li>我们都是好孩子li>
		ul>
		<p>我是pp>
		<script>
			$(function(){
				$("div").on({
					click:function(){
						console.log("我点击了")
					},
					mouseenter:function(){
						console.log("鼠标经过了")
					}
				})
				//事件委托
				$("ul").on("click","li",function(){
					alert(11);
				})
				//1.事件解绑 off()
				//$("div").off();//解除元素身上所有的事件
				$("div").off("click");//解除元素身上click的事件
				//解除事件委托
				$("ul").off("click","li");
				//2. one() 只能触发一次
				$("p").one("click",function(){
					alert(11)
				})
			})

		script>
	body>
html>
2-3 自动触发事件 trigger()
有些事件希望是自动触发,比如轮播图自动播放功能和右键按钮一致。可以利用定时器自动触发右侧按钮点击事件,不必鼠标事件点击触发。
element.click();//第一种简写方式
element.trigger('type');//第二种自动触发模式
$('p').on('click',function(){
	alert(11);
})
$('p').trigger("click);//此时自动触发点击事件,不需要鼠标点击
element.triggerHandler(type)/;/第三种自动触发模式
//他与前两种最大的区别就是不会触发默认行为
<html>
	<head>
		<meta charset="UTF-8">
		<title>title>
		<style>
			div{
				width:100px;
				height:100px;
				background-color: pink;
			}
		style>
		<script type="text/javascript" src="js/jquery.min.js" >script>
		<script>
			$(function(){
				$("div").on("click",function(){
					alert(11);
				})
				//自动触发事件
				//1.element.click()
				//$("div").click();

				//2.element.trigger(type)
				//$("div").trigger("click")

				//3.element.triggerHandler(type)  他与前两种最大的区别就是不会触发默认行为
				//$("div").triggerHandler("click")
				$("input").on("focus",function(){
					$(this).val("你好吗")
				})
				//$("input").triggerHandler("focus") 没有光标
				$("input").trigger("focus");//有光标
			})
		script>
	head>
	<body>
		<div>div>
		<input type="text">
	body>
html>
3、jquery事件对象
事件被触发,就会有事件对象的产生。
element.on(events,[selector],function(evet){})
阻止默认行为:event.preventDefault() 或者return false
阻止冒泡: event.stopPropagation()
<html>
	<head>
		<meta charset="UTF-8">
		<title>title>
		<style>
			div{
				width:100px;
				height:100px;
				background-color: pink;
			}
		style>
		<script type="text/javascript" src="js/jquery.min.js" >script>
		<script>
			$(function(){
				$(document).on("click",function(){
					alert("点击了document")
				})
				$("div").on("click",function(e){
					/*console.log(e)*/
					alert("点击了div");
					//组织冒泡行为
					e.stopPropagation();
				})
			})
		script>
	head>
	<body>
		<div>div>

	body>
html>
四、 jquery 其他方法
目标:
- 能够说出jquery对象的拷贝方法
- 能够说出jquery多库共存的两种方法
- 能够使用jquery插件
1、jquery拷贝对象
如果想要把某个对象拷贝给另外一个对象,此时可以使用$.exend()方法。
语法: $.exend([deep],target,object1,objectN)
- deep:如果设为true为深拷贝,默认为false浅拷贝
- target:要拷贝的目标对象
- object1:待拷贝到第一个对象的对象。
- objectN:待拷贝到第N个对象的对象。
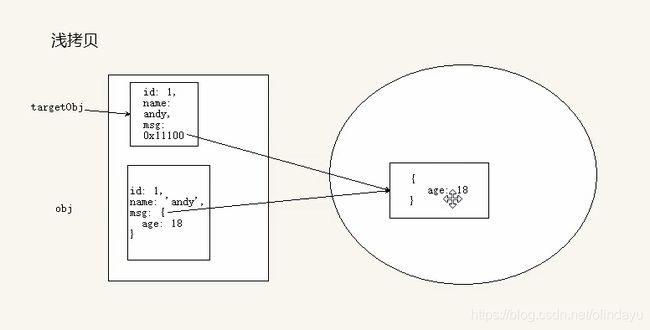
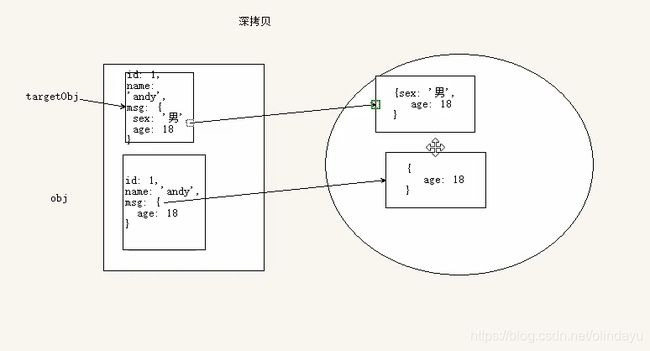
- 浅拷贝是把被拷贝的对象复杂数据类型中的地址拷贝给目标对象,修改目标对象会影响被拷贝的对象。
- 深拷贝,前面加true,完全克隆(拷贝的对象,而不是地址),修改目标对象不会影响到被拷贝的对象。
<html>
	<head>
		<meta charset="UTF-8">
		<title>title>
		<script src="js/jquery.min.js">script>
		<script>
			$(function(){
				/*var targetObj={};
				var obj={
					id:1,
					name:"andy"
				}
				//$.extend(taget,obj)
				$.extend(targetObj,obj);
				console.log(targetObj);*/

				/*var targetObj={
					id:0
				};
				var obj={
					id:1,
					name:"andy"
				}
				//$.extend(taget,obj)
				$.extend(targetObj,obj);
				console.log(targetObj);//会覆盖targetObj里面原来的值*/

				/*var targetObj={
					id:0
				};
				var obj={
					id:1,
					name:"andy",
					msg:{
						age:18
					}
				}
				//$.extend(taget,obj)
				//浅拷贝把原来对象里面的复杂数据类型地址拷贝给目标对象
				$.extend(targetObj,obj);
				targetObj.msg.age=20;
				console.log(targetObj);
				console.log(obj);*/

				var targetObj={
					id:0,
					msg:{
						sex:"男"
					}
				};
				var obj={
					id:1,
					name:"andy",
					msg:{
						age:18
					}
				}
				//$.extend(taget,obj)
				//深拷贝把里面的数据完全复制一份给目标对象,如果里面有不冲突的属性,会合并在一起
				$.extend(true,targetObj,obj);
				targetObj.msg.age=20;
				console.log(targetObj);
				console.log(obj);
			})
		script>
	head>
	<body>
	body>
html>
2、多库共存
问题概述:
jquery使用$作为标识符,随着jquery的流行,其他js库也会用这作为标识符,这样一起使用就会引起冲突。
客观需求:
需要一个解决方案,让jquery和其他的js库不存在冲突,可以同时存在,这就叫做多库共存。
jquery解决方案:
- 把里面的$符号同意改为jquery。比如jquery(“div”)
- jquery变量规定新的名称: . n o C o n f l i c t ( ) v a r x x = .noConflict() var xx= .noConflict()varxx=.noConflict()
<html>
	<head>
		<meta charset="UTF-8">
		<title>title>
		<script type="text/javascript" src="js/jquery.min.js" >script>
		<script>
			$(function(){
				function $(ele){
					return document.querySelector(ele);
				}
				console.log($("div"));
				/*$.each();*/
				//解决冲突方案
				//1.如果$符号冲突,把$改成jquery
				jQuery.each()
				//2.让jquery释放对$控制权,可以自己决定
				var bl=jQuery.noConflict();
				console.log(bl("p"));
				bl("p").each(function(i,ele){
					console.log(i);
					console.log(ele)
				});
			})

		script>
	head>
	<body>
		<div>div>
		<p>p>
	body>
html>
3、jquery插件
jquery功能比较有限,想要更复杂的特效效果,可以借助于jquery插件完成。
注意:这些插件也是依赖于jquery来完成的,所以必须要先引入jquery文件,因此也称为jquery插件。
jquery插件常用的网站:
- jquery插件库:https://www.jq22.com jquery
- jquery之家:http://www.htmleaf.com jquery
jquery插件使用步骤:
- 引入相关文件(jquery文件和插件文件)
- 复制相关的html、css、js(调用插件)
jquery插件演示:
1.瀑布流(图片无序摆放):下载jquery文件,打开文件的demo,查看源代码,然后再引入相关的js和css
2.图片懒加载(图片使用延迟加载可以提高网页下载速度。他也能帮助减轻服务器负载)当我们页面滑动到可视区区域,再显示图片。
我们使用jquery插件库EasyLazyload。注意,此时的js引入文件和js调用必须写道DOM元素(图片)最后面。
<body>
<div>
...
div>
<script src="../js/jquery.min.js">script>
<script src="js/EasyLazyload.min.js">script>
<script>
lazyLoadInit({
coverColor:"white",
coverDiv:"test
",
offsetBottom:0,
offsetTopm:0,
showTime:1100,
onLoadBackEnd:function(i,e){
console.log("onLoadBackEnd:"+i);
}
,onLoadBackStart:function(i,e){
console.log("onLoadBackStart:"+i);
}
});
script>
body>
3.全屏滚动(fullpage.js)
gitHub: https://github.com/alvarotrigo/fullPage.js
中文翻译网站:http://www.dowebok.com/demo/2014/77
<html>
	<head>
		<meta charset="UTF-8">
		<title>title>
		<link rel="stylesheet" href="css/fullpage.min.css" />
		<style>
			.section1 { background: url(http://idowebok.u.qiniudn.com/77/1.jpg) 50%;}
			.section2 { background: url(http://idowebok.u.qiniudn.com/77/2.jpg) 50%;}
			.section3 { background: url(http://idowebok.u.qiniudn.com/77/3.jpg) 50%;}
			.section4 { background: url(http://idowebok.u.qiniudn.com/77/4.jpg) 50%;}
		style>
		<script src="js/jquery.min.js" >script>
		<script src="js/fullpage.min.js" >script>
		<script>
			$(function(){
				$('#dowebok').fullpage({
					sectionsColor: ['#1bbc9b', '#4BBFC3', '#7BAABE', '#f90'],
					navigation: true,
					 continuousVertical: true,
					 navigationColor:"red"

				});
				setInterval(function(){
			        $.fn.fullpage.moveSectionDown();
			    }, 3000);
			});
		script>
	head>
	<body>
		<div id="dowebok">
	    <div class="section section1">
			<h3>第一屏h3>
	    div>
	    <div class="section section2">
	        <h3>第二屏h3>
	    div>
	    <div class="section section2">
	        <h3>第三屏h3>
	    div>
	    <div class="section section4">
	        <h3>第四屏h3>
	    div>
	div>
	body>
html>
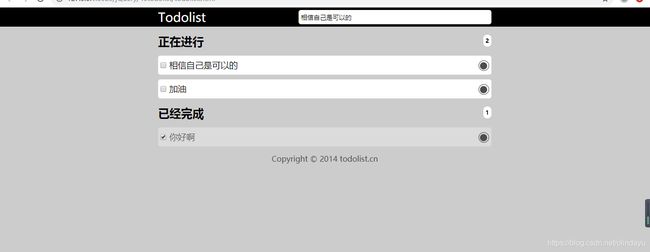
4、综合案例 todolist案例
html部分:

<html>
	<head>
		<meta charset="UTF-8">
		<title>title>
		<link rel="stylesheet" href="css/todolist.css">
		<script src="js/jquery.min.js">script>
		<script src="js/todolist.js">script>
	head>
	<body>
		<header >
			<section class="w">
				<lable for="title">Todolistlable>
				<input type="text" id="title" name="title" placeholder="添加ToDo" required="required">
			section>
		header>
		<section class="w">
			<h2>正在进行<span class="todocount" id="todoCount">span>h2>
			<ol id="todolist" class="demo-box">

			ol>
			<h2>已经完成<span class="todocount" id="doneCount">span>h2>
			<ul class="donelist">

			ul>
		section>
		<footer >
			Copyright © 2014 todolist.cn
		footer>
	body>
html>

css部分:
*{
	padding:0;
	margin:0;
}
.w{
	width:700px;
	margin:0 auto;
	position: relative;
}
body{
	background-color: #ccc;
}
header{
	width:100%;
	height:40px;
	background-color: #000;
	color:#fff;
	font-size:26px;
	line-height: 40px;
}
#title{
	width:400px;
	height:30px;
	margin-left:150px;
	outline: none;
	position:absolute;
	top:50%;
	right:0;
	transform: translateY(-50%);
	border-radius: 5px;
	border:0;
	padding-left:5px;
}
h2{
	margin:15px 0;
}
.todocount{
	display: block;
	height:15px;
	background-color: #fff;
	padding:5px;
	float: right;
	font-size:12px;
	line-height: 15px;
	border-radius: 20px;
	margin-top:2px;
}
li{
	list-style: none;
	margin:10px 0;
	width:100%;
	height:40px;
	background-color: #fff;
	line-height: 40px;
	font-size:18px;
	padding: 0 5px;
	box-sizing: border-box;
	border-radius:5px;
}
li p{
	display: inline;
}
li a{
	text-decoration: none;
	display: inline-block;
	width:20px;
	height:20px;
	border:1px solid #4c4c4c;
	float: right;
	margin-top:10px;
	border-radius: 50%;
	position:relative;
}
li a::before{
	content: "";
	display: inline-block;
	width:15px;
	height:15px;
	background-color: #4c4c4c;
	border-radius: 50%;
	position:absolute;
	top:3px;
	left:2px;
}
.donelist li{
	background-color: rgba(255,255,255,0.3);
	color:#5e5e5e;
}
footer{
	margin-top:15px;
	text-align: center;
	color:#4c4c4c;

}

js部分:
$(function(){
	//按下回车 把完整的数据存储到本地存储里面
	//存储的数据格式:var todolist=[{title:"xxx",done:false}]
	load();
	$("#title").on("keydown",function(event){
		if(event.keyCode===13){
			if($(this).val()===""){
				alert("请输入正确的内容")
			}else{
				//先读取本地存储原来的数据
				var local=getDate();
				console.log(local);
				//把local数组进行更新数据,把最近的数据追加给local数组
				local.push({title:$(this).val(),done:false});
				//把这个数组local存储给本地存储
				saveDate(local);
				//2.todolist本地存储数据渲染加载到页面
				load();
			}

		}
	})
	//toDoList 删除操作
	$("ol,ul").on("click","a",function(){
		//先获取本地存储
		var data=getDate();
		console.log(data)
		//修改数据
		var index=$(this).attr("id")
		console.log(index);
		data.splice(index,1);
		//保存到本地存储
		saveDate(data)
		//重新渲染页面
		load();
	})
	//4.todolist正在进行和已经完成的选项操作
	$("ol,ul").on("click","input",function(){
		//先获取本地存储的数据
		var data=getDate();
		//修改数据
		var index=$(this).siblings("a").attr("id");
		console.log(index);
		data[index].done=$(this).prop("checked");
		//保存本地存储
		saveDate(data);
		//重新渲染页面
		load();
	})
	//读取本地存储的数据
	function getDate(){
		var data=localStorage.getItem("todolist");
		if(data!==null){
			//本地存储里里面的数据是字符串格式的,但是我们需要的是对象格式的
			return JSON.parse(data);
		}else{
			return [];
		}
	}
	//保存本地存储数据
	function saveDate(data){
		localStorage.setItem("todolist",JSON.stringify(data));
	}
	function load(){
		//遍历之前要清空ol里面的元素内容
		$("ol,ul").empty();
		var todoCount=0;//正在进行的个数
		var doneCount=0;//已经完成的个数
		//读取本地存储的数据
		var data=getDate();
		//遍历这个数据
		$.each(data,function(i,n){
			if(n.done){
				$("ul").prepend("<li><input type='checkbox' checked='checked'> <p>"+n.title+"p> <a href='javascript:;' id='"+i+"'>a>li>")
				doneCount++;
			}else{
				$("ol").prepend("<li><input type='checkbox'> <p>"+n.title+"p> <a href='javascript:;' id='"+i+"'>a>li>");
				todoCount++;
			}
		})
		$("#todoCount").text(todoCount);
		$("#doneCount").text(doneCount);
	}
})
cn
css部分:
*{
padding:0;
margin:0;
}
.w{
width:700px;
margin:0 auto;
position: relative;
}
body{
background-color: #ccc;
}
header{
width:100%;
height:40px;
background-color: #000;
color:#fff;
font-size:26px;
line-height: 40px;
}
#title{
width:400px;
height:30px;
margin-left:150px;
outline: none;
position:absolute;
top:50%;
right:0;
transform: translateY(-50%);
border-radius: 5px;
border:0;
padding-left:5px;
}
h2{
margin:15px 0;
}
.todocount{
display: block;
height:15px;
background-color: #fff;
padding:5px;
float: right;
font-size:12px;
line-height: 15px;
border-radius: 20px;
margin-top:2px;
}
li{
list-style: none;
margin:10px 0;
width:100%;
height:40px;
background-color: #fff;
line-height: 40px;
font-size:18px;
padding: 0 5px;
box-sizing: border-box;
border-radius:5px;
}
li p{
display: inline;
}
li a{
text-decoration: none;
display: inline-block;
width:20px;
height:20px;
border:1px solid #4c4c4c;
float: right;
margin-top:10px;
border-radius: 50%;
position:relative;
}
li a::before{
content: “”;
display: inline-block;
width:15px;
height:15px;
background-color: #4c4c4c;
border-radius: 50%;
position:absolute;
top:3px;
left:2px;
}
.donelist li{
background-color: rgba(255,255,255,0.3);
color:#5e5e5e;
}
footer{
margin-top:15px;
text-align: center;
color:#4c4c4c;
}
js部分:
$(function(){
//按下回车 把完整的数据存储到本地存储里面
//存储的数据格式:var todolist=[{title:“xxx”,done:false}]
load();
KaTeX parse error: Expected 'EOF', got '#' at position 3: ("#̲title").on("key…(this).val()===""){
alert(“请输入正确的内容”)
}else{
//先读取本地存储原来的数据
var local=getDate();
console.log(local);
//把local数组进行更新数据,把最近的数据追加给local数组
local.push({title:$(this).val(),done:false});
//把这个数组local存储给本地存储
saveDate(local);
//2.todolist本地存储数据渲染加载到页面
load();
}
	}
})
//toDoList 删除操作
$("ol,ul").on("click","a",function(){
	//先获取本地存储
	var data=getDate();
	console.log(data)
	//修改数据
	var index=$(this).attr("id")
	console.log(index);
	data.splice(index,1);
	//保存到本地存储
	saveDate(data)
	//重新渲染页面
	load();
})
//4.todolist正在进行和已经完成的选项操作
$("ol,ul").on("click","input",function(){
	//先获取本地存储的数据
	var data=getDate();
	//修改数据
	var index=$(this).siblings("a").attr("id");
	console.log(index);
	data[index].done=$(this).prop("checked");
	//保存本地存储
	saveDate(data);
	//重新渲染页面
	load();
})
//读取本地存储的数据
function getDate(){
	var data=localStorage.getItem("todolist");
	if(data!==null){
		//本地存储里里面的数据是字符串格式的,但是我们需要的是对象格式的
		return JSON.parse(data);
	}else{
		return [];
	}
}
//保存本地存储数据
function saveDate(data){
	localStorage.setItem("todolist",JSON.stringify(data));
}
function load(){
	//遍历之前要清空ol里面的元素内容
	$("ol,ul").empty();
	var todoCount=0;//正在进行的个数
	var doneCount=0;//已经完成的个数
	//读取本地存储的数据
	var data=getDate();
	//遍历这个数据
	$.each(data,function(i,n){
		if(n.done){
			$("ul").prepend(" "+n.title+" ")
			doneCount++;
		}else{
			$("ol").prepend(" "+n.title+" ");
			todoCount++;
		}
	})
	$("#todoCount").text(todoCount);
	$("#doneCount").text(doneCount);
}
})


