vs2013 编译CloudCompare(包含liblas)及添加新插件
解决思路:多看CloudCompare的源码,源码里面有真经!
一、cmake构建cloudcompare工程
▪ 打开cmake GUI设置源代码和输出文件路径

▪ 设置Qt安装路径,并勾选MP。

▪再次configure,会出现Configuring done,然后在OPTION下会出现OPTION_USE_LIBLAS,将其勾选上 ,这样就可以打开las文件了

继续configure会出现liblas的错,这时候只需配好相应的路径即可,如下图。这里需要注意两个shared路径的配置,不然会打不开las文件。

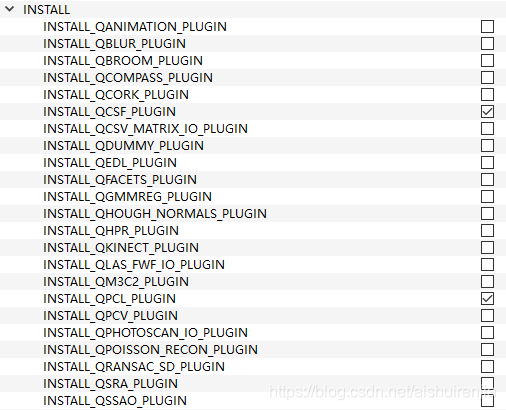
▪选择所需插件
▪ 再次点集Configure无误后,再点击Generate即可,
▪ 打开工程即可以进行编译。用vs2013打开工程后,最好每次编译都查看QCC_IO_LIB的属性,是否在包含目录和库目录中有liblas的相关目录,以免出错。
二、添加自己的插件
我们需要在右边工具栏加入自己的插件

▪ 在源代码路径F:\SZDX_airborneLiDAR\Software_design\CloudCompare-2.9.0\CloudCompare-2.9.0\plugins\下新建一个文件夹TestPlugin

▪ 在TestPlugin文件夹下新建五个空文件

▪ TestPlugin.h里内容如下:
#ifndef TestPlugin_PLUGIN_HEADER
#define TestPlugin_PLUGIN_HEADER

#include "../ccStdPluginInterface.h"

class TestPlugin : public QObject, public ccStdPluginInterface
{
	Q_OBJECT
	Q_INTERFACES(ccStdPluginInterface)
	Q_PLUGIN_METADATA(IID "cccorp.cloudcompare.plugin.TestPlugin" FILE "info.json")

public:

	//! Default constructor
	explicit TestPlugin(QObject* parent = nullptr);

	virtual ~TestPlugin() = default;

	//inherited from ccPluginInterface
	virtual QString getName() const{ return "Test Plugin"; }
	virtual QString getDescription() const{ return "Test Plugin for test"; }
	virtual QIcon getIcon() const;

	//inherited from ccStdPluginInterface
	virtual void onNewSelection(const ccHObject::Container& selectedEntities) override;
	virtual void getActions(QActionGroup& group) override;

protected slots:

	//! Slot called when associated ation is triggered
	void doAction();

protected:

	//! Associated action
	QAction* m_action;
};

#endif //TestPlugin_PLUGIN_HEADER
TestPlugin.cpp里内容如下:
#include "TestPlugin.h"
//qCC_db
#include TestPlugin.qrc里内容如下,这是Qt资源文件添加了两个资源(TestPlugin.png)和(info.json),因此需把这两个资源补齐
<RCC>
    <qresource prefix="/CC/plugin/TestPlugin" >
        <file>TestPlugin.png</file>
        <file>info.json</file>
    </qresource>
</RCC>
同时,将TestPlugin.png文件拷贝到TestPlugin目录下,这个图片就是插件的图标

info.json内容如下,这是插件的信息描述,在对应模板处填写相应信息即可
{
"type" : "Standard",
"core" : true,
"name" : "TestPlugin",
"icon" : ":/CC/plugin/TestPlugin/images/TestPlugin.png",
"description": "",
"authors" : [
{
"name" : "",
"email" : ""
}
],
"maintainers" : [
{
"name" : "",
"email" : ""
}
],
"references" : [
{
"text": "\" \"<br/>
Talk by Alexandre Boulch & Renaud Marlet at the Symposium of Geometry Processing, 2016",
"url" : ""
},
{
"text": "TestPlugin library",
"url": ""
},
{
"text": "Documentation",
"url": ""
}
]
}
CMakeLists.txt内容如下:
cmake_minimum_required(VERSION 3.0)

option( INSTALL_TestPlugin_PLUGIN "Check to install TestPlugin plugin" ON )


if (INSTALL_TestPlugin_PLUGIN )

	project( TestPlugin )
	include( ../CMakePluginTpl.cmake )
	target_link_libraries( ${PROJECT_NAME} )
	target_link_libraries( ${PROJECT_NAME} ${OPENGL_LIBRARIES} )
endif()
上一级目录plugins中的CMakeLists.txt文件就不用修改啦,CC已经在后台帮我们在解决方案添加该插件的源码写好了(不得不说“真高级”。怎么做到的,还需要学习)。
▪ 最后重复步骤一,重新构建工程文件,打开解决方案,即出现TestPlugin工程

▪ 安装成功后,插件已在工具栏中,点集图标出现正确的输出,到处就完事啦!

总结:
这些都是我看CloudCompare源码,外加网上资料摸索出来的。重点阅读了CSF的源码,从中看懂了不少CC添加源码的机制。
所以啊,源码才是重中之重!不由得想到侯捷《STL源码剖析》中的一句话“源码面前,了无秘密”!真的很实用。