Unity在与硬件设备进行串口通信的时候,硬件那边只接收字符串有时候是不行的,还需要接收16进制的数据,在这里简单介绍下使用Unity发送16进制的串口信号。
一、首先开发配置文件功能,代码如下所示,完成后将其挂载到场景的物体上,在这里不再赘述:
using System.Collections;
using System.Collections.Generic;
using UnityEngine;
using System.IO;
using System;
///
/// 配置文件读取
///
public class ConfigTest : MonoBehaviour
{
private string configPath;
//在实际项目中我一般不会用静态类,在有频繁跳转场景的时候很容易出问题
//public static Dictionary> dic;
public Dictionary<string, Dictionary<string, string>> dic;
private void Awake()
{
//读取配置文件(StreamingAssets)路径
configPath = Path.Combine(Application.streamingAssetsPath, "Config.txt");
if (dic == null)
{
dic = new Dictionary<string, Dictionary<string, string>>();
LoadConfig();
}
}
///
/// 读取所有的数据
///
void LoadConfig()
{
string[] lines = null;
if (File.Exists(configPath))
{
lines = File.ReadAllLines(configPath);
BuildDic(lines);
}
}
///
/// 处理所有数据
///
///
private void BuildDic(string[] lines)
{
string mainKey = null;//主键
string subKey = null;//子键
string subValue = null;//值
foreach (var item in lines)
{
string line = null;
line = item.Trim();//去除空白行
if (!string.IsNullOrEmpty(line))
{
if (line.StartsWith("["))//取主键
{
mainKey = line.Substring(1, line.IndexOf("]") - 1);
if (dic.ContainsKey(mainKey))
{
return;
}
dic.Add(mainKey, new Dictionary<string, string>());
}
else//取主键
{
var configValue = line.Split(new char[] { '=' }, StringSplitOptions.RemoveEmptyEntries);
subKey = configValue[0].Trim();
subValue = configValue[1].Trim();
subValue = subValue.StartsWith("\"") ? subValue.Substring(1) : subValue;
dic[mainKey].Add(subKey, subValue);
}
}
}
}
}
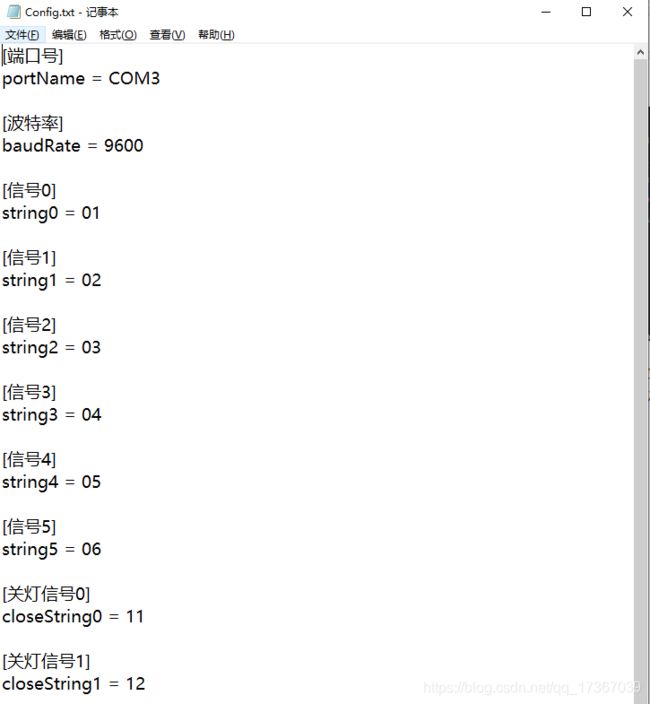
二、在Assets中新建StreamingAssets文件夹,在里面新建一个Config.txt的文件,在Config.txt里面输入以下内容。
三、开发串口通信功能,代码如下所示:
using System.Collections;
using System.Collections.Generic;
using UnityEngine;
using System.IO.Ports;
using System;
public class PortManager : MonoBehaviour
{
#region 参数
string getPortName;
int baudRate = 19200;
private Parity parity = Parity.None;
private int dataBits = 8;
private StopBits stopBits = StopBits.One;
SerialPort sp = null;
private string _data;
private string testString0, testString1, testString2, testString3, testString4, testString5,
closeString0, closeString1, closeString2, closeString3, closeString4, closeString5;
string reciveString;
//配置文件类
public ConfigTest thisConfigTest;
#endregion
#region 常规方法
// Use this for initialization
void Start()
{
getPortName = thisConfigTest.dic["端口号"]["portName"];
baudRate = int.Parse(thisConfigTest.dic["波特率"]["baudRate"]);
testString0 = thisConfigTest.dic["信号0"]["string0"];
testString1 = thisConfigTest.dic["信号1"]["string1"];
testString2 = thisConfigTest.dic["信号2"]["string2"];
testString3 = thisConfigTest.dic["信号3"]["string3"];
testString4 = thisConfigTest.dic["信号4"]["string4"];
testString5 = thisConfigTest.dic["信号5"]["string5"];
closeString0 = thisConfigTest.dic["关灯信号0"]["closeString0"];
closeString1 = thisConfigTest.dic["关灯信号1"]["closeString1"];
closeString2 = thisConfigTest.dic["关灯信号2"]["closeString2"];
closeString3 = thisConfigTest.dic["关灯信号3"]["closeString3"];
closeString4 = thisConfigTest.dic["关灯信号4"]["closeString4"];
closeString5 = thisConfigTest.dic["关灯信号5"]["closeString5"];
reciveString = thisConfigTest.dic["接收信号"]["receiveString"];
OpenPort(getPortName);
StartCoroutine(DataReceiveFunction());
}
#endregion
#region 串口通信控制
///
/// 串口信号控制
///
private void PortSignalControl()
{
if (_data == System.Text.Encoding.ASCII.GetBytes(reciveString)[0].ToString())
{
//Debug.Log("收到串口信号" + testString);
}
}
//打开串口
public void OpenPort(string DefaultPortName)
{
sp = new SerialPort(DefaultPortName, baudRate, parity, dataBits, stopBits);
sp.ReadTimeout = 10;
try
{
if (!sp.IsOpen)
{
sp.Open();
}
}
catch (Exception ex)
{
Debug.Log(ex.Message);
}
}
//关闭串口
public void ClosePort()
{
try
{
sp.Close();
}
catch (Exception ex)
{
Debug.Log(ex.Message);
}
}
IEnumerator DataReceiveFunction()
{
byte[] dataBytes = new byte[128];//存储长度
int bytesToRead = 0;//记录获取的数据长度
while (true)
{
if (sp != null && sp.IsOpen)
{
try
{
//通过read函数获取串口数据
bytesToRead = sp.Read(dataBytes, 0, dataBytes.Length);
_data = dataBytes[0].ToString();
print(_data);
PortSignalControl();
//串口数据已经被存入dataBytes中
}
catch (Exception ex)
{
}
}
yield return new WaitForSeconds(Time.deltaTime);
}
}
//发送一个字节
public void SendSerialPortData(string data)
{
if (sp.IsOpen)
{
sp.WriteLine(data);
}
}
//发送一个字节
public void SendSerialPortData0(byte[] data)
{
if (sp.IsOpen)
{
sp.Write(data,0,data.Length);
}
}
///
/// 发送一个字符串0
///
public void SendString0()
{
//SendSerialPortData(testString0);
SendMsg(testString0);
}
///
/// 发送字符串1
///
internal void SendString1()
{
//SendSerialPortData(testString1);
SendMsg(testString1);
}
///
/// 发送字符串2
///
internal void SendString2()
{
//SendSerialPortData(testString2);
SendMsg(testString2);
}
///
/// 发送字符串3
///
internal void SendString3()
{
//SendSerialPortData(testString3);
SendMsg(testString3);
}
///
/// 发送字符串4
///
internal void SendString4()
{
//SendSerialPortData(testString4);
SendMsg(testString4);
}
///
/// 发送字符串5
///
internal void SendString5()
{
//SendSerialPortData(testString5);
SendMsg(testString5);
}
///
/// 发生关灯信号0
///
internal void SendCloseString0()
{
//SendSerialPortData(closeString0);
SendMsg(closeString0);
}
///
/// 发生关灯信号1
///
internal void SendCloseString1()
{
//SendSerialPortData(closeString1);
SendMsg(closeString1);
}
///
/// 发生关灯信号2
///
internal void SendCloseString2()
{
//SendSerialPortData(closeString2);
SendMsg(closeString2);
}
///
/// 发生关灯信号3
///
internal void SendCloseString3()
{
//SendSerialPortData(closeString3);
SendMsg(closeString3);
}
///
/// 发生关灯信号4
///
internal void SendCloseString4()
{
//SendSerialPortData(closeString4);
SendMsg(closeString4);
}
///
/// 发生关灯信号5
///
internal void SendCloseString5()
{
//SendSerialPortData(closeString5);
SendMsg(closeString5);
}
private void OnApplicationQuit()
{
ClosePort();
}
private void OnDisable()
{
ClosePort();
}
#endregion
#region 信号转16进制方法
public void SendMsg(string s)
{
string msg = s;
//byte[] cmd = new byte[1024 * 1024 * 3];
//cmd = Convert16(msg);
//SendSerialPortData0(cmd);
byte[] cmd = textWork16(s);
SendSerialPortData0(cmd);
}
/*
private byte[] Convert16(string strText)
{
strText = strText.Replace(" ", "");
byte[] bText = new byte[strText.Length / 2];
for (int i = 0; i < strText.Length / 2; i++)
{
bText[i] = Convert.ToByte(Convert.ToInt32(strText.Substring(i * 2, 2), 16));
}
return bText;
}
*/
/*
public byte[] HexStringToBytes(string hs)
{
string[] strArr = hs.Trim().Split(' ');
byte[] b = new byte[strArr.Length];
//逐个字符变为16进制字节数据
for (int i = 0; i < strArr.Length; i++)
{
b[i] = Convert.ToByte(strArr[i], 16);
}
//按照指定编码将字节数组变为字符串
return b;
}
*/
private byte[] textWork16(string strText)
{
strText = strText.Replace(" ", "");
byte[] bText = new byte[strText.Length / 2];
for (int i = 0; i < strText.Length / 2; i++)
{
bText[i] = Convert.ToByte(Convert.ToInt32(strText.Substring(i * 2, 2), 16));
}
return bText;
}
#endregion
}
四、这个脚本和我之前写的串口通信功能类似,只是添加了一个字符串转16进制的功能,如下图所示:
五、在场景中新建portManager物体,将PortManager.cs脚本挂载到portManager物体上,并将configTest物体赋值到该物体上,如下图所示:
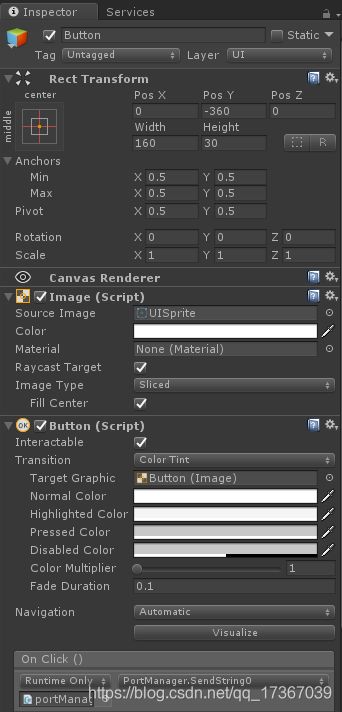
六、在场景中新建一个Button,将SendString0方法赋值到该按钮中,如下图所示:
七、打开串口助手,将串口助手配置设置如下所示:
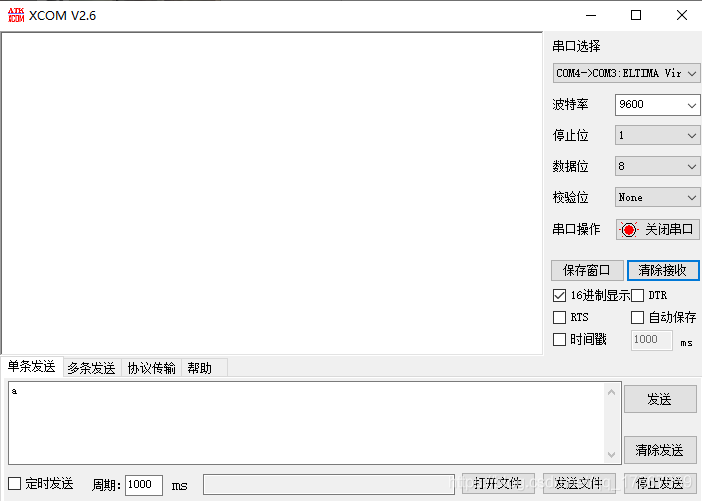
八、运行项目,点击场景中的按钮,可以看到串口已经收到了数字码,如下图所示:
项目Demo