原文链接:Glide核心设计二:缓存管理
引言
Glide作为一个优秀的图片加载框架,缓存管理是必不可少的一部分,这篇文章主要通过各个角度、从整体设计到代码实现,深入的分析Glide的缓存管理模块,力求在同类分析Glide缓存的分析文章中脱颖而出 。关于Glide的生命周期绑定,可查看Glide系列文章Glide核心设计一:皮皮虾,我们走。
前提
本文分析Glide缓存管理,将以使用Glide加载网络图片为例子,如加载本地图片、Gif资源等使用不是本文的重点。因不管是何种使用方式,缓存模块都是一样的,只抓住网络加载图片这条主线,逻辑会更清晰。
本文将先给出Glide缓存管理整体设计的结论,然后再分析源码。
整体设计
缓存类型
Glide的缓存类型分为两大类,一类是Resource缓存,一类是Bitmap缓存。
Resource缓存
为什么需要缓存图片Resource,很好理解,因为图片从网络加载,将图片缓存到本地,当需要再次使用时,直接从缓存中取出而无需再次请求网络。
三层缓存
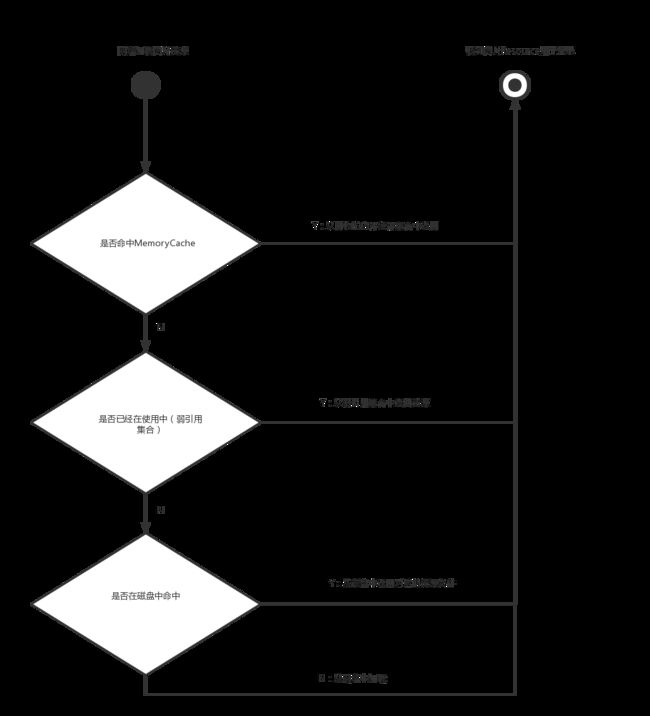
Glide在缓存Resource使用三层缓存,包括:
一级缓存:缓存被回收的资源,使用LRU算法(Least Frequently Used,最近最少使用算法)。当需要再次使用到被回收的资源,直接从内存返回。
二级缓存:使用弱引用缓存正在使用的资源。当系统执行gc操作时,会回收没有强引用的资源。使用弱引用缓存资源,既可以缓存正在使用的强引用资源,也不阻碍系统需要回收无引用资源。
三级缓存:磁盘缓存。网络图片下载成功后将以文件的形式缓存到磁盘中。
Bitmap缓存
Bitmap所占内存大小
Bitmap所占的内存大小由三部分组成:图片的宽度分辨率、高度分辨率和Bitmap质量参数。公式是:Bitmap内存大小 = (宽pix长pix) 质量参数所占的位数。单位是字节B。
Bitmap压缩质量参数
质量参数决定每一个像素点用多少位(bit)来显示:
ALPHA_8就是Alpha由8位组成(1B)
ARGB_4444就是由4个4位组成即16位(2B)
ARGB_8888就是由4个8位组成即32位(4B)
RGB_565就是R为5位,G为6位,B为5位共16位(2B)
Glide默认使用RGB_565,比系统默认使用的ARGB_8888节省一半的资源,但RGB_565无法显示透明度。
Bitmap缓存算法
在Glide中,使用BitmapPool来缓存Bitmap,使用的也是LRU算法。当需要使用Bitmap时,从Bitmap的池子中取出合适的Bitmap,若取不到合适的,则再新创建。当Bitmap使用完后,不直接调用Bitmap.recycler()回收,而是放入Bitmap的池子。
缓存的Key类型
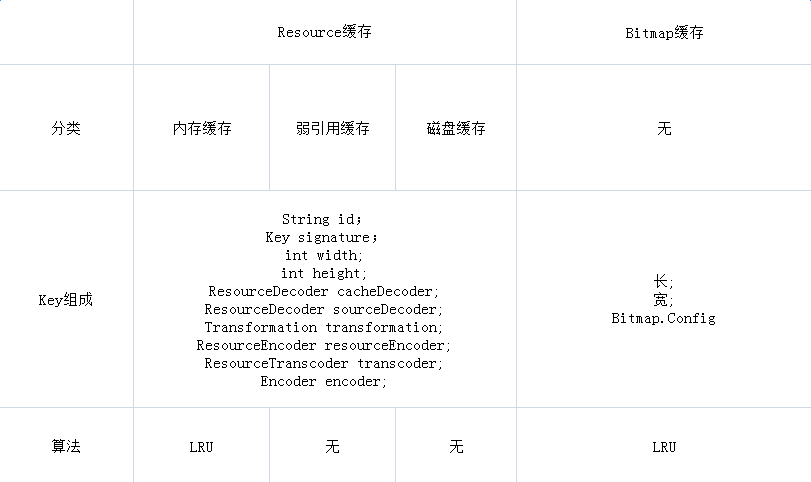
Glide的缓存使用的形式缓存,Resource和Bitmap都是作为Value的部分,将value存储时,必须要有一个Key标识缓存的内容,根据该Key可查找、移除对应的缓存。
从对比中可看出,Resource三层缓存所使用的key的构造形式是一样的,包括图片id(图片的Url地址),宽高等参数来标识。对于其他参数,举一个例子理解:图片资源从网络加载后,经过解码(decode)、缓存到磁盘、从磁盘中取出、变换资源(加圆角等,transformation)、磁盘缓存变换后的图片资源、转码(transcode)显示。
Bitmap的缓存Key的构造相对简单得多,由长、宽的分辨率以及图片压缩参数即可唯一标示一个回收的Bitmap。当需要使用的bitmap时,在BitmapPool中查找对应的长、宽和config都一样的Bitmap并返回,而无需重新创建。
Resource缓存流程
Resource包括三层缓存,通过流程图看它们之间的关系:
滑动控件多图的性能优化
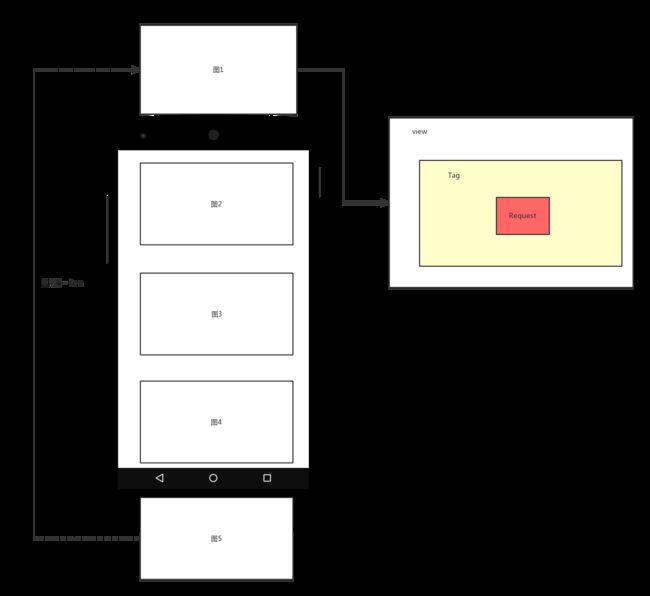
不论是Resource还是Bitmap缓存,若显示的仅是部分照片,并且不存在频繁使用的场景,则使用Glide没有太大的优势。设计缓存的目的就是为了在重复显示时,更快、更省的显示图片资源 。Glide有针对ListView、Recyclerview等控件加载多图时进行优化。此处讨论最常见的场景:Recyclerview显示多图,简略图如下。
LRU算法
BitmapPool的LRU算法流程图如下:
类图
在进行代码分析前,先给出跟Glide缓存管理相关的类图(省略类的大部分变量和方法)。
代码实现
根据以上的Glide缓存管理的结论及类图,可自主跟源码,跳过以下内容。
Glide.with(Context).load(String).into(ImageView)
Glide.with(Context)
返回RequestManager,主要实现和Fragment、Activity生命周期的绑定,详情请看Glide核心设计一:皮皮虾,我们走。
.load(String)
RequestManager的load(String)方法返回DrawableTypeRequest,根据图片地址返回一个用于创建图片请求的Request的Builder,代码如下:
public DrawableTypeRequest load (String string) return (DrawableTypeRequest) fromString().load(string);
}
fromString()方法调用loadGeneric()方法,代码如下:
public DrawableTypeRequest fromString () return loadGeneric(String.class);
}
private DrawableTypeRequest loadGeneric (Class modelClass) {
ModelLoader streamModelLoader = Glide.buildStreamModelLoader(modelClass, context);
ModelLoader fileDescriptorModelLoader =
Glide.buildFileDescriptorModelLoader(modelClass, context);
if (modelClass != null && streamModelLoader == null && fileDescriptorModelLoader == null ) {
throw new IllegalArgumentException("Unknown type " + modelClass + ". You must provide a Model of a type for"
+ " which there is a registered ModelLoader, if you are using a custom model, you must first call"
+ " Glide#register with a ModelLoaderFactory for your custom model class" );
}
return optionsApplier.apply(
new DrawableTypeRequest(modelClass, streamModelLoader, fileDescriptorModelLoader, context,
glide, requestTracker, lifecycle, optionsApplier));
}
DrawableTypeRequest的load()方法如下:
@Override
public DrawableRequestBuilder load (ModelType model) super .load(model);
return this ;
}
DrawableTypeRequest父类是DrawableRequestBuilder,父类的父类是GenericRequestBuilder,调用super.load()方法如下:
public GenericRequestBuilder load (ModelType model) this .model = model;
isModelSet = true ;
return this ;
}
以上代码可知,缓存管理的主要实现代码并不在.load(Sting)代码,接下来继续分析.into(ImageView) 代码。
.into(ImageView)
GenericRequestBuilder的into(ImageView)代码如下:
public Target into (ImageView view) if (view == null ) {
throw new IllegalArgumentException("You must pass in a non null View" );
}
if (!isTransformationSet && view.getScaleType() != null ) {
switch (view.getScaleType()) {
case CENTER_CROP:
applyCenterCrop();
break ;
case FIT_CENTER:
case FIT_START:
case FIT_END:
applyFitCenter();
break ;
default :
}
}
return into(glide.buildImageViewTarget(view, transcodeClass));
}
以上代码主要有两个功能:
根据ScaleType进行图片的变换
将ImageView转换成一个Target
继续查看into(Target)的代码:
public > Y into (Y target) {
Util.assertMainThread();
if (target == null ) {
throw new IllegalArgumentException("You must pass in a non null Target" );
}
if (!isModelSet) {
throw new IllegalArgumentException("You must first set a model (try #load())" );
}
Request previous = target.getRequest();
if (previous != null ) {
previous.clear();
requestTracker.removeRequest(previous);
previous.recycle();
}
Request request = buildRequest(target);
target.setRequest(request);
lifecycle.addListener(target);
requestTracker.runRequest(request);
return target;
}
以上代码,主要将图片加载的Request绑定到Target中,若原有Target具有旧的Request,得先处理旧的Request,再绑定上新的Request。target.setRequest()和target.getRequest()最终会调用ViewTarget的setRequest()方法和getRequest()方法,代码如下:
public void setRequest (Request request) private void setTag (Object tag) if (tagId == null ) {
isTagUsedAtLeastOnce = true ;
view.setTag(tag);
} else {
view.setTag(tagId, tag);
}
}
public Request getRequest () null ;
if (tag != null ) {
if (tag instanceof Request) {
request = (Request) tag;
} else {
throw new IllegalArgumentException("You must not call setTag() on a view Glide is targeting" );
}
}
return request;
}
以上代码可知,Request通过setTag的方式和View进行绑定,当View是复用时,则Request不为空,通过Request可对原来的资源进行缓存与回收。此处通过View的setTag()方法绑定Request,可谓妙用。
以上代码创建了一个Request,requestTracker.runRequest(request); 启动了Request,调用Request的begin()方法,该Request实例是GenericRequest,begin()代码如下:
@Override
public void begin () if (model == null ) {
onException(null );
return ;
}
status = Status.WAITING_FOR_SIZE;
if (Util.isValidDimensions(overrideWidth, overrideHeight)) {
onSizeReady(overrideWidth, overrideHeight);
} else {
target.getSize(this );
}
if (!isComplete() && !isFailed() && canNotifyStatusChanged()) {
target.onLoadStarted(getPlaceholderDrawable());
}
if (Log.isLoggable(TAG, Log.VERBOSE)) {
logV("finished run method in " + LogTime.getElapsedMillis(startTime));
}
}
加载图片前,必须要确定图片的宽高,因为需要根据确定的宽高来获取资源。onSizeReady代码如下:
@Override
public void onSizeReady (int width, int height) if (Log.isLoggable(TAG, Log.VERBOSE)) {
logV("Got onSizeReady in " + LogTime.getElapsedMillis(startTime));
}
if (status != Status.WAITING_FOR_SIZE) {
return ;
}
status = Status.RUNNING;
width = Math.round(sizeMultiplier * width);
height = Math.round(sizeMultiplier * height);
ModelLoader modelLoader = loadProvider.getModelLoader();
final DataFetcher dataFetcher = modelLoader.getResourceFetcher(model, width, height);
if (dataFetcher == null ) {
onException(new Exception("Failed to load model: \'" + model + "\'" ));
return ;
}
ResourceTranscoder transcoder = loadProvider.getTranscoder();
if (Log.isLoggable(TAG, Log.VERBOSE)) {
logV("finished setup for calling load in " + LogTime.getElapsedMillis(startTime));
}
loadedFromMemoryCache = true ;
loadStatus = engine.load(signature, width, height, dataFetcher, loadProvider, transformation, transcoder,
priority, isMemoryCacheable, diskCacheStrategy, this );
loadedFromMemoryCache = resource != null ;
if (Log.isLoggable(TAG, Log.VERBOSE)) {
logV("finished onSizeReady in " + LogTime.getElapsedMillis(startTime));
}
}
以上代码可知,在确定宽高后,将图片加载的任务交给类型为Engine的对象engine,并调用其load方法,代码如下:
public LoadStatus load (Key signature, int width, int height, DataFetcher fetcher,
DataLoadProvider loadProvider, Transformation transformation, ResourceTranscoder transcoder,
Priority priority, boolean isMemoryCacheable, DiskCacheStrategy diskCacheStrategy, ResourceCallback cb) {
Util.assertMainThread();
long startTime = LogTime.getLogTime();
final String id = fetcher.getId();
EngineKey key = keyFactory.buildKey(id, signature, width, height, loadProvider.getCacheDecoder(),
loadProvider.getSourceDecoder(), transformation, loadProvider.getEncoder(),
transcoder, loadProvider.getSourceEncoder());
EngineResource cached = loadFromCache(key, isMemoryCacheable);
if (cached != null ) {
cb.onResourceReady(cached);
if (Log.isLoggable(TAG, Log.VERBOSE)) {
logWithTimeAndKey("Loaded resource from cache" , startTime, key);
}
return null ;
}
EngineResource active = loadFromActiveResources(key, isMemoryCacheable);
if (active != null ) {
cb.onResourceReady(active);
if (Log.isLoggable(TAG, Log.VERBOSE)) {
logWithTimeAndKey("Loaded resource from active resources" , startTime, key);
}
return null ;
}
EngineJob current = jobs.get(key);
if (current != null ) {
current.addCallback(cb);
if (Log.isLoggable(TAG, Log.VERBOSE)) {
logWithTimeAndKey("Added to existing load" , startTime, key);
}
return new LoadStatus(cb, current);
}
EngineJob engineJob = engineJobFactory.build(key, isMemoryCacheable);
DecodeJob decodeJob = new DecodeJob(key, width, height, fetcher, loadProvider, transformation,
transcoder, diskCacheProvider, diskCacheStrategy, priority);
EngineRunnable runnable = new EngineRunnable(engineJob, decodeJob, priority);
jobs.put(key, engineJob);
engineJob.addCallback(cb);
engineJob.start(runnable);
if (Log.isLoggable(TAG, Log.VERBOSE)) {
logWithTimeAndKey("Started new load" , startTime, key);
}
return new LoadStatus(cb, engineJob);
}
分析至此,我们终于看到实现一级缓存和二级缓存的相关代码,可以猜测三级缓存的实现跟EngineRunnable有关。engineJob.start(runnable)会启动EngineRunnable的start()方法。代码如下:
@Override
public void run () if (isCancelled) {
return ;
}
Exception exception = null ;
Resource resource = null ;
try {
resource = decode();
} catch (Exception e) {
if (Log.isLoggable(TAG, Log.VERBOSE)) {
Log.v(TAG, "Exception decoding" , e);
}
exception = e;
}
if (isCancelled) {
if (resource != null ) {
resource.recycle();
}
return ;
}
if (resource == null ) {
onLoadFailed(exception);
} else {
onLoadComplete(resource);
}
}
查看decode()方法如下:
private Resource decode() throws Exception {
if (isDecodingFromCache()) {
return decodeFromCache();
} else {
return decodeFromSource();
}
}
至此,我们看到磁盘缓存和网络请求获取图片资源的代码。查看onLoadFailed()的代码逻辑可知,默认先从磁盘获取,失败则从网络获取。
BitmapPool缓存逻辑
以上就是Resource三层缓存的代码,接下来看BitmapPool的缓存实现代码。
public void recycle () if (!bitmapPool.put(bitmap)) {
bitmap.recycle();
}
}
该代码调用bitmapPool.put(bitmap),bitmapPool的实例是LruBitmapPool代码如下:
public synchronized boolean put (Bitmap bitmap) if (bitmap == null ) {
throw new NullPointerException("Bitmap must not be null" );
}
if (!bitmap.isMutable() || strategy.getSize(bitmap) > maxSize || !allowedConfigs.contains(bitmap.getConfig())) {
if (Log.isLoggable(TAG, Log.VERBOSE)) {
Log.v(TAG, "Reject bitmap from pool"
+ ", bitmap: " + strategy.logBitmap(bitmap)
+ ", is mutable: " + bitmap.isMutable()
+ ", is allowed config: " + allowedConfigs.contains(bitmap.getConfig()));
}
return false ;
}
final int size = strategy.getSize(bitmap);
strategy.put(bitmap);
tracker.add(bitmap);
puts++;
currentSize += size;
if (Log.isLoggable(TAG, Log.VERBOSE)) {
Log.v(TAG, "Put bitmap in pool=" + strategy.logBitmap(bitmap));
}
dump();
evict();
return true ;
}
可以看出,正常情况下调用put方法返回true,证明缓存该Bitmap成功,缓存成功则不调用bitmap.recycler()方法。当需要使用Bitmap时,先从Bitmap中查找是否有符合条件的Bitmap。在RecyclerView中使用Glide的例子中,将大量复用宽高及Bitmap.Config都相等的Bitmap,极大的优化系统内存性能,减少频繁的创建回收Bitmap。
小结
Glide的缓存管理至此就分析完了,主要抓住Resource和Bitmap的缓存来讲解。在代码的阅读中还发现了工厂、装饰者等设计模式。Glide的解耦给开发者提供很大的便利性,可根据自身需求设置缓存参数,例如默认Bitmap.Config、BitmapPool缓存大小等。最后,针对Glide的缓存设计,提出几点小建议:
Glide虽然默认使用的Bitmap.Config是RGB_565,但在进行transform(例如圆角显示图片)时往往默认是ARGB_8888,因为RGB_565没有透明色,此时可重写圆角变换的代码,继续使用RGB_565,同时给canvas设置背景色。
BitmapPool缓存的Bitmap大小跟Bitmap的分辨率也有关系,在加载图片的过程中,可调用.override(width, height) 指定图片的宽高,再调整ImageView控件的大小适应布局。
Resource的一级缓存和Bitmap都是内存缓存,虽然极大的提升了复用,但也会导致部分内存在系统执行GC时无法释放。若内存达到手机性能瓶颈,应在合适的时机调用Glide.get(this).clearMemory() 释放内存。
Glide核心设计一:皮皮虾,我们走
发表于 2017-02-20 | 阅读次数 130
原文链接:Glide核心设计一:皮皮虾,我们走
引言
皮皮虾,又名虾姑,是淡水中的强者。其头部的两个锤节,可以轻易破坏贝类的外壳,身体上的步足可以保证快速移动。这些优秀的品质,使它被表情包盯上。
Glide,作为Android最优秀的图片加载框架之一,能和Activity和Fragment的生命周期绑定,是区别于其它网络框架的核心特征,也是本文分析的重点。
我们将此特征和皮皮虾表情包做一个类比:
框架设计
简单使用
Glide.with(Context).load(String).into(ImageView) 可实现从网络中获取图片并展示到ImageView当中。其中和页面作生命周期绑定的主要入口是Glide.with(Context) 。按照一般的分析逻辑应该先分析源码,才得出结论,但因一入源码深似海,不利于整体把握,所以先给出结论。Glide.with(Context)返回的是一个RequestManager ,我们来看RequestManager 的类的说明注释。
A class for managing and starting requests for Glide. Can use activity, fragment and connectivity lifecycle events to intelligently stop, start, and restart requests. Retrieve either by instantiating a new object, or to take advantage built in Activity and Fragment lifecycle handling, use the static Glide.load methods with your Fragment or Activity.
由此可知,该类就是用于将请求 和Activity或Framgent的生命周期 做绑定。
类图
将和生命周期相关的类图如下(省略大部分类的变量和方法):
类的简单介绍
RequestManagerRetriever :该类用于创建RequestManager或在Activity、Fragment中找出已创建的RequestManager,RequestManagerRetriever是一个单例。RequestManagerFragment :继承Fragment,不可见,仅用于保存RequestManager,还有一个SupportRequestManagerFragment继承v4包的Fragment,功能类似。LifecycleListener :用于监听Activity、Fragment的生命周期事件。Lifecycle :用于添加LifecycleListener。ActivityFragmentLifecycle :实现Livecycle接口,用于通知Activity、Fragment的生命周期事件。RequestTracker :该类用于跟踪、取消和重新启动执行中、已完成和失败的请求。ConnectivityMonitor : 监听网络事件的接口,当网络状态发生变化时,影响网络请求状态,继承LifecycleListener。DefaultConnectivityMonitor : ConnectivityMonitor的实现类,实现监听网络状态的逻辑。RequestManagerConnectivityListener : 实现ConnectivityListener接口,将网络事件传递给RequestTracker。
类的联系
以上对各类有一个简单的了解,接下来将重点讲清楚各类之间的联系。整个生命周期的绑定分为四部分。
调用Glide.with(Context),根据传入的Context类型创建RequestManager。Context可以为Activity、Fragment和Application。
在传入的参数Activity、或者Fragment中,添加一个不可见的Fragment,监听不可见Fragment的生命周期并将该事件传递给和Fragment一一绑定的RequestManager。
RequestManager监听到生命事件后,管理图片请求做出响应。
监听当网络从无到有时,RequestManager要重新启动图片请求。
代码解读
根据以上内容可直接跟代码可跳过以下内容,印象更加深刻。
第一部分:Glide.with(Context)
public static RequestManager with (Context context) return retriever.get(context);
}
`
调用RequestManagerRetriever的get方法如下:
public RequestManager get (Context context) if (context == null ) {
throw new IllegalArgumentException("You cannot start a load on a null Context" );
} else if (Util.isOnMainThread() && !(context instanceof Application)) {
if (context instanceof FragmentActivity) {
return get((FragmentActivity) context);
} else if (context instanceof Activity) {
return get((Activity) context);
} else if (context instanceof ContextWrapper) {
return get(((ContextWrapper) context).getBaseContext());
}
}
return getApplicationManager(context);
}
以传入参数为Activity类型为例,代码如下:
public RequestManager get (Activity activity) if (Util.isOnBackgroundThread() || Build.VERSION.SDK_INT < Build.VERSION_CODES.HONEYCOMB) {
return get(activity.getApplicationContext());
} else {
assertNotDestroyed(activity);
android.app.FragmentManager fm = activity.getFragmentManager();
return fragmentGet(activity, fm);
}
}
主要调用fragmentGet方法,代码如下:
RequestManager fragmentGet (Context context, android.app.FragmentManager fm) {
RequestManagerFragment current = getRequestManagerFragment(fm);
RequestManager requestManager = current.getRequestManager();
if (requestManager == null ) {
requestManager = new RequestManager(context, current.getLifecycle(), current.getRequestManagerTreeNode());
current.setRequestManager(requestManager);
}
return requestManager;
}
getRequestManagerFragment(fm)函数主要是根据FragmentManager获取Fragment,代码如下:
RequestManagerFragment getRequestManagerFragment (final android.app.FragmentManager fm) {
RequestManagerFragment current = (RequestManagerFragment) fm.findFragmentByTag(FRAGMENT_TAG);
if (current == null ) {
current = pendingRequestManagerFragments.get(fm);
if (current == null ) {
current = new RequestManagerFragment();
pendingRequestManagerFragments.put(fm, current);
fm.beginTransaction().add(current, FRAGMENT_TAG).commitAllowingStateLoss();
handler.obtainMessage(ID_REMOVE_FRAGMENT_MANAGER, fm).sendToTarget();
}
}
return current;
}
以上就是根据传入的Context类型创建RequestManager的代码部分。
第二部分:监听不可见Fragment的生命周期并传递给RequestManager
添加不可见Fragment的目的,就是因为该Fragment和父类的Activity具有同样的生命周期,无须改动原有Activity的代码,即可实现生命周期的监听。
@Override
public void onStart () super .onStart();
lifecycle.onStart();
}
@Override
public void onStop () super .onStop();
lifecycle.onStop();
}
@Override
public void onDestroy () super .onDestroy();
lifecycle.onDestroy();
}
可以看出,Fragment的声明周期的监听都转移到类型是ActivityFragmentLifecycle的变量lifecycle中的对应方法执行。查看ActivityFragmentLifecycle的代码:
void onStart () true ;
for (LifecycleListener lifecycleListener : Util.getSnapshot(lifecycleListeners)) {
lifecycleListener.onStart();
}
}
set集合的LifecycleListener是如何添加进去的,看ActivityFragmentLifecycle中的代码:
@Override
public void addListener (LifecycleListener listener) if (isDestroyed) {
listener.onDestroy();
} else if (isStarted) {
listener.onStart();
} else {
listener.onStop();
}
}
addListener(LifecycleListener listener)方法是接口Lifecycle的方法。RequestManagerFragment提供一个公有方法:
ActivityFragmentLifecycle getLifecycle () {
return lifecycle;
}
回看第一部分创建RequestManager时:
requestManager = new RequestManager(context, current.getLifecycle(), current.getRequestManagerTreeNode());
RequestManagerFragment中的Lifecycle作为RequestManager的构造函数的参数传递给RequestManager。RequestManager构造函数如下:
RequestManager(Context context, final Lifecycle lifecycle, RequestManagerTreeNode treeNode,
RequestTracker requestTracker, ConnectivityMonitorFactory factory) {
this .context = context.getApplicationContext();
this .lifecycle = lifecycle;
this .treeNode = treeNode;
this .requestTracker = requestTracker;
this .glide = Glide.get(context);
this .optionsApplier = new OptionsApplier();
ConnectivityMonitor connectivityMonitor = factory.build(context,
new RequestManagerConnectivityListener(requestTracker));
if (Util.isOnBackgroundThread()) {
new Handler(Looper.getMainLooper()).post(new Runnable() {
@Override
public void run () this );
}
});
} else {
lifecycle.addListener(this );
}
lifecycle.addListener(connectivityMonitor);
}
由此可见,lifecycle添加的就是RequestManager实现的LifecycleListener接口。
第三部分:RequestManager实现LifecycleListener
接着查看RequestManager实现LifecycleListener的方法:
@Override
public void onStart () @Override
public void onStop () @Override
public void onDestroy () 继续进入resumeRequests()、pauseRequests()和requestTracker.clearRequests()方法可知,都是调用RequestTracker相应的方法,RequestTracker类包含一个集合的Request,该集合包含一个Activity获取一个
第四部分:监听网络状态并作出相应
RequestManager的构造函数有如下方法:
ConnectivityMonitor connectivityMonitor = factory.build(context,
new RequestManagerConnectivityListener(requestTracker));
lifecycle.addListener(connectivityMonitor);
以上代码可看出,ConnectivityMonitor也实现了LifecycleListener。继续跟踪代码发现,factory的实例是ConnectivityMonitorFactory,在该工厂中会检查网络权限,同时创建ConnectivityMonitor的实例DefaultConnectivityMonitor。LifecycleListener接口的实现如下:
@Override
public void onStart () @Override
public void onStop () @Override
public void onDestroy () 广播接收器代码如下:
private final BroadcastReceiver connectivityReceiver = new BroadcastReceiver() {
@Override
public void onReceive (Context context, Intent intent) boolean wasConnected = isConnected;
isConnected = isConnected(context);
if (wasConnected != isConnected) {
listener.onConnectivityChanged(isConnected);
}
}
};
ConnectivityListener 的实例的类型是RequestManager的内部类,代码如下:
private static class RequestManagerConnectivityListener implements ConnectivityMonitor .ConnectivityListener private final RequestTracker requestTracker;
public RequestManagerConnectivityListener (RequestTracker requestTracker) this .requestTracker = requestTracker;
}
@Override
public void onConnectivityChanged (boolean isConnected) if (isConnected) {
requestTracker.restartRequests();
}
}
}
小结
以上就是Glide实现图片加载和Activity、Fragment生命周期绑定的全部分析。会发现使用了观察者模式和工厂模式进行解耦,其中创建一个不可见的Fragment设置到需要被监控生命周期的Activity、Fragment中,最为精彩。接下来将分析Glide核心设计二:图片缓存。敬请期待。
送一个内存泄漏给2016的记几
发表于 2016-12-23 | 阅读次数 139
原文链接:送一个内存泄漏给2016的记几
背景
年底了,看公司项目的友盟的bug列表,发现java.lang.OutOfMemoryError 的问题不少,也该是时候还了。
问题描述
在解决内存泄漏的过程中,遇到一个静态变量导致的内存泄漏,关键是这代码还是自己敲的,明明已经使用弱引用,为什么还是内存泄漏了。看代码:
public class RtHttp public static RtHttp instance = new RtHttp();
public Context context;
public static void with (Context context) wrContext = new WeakReference(context);
instance.context = wrContext.get();
}
}
RtHttp为封装客户端网络框架请求的入口,假设两个条件:
其中传入的Context对象只能是Activity,不能使用context.getApplicationContext()(因为此RtHttp还封装了显示网络加载对话框的代码)。
不能在Activity onDestroy()方法中调用RtHttp.instance.context = null;
已经使用了弱引用,为什么还是内存泄漏呢?使用弱引用依然内存泄漏 ,WeakReference useless ,无果。
总结
一个内存泄漏的问题,反映了Java基础不牢固,在学习知识和解决问题上也不够深入。一直想写一篇2016的总结,希望以此内存泄漏的问题为界,实现在2017的一个技术提升。
引用
Android 内存泄漏总结
模拟服务器返回数据
发表于 2016-12-15 | 阅读次数 259
本篇文章已授权微信公众号 guolin_blog (郭霖)独家发布
背景
模拟服务器返回的数据,在以下场景具有实际意义:
和服务器开发协商好开发接口,但服务器API尚未部署,想接口定义好就进行开发;
如果客户端开发人员能不走服务器,通过模拟数据返回,能提升开发效率和程序质量。
实现思路
本文主要讲解两种实现方式:
使用网络分析工具拦截客户端请求,并返回伪造数据。
使用客户端网络框架拦截请求并返回。
对于方案一,主要使用网络分析工具Charles进行拦截并返回,对于方案二,主要讲解使用OkHttp作为网络框架,利用拦截器机制实现模拟返回。
使用Charles模拟数据
准备条件
客户端需要连接到和电脑同一个网络(手机连接电脑发出的wifi)
官网下载安装
配置
配置方法参考Charles:移动端设备网络抓包
转接服务器地址
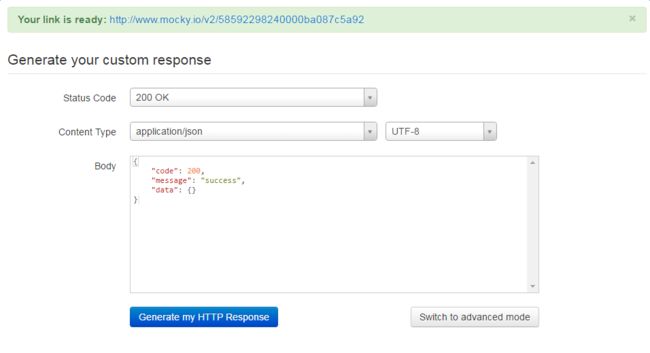
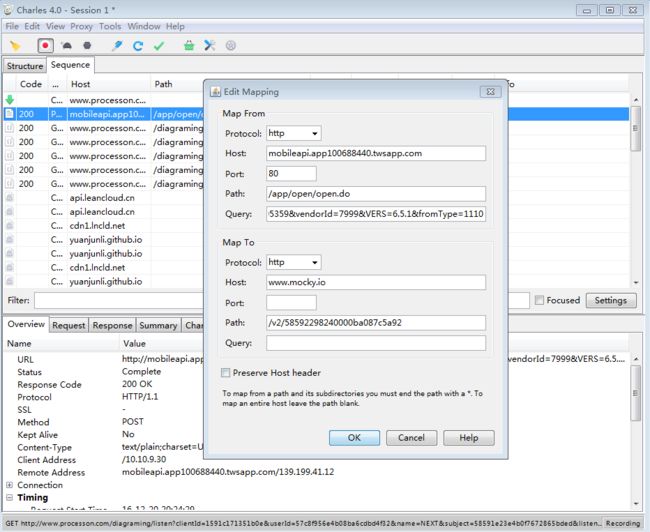
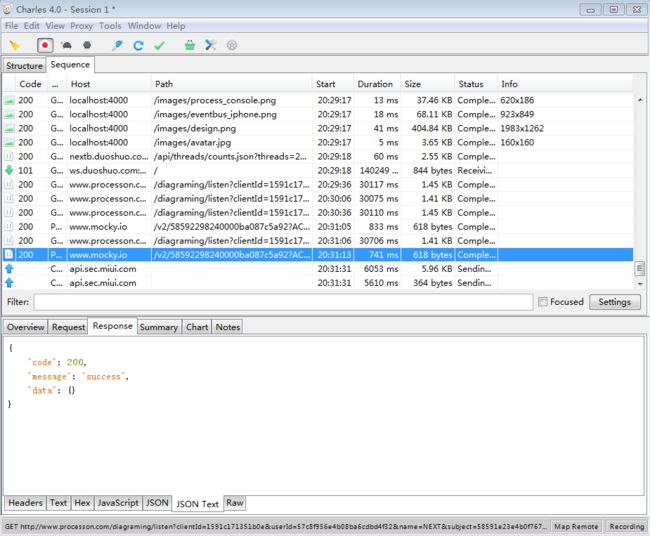
Generate my HTTP Response 按钮生成http的url地址。右键 选择Map Remote… http://www.mocky.io/v2/58592298240000ba087c5a92 ,如下图:Tool工具图标 ,取消选择Map Remote ,再勾选Map Remote ,让设置的ip地址生效。此时,当客户端请求原地址时,都会返回模拟ip地址的数据,效果图如下:
小结
以上,使用Mocky网络和Charles工具实现模拟数据返回,无需改变客户端原有代码,但是,当需要改变客户端返回的数据时,则需要重新生成http模拟地址,再次设置Charles Map to 内容。
自定义OkHttp Interceptor模拟返回
以下内容假设用户掌握OkHttp的简单使用,重点讲解自定义OkHttpInterceptor模拟返回数据。
OkHttp拦截器
代码实现
MockInterceptor代码如下:
public class MockInterceptor implements Interceptor @Override
public Response intercept (Chain chain) throws IOException new Gson();
Response response = null ;
Response.Builder responseBuilder = new Response.Builder()
.code(200 )
.message("" )
.request(chain.request())
.protocol(Protocol.HTTP_1_0)
.addHeader("content-type" , "application/json" );
Request request = chain.request();
if (request.url().equals("http://url_whitch_need_to_mock" )) {
String responseString = "{\n" +
"\t\"code\": 200,\n" +
"\t\"message\": \"success\",\n" +
"\t\"data\": {}\n" +
"}" ;
responseBuilder.body(ResponseBody.create(MediaType.parse("application/json" ), responseString.getBytes()));
response = responseBuilder.build();
}else {
response = chain.proceed(request);
}
return response;
}
}
在debug模式下,将此Interceptor添加到网络请求的OkHttp中,即可对指定的api地址进行拦截,并且返回特定的数据。
小结
使用OkHttp的拦截机制,可实现改变部分代码则可模拟返回数据,返回的数据可在代码中设置,可使用工厂模式将模拟数据的生成变动代码放到Factory中。依赖网络请求框架,若原项目使用OkHttp或Retrofit作为网络框架,可轻易实现模拟接口。
引用
Charles:移动端设备网络抓包
创建OkHttp自定义Log
发表于 2016-12-10 | 阅读次数 27
原文链接:创建OkHttp自定义Log
背景
本文重点讲解如何在使用OkHttp作为网络请求框架的前提下,如何自定义一个适合自己项目的Http Log,从而提升网络Api开发、调试效率。
Http协议
只有对Http协议有基本的了解,才能更好的调试网络接口。
一个故事
男女主一次偶然的机会,开始信件传情,但他们的信件并不是直接寄给对方,而是先寄到某个地点A,由地点A的主人转发。(好吧,这是《北京遇上西雅图之不二情书》的情节)。我们来看男主发信的过程:
先购买有效邮票;
填写信件的收件人、收件地址等信息;
把信件放到信封里寄出去。
显然,女主收到信后回复信件也是同样的流程。
类比
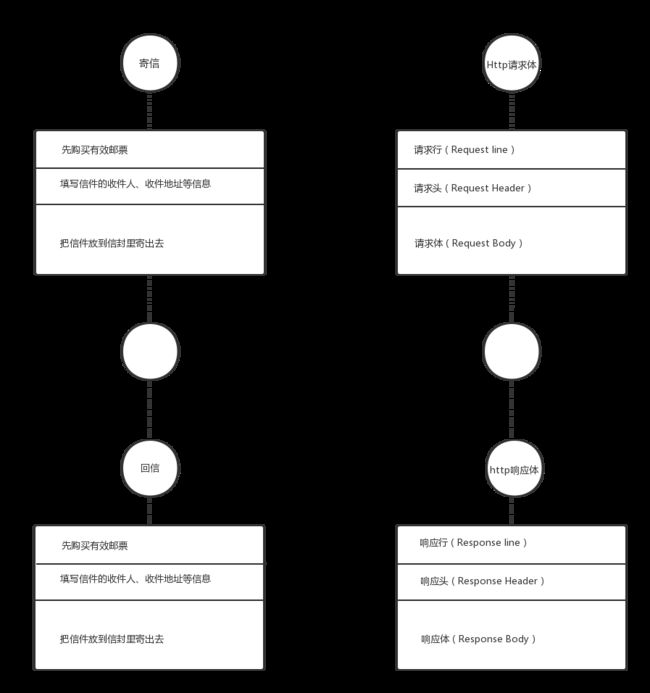
我们现在将Http协议的消息结构和故事主人公收发信的过程做一个类比:
Http消息结构
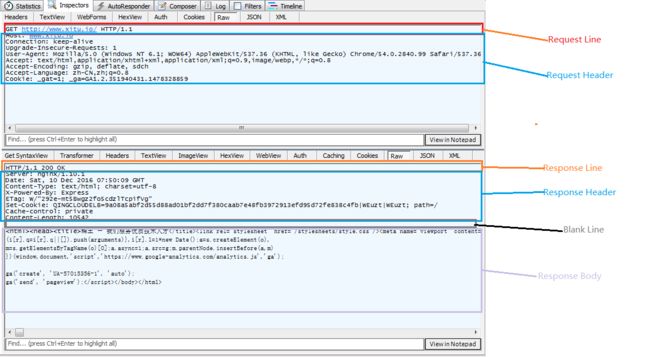
由前面的分析可知,Http请求消息由三部分组成:
请求行由3部分组成:①请求的方法,POST还是GET等;②请求路径;③Http协议
请求头,每一行都是name:value的结构,包含各种来自请求客服端的信息
请求体,提交给服务器的信息,GET方法没有此项。
Http响应体跟请求体格式大致一样。
请求体有协议和响应码组成,200为响应成功
响应头,每一行都是name:value的结构,包含各种来自服务器的信息
响应体,返回客户端需要的数据
自定义LogInterceptor
OkHttp Interceptor
OkHttp的一大特点就是可以在发出请求体和收到响应体之间添加任意个数任意任意功能的拦截器,对请求体或者响应体进行操作。还是用《北京遇上西雅图之不二情书》的故事来说,那么地点A的主人就是充当拦截器的角色,在故事中他不仅转发信件,还阅读了信件的内容。
根据需求确定需要Log的信息
Log的信息和划分两类,一类是跟业务相关的信息,一类是与业务无关。
业务相关包括:
业务无关包括:请求体和响应体的消息结构 中。
Log效果图
以公司项目的测试服务器自动登录接口,log效果如下:
POST
acid->1075
userId->-1
network code->200
url->http:
time->84.473
request headers->sessionId:
request->{"data" :{"pagenum" :0 ,"uid" :-1 ,"flag" :"00000000" },"requeststamp" :"20161212151841836466" }
body->{"code" :200 ,"responsestamp" :"20161212151841836466" ,"data" :{"uid" :-1 ,"nickname" :"游客258" ,"uploadUrl" :"http://mobileapi.app100688440.twsapp.com/uploadservlet" ,"wxUrl" :"http://wx.app100688440.twsapp.com" ,"isEmcee" :0 ,"canLive" :0 ,"goodnum" :0 ,"index" :{},"revGift" :{},"msgRemind" :{},"freshmanMission" :{},"account" :{},"onlineLimit" :"600" ,"userSecretKey" :"brjefjzw37ocw46" }}
log解释:
代码实现
public class LogInterceptor implements Interceptor private static final String TAG = "LogInterceptor" ;
private static final Charset UTF8 = Charset.forName("UTF-8" );
@Override
public Response intercept (Chain chain) throws IOException "before chain,request()" );
Request request = chain.request();
String acid = request.url().queryParameter("ACID" );
Response response;
try {
long t1 = System.nanoTime();
response = chain.proceed(request);
long t2 = System.nanoTime();
double time = (t2 - t1) / 1e6 d;
String userId = request.url().queryParameter("userId" );
String type = "" ;
if (request.method().equals("GET" )) {
type = "GET" ;
} else if (request.method().equals("POST" )) {
type = "POST" ;
} else if (request.method().equals("PUT" )) {
type = "PUT" ;
} else if (request.method().equals("DELETE" )) {
type = "DELETE" ;
}
BufferedSource source = response.body().source();
source.request(Long.MAX_VALUE);
Buffer buffer = source.buffer();
String logStr = "\n--------------------" .concat(TextUtils.isEmpty(acid) ? "" : acid).concat(" begin--------------------\n" )
.concat(type)
.concat("\nacid->" ).concat(TextUtils.isEmpty(acid) ? "" : acid)
.concat("\nuserId->" ).concat(TextUtils.isEmpty(userId) ? "" : userId)
.concat("\nnetwork code->" ).concat(response.code() + "" )
.concat("\nurl->" ).concat(request.url() + "" )
.concat("\ntime->" ).concat(time + "" )
.concat("\nrequest headers->" ).concat(request.headers() + "" )
.concat("request->" ).concat(bodyToString(request.body()))
.concat("\nbody->" ).concat(buffer.clone().readString(UTF8));
Log.i(TAG, logStr);
} catch (Exception e) {
Log.d(TAG,e.getClass().toString()+", error:acid = " +acid);
throw e;
}
return response;
}
private static String bodyToString (final RequestBody request) try {
final Buffer buffer = new Buffer();
request.writeTo(buffer);
return buffer.readUtf8();
} catch (final IOException e) {
return "did not work" ;
}
}
}
开源项目okhttp-logging-interceptor
如果不想自己编写代码,也可以使用开源项目okhttp-logging-interceptor,支持:1.设置Log的等级;2.使用自定义Log。此开源项目也仅是一个Interceptor。但个人觉得log的样式并不适合调试使用。同时log的内容比较通用,若想突出对应项目的信息,建议还是自定义Http Log。
Okhttp+Retrofit+Rxjava
此Interceptor配合OkHttp使用,关于Okhttp+Retrofit+Rxjava的整合,可查看RxJava+Retrofit+OkHttp封装
引用
okhttp-logging-interceptor
RxJava+Retrofit+OkHttp封装
发表于 2016-11-26 | 阅读次数 2264
原文链接:rxjava+retrofit+OkHttp封装
前言
本文假设读者对RxJava、Retrofit和OkHttp具有基本的了解,以项目为例,重点讲解如何优雅的封装一个网络请求框架,以适应实际项目中的使用需求。
要解决的问题
支持切换网络请求地址,例如项目有分区功能,不同的分区对应不同的服务器地址
服务器返回接口格式不一致,有的接口是返回json格式,有的返回String格式
url地址中,包含固定的参数,例如版本号,渠道信息等,怎么统一添加
url地址中,包含动态地参数,如何动态添加
是否添加网络请求的Log
是否添加header(sessionId)
网络请求可配置是否显示网络加载动画
封装Observalbe进行数据处理的步骤,可动态改变数据处理的过程
封装错误处理,区分网络错误和应用层响应错误。
优雅封装
相互联系
在三者的关系中,Retrofit主要负责将网络请求接口化,真正的网络请求和响应交给OkHttp,而RxJava在网络框架中扮演数据响应后进行数据处理的角色。做个简单比喻:假设用户需要从上海飞往北京中关村办事,需要办理登机、做飞机、到达北京后前往中关村。登机手续由Retrofit负责,真正的运输是由飞机(Okhttp)完成,客户到达(数据返回)选择交通工具(RtHttp)到达中关村。
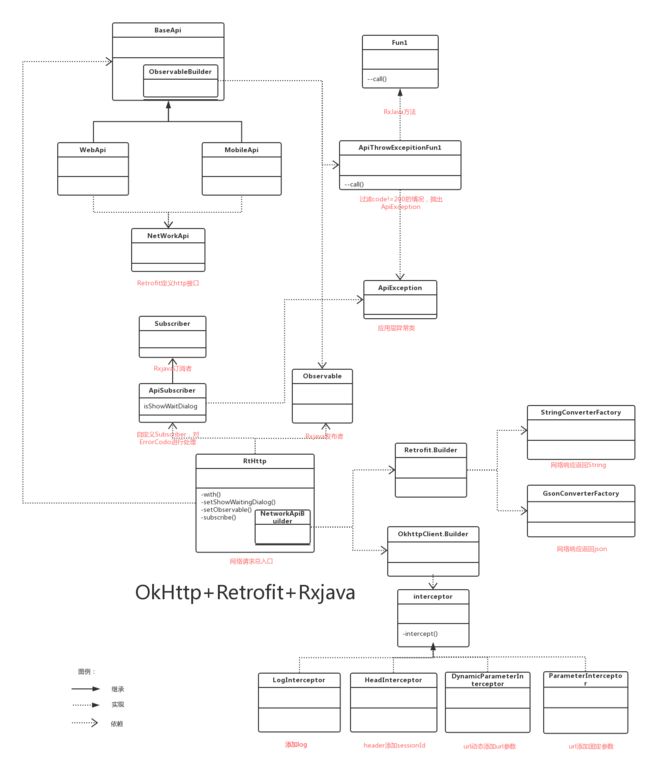
设计图
设计代码
使用
首先,我们来看封装后的网络请求使用:
RtHttp.with(this )
.setShowWaitingDialog(true )
.setObservable(MobileApi.response(map,ProtocolUtils.PROTOCOL_MSG_ID_LOGIN))
.subscriber(new ApiSubscriber() {
@Override
public void onNext (JSONObject result) RtHttp
封装后,RtHttp支持链式调用,我们来看RtHttp的代码:
public class RtHttp public static final String TAG = "RtHttp" ;
public static RtHttp instance = new RtHttp();
private Observable observable;
private static WeakReference wrContext;
private boolean isShowWaitingDialog;
public static RtHttp with (Context ct) new WeakReference (ct);
return instance;
}
public RtHttp setShowWaitingDialog (boolean showWaitingDialog) return instance;
}
public RtHttp setObservable (Observable observable) this .observable = observable;
return instance;
}
public RtHttp subscriber (ApiSubscriber subscriber) return instance;
}
public static class NetworkApiBuilder private String baseUrl;
private boolean isAddSession;
private HashMap addDynamicParameterMap;
private boolean isAddParameter;
private Retrofit.Builder rtBuilder;
private OkHttpClient.Builder okBuild;
private Converter.Factory convertFactory;
public NetworkApiBuilder setConvertFactory (Converter.Factory convertFactory) this .convertFactory = convertFactory;
return this ;
}
public NetworkApiBuilder setBaseUrl (String baseUrl) this .baseUrl = baseUrl;
return this ;
}
public NetworkApiBuilder addParameter () true ;
return this ;
}
public NetworkApiBuilder addSession () true ;
return this ;
}
public NetworkApiBuilder addDynamicParameter (HashMap map) return this ;
}
public NetworkApi build () new Retrofit.Builder();
okBuild = new OkHttpClient().newBuilder();
if (!TextUtils.isEmpty(baseUrl)){
rtBuilder.baseUrl(baseUrl);
}else {
rtBuilder.baseUrl(Mobile.getBaseUrl());
}
if (isAddSession){
okBuild.addInterceptor(new HeaderInterceptor(wrContext.get()));
}
if (isAddParameter){
okBuild.addInterceptor(new ParameterInterceptor());
}
if (addDynamicParameterMap!=null ){
okBuild.addInterceptor(new DynamicParameterInterceptor(addDynamicParameterMap));
}
if (Log.isDebuggable()){
okBuild.addInterceptor(new LogInterceptor());
}
if (convertFactory!=null ){
rtBuilder.addConverterFactory(convertFactory);
}else {
rtBuilder.addConverterFactory(GsonConverterFactory.create());
}
rtBuilder.addCallAdapterFactory(RxJavaCallAdapterFactory.create())
.client(okBuild.build());
return rtBuilder.build().create(NetworkApi.class);
}
}
}
RtHttp的代码很简洁,NetworkApiBuilder使用builder模式创建NetWorkApi,可以动态地配置Retrofit和OkHttpClient的参数。
baseUrl:可通过设置baseUrl产生不同的retrofit
addConverterFactory:通过设置addConverterFactory可适配后台接口返回不同的数据类型,例如json和String
OkHttp可添加任意Interceptor实现网络请求的处理:
HeaderInterceptory用于添加header(sessionid)
ParameterInterceptor用于添加url固定的参数
DynamicParameterInterceptor用于url添加动态参数
LogInterceptor 用户显示log
MobileApi
下面我们来看Observable的创建:
public class MobileApi extends BaseApi public static NetworkApi networkApi;
public static Observable obserable;
public static NetworkApi getNetworkApi () if (networkApi==null ){
networkApi = new RtHttp.NetworkApiBuilder()
.addSession()
.addParameter()
.build();
}
return networkApi;
}
public static Observable getObserable (Observable observable) new ObserableBuilder(observable)
.addApiException()
.build();
return obserable;
}
public static Observable response (HashMap map, int protocolId) return getObserable(getNetworkApi().response(protocolId, body));
}
}
getNetworkApi()方法可以创建特定的NetworkApi,getObserable添加数据返回后特定的处理。
NetWorkApi接口定义
public interface NetworkApi @POST ("open/open.do" )
Observable post (@Query("ACID" ) int acid, @Body RequestBody entery) ;
@POST ("open/open.do" )
Observable> response(@Query ("ACID" ) int acid, @Body RequestBody entery);
}
acid是用于区分接口功能,RequestBody为请求的body参数。
BaseApi
public abstract class BaseApi public static RequestBody toBody (HashMap map) new Gson();
ImiRequestBean requestBean= new ImiRequestBean();
requestBean.setRequeststamp(ProtocolUtils.getTimestamp());
requestBean.setData(map);
return RequestBody.create(okhttp3.MediaType.parse("application/json; charset=utf-8" ), gson.toJson(requestBean));
}
public static RequestBody toBody (JSONObject jsonObject) return RequestBody.create(okhttp3.MediaType.parse("application/json; charset=utf-8" ), (jsonObject).toString());
}
public static class ObserableBuilder private Observable observable;
private boolean apiException;
private boolean toJSONJbject;
private boolean isWeb;
private Scheduler subscribeScheduler;
private Scheduler obscerveScheduler;
public void setObscerveScheduler (Scheduler obscerveScheduler) this .obscerveScheduler = obscerveScheduler;
}
public void setSubscribeScheduler (Scheduler subscribeScheduler) this .subscribeScheduler = subscribeScheduler;
}
public ObserableBuilder (Observable o) this .observable = o;
}
public ObserableBuilder addApiException () true ;
return this ;
}
public ObserableBuilder addToJSONObject () true ;
return this ;
}
public ObserableBuilder isWeb () true ;
return this ;
}
public Observable build () if (isWeb){
observable = observable.map(new StringToJSONObjectFun1());
}
if (apiException){
observable = observable.flatMap(new ApiThrowExcepitionFun1());
}
if (toJSONJbject){
observable = observable.map(new ObjectToJSONObjectFun1());
}
if (subscribeScheduler!=null ){
observable = observable.subscribeOn(subscribeScheduler);
}else {
observable = observable.subscribeOn(Schedulers.io());
}
if (obscerveScheduler!=null ){
observable = observable.observeOn(obscerveScheduler);
}else {
observable = observable.observeOn(AndroidSchedulers.mainThread());
}
return observable;
}
}
}
BaseApi提供toBody的方法,支持将JSONObject和HashMap转换成RequestBody。ObserableBuilder用于处理NetworkApi返回的Observalbe对象。使用ObserableBuilder可返回不同的observalbe。默认设置数据请求在子线程,处理完返回OnNext方法使用主线程。
WebApi
webApi跟MobileApi请求地址以及返回数据的数据都不一样,WebApi返回的数据类型是String,我们来看WebApi的代码:
public class WebApi extends BaseApi public static final int ROLLER = 1 ;
public static final int FRUIT = 2 ;
public static final int WX = 3 ;
public static NetworkApi networkApi;
public static Observable observable;
public static NetworkApi getNetworkApi (String baseUrl, HashMap map) new RtHttp.NetworkApiBuilder()
.setBaseUrl(baseUrl)
.addDynamicParameter(map)
.setConvertFactory(StringConverFactory.create())
.build();
return networkApi;
}
public static NetworkApi getRollerApi (HashMap map) return getNetworkApi(Web.getRollerUrl(), map);
}
public static NetworkApi getFruitApi (HashMap map) return getNetworkApi(Web.getFruitUrl(), map);
}
public static NetworkApi getWxApi (HashMap map) return getNetworkApi(Web.getWXUrl(), map);
}
public static Observable getObserable (Observable observable) new ObserableBuilder(observable)
.isWeb()
.build();
return observable;
}
public static Observable webPost (HashMap map, String action, int type) null ;
if (type == ROLLER) {
networkApi = getRollerApi(map);
} else if (type == FRUIT) {
networkApi = getFruitApi(map);
} else if (type == WX) {
networkApi = getWxApi(map);
}
String[] str = action.split("/" );
if (str.length == 1 ) {
observable = networkApi.webPost(str[0 ]);
} else if (str.length == 2 ) {
observable = networkApi.webPost(str[0 ], str[1 ]);
} else {
return null ;
}
return getObserable(observable);
}
}
getNetworkApi的参数时baseUrl和设置动态url参数 的map。getObserable的方法不使用addApiException的方法,而是使用isWeb()的方法。可以看出,变化的代码都封装在BaseApi的子类中。通过创建不同的子类,实现不同的网络请求及数据处理逻辑。
ApiSubscriber
ApiSubscriber封装了是否显示加载动画和对onError()的默认处理。
public abstract class ApiSubscriber <T > extends Subscriber <T > private Context mCtx;
private WaitingDialog waitingDialog;
private boolean isShowWaitDialog;
public void setShowWaitDialog (boolean showWaitDialog) @Override
public void onStart () super .onStart();
if (isShowWaitDialog){
showWaitDialog();
}
}
public void setmCtx (Context mCtx) this .mCtx = mCtx;
}
@Override
public void onCompleted () if (isShowWaitDialog){
dismissDialog();
}
}
@Override
public void onError (Throwable e) if (isShowWaitDialog){
dismissDialog();
}
Throwable throwable = e;
if (Log.isDebuggable()){
Log.i(RtHttp.TAG,throwable.getMessage().toString());
}
while (throwable.getCause() != null ){
e = throwable;
throwable = throwable.getCause();
}
if (e instanceof HttpException){
HttpException httpException = (HttpException) e;
if (TextUtils.isEmpty(httpException.getMessage())){
ToastUtil.showToast(mCtx, R.string.imi_toast_common_net_error);
}else {
String errorMsg = httpException.getMessage();
if (TextUtils.isEmpty(errorMsg)){
ToastUtil.showToast(mCtx, R.string.imi_toast_common_net_error);
}else {
ToastUtil.showToast(mCtx, errorMsg);
}
}
}else if (e instanceof ApiException){
onResultError((ApiException) e);
}else if (e instanceof JsonParseException
|| e instanceof JSONException
|| e instanceof ParseException){
ToastUtil.showToast(mCtx, R.string.imi_toast_common_parse_error);
}else if (e instanceof UnknownHostException){
ToastUtil.showToast(mCtx, R.string.imi_toast_common_server_error);
}else if (e instanceof SocketTimeoutException) {
ToastUtil.showToast(mCtx, R.string.imi_toast_common_net_timeout);
}else {
e.printStackTrace();
ToastUtil.showToast(mCtx, R.string.imi_toast_common_net_error);
}
}
protected void onResultError (ApiException ex) switch (ex.getCode()){
case 10021 :
ToastUtil.showToast(mCtx, R.string.imi_login_input_mail_error);
break ;
case 10431 :
ToastUtil.showToast(mCtx, R.string.imi_const_tip_charge);
break ;
default :
String msg = ex.getMessage();
if (TextUtils.isEmpty(msg)){
ToastUtil.showToast(mCtx, R.string.imi_toast_common_net_error);
}else {
ToastUtil.showToast(mCtx, msg);
}
}
}
private void dismissDialog () if (waitingDialog!=null ) {
if (waitingDialog.isShowing()) {
waitingDialog.dismiss();
}
}
}
private void showWaitDialog () if (waitingDialog == null ) {
waitingDialog = new WaitingDialog(mCtx);
waitingDialog.setDialogWindowStyle();
waitingDialog.setCanceledOnTouchOutside(false );
}
waitingDialog.show();
}
}
ApiThrowExcepitionFun1
使用ObservalbeBuilder中通过addApiException()的方可以法添加对服务器返回code的处理,下面来看抛出异常的代码:
public class ApiThrowExcepitionFun1 <T > implements Func1 <ResponseInfo <T >, Observable <T >>@Override
public Observable call (ResponseInfo responseInfo) if (responseInfo.getCode()!= 200 ) {
return Observable.error(new ApiException(responseInfo.getCode(),responseInfo.getMessage()));
}
return Observable.just(responseInfo.getData());
}
}
ResponseInfo
public class ResponseInfo <T > private int code;
private String message;
private T data;
private String responsestamp;
public String getResponsestamp () return responsestamp;
}
public void setResponsestamp (String responsestamp) this .responsestamp = responsestamp;
}
public int getCode () return code;
}
public void setCode (int code) this .code = code;
}
public String getMessage () return message;
}
public void setMessage (String message) this .message = message;
}
public T getData () return data;
}
public void setData (T data) this .data = data;
}
}
ApiException
public class ApiException extends Exception int code;
public ApiException (int code,String s) super (s);
this .code = code;
}
public int getCode () return code;
}
}
ParameterInterceptor
public class ParameterInterceptor implements Interceptor @Override
public Response intercept (Chain chain) throws IOException "userId" , CommonData.getUid()+"" )
.build();
request = request.newBuilder().url(httpUrl).build();
return chain.proceed(request);
}
}
DynamicParameterInterceptor
public class DynamicParameterInterceptor implements Interceptor private HashMap map;
public DynamicParameterInterceptor (HashMap map) this .map = map;
}
@Override
public Response intercept (Chain chain) throws IOException while (iter.hasNext()) {
Map.Entry entry = (Map.Entry) iter.next();
bulider.addQueryParameter((String) entry.getKey(), (String) entry.getValue());
}
request = request.newBuilder().url(bulider.build()).build();
return chain.proceed(request);
}
}
HeadInterceptor
public class HeaderInterceptor implements Interceptor private Context context;
public HeaderInterceptor (Context context) this .context = context;
}
@Override
public Response intercept (Chain chain) throws IOException "sessionId" , CommonData.getUserInfo(context).sessionId);
Request request = requestBuilder.build();
return chain.proceed(request);
}
}
LogInterceptor
public class LogInterceptor implements Interceptor private static final String TAG = "LogInterceptor" ;
private static final Charset UTF8 = Charset.forName("UTF-8" );
@Override
public Response intercept (Chain chain) throws IOException "before chain,request()" );
Request request = chain.request();
Response response;
try {
long t1 = System.nanoTime();
response = chain.proceed(request);
long t2 = System.nanoTime();
double time = (t2 - t1) / 1e6 d;
String acid = request.url().queryParameter("ACID" );
String userId = request.url().queryParameter("userId" );
String type = "" ;
if (request.method().equals("GET" )) {
type = "GET" ;
} else if (request.method().equals("POST" )) {
type = "POST" ;
} else if (request.method().equals("PUT" )) {
type = "PUT" ;
} else if (request.method().equals("DELETE" )) {
type = "DELETE" ;
}
BufferedSource source = response.body().source();
source.request(Long.MAX_VALUE);
Buffer buffer = source.buffer();
String logStr = "\n--------------------" .concat(TextUtils.isEmpty(acid) ? "" : acid).concat(" begin--------------------\n" )
.concat(type)
.concat("\nacid->" ).concat(TextUtils.isEmpty(acid) ? "" : acid)
.concat("\nuserId->" ).concat(TextUtils.isEmpty(userId) ? "" : userId)
.concat("\nnetwork code->" ).concat(response.code() + "" )
.concat("\nurl->" ).concat(request.url() + "" )
.concat("\ntime->" ).concat(time + "" )
.concat("\nrequest headers->" ).concat(request.headers() + "" )
.concat("request->" ).concat(bodyToString(request.body()))
.concat("\nbody->" ).concat(buffer.clone().readString(UTF8));
Log.i(RtHttp.TAG, logStr);
} catch (Exception e) {
throw e;
}
return response;
}
private static String bodyToString (final RequestBody request) try {
final Buffer buffer = new Buffer();
request.writeTo(buffer);
return buffer.readUtf8();
} catch (final IOException e) {
return "did not work" ;
}
}
}
小结
我们来看,网络请求返回的log如下:
RtHttp: -------------------- begin--------------------
POST
acid->
userId->306448537
network code->200
url->http:
time->160.708437
request headers->request->
body->({"data" :{"getTime" :1 ,"prize" :[{"id" :4 ,"name" :"跑车, 价值8000金豆" ,"num" :"x1" },{"id" :9 ,"name" :"生日蛋糕, 价值80000金豆" ,"num" :"x1" },{"id" :11 ,"name" :"爱的火山, 价值80000金豆" ,"num" :"x1" },{"id" :15 ,"name" :"68888金豆" ,"num" :"68888" },{"id" :63 ,"name" :"炫酷边框,发言与众不同!" ,"num" :"x1" },{"id" :25 ,"name" :"中幸运石, 5分钟内中奖率中幅提升" ,"num" :"x1" },{"id" :28 ,"name" :"1888阳光, 价值944金豆" ,"num" :"1888" },{"id" :30 ,"name" :"自行车, 价值80000金豆" ,"num" :"x1" },{"id" :59 ,"name" :"红玫瑰, 价值1000金豆" ,"num" :"10" },{"id" :34 ,"name" :"超级靓号宝箱,价值700000金豆" ,"num" :"x1" },{"id" :36 ,"name" :"花精灵520个, 女神的最爱" ,"num" :"x520" },{"id" :38 ,"name" :"幸运星, 30分钟内中奖率极大提升" ,"num" :"x1" },{"id" :40 ,"name" :"钻石项链, 价值12000金豆" ,"num" :"x3" },{"id" :42 ,"name" :"水晶鞋, 价值2400金豆" ,"num" :"x3" }],"resetTime" :6 ,"userId" :306448537 },"msg" :"OK" ,"result" :1 })
以上是封装的代码,通过使用Builder模式可以创建不同的Networkapi实例,从而满足项目中的需求及能够更好的应对变化的需求。
引用
Handling API exceptions in RxJava
不是学习工厂模式最简单的指南
发表于 2016-11-09 | 阅读次数 141
引言
工厂模式,简单的理解,就是封装通过new方式创建对象的代码。工厂模式可分为三类:
简单工厂(Simple Factory)
本文的目的,就是通过举例理解区分三种工厂模式。
没有工厂模式
场景
如果用户要购买Iphone手机,在没有工厂模式的情况下,用户只能自己根据手机型号来创建手机,客户代码如下:
public class Customer public Iphone getIphone (String type) switch (type) {
case "iphone5" :
return new Iphone5();
case "iphone6" :
return new Iphone6();
}
return null ;
}
}
问题
当现在需要把ipone5下架,推出iphone6时,Customer代码如下:
public class Customer public Iphone getIphone (String type) switch (type) {
case "iphone6" :
return new Iphone6();
case "iphone7" :
return new Iphone7();
}
return null ;
}
}
简单的修改Customer端的代码,就能满足新的需求,但是,这违背了一个原则:
设计应该”对扩展开发,对修改关闭”
每次有新的型号,都需要改变Customer的代码,这明显是不合理,于是该普通工厂模式出现了。
普通工厂
把创建手机变化的部分封装到一个新的类SimpleIphoneFactory,Customer代码如下:
public class Customer public Iphone getIphone (String type) new SimpleIphoneFactory();
return simpleIphoneFactory.creatIphone(type);
}
}
SimpleIphoneFactory的代码如下:
public class SimpleIphoneFactory public Iphone creatIphone (String type) switch (type){
case "iphone6" :
return new Iphone6();
case "iphone7" :
return new Iphone7();
}
return null ;
}
}
改变后,感觉代码并没有太大的变化。当iphone6下架,iphone8上架,还是得改变SimpleIphoneFactory的代码。简单工厂方法的目的,就是把具体实例化的代码,从客户端删除 。
问题
当Iphone的型号越来越多时,SimpleIphoneFactory的代码依然需要改变,Customer类符合开闭原则,SimpleIphoneFactory不符合开闭原则。下面,我们采用工厂方法,把获取手机的方法getIphone()移回Customer,解决SimpleIponeFactory依赖过多Iphone实体对象的问题。
工厂方法
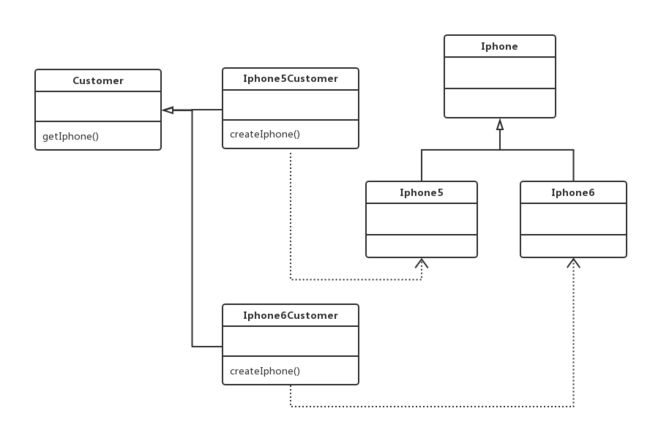
把用户变成抽象类,他的子类决定实例化什么类型的手机:
public abstract class Customer public abstract Iphone getIphone () Iphone5消费者:
public class Iphone5Customer extends Customer @Override
public Iphone getIphone () return new Iphone5();
}
}
Iphone6消费者:
public class Iphone6Customer extends Customer @Override
public Iphone getIphone () return new Iphone6();
}e
}
下面来看不同用户获取手机的代码:
Customer iphone5Customer = new Iphone5Customer();
iphone5Customer.getIphone();
Customer iphone6Customer = new Iphone6Customer();
iphone5Customer.getIphone();
问题
用户获取手机,是为了使用,我们给手机添加一个startUp()方法启动手机:
public abstract class Iphone protected int power;
protected Battery battery;
public void setBattery (Battery battery) this .battery = battery;
};
public abstract void startUp () Iphone抽象类提供一个开机的抽象方法,由子类实现。我们开看Iphone5的实体类:
public class Iphone5 extends Iphone private static final String TAG = "Iphone5" ;
@Override
public void startUp () if (battery.power() == 5000 ){
Log.d(TAG,"startUp success" );
}else {
Log.d(TAG,"Boom!!!!" );
}
}
}
可以看到Iphone5实体类,当调用startUp方法时,需要判断电池的毫安数,当等于5000时,成功启动;否则会爆炸。Iphone依赖Battery,下面来看Battery抽象类:
public abstract class Battery public abstract int power () 抽象类定义了一个抽象power()方法,调用此方法返回电池的毫安数。来看Iphone5Battery和Iphone6Battery的类:
public class Iphone5Battery extends Battery @Override
public int power () return 5000 ;
}
}
public class Iphone6Battery extends Battery @Override
public int power () return 10000 ;
}
}
假设,用户把iphone5的手机配上iphone6的电池(假设电池外形一样,只是毫安数不一样),代码如下:
Customer iphone5Customer = new Iphone5Customer();
Iphone iphone5 = iphone5Customer.getIphone();
iphone5.setBattery(new Iphone6Battery());
iphone5.startUp();
毫无疑问,这会发生爆炸。Log.d(TAG,"Boom!!!!")。为了防止爆炸,生产手机时,必须要配套生产同类型的电池。当需要约束产品类之间的关系时 ,抽象工厂出场了。
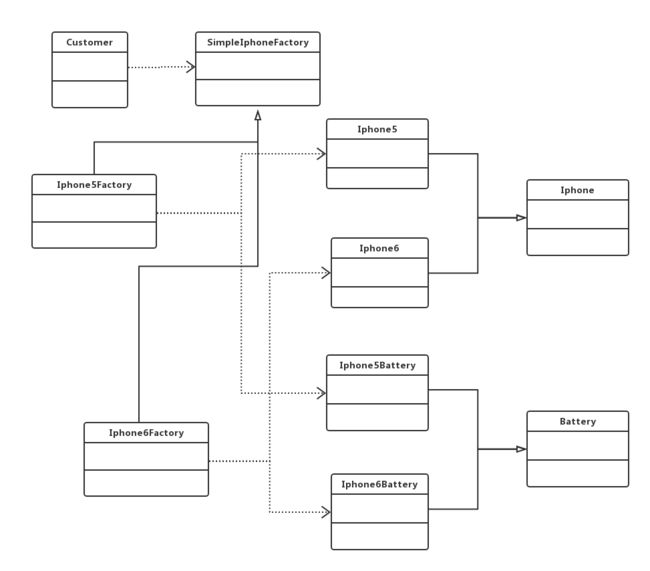
抽象工厂
Iphone稳定的产能,需要各个代工厂的生产,苹果公司制定了一套生产手机的框架来保证手机的质量,例如Iphone6的手机只能使用Iphone6的电池。苹果公司可不想像三星手机那样因电池原因 发生爆炸事件。
public class Customer public void startUp (IphoneFactory iphoneFactory) Customer类提供了一个启动手机的方法,传入一个IphoneFactory对象,由IphoneFactory创建手机和对应的电池,防止因电池型号不对导致的爆炸意外。
public abstract class IphoneFactory public abstract Iphone creatIphone () public abstract Battery creatBattery () public void startUp () IphoneFactory是一个抽象类,startUp方法确定了Iphone和Battery的关系,子类实现创建Iphone和Battery的方法。看Iphone5Factory的类:
public class Iphone5Factory extends IphoneFactory @Override
public Iphone creatIphone () return new Iphone5();
}
@Override
public Battery creatBattery () return new Iphone4Battery();
}
}
最后我们来看启动Iphone5手机的代码:
IphoneFactory iphone5Factory = new Iphone5Factory();
Customer customer = new Customer();
customer.startUp(iphone5Factory);
可以看到,iphone5手机成功启动的Log。因为IphoneFactory封装了startUp的方法,明确了Iphone和Battery的关系,用户不能自主组装Iphone和Battery,防止了因装错电池导致事故的发生。
类图
简单工厂
工厂方法
抽象工厂
一句话小结
简单工厂:将创建代码从客户端移至工厂类。
引用
设计模式(一)工厂模式Factory(创建型)
Android编译时注解实践指南
发表于 2016-10-19 | 阅读次数 214
概述
Android注解分为两种,一种是运行时注解,一种是编译时注解。RxJava就是运行时注解,而butterKnife和EventBus是编译时注解,啃代码的时候经常碰到注解,所以只能乖乖的学习。本文主要讲解演示如何在Android Studio上运行一个编译时注解的Demo,被注解的对象打印出该对象的信息。
1.新建一个Java Library项目
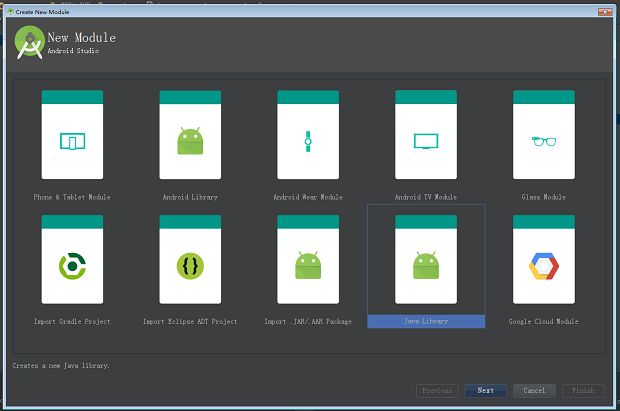
在Android Studio中先新建一个Android project。在Android project 中选中File->New->New Module…选择Java Library 新建一个module。因为注解中用到Java库,所以必须要导入Java Library.
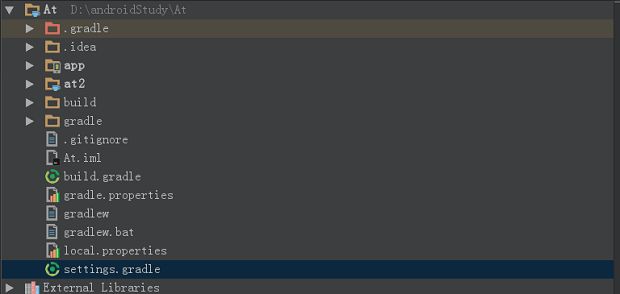
新建的Android项目名叫At(Annotation),Java Library名字是at2.
2.编写注解类
在at2项目中,新建一个PrintInject,加入以下代码声明一个注解类,注解类的类型是@interface
         1


         2


         3


         4


         5


         6


         7


         8


         9


         10
* Author : yuanjunli
* Create Time : 2016/10/19 13:50
*/
@Target ({ElementType.TYPE, ElementType.FIELD, ElementType.METHOD})
@Retention (RetentionPolicy.CLASS)
public
@interface PrintInject {
int value ()
}
@Target(ElementType.TYPE) //接口、类、枚举、注解
3.注册声明方法
在他项目中,新建一个PrintInjectProcessor,键入以下代码:
         1


         2


         3


         4


         5


         6


         7


         8


         9


         10


         11


         12


         13


         14
@SupportedAnnotationTypes (
"com.example.PrintInject" )
@SupportedSourceVersion (SourceVersion.RELEASE_7)
public
class PrintInjectProcessor extends AbstractProcessor
@Override
public boolean process (Set annotations, RoundEnvironment roundEnv)
Messager messager = processingEnv.getMessager();
for (TypeElement te : annotations) {
for (Element e : roundEnv.getElementsAnnotatedWith(te)) {
messager.printMessage(Diagnostic.Kind.NOTE,
"Printing: " + e.toString());
}
}
return
true ;
}
}
@SupportedAnnotationTypes:指定该注解起作用的类;Gradle Console 切页中显示;e.toString()打印注解类的信息。
4.创建路径文件
在resources路径文件夹下创建一个META-INF文件夹,META-INF下面创建一个services文件夹,在里边创建一个javax.annotation.processing.Processor文件,此文件路径不能出错。在文件中写入注解路径的声明,本项目路径是com.example.PrintInjectProcessor
5.生成编译注解at2的jar包
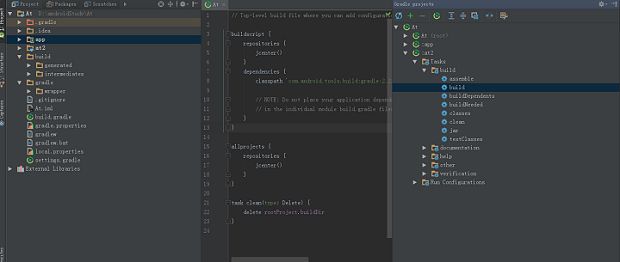
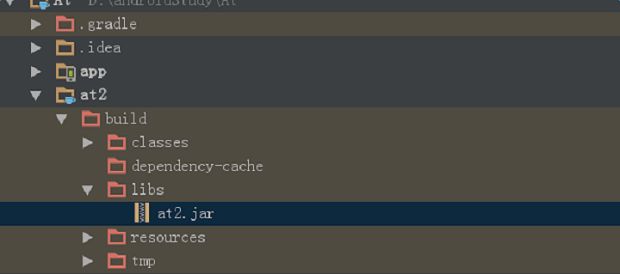
经过以上操作,编写了一个@PrintInject的声明,当对象被@PrintInject声明时,在项目编译时就会打印对象的信息。接下来单独编译运行at2 这个module,导出该jar包。
6.demo测试
将at2.jar copy 到at主项目的libs文件夹下,生成android项目时在app/build.gradle文件下有compile fileTree(dir: 'libs', include: ['*.jar'])为自动导入jar。编写MainActivity代码如下:
         1


         2


         3


         4


         5


         6


         7


         8


         9


         10
public
class MainActivity extends AppCompatActivity
@Override
@PrintInject (
1 )
protected void onCreate (Bundle savedInstanceState)
super .onCreate(savedInstanceState);
setContentView(R.layout.activity_main);
}
}
@PrintInject(1)在方法onCreate()上添加注解,int参数为1。接着看编译运行demo后,message的输出并不在Message切页,也不知Log里边,是在Gradle Console 下。需要注意,第一次运行项目的时候会有message输出,当再次运行时并没有,因为第二次无须再次编译,如果需要再次看到输出的信息,可以Build->Clean Project。
7.总结
以上就是编译注解demo的全部内容,并不涉及注解的深入使用,只在于跑通注解的流程。
8.引用
Android 打造编译时注解解析框架 这只是一个开始
当把EventBus比喻成苹果卖手机
发表于 2016-10-18 | 阅读次数 144
概况
EventBus一直都知道这个库,但是没有接触,看到国内 Top500 Android 应用分析报告使用情况,觉得有必要掌握此库。EventBus是android的一个用于消息传递的库,属于订阅者模式,让发布者和订阅者解耦。本文通过对EventBus的使用,分析其内部实现。
简单使用
关于EventBus的使用不是本文的重点,EventBus的使用请查看EventBus使用详解。
做个比喻
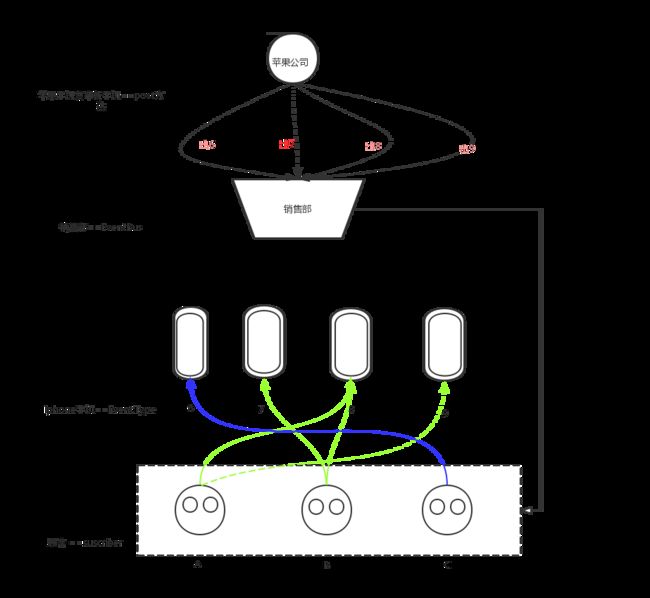
为了更好的理解EventBus这个库的流程,以下将根据下图做一个比喻。
阅读源码
EventBus.getDefault().register(this);
public static EventBus getDefault () if (defaultInstance == null ) {
synchronized (EventBus.class) {
if (defaultInstance == null ) {
defaultInstance = new EventBus();
}
}
}
return defaultInstance;
}
看new EventBus做了什么初始化工作:
public EventBus () this (DEFAULT_BUILDER);
}
空构造函数引用带参数的构造函数,参数类型是EventBusBuilder:
EventBus(EventBusBuilder builder) {
subscriptionsByEventType = new HashMap<>();
typesBySubscriber = new HashMap<>();
stickyEvents = new ConcurrentHashMap<>();
mainThreadPoster = new HandlerPoster(this , Looper.getMainLooper(), 10 );
backgroundPoster = new BackgroundPoster(this );
asyncPoster = new AsyncPoster(this );
indexCount = builder.subscriberInfoIndexes != null ? builder.subscriberInfoIndexes.size() : 0 ;
subscriberMethodFinder = new SubscriberMethodFinder(builder.subscriberInfoIndexes,
builder.strictMethodVerification, builder.ignoreGeneratedIndex);
logSubscriberExceptions = builder.logSubscriberExceptions;
logNoSubscriberMessages = builder.logNoSubscriberMessages;
sendSubscriberExceptionEvent = builder.sendSubscriberExceptionEvent;
sendNoSubscriberEvent = builder.sendNoSubscriberEvent;
throwSubscriberException = builder.throwSubscriberException;
eventInheritance = builder.eventInheritance;
executorService = builder.executorService;
}
通过使用默认构造器EventBusBuilder,默认配置了一些参数,部分重点参数会接下来在阅读源码中提到。
register(Object subscriber)
public void register (Object subscriber) subscriberMethods = subscriberMethodFinder.findSubscriberMethods(subscriberClass);
synchronized (this ) {
for (SubscriberMethod subscriberMethod : subscriberMethods) {
subscribe(subscriber, subscriberMethod);
}
}
}
调用register方法,可以看到参数是一个Object,EventBus支持Activity、Fragment、Service、BroadcastReceiver等之间传递消息。
subscribe(subscriber, subscriberMethod);
private void subscribe (Object subscriber, SubscriberMethod subscriberMethod) new Subscription(subscriber, subscriberMethod);
CopyOnWriteArrayList subscriptions = subscriptionsByEventType.get(eventType);
if (subscriptions == null ) {
subscriptions = new CopyOnWriteArrayList<>();
subscriptionsByEventType.put(eventType, subscriptions);
} else {
if (subscriptions.contains(newSubscription)) {
throw new EventBusException("Subscriber " + subscriber.getClass() + " already registered to event "
+ eventType);
}
}
int size = subscriptions.size();
for (int i = 0 ; i <= size; i++) {
if (i == size || subscriberMethod.priority > subscriptions.get(i).subscriberMethod.priority) {
subscriptions.add(i, newSubscription);
break ;
}
}
List> subscribedEvents = typesBySubscriber.get(subscriber);
if (subscribedEvents == null ) {
subscribedEvents = new ArrayList<>();
typesBySubscriber.put(subscriber, subscribedEvents);
}
subscribedEvents.add(eventType);
if (subscriberMethod.sticky) {
if (eventInheritance) { eventInheritance标识是否考虑EventType的类层次结构
Set, Object>> entries = stickyEvents.entrySet();
for (Map.Entry, Object> entry : entries) {
Class candidateEventType = entry.getKey();
if (eventType.isAssignableFrom(candidateEventType)) {
Object stickyEvent = entry.getValue();
heckPostStickyEventToSubscription(newSubscription, stickyEvent);
}
}
} else {
Object stickyEvent = stickyEvents.get(eventType);
checkPostStickyEventToSubscription(newSubscription, stickyEvent);
}
}
}
关键代码以上都有注释。
checkPostStickyEventToSubscription(newSubscription, stickyEvent);
private void checkPostStickyEventToSubscription (Subscription newSubscription, Object stickyEvent) if (stickyEvent != null ) {
postToSubscription(newSubscription, stickyEvent, Looper.getMainLooper() == Looper.myLooper());
}
}
跳转postToSubscription方法;
private void postToSubscription (Subscription subscription, Object event, boolean isMainThread) switch (subscription.subscriberMethod.threadMode) {
case POSTING:
invokeSubscriber(subscription, event);
break ;
case MAIN:
if (isMainThread) {
invokeSubscriber(subscription, event);
} else {
mainThreadPoster.enqueue(subscription, event);
}
break ;
case BACKGROUND:
if (isMainThread) {
backgroundPoster.enqueue(subscription, event);
} else {
invokeSubscriber(subscription, event);
}
break ;
case ASYNC:
asyncPoster.enqueue(subscription, event);
break ;
default :
throw new IllegalStateException("Unknown thread mode: " + subscription.subscriberMethod.threadMode);
}
}
invokeSubscriber(subscription, event)
下面我们来分析threadMode = ThreadMode.POSTING的情况,调用invokeSubscriber()方法,其他情况类似。
void invokeSubscriber (Subscription subscription, Object event) try {
subscription.subscriberMethod.method.invoke(subscription.subscriber, event);
} catch (InvocationTargetException e) {
handleSubscriberException(subscription, event, e.getCause());
} catch (IllegalAccessException e) {
throw new IllegalStateException("Unexpected exception" , e);
}
}
EventBus.getDefault().register(this)小结
回到苹果公司卖手机的例子,EventBus.getDefault().register(this)中,this指的就是买手机的顾客,顾客通过调用此方法告诉销售部说我想登记买手机,登记的流程包括:subscriberMethodFinder.findSubscriberMethods(subscriberClass));subscriptions == null,则添加到预约信息中;若之前有预约过的信息,检查是否有相同的预约信息(subscriber和subscriberMethod都一样)subscriptions.contains(newSubscription),若有,则预约失败,并且丢给用户一个臭脸throw new EventBusException("Subscriber " + subscriber.getClass() + " already registered to event "+ eventType);。subscriberMethod.sticky=ture,则无需预约,可直接购买。
EventBus.getDefault().post(EventType);
post()和postSticky()的区别
发布者调用post(EventType)方法,若订阅者需要接收到此EventType,则订阅者必须要先注册并且注解接收此方法,否则收不到该方法;而调用postSticky(EventType),及时先发布者先发送消息,订阅者在注册事件,也能收到消息。
post(EventType);
public void post (Object event) eventQueue = postingState.eventQueue;
eventQueue.add(event);
if (!postingState.isPosting) {
postingState.isMainThread = Looper.getMainLooper() == Looper.myLooper();
postingState.isPosting = true ;
if (postingState.canceled) {
throw new EventBusException("Internal error. Abort state was not reset" );
}
try {
while (!eventQueue.isEmpty()) {
postSingleEvent(eventQueue.remove(0 ), postingState);
}
} finally {
postingState.isPosting = false ;
postingState.isMainThread = false ;
}
}
}
将当前发送事件添加到待处理的事件列表,如果当前不是在发送事件状态,则循环事件列表,调用postSingleEvent(eventQueue.remove(0), postingState)发送每一个事件。
postSingleEvent(eventQueue.remove(0), postingState);
private void postSingleEvent (Object event, PostingThreadState postingState) throws Error boolean subscriptionFound = false ;
if (eventInheritance) {
List> eventTypes = lookupAllEventTypes(eventClass);
int countTypes = eventTypes.size();
for (int h = 0 ; h < countTypes; h++) {
Class clazz = eventTypes.get(h);
subscriptionFound |= postSingleEventForEventType(event, postingState, clazz);
}
} else {
subscriptionFound = postSingleEventForEventType(event, postingState, eventClass);
}
if (!subscriptionFound) {
if (logNoSubscriberMessages) {
Log.d(TAG, "No subscribers registered for event " + eventClass);
}
if (sendNoSubscriberEvent && eventClass != NoSubscriberEvent.class &&
eventClass != SubscriberExceptionEvent.class) {
post(new NoSubscriberEvent(this , event));
}
}
}
主要处理调用postSingleEventForEventType()遇到的错误。
postSingleEventForEventType()
private boolean postSingleEventForEventType (Object event, PostingThreadState postingState, Class eventClass) subscriptions;
synchronized (this ) {
subscriptions = subscriptionsByEventType.get(eventClass);
}
if (subscriptions != null && !subscriptions.isEmpty()) {
for (Subscription subscription : subscriptions) {
postingState.event = event;
postingState.subscription = subscription;
boolean aborted = false ;
try {
postToSubscription(subscription, event, postingState.isMainThread);
aborted = postingState.canceled;
} finally {
postingState.event = null ;
postingState.subscription = null ;
postingState.canceled = false ;
}
if (aborted) {
break ;
}
}
return true ;
}
return false ;
}
以上代码主要是将该事件传递给订阅了该事件的订阅者,每一个订阅者都尝试将该事件作为参数,调用所有的订阅的方法。
post()方法小结
以上逻辑并不复杂,就直接做比喻好了:
总结
以上分析了EventBus的两个主要入口代码,做的比喻可能并不恰当,但应该能对理解源码的逻辑有很大的帮助。
引用
EventBus 源码解析
Head First设计模式思维导图
发表于 2016-10-17 | 阅读次数 31
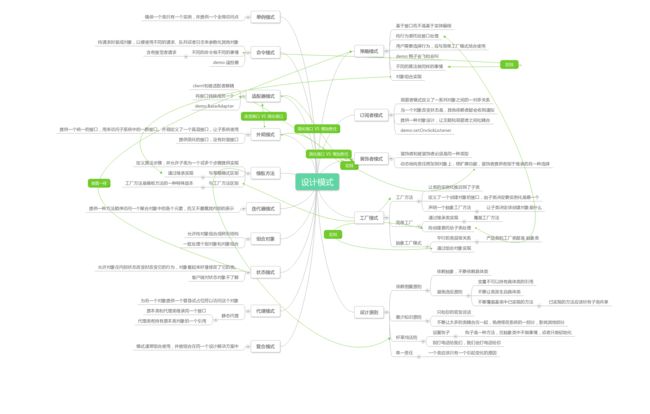
这么多设计模式,看书经常看完后面的就把前面的忘记了。所以在读Head First时,特意边读边做笔记,用思维导图有利于描述设计模式之间的区别和联系。图不是很清晰,可以打开Head First设计模式思维导图查看大图。
![]()
![]()

