美女图片采集器 (源码+解析)
前言:
有一段时间没写博客了, "持之以恒"徽章都暗了, 实在不该。 前一段确实比较忙, ...小小地给自己的懒找个借口吧。 大二即将结束, 学习iOS也有一段时间了。今天抽点时间, 开源一个前几天刚上传的App里面的一个功能, RT, 美女图片采集器。 美女.. 相信没有人不喜欢吧, 基于此, 这个小Demo应运而生。
注:
本文正在参加博客大赛。 如果觉得对你有所帮助, 还望帮忙投下票。 多谢。
投票链接: http://vote.blog.csdn.net/Article/Details?articleid=37825177 (投票按钮在最下方)
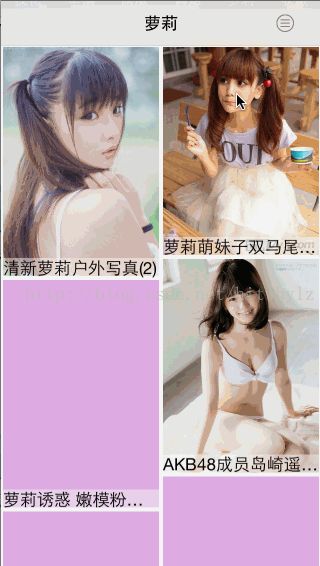
效果演示:

看到这里, 如果还有兴趣学习的话, 可以先到我的git中下载源码, 然后配合着源码看我下面的解析。相信, 会让你有所收获的。
git下载链接: BeautyPickDemo.git
涉及内容:
- 百度图片API的使用
- JSON格式数据解析
- 图片异步下载 + 离线缓存
- 图片基本操作(缩放, 删除, 添加, 保存到本地)
- 下拉刷新, 上提加载
- 幻灯片放映
- 自定义后台显示图片
源码解析:
一。百度图片API的使用
首先, 我们知道百度是没有对外开放图片API的, 但是我们可以通过谷歌浏览器来捕捉到访问过程中它调用的API。有兴趣的, 可以了解下谷歌浏览器Network选项的使用, 也可以参考下这篇文章: 百度图片api
这里, 我们主要介绍如何使用即可。
1.百度图片通用API:
http://image.baidu.com/i?tn=resultjsonavstar&ie=utf-8&word=刘德华&pn=0&rn=60
说明:
返回格式为json
word为查询的内容
pn为第几页
rn为一页返回的图片数量
用法:大家在浏览器地址栏输入上述地址,回车即可看到返回的图片地址
说明:
返回格式为json
word为查询的内容
pn为第几页
rn为一页返回的图片数量
用法:大家在浏览器地址栏输入上述地址,回车即可看到返回的图片地址
2.百度图片分类API (我们使用的就是这个)
http://image.baidu.com/channel/listjson?pn=0&rn=30&tag1=美女&tag2=全部&ie=utf8
http://image.baidu.com/channel/listjson?pn=0&rn=30&tag1=美女&tag2=全部&ftags=校花&ie=utf8
http://image.baidu.com/channel/listjson?pn=0&rn=30&tag1=美女&tag2=全部&ftags=校花&ie=utf8
至于其他的, 依照这个方法都能获取到. 就不重复说明了。
至于如何调用API, 涉及到网络编程。
开源的ASI类库做的比较好(虽然挺老的一个东西了, 也有一段时间没更新了, 但是能满足我们需求)。
从源码中, 可以找到 网络请求ASI文件夹,里面有需要的文件
1。导入这里的文件
2。导入必须的框架, 包括:
SystemConfiguration.framework
MobileCoreServices.framework
CFNetwork.framework
libz.dylib
MobileCoreServices.framework
CFNetwork.framework
libz.dylib
3。调用API (参见 主界面-->picVC)
@property (nonatomic,strong) ASIHTTPRequest *testRequest;
-
NSString* urlString = [
NSString stringWithFormat:
@"http://image.baidu.com/channel/listjson?pn=%d&rn=10&tag1=美女&tag2=%@", nowPage, [chooseArr objectAtIndex:nowChoose]];
-
-
urlString = [urlString stringByAddingPercentEscapesUsingEncoding:
NSUTF8StringEncoding];
-
NSURL *url = [
NSURL URLWithString:urlString];
-
testRequest = [ASIHTTPRequest requestWithURL:url];
-
[testRequest setDelegate:
self];
-
[testRequest startAsynchronous];
即可正常调用API。至于如何处理返回的数据, 下面再详细讲。
二。JSON格式数据解析
一般的数据格式有
XML和
JSON, 这里因为调用百度图片API返回的数据格式是JSON, 所以我们只要解析JSON即可。
调用API成功后, 它会自动执行这个函数
-
#pragma mark - 加载数据完毕
-
- (
void)requestFinished:(ASIHTTPRequest *)request
这个方法返回的数据是二进制格式的NSData, 我们需要手动转为UTF8编码。可以这样获取:
-
//当以二进制读取返回内容时用这个方法
-
NSData *responseData = [request responseData];
-
NSString *responseString = [[
NSString alloc] initWithData:responseData encoding:
NSUTF8StringEncoding];
接下去就是神奇的时候了, 对于这样的一个字符串, 如果直接打印, 你可能会看得云里雾里的, json格式并且没有重新排列。
但是我们可以使用JsonKit来直接解析。(文件在json解析文件夹中)
只需这样一条语句即可:
self.testDic = [responseString objectFromJSONString];
打印解析后的数据如下:

至于需要哪些, 直接取就好了。比如. 我们这里需要获取到图片的标题. url, 宽度, 高度
-
NSMutableDictionary *nowDic = [[
NSMutableDictionary alloc]init];
-
[nowDic setObject:[[array objectAtIndex:i]objectForKey:
@"image_url"] forKey:
@"image_url"];
-
[nowDic setObject:[[array objectAtIndex:i]objectForKey:
@"image_width"] forKey:
@"image_width"];
-
[nowDic setObject:[[array objectAtIndex:i]objectForKey:
@"image_height"] forKey:
@"image_height"];
-
[nowDic setObject:[[array objectAtIndex:i]objectForKey:
@"desc"] forKey:
@"desc"];
-
-
[picArray addObject:nowDic];
三。图片异步下载+离线缓存
这里提一下SDWebImage, 我们将会使用它来实现。 具体使用参见: SDWebImage 笔记
在解析完json数据后, 我们会获取到图片对应的url。
我们可以通过访问url获取图片。
- (void)setImageWithURL:(NSURL *)url placeholderImage:(UIImage *)placeholder;
使用方法:
-
UIImageView *imageView = [[
UIImageView alloc]initWithFrame:
CGRectMake(SPACE /
2 , SPACE /
2 , width, height)];
-
NSURL *url = [
NSURL URLWithString:imageInfo.thumbURL];
-
[imageView setImageWithURL:url placeholderImage:
nil];
-
imageView.backgroundColor = [
UIColor palePurpleColor];
-
[
self addSubview:imageView];
异步下载,离线缓存效果:(离线缓存可以到应用沙盒中查看)

四。图片基本操作(缩放, 删除, 添加, 保存到本地)
这里涉及的主要是一些常规操作, 包括缩放, 删除, 添加, 保存到本地等。
至于删除, 一般是长按删除, 只要在图片上加上长按手势响应即可。然后弹出一个对话框, 提示用户是否删除。确定删除后, 从沙盒中清除缓存即可。
添加手势方法:
-
//长按
-
UILongPressGestureRecognizer *longRecognizer;
-
longRecognizer = [[
UILongPressGestureRecognizer alloc]initWithTarget:
self action:
@selector(handleSingleLongFrom:)];
-
[
self addGestureRecognizer:longRecognizer];
从视图和沙盒中删除
-
//从当前视图中删除
-
[testArr removeObject:data];
-
//刷新数据
-
__
weak picVC *blockSelf =
self;
-
[blockSelf.waterView refreshView:testArr];
-
[blockSelf.waterView.infiniteScrollingView stopAnimating];
-
-
//从沙盒中删除
-
//打开沙盒
-
NSArray *paths =
NSSearchPathForDirectoriesInDomains(
NSDocumentDirectory,
NSUserDomainMask,
YES);
-
NSString *documentsDirectory = [paths objectAtIndex:
0];
-
NSString * namePath = [documentsDirectory stringByAppendingPathComponent:[
NSString stringWithFormat:
@"savedPicInfo_%d.plist",nowChoose]];
-
NSMutableArray *picArray = [[
NSMutableArray alloc] initWithContentsOfFile:namePath];
-
-
for (
int i=
0; i<[picArray count]; i++)
-
{
-
if ([[[picArray objectAtIndex:i]objectForKey:
@"image_url"] isEqualToString:data.thumbURL])
-
{
-
[picArray removeObjectAtIndex:i];
-
break;
-
}
-
}
-
[picArray writeToFile:namePath atomically:
YES];
至于缩放, 首先要弹出一个全屏显示的视图。
像这样:
-
//单击, 显示大图
-
-(
void)showImage:(ImageInfo*)data
-
{
-
NSURL *url = [
NSURL URLWithString:data.thumbURL];
-
[clickImage setImageWithURL:url placeholderImage:
nil];
-
TGRImageViewController *viewController = [[TGRImageViewController alloc] initWithImage:clickImage.image setImageInfo:data];
-
viewController.transitioningDelegate =
self;
-
[
self presentViewController:viewController animated:
YES completion:
nil];
-
}
本质就是调用presentViewController:viewController。
当然,我们可以给新视图的显示加上动画效果, 如下:
-
#pragma mark - UIViewControllerTransitioningDelegate methods
-
- (
id<
UIViewControllerAnimatedTransitioning>)animationControllerForPresentedController:(
UIViewController *)presented presentingController:(
UIViewController *)presenting sourceController:(
UIViewController *)source
-
{
-
if ([presented isKindOfClass:TGRImageViewController.class]) {
-
return [[TGRImageZoomAnimationController alloc] initWithReferenceImageView:clickImage];
-
}
-
return
nil;
-
}
-
-
- (
id<
UIViewControllerAnimatedTransitioning>)animationControllerForDismissedController:(
UIViewController *)dismissed {
-
if ([dismissed isKindOfClass:TGRImageViewController.class]) {
-
return [[TGRImageZoomAnimationController alloc] initWithReferenceImageView:clickImage];
-
}
-
return
nil;
-
}
然后, 在新视图中, 添加点击移除, 长按弹出新操作, 双指移动缩放手势即可。
具体实现如下:
-
#pragma mark - Private methods
-
-
- (
void)longPress:(
UITapGestureRecognizer *)tapGestureRecognizer
-
{
-
-
if(tapGestureRecognizer.state ==
UIGestureRecognizerStateBegan)
-
{
-
[
self popupActionSheet];
-
}
-
}
-
-
- (
IBAction)handleSingleTap:(
UITapGestureRecognizer *)tapGestureRecognizer {
-
[
self dismissViewControllerAnimated:
YES completion:
nil];
-
}
-
-
- (
IBAction)handleDoubleTap:(
UITapGestureRecognizer *)tapGestureRecognizer {
-
if (
self.scrollView.zoomScale ==
self.scrollView.minimumZoomScale) {
-
// Zoom in
-
CGPoint center = [tapGestureRecognizer locationInView:
self.scrollView];
-
CGSize size =
CGSizeMake(
self.scrollView.bounds.size.width /
self.scrollView.maximumZoomScale,
-
self.scrollView.bounds.size.height /
self.scrollView.maximumZoomScale);
-
CGRect rect =
CGRectMake(center.x - (size.width /
2.0), center.y - (size.height /
2.0), size.width, size.height);
-
[
self.scrollView zoomToRect:rect animated:
YES];
-
}
-
else {
-
// Zoom out
-
[
self.scrollView zoomToRect:
self.scrollView.bounds animated:
YES];
-
}
-
}
五。下拉刷新, 上提加载
这个功能具体在浏览图片的时候使用。 代码在picVC中。
但是因为我之前专门写过一篇这样的博客。 就不再重复了。
详细可以看这里:
iOS开发-ios7下拉刷新,上提加载快速集成
六。幻灯片放映
顾名思义, 就是能够自动播放收藏过的美女图片..
这里的原理是利用UIView的动画, 不断切换显示图片和显示效果。
切换效果如下:
-
_transitionOptions= @[[
NSNumber numberWithInteger:
UIViewAnimationOptionTransitionFlipFromLeft],
-
[
NSNumber numberWithInteger:
UIViewAnimationOptionTransitionFlipFromRight],
-
[
NSNumber numberWithInteger:
UIViewAnimationOptionTransitionCurlUp],
-
[
NSNumber numberWithInteger:
UIViewAnimationOptionTransitionCurlDown],
-
[
NSNumber numberWithInteger:
UIViewAnimationOptionTransitionCrossDissolve],
-
[
NSNumber numberWithInteger:
UIViewAnimationOptionTransitionFlipFromTop],
-
[
NSNumber numberWithInteger:
UIViewAnimationCurveEaseIn],
-
[
NSNumber numberWithInteger:
UIViewAnimationCurveEaseOut],
-
[
NSNumber numberWithInteger:
UIViewAnimationCurveLinear],
-
[
NSNumber numberWithInteger:
UIViewAnimationOptionAllowAnimatedContent],
-
[
NSNumber numberWithInteger:
UIViewAnimationOptionOverrideInheritedCurve],
-
[
NSNumber numberWithInteger:
UIViewAnimationOptionTransitionFlipFromTop],
-
[
NSNumber numberWithInteger:
UIViewAnimationOptionTransitionFlipFromBottom]];
然后切换图片的时候, 实现如下代码即可。 (具体参见PhotoStackView)
-
-(
void)reloadData {
-
-
if (!
self.dataSource) {
-
//exit if data source has not been set up yet
-
self.photoViews =
nil;
-
return;
-
}
-
-
NSInteger numberOfPhotos = [
self.dataSource numberOfPhotosInPhotoStackView:
self];
-
NSInteger topPhotoIndex = [
self indexOfTopPhoto];
// Keeping track of current photo's top index so that it remains on top if new photos are added
-
-
if(numberOfPhotos >
0) {
-
-
NSMutableArray *photoViewsMutable = [[
NSMutableArray alloc] initWithCapacity:numberOfPhotos];
-
UIImage *borderImage = [
self.borderImage resizableImageWithCapInsets:
UIEdgeInsetsMake(
self.borderWidth,
self.borderWidth,
self.borderWidth,
self.borderWidth)];
-
-
for (
NSUInteger index =
0; index < numberOfPhotos; index++) {
-
-
UIImage *image = [
self.dataSource photoStackView:
self photoForIndex:index];
-
CGSize imageSize = image.size;
-
if([
self.dataSource respondsToSelector:
@selector(photoStackView:photoSizeForIndex:)]){
-
imageSize = [
self.dataSource photoStackView:
self photoSizeForIndex:index];
-
}
-
UIImageView *photoImageView = [[
UIImageView alloc] initWithFrame:(
CGRect){
CGPointZero, imageSize}];
-
photoImageView.image = image;
-
UIView *view = [[
UIView alloc] initWithFrame:photoImageView.frame];
-
view.layer.rasterizationScale = [[
UIScreen mainScreen] scale];
-
view.layer.shouldRasterize =
YES;
// rasterize the view for faster drawing and smooth edges
-
-
if (
self.showBorder) {
-
-
// Add the background image
-
if (borderImage) {
-
// If there is a border image, we need to add a background image view, and add some padding around the photo for the border
-
-
CGRect photoFrame = photoImageView.frame;
-
photoFrame.origin =
CGPointMake(
self.borderWidth,
self.borderWidth);
-
photoImageView.frame = photoFrame;
-
-
view.frame =
CGRectMake(
0,
0, photoImageView.frame.size.width+(
self.borderWidth*
2), photoImageView.frame.size.height+(
self.borderWidth*
2));
-
UIImageView *backgroundImageView = [[
UIImageView alloc] initWithFrame:view.frame];
-
backgroundImageView.image = borderImage;
-
-
[view addSubview:backgroundImageView];
-
}
else {
-
// if there is no boarder image draw one with the CALayer
-
view.layer.borderWidth =
self.borderWidth;
-
view.layer.borderColor = [[
UIColor whiteColor]
CGColor];
-
view.layer.shadowOffset =
CGSizeMake(
0,
0);
-
view.layer.shadowOpacity =
0.5;
-
}
-
}
-
-
[view addSubview:photoImageView];
-
-
view.tag = index;
-
view.center =
CGPointMake(
CGRectGetMidX(
self.bounds),
CGRectGetMidY(
self.bounds));
-
-
[photoViewsMutable addObject:view];
-
-
}
-
-
// Photo views are added to subview in the photoView setter
-
self.photoViews = photoViewsMutable; photoViewsMutable =
nil;
-
[
self goToPhotoAtIndex:topPhotoIndex];
-
-
}
-
-
}
七。自定义后台显示图片
这个功能就是演示效果里面, 当应用切换到后台后, 我们双击home键后显示后台程序时候, 该应用的显示效果。
比如.. 有时候我们浏览的图片尺度比较大.. 然后切到后台的时候, 就希望把它隐藏起来..
这就涉及到了Background Fetch的应用。
之前也写过一篇博客专门介绍。 这里就不重复了。
具体参见:
iOS开发-自定义后台显示图片(iOS7-Background Fetch的应用)
好了。 到这里终于是介绍的差不多了。
当然。 我这里的解析都比较概括, 列举的都是几个关键代码段。
更加详细的还是需要自己去看代码。 注释也写了, 估计没什么问题。 如果有问题, 欢迎联系我。
一口气写了3个小时的博客... 累的够呛的。也希望, 能对你有所帮助。
本文正在参加博客大赛。 如果觉得对你有所帮助, 还望帮忙投下票。 多谢。
投票链接: http://vote.blog.csdn.net/Article/Details?articleid=37825177 (投票按钮在最下方)
学习的路上, 与君共勉。
