iOS11适配-Safe Area
1.Safe area介绍
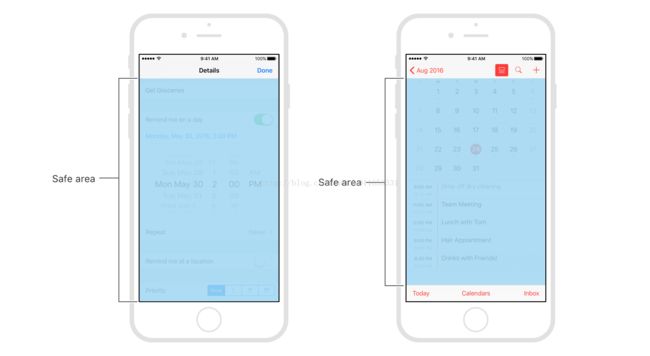
Safe area 是iOS11的新特性, 帮助你将视图布局在可访问区域内,不被一些特殊视图覆盖,如:状态栏,导航控制器的导航栏等,尤其是具有顶部头帘和底部横条的iPhone X问世以来非常有用。
下图展示了日历视图的安全区域:
2.Safe area使用
与Safe area相关的方法有
#pragma mark -  UIView 新增属性
@property(nonatomic,readonly,strong) UILayoutGuide *safeAreaLayoutGuide API_AVAILABLE(ios(11.0),tvos(11.0));
@property (nonatomic,readonly) UIEdgeInsets safeAreaInsets API_AVAILABLE(ios(11.0),tvos(11.0));
#pragma mark - UIViewController 新增方法
@property(nonatomic) UIEdgeInsets additionalSafeAreaInsets API_AVAILABLE(ios(11.0), tvos(11.0));
// safeAreaInsets属性改变的时候回调用该方法
- (void)viewSafeAreaInsetsDidChange NS_REQUIRES_SUPER API_AVAILABLE(ios(11.0), tvos(11.0));1. safeAreaLayoutGuide
在iOS11中为View新增加了属性safeAreaLayoutGuide,在使用Auto Layout布局的时候,我们可以使用safeAreaLayoutGuide来创建约束,如:
 UILabel *label = [[UILabel alloc] init];
    label.text = @"SafeArea";
    label.textAlignment = NSTextAlignmentCenter;
    label.backgroundColor = [UIColor greenColor];
    [self.view addSubview:label];

    label.translatesAutoresizingMaskIntoConstraints = NO;
    UILayoutGuide *safeGuide = self.view.safeAreaLayoutGuide;
    NSLayoutConstraint *topCon = [label.topAnchor constraintEqualToAnchor:safeGuide.topAnchor];
    NSLayoutConstraint *bottomCon = [label.bottomAnchor constraintEqualToAnchor:safeGuide.bottomAnchor];
    NSLayoutConstraint *leftCon = [label.leftAnchor constraintEqualToAnchor:safeGuide.leftAnchor constant:0];
    NSLayoutConstraint * rightCon = [label.rightAnchor constraintEqualToAnchor:safeGuide.rightAnchor constant:0];
[NSLayoutConstraint activateConstraints:@[topCon, bottomCon, leftCon, rightCon]];2.safeAreaInsets
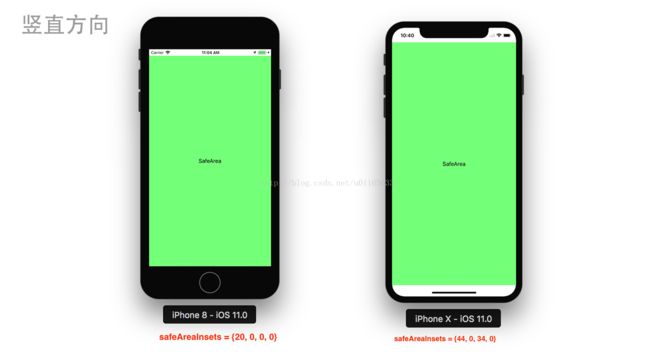
safeAreaInsets也是iOS11为View新增加的属性,表示相对于边缘的距离,在我们使用不用Auto Layout布局而是通过计算视图的frame来布局的时候,可以使用它来辅助布局如:
@interface NextViewController ()
@property (nonatomic, strong) UILabel *testLabel;
@end

@implementation NextViewController

- (void)viewDidLoad {
    [super viewDidLoad];
    // Do any additional setup after loading the view.
    UILabel *label = [[UILabel alloc] initWithFrame:self.view.bounds];
    label.text = @"SafeArea";
    label.textAlignment = NSTextAlignmentCenter;
    label.backgroundColor = [UIColor greenColor];
    [self.view addSubview:label];
    self.testLabel = label;
}

// safeAreaInsets改变的时候回调用该方法
- (void)viewSafeAreaInsetsDidChange {
    [super viewSafeAreaInsetsDidChange];
    UIEdgeInsets insets = self.view.safeAreaInsets;
    self.testLabel.frame = CGRectMake(insets.left, insets.top, self.view.frame.size.width - (insets.right + insets.left), self.view.frame.size.height - (insets.top + insets.bottom));
}注意:safeAreaInsets的值在-viewDidLoad中获取不到真实的值,可以在-viewSafeAreaInsetsDidChange或则
-viewDidAppear:方法中获取到真实的值。
3.使用Masonry
由于在项目中我们通常很少使用系统的Auto Layout生成布局,往往我们会选择一些三方库,比如使用Masonry完成以上例子
    UILabel *label = [[UILabel alloc] init];
    label.text = @"SafeArea";
    label.textAlignment = NSTextAlignmentCenter;
    label.backgroundColor = [UIColor greenColor];
    [self.view addSubview:label];

    [label mas_makeConstraints:^(MASConstraintMaker *make) {
        make.top.equalTo(self.view.mas_safeAreaLayoutGuideTop);
        make.left.equalTo(self.view.mas_safeAreaLayoutGuideLeft);
        make.right.equalTo(self.view.mas_safeAreaLayoutGuideRight);
        make.bottom.equalTo(self.view.mas_safeAreaLayoutGuideBottom);
}];4.扩展Safe area
我们知道容器视图往往会覆盖自己的特殊视图在被嵌入的子视图控制器的视图之上,如:UINavigationController的UINavigationBar,如果我们要自定义容器视图,可以通过修改容器视图或者其子视图控制器的属性additionalSafeAreaInsets来修改视图控制器的安全区域,要扩展如下图的安全区域:
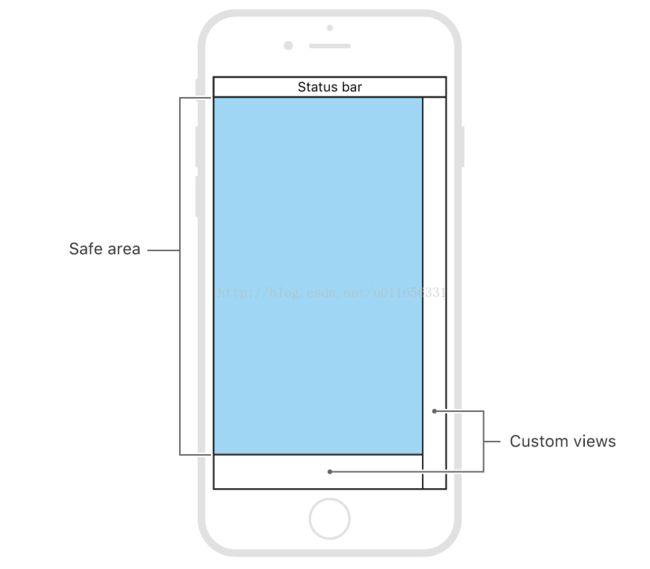
在容器视图的- (void)viewDidAppear:(BOOL)animated方法中加入以下代码即可
- (void)viewDidAppear:(BOOL)animated {
    [super viewDidAppear:animated];
    UIEdgeInsets newSafeAreaInsets = self.view.safeAreaInsets;
    CGFloat rightViewWidth = 40;
    CGFloat bottomViewHeight = 49;
    newSafeAreaInsets.right += rightViewWidth;
    newSafeAreaInsets.bottom += bottomViewHeight;
    self.additionalSafeAreaInsets = newSafeAreaInsets;
}3.topLayoutGuide和bottomLayoutGuide向Safe area迁移
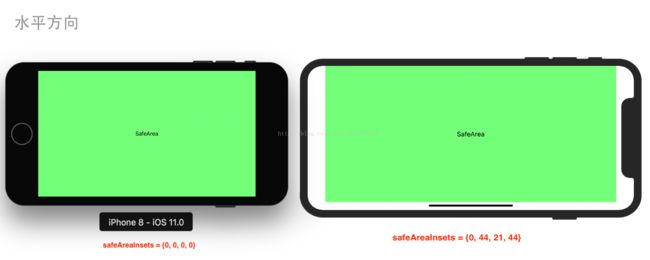
Apple在iOS7为UIViewController新增了topLayoutGuide和bottomLayoutGuide属性。它们可以让你创建约束以避免内容被UIKit的横条,如状态、导航栏或标签栏覆盖。在iOS 11由于Apple新推出了iPhone X这种顶部具有头帘、底部具有横条的机型,这种机型在横屏的时候不但上下需要离屏幕边缘具有一定间距,左右也需要具有一定的间距,因此这些布局指南被废弃,被Safe Area这个带有上下左右安全距离的方式所代替。
1.Interface Builder迁移
在XCode8中的storyboard拖入一个ViewController会发现ViewController下面有Top Layout Guide和Bottom Layout Guide,如下图:
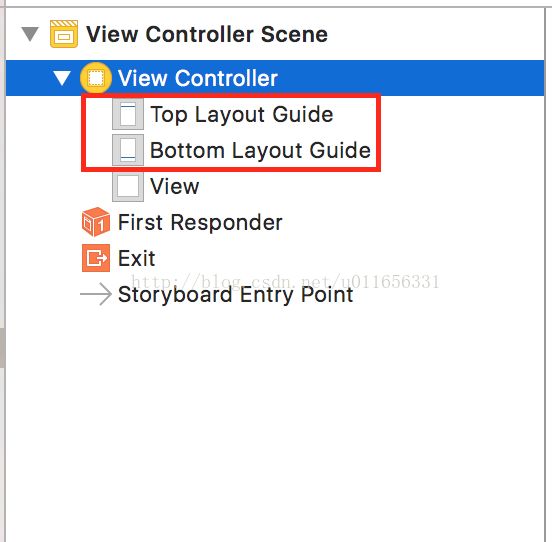
一般我们布局的时候为了内容不被Navigation Bar、Tab Bar 等覆盖,我们对上我们一般相对于Top Layout Guide布局,对下相对于Bottom Layout Guide布局.
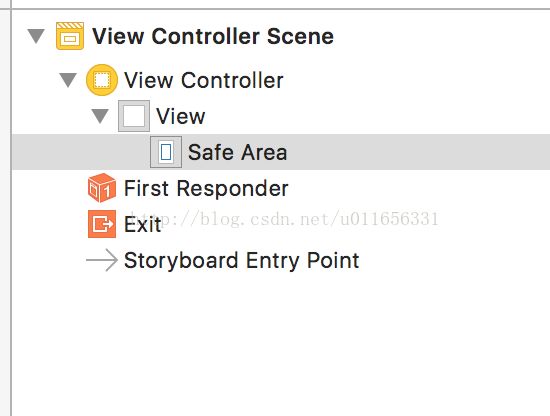
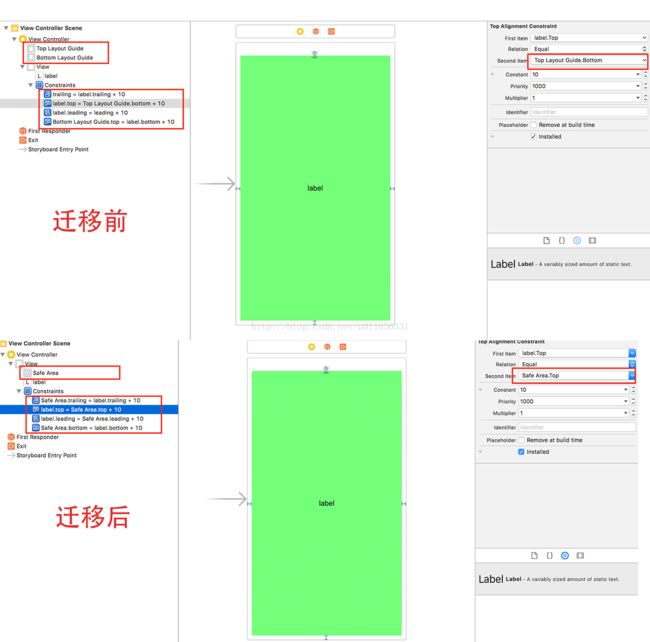
在XCode9中的storyboard拖入一个ViewController会发现View下面有一个SafeAeara如下图,Apple建议:不要把 Control(如:UIButton等)放在 Safe Area 之外的地方。
这时我们一般相对于这个安全区域来布局。
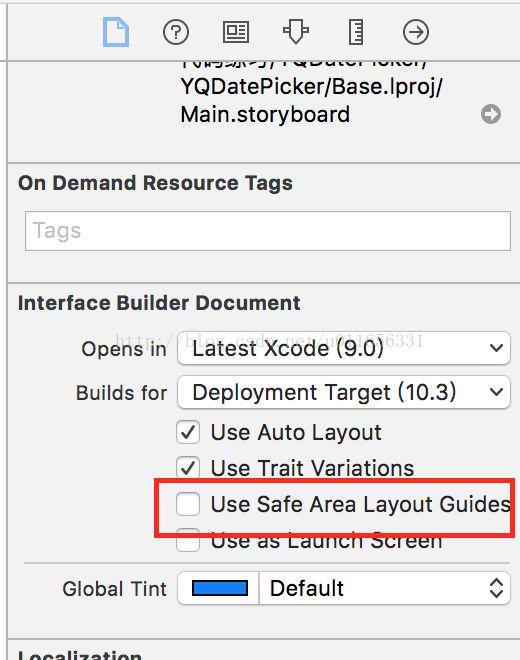
使用安全区域的Storyboard可向后部署, 这意味着即使目标为iOS 10及更早版本,也可以在Interface Builder切换使用安全区布局指南。你可以通过更改Storyboard文件检查器的设置,将顶部和底部布局指南转换为安全区布局指南。这时 需要为项目中的每个Storyboard执行一下操作。
2.代码迁移
UILabel *label = [[UILabel alloc] init];
    label.text = @"SafeArea";
    label.textAlignment = NSTextAlignmentCenter;
    label.backgroundColor = [UIColor greenColor];
    [self.view addSubview:label];

    [label mas_makeConstraints:^(MASConstraintMaker *make) {
        if (@available(iOS 11, *)) {
            make.top.equalTo(self.view.mas_safeAreaLayoutGuideTop);
            make.left.equalTo(self.view.mas_safeAreaLayoutGuideLeft);
            make.right.equalTo(self.view.mas_safeAreaLayoutGuideRight);
            make.bottom.equalTo(self.view.mas_safeAreaLayoutGuideBottom);
        } else {
            make.top.equalTo(self.mas_topLayoutGuideBottom);
            make.bottom.equalTo(self.mas_bottomLayoutGuideTop);
            make.left.mas_equalTo(0);
            make.right.mas_equalTo(0);
        }
}];Positioning Content Relative to the Safe Area
iOS11安全区布局指南
