Django+Scrapy完成微博首页热点的提取和网页显示
目录
1. 本系统编写的思路
2. 系统的目录结构
3. 项目建立和编程代码过程展示
4. 效果展示
5. 碰到的问题及解决思路(重要)
6. 总结
1. 本系统编写的思路
系统是采用的Django+Scrapy+Mysql三层架构进行开发的,主要思路是我们通过scrapy框架进行微博热点的爬取,经过一系列的处理最终成为我们想要的item,然后存入mysql数据库,最后Django从数据库中读取数据在网页上输出。其中我们在django和scrapy两个框架之间使用了scrapy-djangoitem工具包,将从scrapy得到的item与django的model建立关联,通过django强大的orm管理,直接将item存入数据库,减少了在scrapy编写sql的过程,提高了效率。除此之外,本系统开发十分简单,特别适合刚入门的童鞋学习。
2. 系统的目录结构
目录的结构影响到django和scrapy框架间是否能够通过scrapy-djangoitem进行连接,由于我之前在这之间碰到了很大的弯路,所以我这里选择了一种比较简答的项目创建方式,可以在之后的环境变量中省却很大的功夫(我还没从坑中完全爬起),更好的连接django和scrapy。
│ manage.py
│ tree.txt
│
├─.idea
│ │ DjangoRelateScrapy.iml
│ │ misc.xml
│ │ modules.xml
│ │ workspace.xml
│ │
│ ├─inspectionProfiles
│ └─libraries
│ R_User_Library.xml
│
├─DjangoRelateScrapy
│ │ settings.py
│ │ urls.py
│ │ wsgi.py
│ │ __init__.py
│ │
│ └─__pycache__
│ settings.cpython-37.pyc
│ urls.cpython-37.pyc
│ wsgi.cpython-37.pyc
│ __init__.cpython-37.pyc
│
├─microblog
│ │ admin.py
│ │ apps.py
│ │ models.py
│ │ tests.py
│ │ urls.py
│ │ views.py
│ │ __init__.py
│ │
│ ├─migrations
│ │ │ 0001_initial.py
│ │ │ 0002_auto_20190502_2117.py
│ │ │ __init__.py
│ │ │
│ │ └─__pycache__
│ │ 0001_initial.cpython-37.pyc
│ │ 0002_auto_20190502_2117.cpython-37.pyc
│ │ __init__.cpython-37.pyc
│ │
│ └─__pycache__
│ admin.cpython-37.pyc
│ models.cpython-37.pyc
│ urls.cpython-37.pyc
│ views.cpython-37.pyc
│ __init__.cpython-37.pyc
│
├─static
│ ├─css
│ │ a.css
│ │
│ ├─img
│ │ approve.png
│ │ comment.png
│ │ jiji.png
│ │ repost.png
│ │ weibo.png
│ │
│ └─js
├─templates
│ test.html
│ weibo.html
│
└─weibo
│ scrapy.cfg
│
└─weibo
│ items.py
│ main.py
│ middlewares.py
│ pipelines.py
│ settings.py
│ __init__.py
│
├─spiders
│ │ WBlog.py
│ │ __init__.py
│ │
│ └─__pycache__
│ WBlog.cpython-37.pyc
│ __init__.cpython-37.pyc
│
└─__pycache__
items.cpython-37.pyc
main.cpython-37.pyc
pipelines.cpython-37.pyc
settings.cpython-37.pyc
__init__.cpython-37.pyc
或者:
3. 项目建立和编程代码过程展示
1. 首先我们新建一个Django项目
django-admin startproject DjangoRelateScrapy2. 打开新建的django项目,然后新建一个app
cd DjangoRelateScrapy
python manage.py startapp microblog
3. 在django的根目录下,即DjangoRelateScrapy项目目录下,创建scrapy项目
scrapy startproject weibo4. 进入创建的scrapy项目,生成spider类
cd weibo
scrapy genspider WBlog "weibo.com"
5. 以上我们基本的项目的结构就创建完毕,接下来让我们从scrapy项目开始,一步步编写代码和配置文件,编写核心的爬虫文件WBlog.py:
import json
import re

import scrapy
from scrapy.spiders import CrawlSpider

from weibo.items import WeiboItem


class WblogSpider(CrawlSpider):
    name = 'WBlog'
    aallowed_domains = ['weibo.com']
    offset = 0
    base_url = "https://weibo.com/a/aj/transform/loadingmoreunlogin?ajwvr=6&category=1760&page={0}&lefnav=0&cursor=&__rnd=1556799484815"
    start_urls = [base_url.format(offset)]

    def parse(self, response):
        data = json.loads(response.text)
        if data and 'data' in data:
            pattern = re.compile(
                '(.*?).*?subinfo S_txt2">(.*?).*?'
                + 'S_txt2">(.*?).*?praised S_ficon W_f16">ñ(.*?).*?ficon_'
                + 'repeat S_ficon W_f16">.*?(.*?).*?forward S_ficon W_f16.*?'
+ '(.*?).*? 这个解析源代码的方式没有使用scrapy提供的xpath或者css解析,而是使用了re包解析,显得麻烦了点
6. 接下来就是要和django进行交互的代码编写了,我们先在scrapy的settings.py文件中添加配置信息:
# 配置python的环境变量
import django
os.environ['DJANGO_SETTINGS_MODULE'] = 'DjangoRelateScrapy.settings'
django.setup()

# 默认为True,此处改为False
ROBOTSTXT_OBEY = False

# 默认请求头,我一般习惯加上user-agent
DEFAULT_REQUEST_HEADERS = {
  'Accept': 'text/html,application/xhtml+xml,application/xml;q=0.9,*/*;q=0.8',
  'Accept-Language': 'en',
  'User-Agent': 'Mozilla/5.0 (Windows NT 6.3; Win64; x64) AppleWebKit/537.36 (KHTML, like Gecko) Chrome/71.0.3578.98 Safari/537.36'
}

# 开启我们的管道
ITEM_PIPELINES = {
   'weibo.pipelines.WeiboPipeline': 300,
}
7. 在django项目中的setting文件中修改和添加配置(包括数据库配置):
# 在这里添加上我们生成的app名称,我的就是最后一个microblog
INSTALLED_APPS = [
    'django.contrib.admin',
    'django.contrib.auth',
    'django.contrib.contenttypes',
    'django.contrib.sessions',
    'django.contrib.messages',
    'django.contrib.staticfiles',
    'microblog',
]
# 连接数据库的配置
DATABASES = {
    'default': {
        'ENGINE': 'django.db.backends.mysql',
        'NAME': 'weibo1',
        'USER': 'root',
        'PASSWORD': 'wangqile',
        'HOST': 'localhost',
        'PORT': '3306'
    }
}
# 加载static中的静态文件
STATICFILES_DIRS = [
    os.path.join(BASE_DIR, 'static'),
    os.path.join(BASE_DIR),
]
8. 编写django项目下models.py:
from django.db import models

# Create your models here.


class HotSpot(models.Model):

    content = models.CharField(max_length=255)
    author = models.CharField(max_length=255)
    publishTime = models.CharField(max_length=255)
    repost = models.IntegerField()
    comment = models.IntegerField()
    approve = models.IntegerField()
    address = models.URLField()

    # 排序
    class Meta:
        ordering = ['-id']
由于django具有站点管理的功能,所以编写的admin.py文件如下:
from django.contrib import admin

# Register your models here.
from microblog.models import HotSpot


@admin.register(HotSpot)
class SpotAdmin(admin.ModelAdmin):
    # 设置页面列的名称
    list_display = ['pk', 'content', 'author', 'publishTime', 'repost',
                    'comment', 'approve', 'address']
    list_per_page = 10


    ordering = ('pk',)

    search_fields = ['content']

    # 执行动作的位置
    actions_on_bottom = True
    actions_on_top = False
9. 在django根目录下执行django的数据迁移,生成迁移文件和数据库表
python manage.py makemigrations
python manage.py migrate
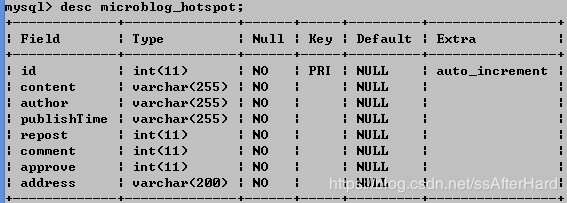
生成的数据库表结构如下
10. 下载scrapy-djangoitem工具包:
pip install scrapy-djangoitem具体的关于scrapy-djangoitem信息内容请参考https://github.com/scrapy-plugins/scrapy-djangoitem
11. 在scrapy的items.py中编写:
import scrapy
from scrapy_djangoitem import DjangoItem

from microblog.models import HotSpot


class WeiboItem(DjangoItem):
    # define the fields for your item here like:
    django_model = HotSpot
HotSpot就是我们引用的django中的models.py中的一个模型类
12. 在scrapy的pipleline.py中编写:
class WeiboPipeline(object):
    def process_item(self, item, spider):
        # 使用save就是把item存入到了数据库
        item.save()
        return item
13. 此时我们可以在scrapy项目下创建一个测试文件,测试是否把我们爬取的数据存入到了数据库:
编写的测试文件main.py:
from scrapy.cmdline import execute


execute('scrapy crawl WBlog'.split())
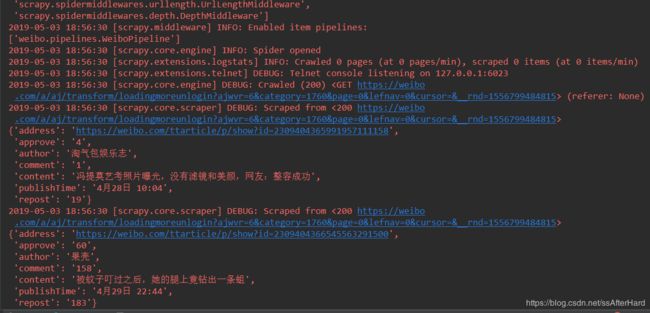
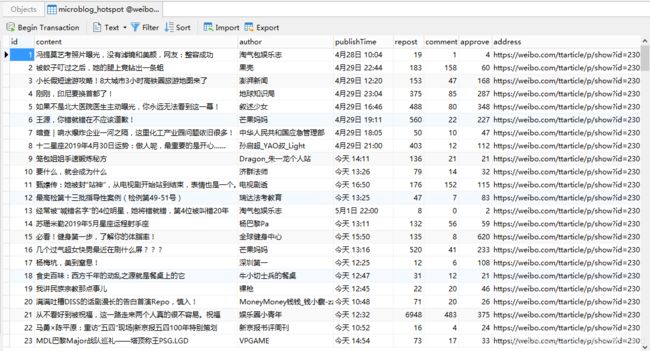
直接在测试文件中运行,避免了我们在命令行中去运行爬虫文件,运行后的结果如下:
太多信息没法截图省略了,但我们可以观察到微博热点信息已经爬取出来了,而且数据库中数据也存入进来:
14. 由于我们最终的效果是把微博热点展示在网页上,所以我们要在django项目中添加路由,编写urls.py:
from django.urls import path
from . import views

app_name = 'microblog'

urlpatterns = [
    path('', views.weibo, name='weibo'),
    path('detail//', views.detail, name='detail'),
]
这个是在app下床架的urls.py,需要在项目下的urls.py中指定下该文件:
from django.contrib import admin
from django.urls import path, include

urlpatterns = [
    path('admin/', admin.site.urls),
    path('', include('microblog.urls', namespace="microblog"))
]
15. 紧接着编写好视图文件views.py:
from django.core.paginator import Paginator
from django.http import HttpResponse
from django.shortcuts import render

# Create your views here.
from microblog.models import HotSpot

# 这个函数不用关注
def weibo(request):
    return render(request, 'weibo.html')


def detail(request, num):
    list = HotSpot.objects.all()
    # 实现分页功能
    paginator = Paginator(list, 8)
    if num > 100:
        num = 1
    page = paginator.page(num)

    return render(request, 'weibo.html', {'spotList': page})
16. 最后编写我们的前端页面weibo.html:
微博首页

微博热点自动提取软件开发
←←←点这里
{% for item in spotList %}
- {{ item.content }}
- {{ item.author }} {{ item.publishTime }}
-
{{ item.approve }}
{{ item.comment }}
{{ item.repost }}
{% endfor %}
{% for index in spotList.paginator.page_range %}
{% if index == spotList.number %}
- {{ index }}
{% else %}
-
{{ index }}
{% endif %}
{% endfor %}
外部静态文件夹下的css文件如下:
.topDiv {
            height: 80px; width: 100%;
            border-bottom: 2px solid #ebebeb;
            box-shadow:0px 5px 0px 0px rgba(245, 245, 245, 0.45);
        }
        .topDiv p {
            font-family:"Microsoft YaHei",Tahoma,Verdana,SimSun;
            font-size: 25px;
            text-align: center;
            color: #bdae9c;
            position: relative;
            left: 400px; top: 0px;
            display: inline-block;
        }
        .oneSpan {
            color: red;
            font-weight: bold;
            font-size: 30px;
        }
        .topDiv div {
            position: relative;
            left: 650px; top: 0px;
            display: inline-block;
        }
        .twoSpan {
            font-size: 23px;
            color: burlywood;
        }
        .oneSpan, .twoSpan {
            position: relative;
            left: 8px; top: -15px;
        }
        .leftDiv {
            width: 13%;
        }
        ul li {
            list-style: none;
        }
        .leftDiv ul li a {
            display: block;
            font-size: 18px;
            color: #000;
            height: 60px;
            line-height: 50px;
            border-radius: 3px;
            overflow: hidden;
            text-overflow: ellipsis;
            white-space: nowrap;
            padding: 0 8px;
            text-align: center;
            text-decoration: none;
        }
        .leftDiv ul li a:hover{
            background-color: #ff4418;
            color: white;
        }
        .spotDiv {
            position: absolute;
            top: 16%; left: 19%;
            width: 1000px;
            border-left-color: #ff122d;
        }
        .spotDiv ul li {
            display: inline-block;
        }
        .spotDiv ul div {
            height: 80px;
            border-bottom: 1px solid #ebebeb;
            box-shadow:0px 1px 0px 0px rgba(245, 245, 245, 0.45);
            background-color: #fbfff6;
        }
        .oneLi a{
            font-size: 20px;
            text-decoration: none;
            color: #ff6466;
            font-weight: bold;
        }
        .twoLi {
            position: absolute;
            left: 70%;
        }
        .twoLi input {
            width: 16px; height: 16px;
        }
        .oneUl li a{
            text-decoration: none;
            color: black;
            background-color: #00c1c1;
        }
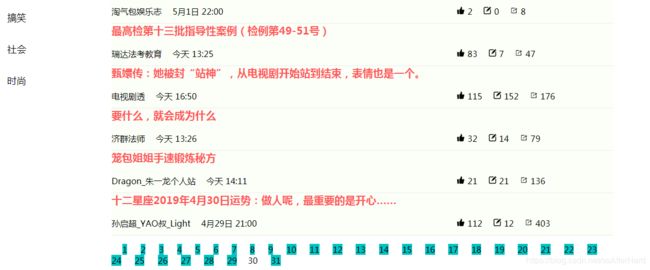
4. 效果展示
5. 碰到的问题及解决思路(重要)
1. 当初碰到的第一个问题就是django和scrapy通过scrapy-djangoitem无法进行关联,因为python的环境变量是在不懂的怎么配,参考了网上的很多教程,最后找到了衣蛾比较简单的方法,就是在django的根目录下直接创建scrapy项目,这样我们就省却了一步在scrapy的settings.py文件中配置django项目文件路径,只需要加载下django的setting文件即可
解决方式来源于这个博主的文章:https://juejin.im/post/5a2605f251882535c56cc2e6
2. 解决了上面一个问题之后,发现我们需要在命令行中编写scrapy crawl WBlog命令爬虫文件爬取信息,这种方式还是太low,所以scrapy提供了一个cmdline包,编写一个python文件直接在函数中执行该命令,我们只需要运行这个python文件即可:
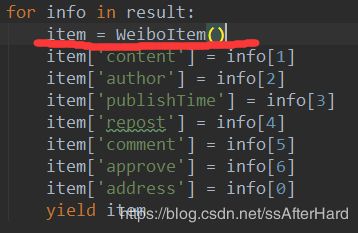
3. 当数据存入数据库时,发现存入的数据太少了,本来存入几百条的数据只存入了几十条,最终在编写的爬虫类WBlog.py中找到问题:
我把红线标记的地方写到了for循环外,这就直接导致我每爬取一页的数据,最终一页八条的数据只存入数据库一条,究其原因,是因为每一条数据都需要创建一个item = WeiboItem(),写在for循环外相当于我们一页就创建了一个item,所以存入数据库中也就一条数据,而不是一页八条的数据
6. 总结
这个是我的毕设,我比较后悔的是用了很多的框架。不可否认,框架确实能提高我们的编程效率和代码可读性,但对于小的项目来讲,我们应该避免使用很多的框架,因为框架之间的关联起来有时是听麻烦挺坑的,比如我就在django和scrapy关联上卡死了很久,于是在最后编写前端页面的时候没有使用bootstrap框架,因为实在没必要,大材小用了,最终,我们在处理Bug时一定放平心态,切记切记不要急躁!!
项目的源代码:链接: https://pan.baidu.com/s/16oTAsnctVK4HLuABBCNw0g 提取码: n3hp

