NIO--Buffer
1. 概述
一个 Buffer ,本质上是内存中的一块,我们可以将数据写入这块内存,之后从这块内存获取数据。通过将这块内存封装成 NIO Buffer 对象,并提供了一组常用的方法,方便我们对该块内存的读写。
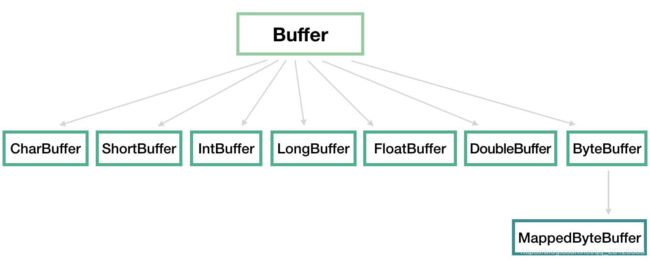
Buffer 在 java.nio 包中实现,被定义成抽象类,从而实现一组常用的方法。整体类图如下:
2. 基本属性
Buffer 中有 4 个重要的属性:capacity、limit、position、mark 。代码如下:
public abstract class Buffer {

    // Invariants: mark <= position <= limit <= capacity
    private int mark = -1;
    private int position = 0;
    private int limit;
    private int capacity;

    // Used only by direct buffers
    // NOTE: hoisted here for speed in JNI GetDirectBufferAddress
    long address;

    Buffer(int mark, int pos, int lim, int cap) {       // package-private
        if (cap < 0)
            throw new IllegalArgumentException("Negative capacity: " + cap);
        this.capacity = cap;
        limit(lim);
        position(pos);
        if (mark >= 0) {
            if (mark > pos)
                throw new IllegalArgumentException("mark > position: ("
                                                   + mark + " > " + pos + ")");
            this.mark = mark;
        }
    }

}
capacity 属性,容量,Buffer 能容纳的数据元素的最大值。这一容量在 Buffer 创建时被赋值,并且永远不能被修改。
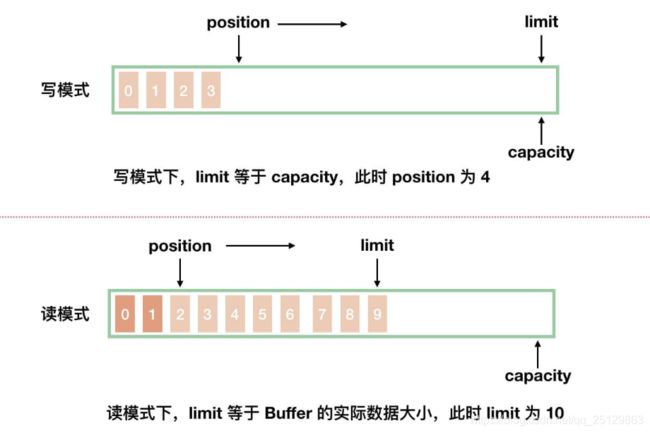
Buffer 分成写模式和读模式两种情况。如下图所示:
从图中,我们可以看到,两种模式下,position 和 limit 属性分别代表不同的含义。下面,我们来分别看看。
position 属性,位置,初始值为 0 。
写模式下,每往 Buffer 中写入一个值,position 就自动加 1 ,代表下一次的写入位置。
读模式下,每从 Buffer 中读取一个值,position 就自动加 1 ,代表下一次的读取位置。
limit 属性,上限。
写模式下,代表最大能写入的数据上限位置,这个时候 limit 等于 capacity 。
读模式下,在 Buffer 完成所有数据写入后,通过调用 #flip() 方法,切换到读模式。此时,limit 等于 Buffer 中实际的数据大小。因为 Buffer 不一定被写满,所以不能使用 capacity 作为实际的数据大小。
mark 属性,标记,通过 #mark() 方法,记录当前 position ;通过 reset() 方法,恢复 position 为标记。
写模式下,标记上一次写位置。
读模式下,标记上一次读位置。
从代码注释上,我们可以看到,四个属性总是遵循如下大小关系:
mark <= position <= limit <= capacity3. 创建 Buffer
每个 Buffer 实现类,都提供了 allocate(int capacity) 静态方法,帮助我们快速实例化一个 Buffer 对象。以 ByteBuffer 举例子,代码如下:
public static ByteBuffer allocate(int capacity) {
    if (capacity < 0)
        throw new IllegalArgumentException();
    return new HeapByteBuffer(capacity, capacity);
}
每个 Buffer 实现类,都提供了 wrap(byte[] array) 静态方法,帮助我们将其对应的数组包装成一个 Buffer 对象。还是以 ByteBuffer 举例子,代码如下:
public static ByteBuffer wrap(byte[] array, int offset, int length){
    try {
        return new HeapByteBuffer(array, offset, length);
    } catch (IllegalArgumentException x) {
        throw new IndexOutOfBoundsException();
    }
}

public static ByteBuffer wrap(byte[] array) {
    return wrap(array, 0, array.length);
}
每个 Buffer 实现类,都提供了 #allocateDirect(int capacity) 静态方法,帮助我们快速实例化一个 Buffer 对象。以 ByteBuffer 举例子,代码如下:
public static ByteBuffer allocateDirect(int capacity) {
    return new DirectByteBuffer(capacity);
}
4. 向 Buffer 写入数据
每个 Buffer 实现类,都提供了 put(...) 方法,向 Buffer 写入数据。以 ByteBuffer 举例子,代码如下:
// 写入 byte
public abstract ByteBuffer put(byte b);
public abstract ByteBuffer put(int index, byte b);
// 写入 byte 数组
public final ByteBuffer put(byte[] src) { ... }
public ByteBuffer put(byte[] src, int offset, int length) {...}
对于 Buffer 来说,有一个非常重要的操作就是,我们要讲来自 Channel 的数据写入到 Buffer 中。在系统层面上,这个操作我们称为读操作,因为数据是从外部( 文件或者网络等 )读取到内存中。示例如下:
int num = channel.read(buffer);
上述方法会返回从 Channel 中写入到 Buffer 的数据大小。对应方法的代码如下:
public interface ReadableByteChannel extends Channel {

    public int read(ByteBuffer dst) throws IOException;

}
说 NIO 的读操作的时候,我们说的是从 Channel 中读数据到 Buffer 中,对应的是对 Buffer 的写入操作。
5. 从 Buffer 读取数据
每个 Buffer 实现类,都提供了 get(...) 方法,从 Buffer 读取数据。以 ByteBuffer 举例子,代码如下:
// 读取 byte
public abstract byte get();
public abstract byte get(int index);
// 读取 byte 数组
public ByteBuffer get(byte[] dst, int offset, int length) {...}
public ByteBuffer get(byte[] dst) {...}
对于 Buffer 来说,还有一个非常重要的操作就是,我们要讲来向 Channel 的写入 Buffer 中的数据。在系统层面上,这个操作我们称为写操作,因为数据是从内存中写入到外部( 文件或者网络等 )。示例如下:
int num = channel.write(buffer);
上述方法会返回向 Channel 中写入 Buffer 的数据大小。对应方法的代码如下:
public interface WritableByteChannel extends Channel {

    public int write(ByteBuffer src) throws IOException;

}
6. rewind() v.s. flip() v.s. clear()
6.1 flip
如果要读取 Buffer 中的数据,需要切换模式,从写模式切换到读模式。对应的为 #flip() 方法,代码如下:
public final Buffer flip() {
    limit = position; // 设置读取上限
    position = 0; // 重置 position
    mark = -1; // 清空 mark
    return this;
}
使用示例,代码如下:
buf.put(magic);    // Prepend header
in.read(buf);      // Read data into rest of buffer
buf.flip();        // Flip buffer
channel.write(buf);    // Write header + data to channel
6.2 rewind
rewind() 方法,可以重置 position 的值为 0 。因此,我们可以重新读取和写入 Buffer 了。
大多数情况下,该方法主要针对于读模式,所以可以翻译为“倒带”。也就是说,和我们当年的磁带倒回去是一个意思。代码如下:
public final Buffer rewind() {
    position = 0; // 重置 position
    mark = -1; // 清空 mark
    return this;
}
使用示例,代码如下:
channel.write(buf);    // Write remaining data
buf.rewind();      // Rewind buffer
buf.get(array);    // Copy data into array
6.3 clear
clear() 方法,可以“重置” Buffer 的数据。因此,我们可以重新读取和写入 Buffer 了。
大多数情况下,该方法主要针对于写模式。代码如下:
public final Buffer clear() {
    position = 0; // 重置 position
    limit = capacity; // 恢复 limit 为 capacity
    mark = -1; // 清空 mark
    return this;
}
从源码上,我们可以看出,Buffer 的数据实际并未清理掉,所以使用时需要注意。
读模式下,尽量不要调用 clear() 方法,因为 limit 可能会被错误的赋值为 capacity 。相比来说,调用 rewind() 更合理,如果有重读的需求。
7.Buffer的基本用法
使用Buffer读写数据一般遵循以下四个步骤:
(1)写入数据到Buffer
(2)调用flip()方法
(3) 从Buffer中读取数据
(4)调用clear()方法或者compact()方法
当向buffer写入数据时,buffer会记录下写了多少数据。一旦要读取数据,需要通过flip()方法将Buffer从写模式切换到读模式。在读模式下,可以读取之前写入到buffer的所有数据。
一旦读完了所有的数据,就需要清空缓冲区,让它可以再次被写入。有两种方式能清空缓冲区:调用clear()或compact()方法。clear()方法会清空整个缓冲区。compact()方法只会清除已经读过的数据。任何未读的数据都被移到缓冲区的起始处,新写入的数据将放到缓冲区未读数据的后面。
下面是一个使用Buffer的例子:
RandomAccessFile aFile = new RandomAccessFile("data/nio-data.txt", "rw");
FileChannel inChannel = aFile.getChannel();
//create buffer with capacity of 48 bytes
ByteBuffer buf = ByteBuffer.allocate(48);
int bytesRead = inChannel.read(buf); //read into buffer.
while (bytesRead != -1) {

  buf.flip();  //make buffer ready for read

  while(buf.hasRemaining()){
      System.out.print((char) buf.get()); // read 1 byte at a time
  }

  buf.clear(); //make buffer ready for writing
  bytesRead = inChannel.read(buf);
}
aFile.close();

