VUE-CLI项目搭建和常用插件使用
一. 安装node js
二. 安装vue-cli 环境
1. npm install vue -g
2 npm install vue-cli -g
3 npm install webpack -g
4 npm install webpack-cli -g
三. 创建项目
1 vue init webpack 项目名
2 npm run dev 运行项目
四. 安装常用插件 ()
1. axios请求
(1) npm install axios --save 或者 npm install axios --save-dev
(2) 在main.js里面引入axios: import axios from 'axios'
(3) 把axios继承在vue的原型链上面 在引入axios下面写: Vue.prototype.$axios=axios
2. css样式单位转换:px单位自动转成rem
(1) 创建一个rem.js
//rem.js


// 基准大小
const baseSize = 32
// 设置 rem 函数
function setRem () {
  // 当前页面宽度相对于 750 宽的缩放比例,可根据自己需要修改。
  const scale = document.documentElement.clientWidth / 750
  // 设置页面根节点字体大小
  document.documentElement.style.fontSize = (baseSize * Math.min(scale, 2)) + 'px'
}
// 初始化
setRem()
// 改变窗口大小时重新设置 rem
window.onresize = function () {
  setRem()
}
(2) 在main.js里面引入rem.js
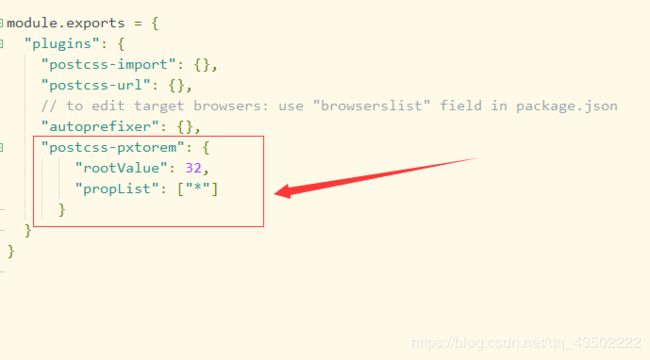
(3) 下载px转rem插件: postcss-pxtorem
(4) 找到: .postcssrc.js文件,,,新增属性
3 本地localStorage简单封装
(1) 创建一个localStorage.js文件
const storage={
	setStorage(key,value){
		localStorage.setItem(key,JSON.stringify(value))
	},
	getStorAge(key){
		return JSON.parse(localStorage.getItem(key));
	},
	removeStorAge(key){
		localStorage.removeItem(key);
	}
}

export default storage;
(2) 在需要使用的地方引用 import storage from '../localStorage/localStorage.js'
(3) 调用 storage.方法名
4 vuex 使用
(1) 下载vuex : npm install vuex --save 或者 npm install vuex --save-dev
(2) 创建一个store.js 引入vuex
import Vue from 'vue';
import Vuex from 'vuex'
import userInfo from './userInfo/userInfo.js'

Vue.use(Vuex);

export default new Vuex.Store({
    modules:{
        userInfo
    }
})
(3)在main.js引入store.js
//引入store.js
import store from './store/store.js'
/* eslint-disable no-new */
new Vue({
el: '#app',
router,
components: { App },
template: '(4) 编写vuex 四大核心方法 : state, getters,mutations,actions
import storage from '../localStorage/localStorage.js'
//state存储变量数据
const state = {
    courseId: 0,
}
//getters用于获取state里面的最新变量值
const getters = {
    getCourseNum: state => state.courseId

}
//mutations用于对state里面的数据增删改查,mutations使用场景是给下面的actions做中间界的
const mutations = {
    getCourseId: (state, newVal) => {
        state.courseId = newVal;
        console.log(state.courseId, "改变值");
    }
}

//action用于调用mutations 里面的方法
const actions = {
     getId({ commit }, newVal) {
        commit("getCourseId", newVal);
    },
}

//最后把四大核心方法暴露出去,否则无法引用vuex
export default {
    state,
    getters,
    mutations,
    actions
}
(8): 调用vuex
// 引入vuex的三个方法
	// {用于调用getters里面的方法,用于调用actions里面的方法,用于调用mutations}  常用两个
	import {mapGetters ,mapActions, mapMutations}
	export default{
		mounted(){
			// 直接调用state里面 的数据
			this.$store.state.id;
		},
		computed:{
			...mapGetters({
				getID:"getCourseNum"  //语法 getID:调用的是四大核心方法里面的getters下面的方法
			})
		},
		methods:{
			...mapActions({
				updataGetId:"getId"   //语法 方法名:调用的是四大核心方法里面的getId下面的方法
			})
		},

	}
5. vscode 编译scss
1: 在 VSCode 菜单栏依次点击“文件 首选项 设置”,打开 settings.json 全局配置文件。搜索“easysass”,然后把 easysass 相 关的设置项复制到右侧的用户设置编辑窗口中,再根据实际情况修改配置项。
2:
"easysass.compileAfterSave": true,

"easysass.excludeRegex": "",

"easysass.formats": [
    {
      "format": "expanded",
      "extension": ".css"
    },
    {
      "format": "compressed",
      "extension": ".min.css"
    }
],

"easysass.targetDir": ""
