手把手教你,嘴对嘴传达------Apache --ab测试
文章目录
- 一、ab的原理
- 二 、ab测试结果关键参数说明
- 1、ab常用参数
- 三、实验步骤
- 1、一键编译安装apache
- 2、一键配置dns服务
- 3、在网站首页放张图片
- 4、没压缩之前ab测试一下
- 5、压缩之后测试
- 6、再重新测试
一、ab的原理
-
ab是apachebench命令的缩写。
-
ab的原理:ab命令会创建多个并发访问线程,模拟多个访问者同时对某一URL地址进行访问。它的测试目标是基于URL的,因此,它既可以用来测试apache的负载压力,也可以测试nginx、lighthttp、tomcat、IIS等其它Web服务器的压力。
-
ab命令对发出负载的计算机要求很低,它既不会占用很高CPU,也不会占用很多内存。但却会给目标服务器造成巨大的负载,其原理类似CC攻击。自己测试使用也需要注意,否则一次上太多的负载。可能造成目标服务器资源耗完,严重时甚至导致死机。
二 、ab测试结果关键参数说明
1、ab常用参数
-n :总共的请求执行数,缺省是1;

-c: 并发数,缺省是1;

-t:测试所进行的总时间,秒为单位,缺省50000s

-p:POST时的数据文件

-w: 以HTML表的格式输出结果
具体如下
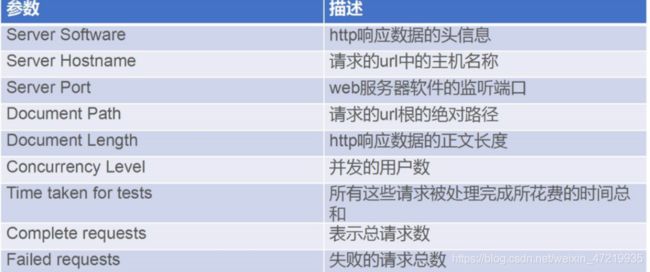
Server Hostname:        192.168.110.132   #请求的URL主机名
Server Port:            80     #请求端口

Document Path:          /  #请求路径
Document Length:        5039 bytes    #HTTP响应数据的正文长度

Concurrency Level:      100    #并发用户数,这是我们设置的参数之一
Time taken for tests:   11.317 seconds    #所有这些请求被处理完成所花费的总时间 单位秒
Complete requests:      1097     #总请求数量,这是我们设置的参数之一
Failed requests:        159     #表示失败的请求数量
   (Connect: 0, Receive: 0, Length: 159, Exceptions: 0)
Write errors:           0
Total transferred:      5674622 bytes     #所有请求的响应数据长度总和。包括每个HTTP响应数据的头信息和正文数据的长度
HTML transferred:       5527624 bytes   #所有请求的响应数据中正文数据的总和,也就是减去了Total transferred中HTTP响应数据中的头信息的长度
Requests per second:    96.94 [#/sec] (mean)   #吞吐量,计算公式:Complete requests/Time taken for tests  总请求数/处理完成这些请求数所花费的时间
Time per request:       1031.611 [ms] (mean)    #用户平均请求等待时间,计算公式:Time token for tests/(Complete requests/Concurrency Level)。处理完成所有请求数所花费的时间/(总请求数/并发用户数)
Time per request:       10.316 [ms] (mean, across all concurrent requests)  #服务器平均请求等待时间,计算公式:Time taken for tests/Complete requests,正好是吞吐率的倒数。也可以这么统计:Time per request/Concurrency Level
Transfer rate:          489.68 [Kbytes/sec] received    表示这些请求在单位时间内从服务器获取的数据长度,计算公式:Total trnasferred/ Time taken for tests,这个统计很好的说明服务器的处理能力达到极限时,其出口宽带的需求量。

Connection Times (ms)
              min  mean[+/-sd] median   max
Connect:        1  516 1148.7      3    7077
Processing:     4  212 415.3     27    2193
Waiting:        3  178 339.1     26    1833
Total:          6  728 1158.6     89    7445

Percentage of the requests served within a certain time (ms)
  50%     88    #50%的请求在88ms内返回
  66%    909
  75%   1043
  80%   1151
  90%   2294
  95%   3019
  98%   4093  #98%的请求在4093ms内返回
  99%   7024
 100%   7445 (longest request)
三、实验步骤
1、一键编译安装apache
#!/bin/bash
ip=www.baidu.com
ping -c 2 -w 3 -i 0.3 $ip &>/dev/null
if  [ $? -eq 0 ]
 then
echo " 可以ping的通百度"
 else
 echo "正在更改你的网卡"
sed -i '/^IPADDR=/cIPADDR=192.168.110.132' /etc/sysconfig/network-scripts/ifcfg-ens33
sed -i '/^GATEWAY=/cGATEWAY=192.168.110.2' /etc/sysconfig/network-scripts/ifcfg-ens33
sed -i '/^DNS1=/cDNS1=8.8.8.8' /etc/sysconfig/network-scripts/ifcfg-ens33
echo "网卡配置文件已改完  正在重启网络服务"
systemctl restart network
fi

ping -c 2 $ip &>/dev/null
if [ $? -eq 0 ] ;then
 echo "一切准备就绪"
 else
  echo "请检查你绑定的网卡是不是vm8"
fi

cd ~
cd apache
tar zxvf apr-1.6.2.tar.gz
tar zxvf apr-util-1.6.0.tar.gz
tar jxvf httpd-2.4.29.tar.bz2
mv apr-1.6.2 httpd-2.4.29/srclib/apr
mv apr-util-1.6.0 httpd-2.4.29/srclib/apr-util
yum -y install gcc gCc-C++ make pcre-devel expat-devel perl zlib-devel
 if [ $? -eq 0 ];then
 echo "正在下载软件包环境"
 fi
cd httpd-2.4.29
./configure \
--prefix=/usr/local/httpd \
--enable-so \
--enable-rewrite \
--enable-charset-lite \
--enable-cgi \
--enable-deflate
if [ $? -eq 0 ];then
 echo "./configure 执行成功"
 else
 echo "凉了"
fi
make
make install
cp /usr/local/httpd/bin/apachectl /etc/init.d/httpd
sed -i '2a#chkconfig: 35 85 21' /etc/init.d/httpd
chkconfig --add httpd
sed -i '/#ServerName www.example.com:80/cServerName www.shang.com:80' /usr/local/httpd/conf/httpd.conf
sed -i '52s/^/#/' /usr/local/httpd/conf/httpd.conf
sed -i '/#Listen 12.34.56.78:80/cListen 192.168.110.132:80' /usr/local/httpd/conf/httpd.conf
ln -s /usr/local/httpd/conf/httpd.conf /etc/httpd.conf
ln -S /usr/local/httpd/bin/* /usr/local/bin/
systemctl stop firewalld.service
setenforce 0
service httpd start
if [ $? -eq 0 ] ;then
 echo "成功启动apache"
 else
 echo "完犊子了"
 fi
2、一键配置dns服务
#!/bin/bash
sed -i 's/localhost/any/' /etc/named.conf
sed -i 's/127.0.0.1/any/' /etc/named.conf
sed  -i '19,23{H};23G' /etc/named.rfc1912.zones
sed  -i '25s/localhost/shang.com/' /etc/named.rfc1912.zones
sed -i '27s/named.localhost/shang.com.zone/' /etc/named.rfc1912.zones

#cat>>/etc/named.rfc1912.zones<

#zone "shang.com" IN {
#       type master;
#       file "shang.com.zone";
#       allow-update{ none; };
#};
#EOF
cp -p /var/named/named.localhost /var/named/shang.com.zone
#sed -i '/127.0.0.1\|AAAA/d' /var/named/shang.com.zone
cat>/var/named/shang.com.zone<<EOF
\$TTL 1D
@       IN SOA  @ rname.invalid. (
                                        0       ; serial
                                        1D      ; refresh
                                        1H      ; retry
                                        1W      ; expire
                                        3H )    ; minimum
        NS      @
        A       127.0.0.1
www IN  A       192.168.110.132
EOF

sed -i '1inameserver 192.168.110.132' /etc/resolv.conf
nslookup www.shang.com
3、在网站首页放张图片
cd /usr/local/httpd/bin/
ln -s /usr/local/httpd/bin/ab /usr/sbin/
service httpd start
[root@localhost bin]# setenforce 0
[root@localhost bin]# systemctl stop firewalld
host www.shang.com
www.shang.com has address 192.168.110.132
 cd  /usr/local/httpd/htdocs
vim index

<html><body><h1>It works!</h1></body></html>
<img src="av.jpg"/>
</body></html>
4、没压缩之前ab测试一下
[root@localhost htdocs]# ab -n 3000 -c 1000 www.shang.com/index.html
This is ApacheBench, Version 2.3 <$Revision: 1807734 $>
Copyright 1996 Adam Twiss, Zeus Technology Ltd, http://www.zeustech.net/
Licensed to The Apache Software Foundation, http://www.apache.org/

Benchmarking www.shang.com (be patient)
Completed 300 requests
Completed 600 requests
Completed 900 requests
Completed 1200 requests
Completed 1500 requests
Completed 1800 requests
Completed 2100 requests
Completed 2400 requests
Completed 2700 requests
Completed 3000 requests
Finished 3000 requests


Server Software:        Apache/2.4.29
Server Hostname:        www.shang.com
Server Port:            80

Document Path:          /index.html
Document Length:        80 bytes

Concurrency Level:      1000
Time taken for tests:   0.734 seconds           ////0.734秒处理
Complete requests:      3000
Failed requests:        0
Total transferred:      972000 bytes
HTML transferred:       240000 bytes
Requests per second:    4086.01 [#/sec] (mean)
Time per request:       244.737 [ms] (mean)
Time per request:       0.245 [ms] (mean, across all concurrent requests)
Transfer rate:          1292.84 [Kbytes/sec] received

Connection Times (ms)
              min  mean[+/-sd] median   max
Connect:        0   29  17.4     27      74
Processing:     5   67  92.4     40     503
Waiting:        3   60  91.5     32     491
Total:         21   96 103.5     67     562

Percentage of the requests served within a certain time (ms)
  50%     67
  66%     87
  75%     95
  80%     98
  90%    111
  95%    326
  98%    505
  99%    511
 100%    562 (longest request)
[root@localhost htdocs]#
5、压缩之后测试
进入主配置文件 /usr/local/httpd/conf/httpd.conf
开启下面三个功能模块
LoadModule headers_module modules/mod_headers.so
LoadModule filter_module modules/mod_filter.so
LoadModule deflate_module modules/mod_deflate.so
最后一行填写
<IfModule mod_deflate.c>
  AddOutputFilterByType DEFLATE text/html text/plain text/css text/xml text/javascrip text/jpg text/png
  DeflateCompressionLevel 9
  SetOutputFilter DEFLATE
</IfModule>
6、再重新测试
这里需要强调的是 ,压力测试是有偶然性的 ,需要多次测试取平均值 ,这里小编测试的网站没有东西,就不进行测试了
[root@localhost conf]# ab -n 3000 -c 1000 www.shang.com/index.html
在进行压力测试
Time taken for tests:   20.964 seconds

