深度学习中的数据增强
文章目录
- @[toc]
- 一、简介
- 二、单样本数据增强
- 1、空间几何变换
- A、分类网络中常用的 crop 操作
- a、train phase cropping
- I、single-scale cropping (`alexnet`)
- II、multi-scale cropping (`vgg&resnet: scale jittering`)
- III、代码实现
- b、test phase cropping
- I、1-crop testing
- II、10-crop testing(corners + center, plus horizontal fips)
- III、144-crop testing (multiple scales cropping)
- IV、10-crop testing 实现
- B、翻转(flip)、旋转(rotation)、平移(shifting)、缩放(scaling)
- 2、像素内容变换
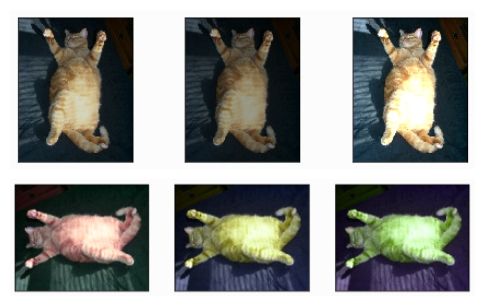
- I、色彩抖动(Color jittering):
- II、颜色通道变换(RandomLightingNoise)
- III、加噪声(Noise)
- 三、多样本数据增强
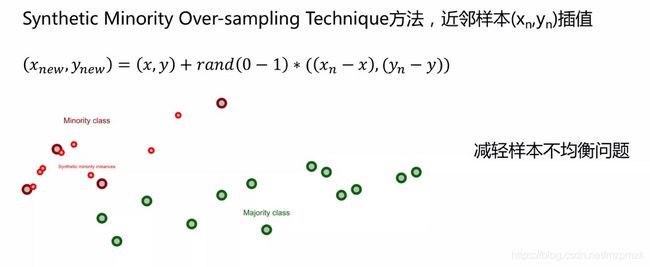
- 1、多样本融合(SMOT)
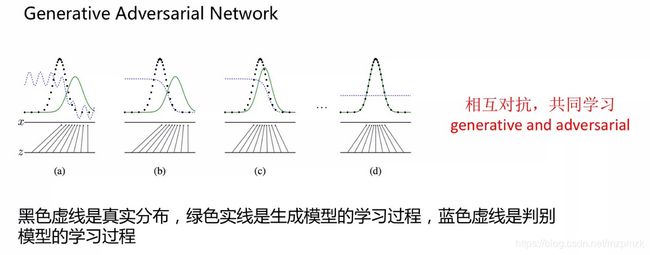
- 2、生成对抗网络(GAN)
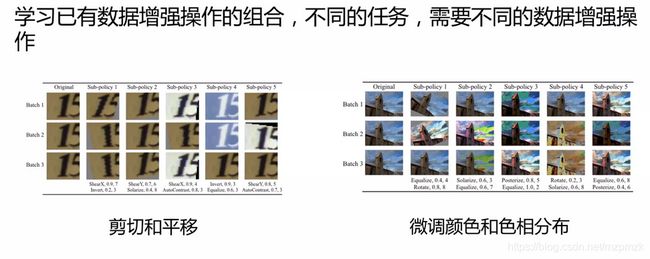
- 3、自动搜索最优数据增强组合(AutoAugmentation)
- 4、Fancy PCA(AlexNet)
- 5、监督式数据增强(海康)---适用于场景分类(高层语义)
- 6、样本不均衡的处理方法
- 四、开源框架中的数据增强(online)
- 1、caffe 中的数据增强
- 2、TensorFlow 中的数据增强
- 五、Python 中的数据增强工具(offline)
- 六、参考资料
一、简介
- 深层神经网络一般都需要大量的训练数据才能获得比较理想的结果。在数据量有限的情况下,可以通过数据增强(Data Augmentation)来
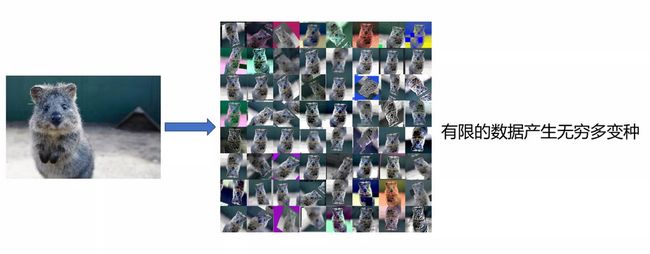
增加训练样本的多样性,降低模型对某些属性的依赖, 从而提⾼模型的泛化能⼒,避免过拟合(可以看做一种 隐式正则化)- 例如,我们可以对图像进⾏不同方式的裁剪,让物体以
不同的⽐例出现在图像的不同位置,这同样能够降低模型对⽬标位置的敏感性。 - 例如,我们也可以调整
亮度、对⽐度、饱和度和⾊调等因素来降低模型对⾊彩的敏感度。
- 例如,我们可以对图像进⾏不同方式的裁剪,让物体以
- 图片数据增强通常只是针对训练数据,对于测试数据则用得较少。
后者常用的是:做 5 次随机剪裁(左上、右上、右下、左下、中间),然后将 5 张图片的预测结果做均值。
- 数据增强的顺序(结合 caffe ssd 提问?resize 参数 FIT_SMALL_SIZE 是如何使用的?)
二、单样本数据增强
1、空间几何变换
空间几何变换 未改变图像本身的内容,而是选择了图像的一部分或者像素的空间重分布
A、分类网络中常用的 crop 操作
a、train phase cropping
I、single-scale cropping (alexnet)
- 首先,找出图像中的短边并将其
resize至 256 256 256,长边按照短边的缩放比例进行resize - 其次,对缩放后的图像进行
center crop(或top center crop等)至 256 ∗ 256 256*256 256∗256 - 最后,对 crop 后的图像进行
online random crop至 224 ∗ 224 224*224 224∗224 后进行模型训练( 32 ∗ 32 32*32 32∗32 种可能)
II、multi-scale cropping (vgg&resnet: scale jittering)
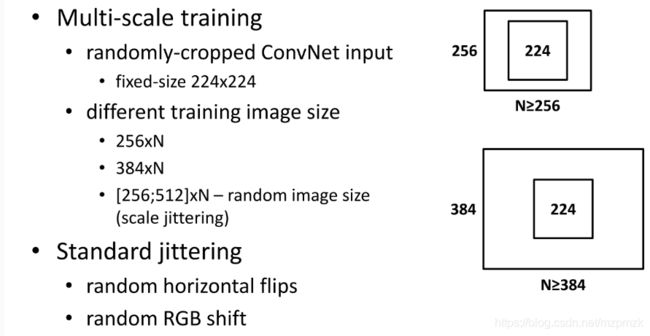
- crop size 是固定的,而 image size 是随机可变的。举例来说,比如把 crop size 固定在 224×224,而 image 的 短边 可以按比例缩放到 [256, 480] 区间的某个随机数值,然后随机偏移裁剪个 224×224 的图像区域
- 一般来说,我们要识别的物体不一定会在图像的中间,而且图像中物体的大小也不尽相同,所以这样多尺度的处理是合理的
III、代码实现
可参考: slim 中的实现
def preprocess(img_dir, save_dir, save_phase):
    CROP_SIZE = 128.0
    cnt = 0
    wrong_cnt = 0
    f = codecs.open(save_phase, "w", encoding="utf-8")  # save the result
    for img_name in os.listdir(img_dir):
        try:
            img_path = os.path.join(img_dir, img_name)
            save_path = os.path.join(save_dir, img_name)
            img_label = img_name.split('_')[0]
            img_bgr = cv2.imdecode(np.fromfile(img_path, dtype=np.uint8), 1)

            #  resize the image(min_side size) proportionally
            h, w = img_bgr.shape[:2]
            if h > w:
                resize_ratio = CROP_SIZE / w
                h_resized = int(np.round(resize_ratio * h))
                w_resized = 128
            else:
                resize_ratio = CROP_SIZE / h
                h_resized = 128
                w_resized = int(np.round(resize_ratio * w))

            img_bgr_resized = cv2.resize(img_bgr, (w_resized, h_resized), interpolation=cv2.INTER_AREA)  # better for resize

            # top center crop
            if h_resized < w_resized:
                off = (w_resized - h_resized) // 2
                img_bgr_cropped = img_bgr_resized[:, off:off + h_resized]
            else:
                img_bgr_cropped = img_bgr_resized[:w_resized, :]

            """
            # center crop
		    if h_resized < w_resized:
		        off = (w_resized - h_resized) // 2
		        img_bgr_cropped = img_bgr_resized[:, off:off + h_resized]
		    else:
		        off = (h_resized - w_resized) // 2
		        img_bgr_cropped = img_bgr_resized[off:off + w_resized, :]
			"""
            cv2.imencode('.jpg', img_bgr_cropped)[1].tofile(save_path)
            f.write("{} {}\n".format(save_path, img_label))

            cnt += 1
            print('Process the {} img'.format(cnt))

        except Exception as e:
            wrong_cnt += 1
            print("Wrong img name is!{}".format(img_name))
            print('Error reason is {}'.format(e))
            print('Wrong cnt is {}'.format(wrong_cnt))
            continue
    f.close()
b、test phase cropping
可参考:single crop/multiple crops
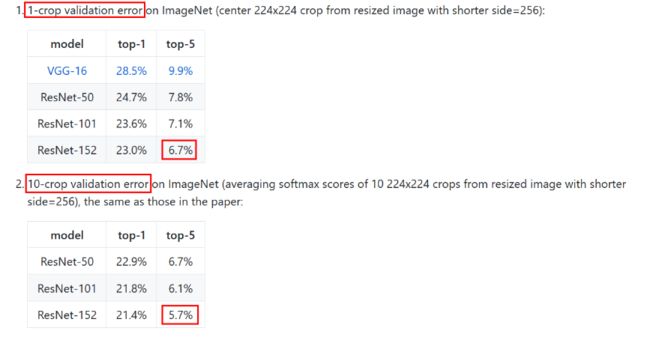
I、1-crop testing
- 首先,找出图像中的短边并将其
resize至 256 256 256,长边按照短边的缩放比例进行resize - 其次,对缩放后的图像进行
center crop(或top center crop等)至 256 ∗ 256 256*256 256∗256 - 最后,对 crop 后的图像进行
center crop至 224 ∗ 224 224*224 224∗224 后进行模型评估 或者:直接找出图像中的短边并将其resize至 224 224 224,然后再center crop(或top center crop等)至 224 ∗ 224 224*224 224∗224进行模型评估
II、10-crop testing(corners + center, plus horizontal fips)
- 首先,找出图像中的短边并将其
resize至 256 256 256,长边按照短边的缩放比例进行resize - 其次,对缩放后的图像进行
center crop(或top center crop等)至 256 ∗ 256 256*256 256∗256 - 最后,取(左上,左下,右上,右下,正中)以及它们的水平翻转( 224 ∗ 224 224*224 224∗224)这10 个 crops 的 softmax 平均值作为最终预测结果
III、144-crop testing (multiple scales cropping)
- 首先,将图像按照短边 resize 到 4 个尺度(256xN,320xN,384xN,480xN)
- 其次,在每个尺度上去取(最左,正中,最右)3 个位置的正方形区域( 256x256,320x320,384x384,480x480)
- 然后,对每个正方形区域( 256x256,320x320,384x384,480x480)
- 按 10-crop 规则取 10 个 224x224 的 crops,则得到 4x3x10=120 个 crops
- 将正方形区域直接 resize 到 224x224,以及做 horizontal flip,则又得到 4x3x2=24 个 crops
- 最后, 将 120+24=144 个 crops 的 softmax 平均值作为最终预测结果
IV、10-crop testing 实现
# 参考 caffe/python/caffe/io.py
def oversample(images, crop_dims):
    """
    Crop images into the four corners, center, and their mirrored versions.

    Parameters
    ----------
    image : iterable of (H x W x K) ndarrays
    crop_dims : (height, width) tuple for the crops.

    Returns
    -------
    crops : (10*N x H x W x K) ndarray of crops for number of inputs N.
    """
    # Dimensions and center.
    im_shape = np.array(images[0].shape)
    crop_dims = np.array(crop_dims)
    im_center = im_shape[:2] / 2.0

    # Make crop coordinates
    h_indices = (0, im_shape[0] - crop_dims[0])
    w_indices = (0, im_shape[1] - crop_dims[1])
    crops_ix = np.empty((5, 4), dtype=int)
    curr = 0
    for i in h_indices:
        for j in w_indices:
            crops_ix[curr] = (i, j, i + crop_dims[0], j + crop_dims[1])
            curr += 1
    crops_ix[4] = np.tile(im_center, (1, 2)) + np.concatenate([
        -crop_dims / 2.0,
         crop_dims / 2.0
    ])
    crops_ix = np.tile(crops_ix, (2, 1))

    # Extract crops
    crops = np.empty((10 * len(images), crop_dims[0], crop_dims[1],
                      im_shape[-1]), dtype=np.float32)
    ix = 0
    for im in images:
        for crop in crops_ix:
            crops[ix] = im[crop[0]:crop[2], crop[1]:crop[3], :]
            ix += 1
        crops[ix-5:ix] = crops[ix-5:ix, :, ::-1, :]  # flip for mirrors
    return crops
B、翻转(flip)、旋转(rotation)、平移(shifting)、缩放(scaling)
- 这些操作在 opencv 中的实现可参考博客:图像的几何变换(Geometric Transformations of Images)
- 尤其要注意翻转和旋转过程中
坐标的变化
2、像素内容变换
I、色彩抖动(Color jittering):
-
首先,将图片从 RGB 颜色空间转换到 HSV 颜色空间
-
然后,在 HSV 颜色空间随机改变图像原有的
饱和度和明度(即,改变 S 和 V 通道的值)或对色调(Hue)进行小范围微调- 对于图像亮度来说:可以直接在 RGB 空间
随机增加每个像素的值来实现 if random.randint(2): image += random.uniform(-self.delta, self.delta), the default value of delta is 32
- 对于图像亮度来说:可以直接在 RGB 空间
-
注意:还可随机改变对比度,组合情况:
随机亮度 --> 随机对比度 --> 随机 HSVor随机亮度 --> 随机 HSV --> 随机对比度self.pd = [ RandomContrast(), ConvertColor(transform='HSV'), RandomSaturation(), RandomHue(), ConvertColor(current='HSV', transform='BGR'), RandomContrast() ] im, boxes, labels = self.rand_brightness(im, boxes, labels) if random.randint(2): distort = Compose(self.pd[:-1]) else: distort = Compose(self.pd[1:]) im, boxes, labels = distort(im, boxes, labels) -
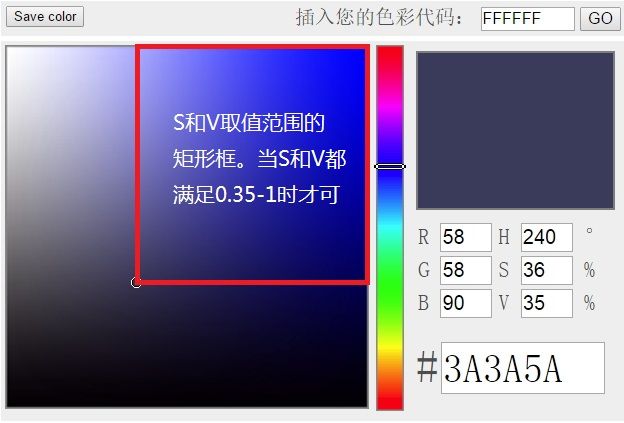
使用 HSV 来调整图像颜色的原理:- 通常我们会想到使用图像的 RGB 值来判断其颜色,但是图像颜色是由这三个值共同决定的,只固定其中一个分量(比如蓝色分量),很难调节另外两个分量的配比让其一定呈现蓝色。而 HSV 则非常适合图像颜色判断的问题。其中,H(ue) 代表色调,取值范围为: 0 ∘ ∼ 36 0 ∘ 0^{\circ} \sim 360^{\circ} 0∘∼360∘,红色为 0 ∘ 0^{\circ} 0∘,绿色为 12 0 ∘ 120^{\circ} 120∘,蓝色为 24 0 ∘ 240^{\circ} 240∘;S(aturation)代表饱和度,取值范围为: 0 % ∼ 100 % 0\% \sim 100\% 0%∼100%,值越大,色彩越饱和;V(alue) 代表明度,取值范围为: 0 % ∼ 100 % 0\% \sim 100\% 0%∼100%,值越大,色彩越明亮。
- 色调(H) 是 HSV 颜色模型中唯一与颜色本质有关的变量,所以只要固定了 H 的值,并且保持饱和度(S)和明度(V)分量不太小,那么表现的颜色就基本可以确定了。如下图所示,当我们固定 H = 24 0 ∘ H = 240^{\circ} H=240∘ 时,只要饱和度(S)和明度(V)都大于 0.35 0.35 0.35,那么我们就可以认为框中的颜色均为为蓝色。
II、颜色通道变换(RandomLightingNoise)
# 适用于对颜色不敏感的任务,以 0.5 的概率随机选择其中一种进行颜色通道变换,总共有 6 中可能
self.perms = ((0, 1, 2), (0, 2, 1),
              (1, 0, 2), (1, 2, 0),
              (2, 0, 1), (2, 1, 0))
III、加噪声(Noise)
- 加入随机高斯噪声或高斯模糊
三、多样本数据增强
1、多样本融合(SMOT)
2、生成对抗网络(GAN)
3、自动搜索最优数据增强组合(AutoAugmentation)
4、Fancy PCA(AlexNet)
- Altering the
intensities of the RGB channelsin training images - 首先按照RGB三个颜色通道计算均值和标准差,再在整个训练集上计算协方差矩阵,进行特征分解,得到特征向量和特征值,用来做PCA Jittering
5、监督式数据增强(海康)—适用于场景分类(高层语义)
6、样本不均衡的处理方法
- label shuffle
- focal loss
- OHEM
- SMOT
- 还可以用Weighted samples,给每一个样本加权重,样本多的类别每个的权重就小些,样本少的类别每个的权重就大些,这样无论样本是否均衡,在Loss Function中每类的影响力都一样的
四、开源框架中的数据增强(online)
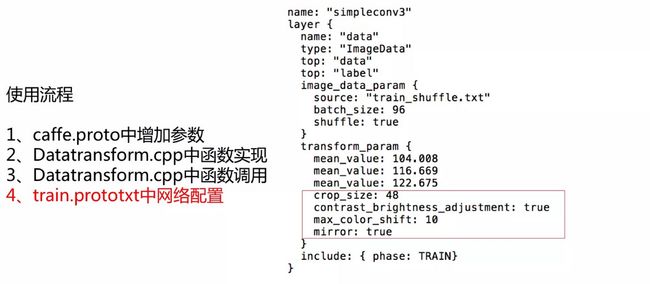
1、caffe 中的数据增强
2、TensorFlow 中的数据增强
- tf.image API
五、Python 中的数据增强工具(offline)
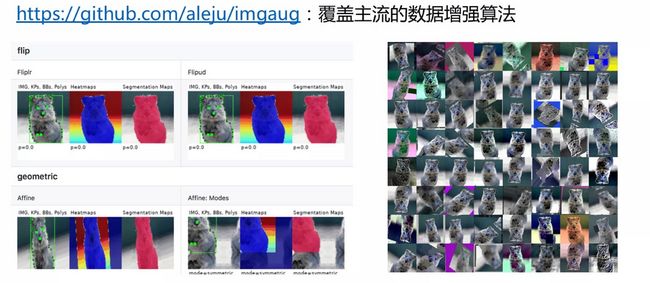
- imgaug:Image augmentation for machine learning experiments
- Augmentor:Image augmentation library in Python for machine learning
- 安装:
pip install Augmentor
- 安装:
六、参考资料
1、Data Augmentation in SSD !!! (Single Shot Detector)
2、https://github.com/tensorflow/models/blob/master/research/object_detection/core/preprocessor.py
3、公输睚信:https://github.com/Shirhe-Lyh/finetune_classification/blob/master/preprocessing.py
4、Application of Synthetic Minority Over-sampling Technique (SMOTe) for imbalanced datasets
5、AutoAugment:Learning Augmentation Strategies from Data【Google Brain】
6、自己之前的总结
7、高手之道】海康威视研究院ImageNet2016竞赛经验分享
8、http://image-net.org/challenges/talks/2016/Hikvision_at_ImageNet_2016.pdf
9、理解卷积神经网络的利器:9篇重要的深度学习论文(上)
10、https://github.com/chuanqi305/MobileNet-SSD
11、一起来看数据增强
