Pytorch使用细节总结
文章目录
- 基于Pytorch的目标检测数据加载
- Pytorch加载数据
- VOC格式数据集的加载
- COCO格式数据集的加载
- 总结
- Pytorch源码解读之torchvision.transforms
- Compose类
- ToTensor类
- ToPILImage类
- Normalize类
- Resize类
- CenterCrop类
- RandomCrop类
- RandomHorizontalFlip类
- RandomVerticalFlip类
- RandomResizedCrop类
- FiveCrop类
- TenCrop类
- LinearTransformation类
- ColorJitter类
- RandomRotation类
- Grayscale类
- RandomGrayscale类
- 基于PyTorch的目标检测数据增强
- 1. 简介
- 2. 针对像素的数据增强
- 3. 针对图像的数据增强
- 3.1 随机镜像
- 3.2 随机缩放
- 3.3 随机裁剪
- 4. 总结
- Pytorch保存和加载模型
- Pytorch:多GPU训练网络与单GPU训练网络保存模型的区别
- Pytorch保留验证集上最好的模型
- PyTorch学习之六个学习率调整策略
- 参考链接
基于Pytorch的目标检测数据加载
PyTorch框架中有一个非常重要且好用的包:torchvision,该包主要由3个子包组成,分别是:torchvision.datasets、torchvision.models、torchvision.transforms。这3个子包的具体介绍可以参考官网:http://pytorch.org/docs/master/torchvision/index.html。具体代码可以参考github:https://github.com/pytorch/vision/tree/master/torchvision。
Pytorch加载数据
Pytorch中使用Dataset和DataLoader两个工具类完成数据的加载,前者用于构造数据集(数据集能够通过索引取出一条数据)、后者用于取一批次的数据(Pytorch只支持批数据处理)。
本文介绍使用Pytorch处理目标检测数据,主要涉及VOC标注格式的数据集和COCO标注格式的数据集两种,其加载数据的整体结构如下:
from torch.utils.data import Dataset, DataLoader


class CustomDataSet(Dataset):
    def __init__(self):
        pass

    def __getitem__(self, index):
        pass

    def __len__(self):
        pass

dataset = CustomDataSet()
dataloader = DataLoader(
    dataset=dataset,
    batch_size=64,
    shuffle=True,
    num_workers=4)
-
CustomDataSet是我们自定义的数据加载类,其继承自Dataset类。 -
__init__方法用于定义一些初始化操作。我们可以通过该方法将所有数据加载至内存,后续通过索引在内存中取相应数据,这适合于数据本身很小的情况下;而我们更多采用的是首先将数据的路径存在相关文件内,后续根据路径索引取得相应数据,这往往应用于数据量较大的情况。 -
__getitem__方法的功能是根据索引取出一条数据。注意该数据是处理后的数据,可以直接作为网络的输入,所以在返回前需要进行一些必要的如数据增强、标准化等操作。 -
__len__方法用于返回数据集的条数。 -
最后使用
DataLoader类制作数据加载器,我们通常使用的几个参数如上面程序所示。第一个参数
dataset就是前面我们定义的数据加载类的对象;第二参数
batch_szie是每批次数据的大小,通常根据内存等确定;第三个参数
shuffle是每次加载一批数据时是否将其打乱,在训练时一般设置为True、测试时设置为False;第四个参数
num_workers是在读取数据时使用的线程数。 -
有时候为了实现更加高效的数据加载,我们会使用
DataLoader类的其他参数,可参考PyTorch文档,可参考这里。
以上介绍了使用Pytorch加载数据时的整体结构,下面就VOC标注格式的数据集和COCO标注格式的数据集分别介绍相应的处理流程。
VOC格式数据集的加载
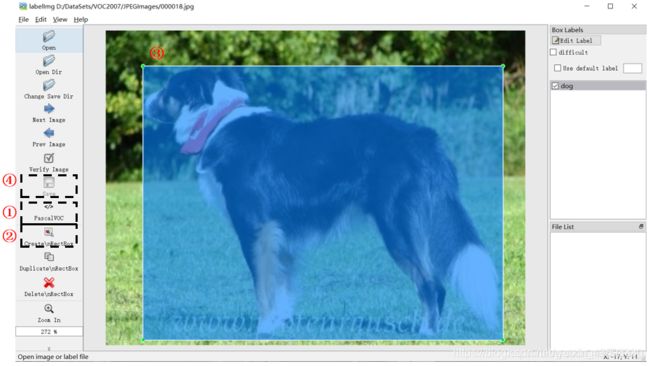
VOC数据集大致有2007和2012两个版本,二者标注形式完全一致,只是数据量不同,数据集可以在这里下载(本文以VOC 2007为例说明)。同时,我们可以将自己的数据集制作为VOC格式,这里使用的是labelImg工具。首先在使用pip install labelImg命令安装工具,安装成功后输入labelImg即可打开可视化界面。
数据集的目录结构如下图。在制作自己的数据集时,首先我们要依照下图格式建立相应的文件夹。然后如上图分别执行对应的四个步骤。其中在画完框后会自动弹出来一个对话框,此时我们需要输入该标注目标的类别。最后根据标注信息将自动生成.xml文件。
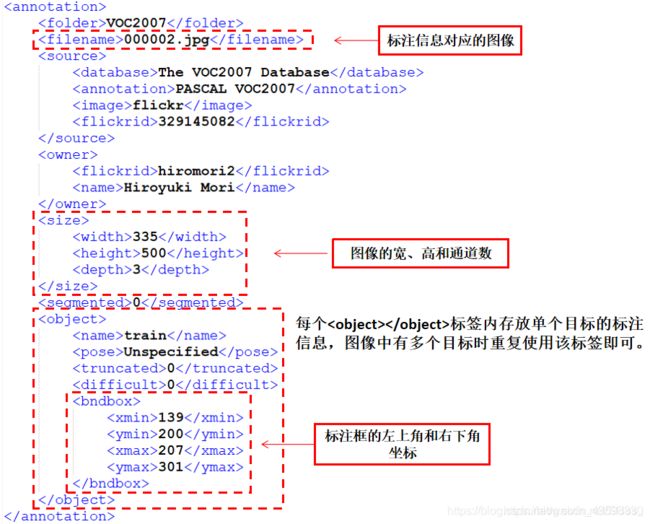
其中,第一个文件夹用于存放数据集的标注信息,以.xml文件保存。我们以目标检测部分的标注信息介绍文件内的具体内容,以000002.xml为例。
第二个文件夹内的Main文件夹存放着目标检测相关的文件。其中train.txt、val.txt、test.txt和trainval.txt分别存放了训练集、验证集、测试集和训练验证集的图像名称。
第三个文件夹内存放图像本身,如上述标注文件对应的图像000002.jpg为下图。
第四个文件夹和第五个文件夹内存放的图像分割的相关标注信息。
首先我们来定义文件解析类,其参数是ElementTree类的对象(用于解析xml文件的类),返回是对应文件所包含的标注信息。
class VOCAnnotationTransform():
    def __init__(self):
        # 将类别标签转换为对应的数字标签
        self.class_to_ind = dict(zip(VOC_CLASSES, range(len(VOC_CLASSES))))

    def __call__(self, target, width, height):
        res = []
        for obj in target.iter('object'):
            # 目标类别
            name = obj.find('name').text.lower().strip()
            # 标注框
            bbox = obj.find('bndbox')
            pts = ['xmin', 'ymin', 'xmax', 'ymax']
            bndbox = []
            for i, pt in enumerate(pts):
                # 将坐标值缩放到[0,1]内
                cur_pt = int(bbox.find(pt).text) - 1
                cur_pt = cur_pt / width if i % 2 == 0 else cur_pt / height
                bndbox.append(cur_pt)
            # 获取类别和标注框信息并添加到结果
            label_idx = self.class_to_ind[name]
            bndbox.append(label_idx)
            res += [bndbox]
        return res  # res=[[xmin, ymin, xmax, ymax, label_ind], ... ]
然后定义数据加载类。在数据加载时,只有当使用到该条数据时我们才将其加载到内存,在函数pull_item函数内实现。最后通过__getitem__函数返回指定index的数据。
class VOCDetection(data.Dataset):
    def __init__(self, root, target_transform=VOCAnnotationTransform()):
        # 数据集根目录
        self.root = root
        # 调用解析类
        self.target_transform = target_transform
        # 文件路径
        self.annopath = osp.join('%s', 'Annotations', '%s.xml')
        self.imgpath = osp.join('%s', 'JPEGImages', '%s.jpg')
        # self.ids=((数据集根目录, 文件名),...),作用是与上面“文件路径”变量组合称为完整路径
        self.ids = list()
        for line in open(osp.join(self.root, 'ImageSets', 'Main', "trainval" + '.txt')):
            self.ids.append((self.root, line.strip()))

    def __getitem__(self, index):
        im, gt, h, w = self.pull_item(index)
        # 返回数据
        return im, gt

    def __len__(self):
        return len(self.ids)

    def pull_item(self, index):
        # 根据index取出某一条(数据集根目录, 文件名)
        img_id = self.ids[index]
        # 组合成完成路径后解析xml文件和读取图像
        target = ET.parse(self.annopath % img_id).getroot()
        img = cv2.imread(self.imgpath % img_id)
        height, width, channels = img.shape
        # xml解析
        if self.target_transform is not None:
            target = self.target_transform(target, width, height)
        return torch.from_numpy(img).permute(2, 0, 1), target, height, width
COCO格式数据集的加载
相比于VOC数据集,COCO数据量更大、图像中小目标居多、图像中的目标数据更多等,因此其常作为当前目标检测算法的判断基准。另外一个不同是,VOC数据集中每张图像都有与之对应的标注文件,而COCO数据集中的所有图像的标注信息存放在一个.json文件。同时,我们可以将自己的数据集制作为COCO格式,这里使用的是labelme工具。首先在使用pip install labelme命令安装工具,安装成功后输入labelme即可打开可视化界面。 其标注方式与上相似,这里不再赘述。
本文以COCO 2017数据集为例进行说明。COCO数据集官方提供了COCO API用于更加方便地解析标注文件,在使用之前通过pip install pycocotools安装依赖。数据集和COCO API相关信息可以在这里下载和查看。首先,我们来介绍COCO API的相关内容。
在使用各API前,我们需要实例化COCO类,它接受的参数为标注文件的路径,返回类的对象。
以本文的内容为例,首先我们使用以下语句初始化COCO类的对象。这里使用的是COCO 2017数据集中对应的训练集部分。
coco = COCO(os.path.join(root, 'annotations', 'instances_{}.json'.format('train2017')))
然后,我们就可以通过COCO类的对象调用各种API函数。其中,在本文将会使用的API函数包括:
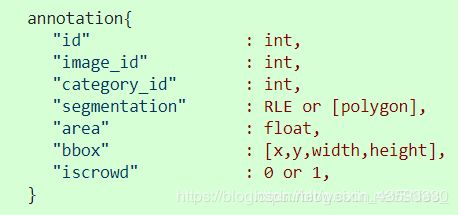
coco.imgToAnns将图像的索引与其标注信息相关联,执行后的效果是给定指定的图像索引可以返回该图像对应的所有标注信息,coco.imgToAnns.keys()返回所有的图像的索引(给数据集中的每幅图像赋值一个索引,用于后续与其标注和类别信息相关联),然后再通过指定图像的索引就可以访问其相关的标注信息。如下图是各索引之间的相互关联。
注意每个annotation里面仅对应于一个目标的标注信息。如果我们使用coco.imgToAnns.keys()[index],则将区域索引为index的图像对应的标注信息的索引,是一个列表。然后根据每个标注信息的索引去寻找每一个目标的标注信息。如上图,bbox即为本文中我们所需要的目标检测的标注信息。
coco.getAnnIds(imgIds=imgIds)就是根据参数值取指定索引图像的标注信息,返回一个列表。- 得到标注信息的索引的列表后,我们就可以使用
coco.loadAnns(ids=ann_ids)返回指定标注索引的标注内容,其中同时包括目标检测和图像分割的内容。也就是上图中的annotations{}部分。 - 同时,根据
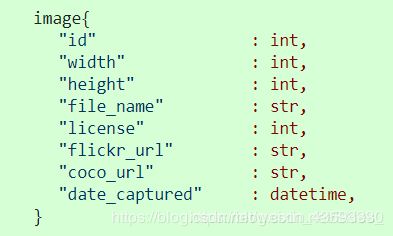
coco.loadImgs(ids=img_ids)就可以获得指定图像索引的图像信息,其格式如下:
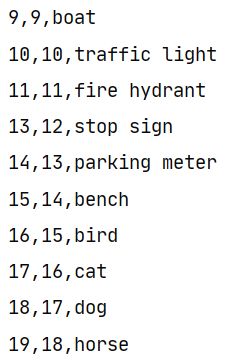
则现在我们可以完成整个数据加载类的书写。首先我们需要注意的是,由于COCO数据集中的索引并不是连续的,如图:
最左边是原始的索引,中间是经过处理后的索引,最后一列表示具体的类别。首先,我们需要根据该文件的内容使用中间一列的索引作为最后的索引。定义如下函数:
def get_label_map(label_file):
    label_map = {}
    labels = open(label_file, 'r')
    for line in labels:
        ids = line.split(',')
        # 返回字典形式,如上图中的为{...,11:11,13:12,14:16,...}
        label_map[int(ids[0])] = int(ids[1])
    return label_map
和VOC数据集的加载流程一致,首先我们定义解析类COCOAnnotationTransform,传入参数是标注信息,即上文提到的一系列的annotations{}。然后返回形式同VOCAnnotationTransform类一致。
class COCOAnnotationTransform:
    def __init__(self):
        self.label_map = get_label_map(osp.join('data', 'coco_labels.txt'))

    def __call__(self, target, width, height):
        scale = np.array([width, height, width, height])
        res = []
        for obj in target:
            if 'bbox' in obj:
                # 将(x,y,w,h)->(xmin,ymin,xmax,ymax)
                bbox = obj['bbox']
                bbox[2] += bbox[0]
                bbox[3] += bbox[1]
                # 将坐标值缩放到[0,1]内
                final_box = list(np.array(bbox)/scale)
                # 获取类别和标注框信息并添加到结果
                label_idx = self.label_map[obj['category_id']] - 1
                final_box.append(label_idx)
                res += [final_box]
            else:
                print("no bbox problem!")
        return res  # [[xmin, ymin, xmax, ymax, label_idx], ... ]
然后定义数据加载类,相应内容同上。
class COCODetection(data.Dataset):
    def __init__(self, root, target_transform=COCOAnnotationTransform()):
        # 图像数据集根目录
        self.root = osp.join(root, 'train2017')
        # 参数为标注文件路径,返回COCO类的对象
        self.coco = COCO(osp.join(root, 'annotations', 'instances_{}.json'.format('train2017')))
        # 获取每张图片的索引,同时将图片索引与标注信息相关联
        self.ids = list(self.coco.imgToAnns.keys())
        # 调用解析类
        self.target_transform = target_transform

    def __getitem__(self, index):
        im, gt, h, w = self.pull_item(index)
        # 返回数据
        return im, gt

    def __len__(self):
        return len(self.ids)

    def pull_item(self, index):
        # 获得图像索引
        img_id = self.ids[index]
        # 获得指定图像索引的标注信息,返回一个列表,列表的每一个值表示一个目标的标注信息索引
        ann_ids = self.coco.getAnnIds(imgIds=img_id)
        # 根据标注信息的索引返回其具体的标注内容
        target = self.coco.loadAnns(ann_ids)
        # 获得图像的完整路径
        path = osp.join(self.root, self.coco.loadImgs(img_id)[0]['file_name'])
        assert osp.exists(path), 'Image path does not exist: {}'.format(path)
        img = cv2.imread(path)
        # 解析标注信息
        height, width, _ = img.shape
        if self.target_transform is not None:
            target = self.target_transform(target, width, height)
        return torch.from_numpy(img).permute(2, 0, 1), target, height, width
总结
我们在编写完数据加载类后,就可以通过如下方式使用,我们以上述COCODetection类为例。
cocoDetection = COCODetection(root=root)
# 117266,即训练集的图像数目
print(len(cocoDetection))
# 获取指定索引的图像的返回信息,如下图
print(cocoDetection[index])
如上图,第一个tensor是图像的像素值;第二个tensor是目标检测的标注信息,这里边界框的坐标进行了归一化。
由以上两种格式的数据集的加载流程,我们可以得到:VOC数据集的标注格式更加清晰易懂,且加载过程仅调用Python中的各API就可以实现;而COCO数据集的标注信息由于在一个文件内完成,所以难以产生直观的理解。但在面临大规模的数据集时,如COCO 2017数据集,COCO格式的数据集更加节省标注文件所占用的空间,且可以在一定程度上加快标注信息的加载。但在制作自己的数据集时,为了方便理解和操作,尽量使用VOC格式。 同时,我们也可以使COCO格式的数据集和VOC格式的数据集之间实现相互转化。
以上两种格式的数据集的加载程序可以作为目标检测中的通用程序。而在数据预处理中,为了增强训练模型的鲁棒性,我们通常还会加上数据增强操作。
Pytorch源码解读之torchvision.transforms
这篇博客介绍torchvision.transformas。torchvision.transforms这个包中包含resize、crop等常见的data augmentation操作,基本上PyTorch中的data augmentation操作都可以通过该接口实现。
该包主要包含两个脚本:transformas.py和functional.py,前者定义了各种data augmentation的类,在每个类中通过调用functional.py中对应的函数完成data augmentation操作。
使用例子:
import torch
import torchvision


train_augmentation = torchvision.transforms.Compose([torchvision.transforms.Resize(256),
                                                    torchvision.transforms.RandomCrop(224),
                                                    torchvision.transofrms.RandomHorizontalFlip(),
                                                    torchvision.transforms.ToTensor(),
                                                    torch vision.Normalize([0.485, 0.456, -.406],[0.229, 0.224, 0.225])
                                                    ])

Class custom_dataread(torch.utils.data.Dataset):
    def __init__():
        ...
    def __getitem__():
        # use self.transform for input image
    def __len__():
        ...

train_loader = torch.utils.data.DataLoader(
    custom_dataread(transform=train_augmentation),
    batch_size = batch_size, shuffle = True,
    num_workers = workers, pin_memory = True)
这里定义了resize、crop、normalize等数据预处理操作,并最终作为数据读取类custom_dataread的一个参数传入,可以在内部方法__getitem__中实现数据增强操作。
主要代码在transformas.py脚本中,这里仅介绍常见的data augmentation操作,源码如下:
首先是导入必须的模型,这里比较重要的是from . import functional as F,也就是导入了functional.py脚本中具体的data augmentation函数。__all__列表定义了可以从外部import的函数名或类名。
from __future__ import division
import torch
import math
import random
from PIL import Image, ImageOps, ImageEnhance
try:
    import accimage
except ImportError:
    accimage = None
import numpy as np
import numbers
import types
import collections
import warnings

from . import functional as F

__all__ = ["Compose", "ToTensor", "ToPILImage", "Normalize", "Resize",
"Scale", "CenterCrop", "Pad", "Lambda", "RandomCrop",
"RandomHorizontalFlip", "RandomVerticalFlip", "RandomResizedCrop",
"RandomSizedCrop", "FiveCrop", "TenCrop","LinearTransformation",
"ColorJitter", "RandomRotation", "Grayscale", "RandomGrayscale"]
Compose类
Compose这个类是用来管理各个transform的,可以看到主要的__call__方法就是对输入图像img循环所有的transform操作。
class Compose(object):
    """Composes several transforms together.

    Args:
        transforms (list of ``Transform`` objects): list of transforms to compose.

    Example:
        >>> transforms.Compose([
        >>>     transforms.CenterCrop(10),
        >>>     transforms.ToTensor(),
        >>> ])
    """

    def __init__(self, transforms):
        self.transforms = transforms

    def __call__(self, img):
        for t in self.transforms:
            img = t(img)
        return img

    def __repr__(self):
        format_string = self.__class__.__name__ + '('
        for t in self.transforms:
            format_string += '\n'
            format_string += '    {0}'.format(t)
        format_string += '\n)'
        return format_string
ToTensor类
ToTensor类是实现:Convert a PIL Image or numpy.ndarray to tensor 的过程,在PyTorch中常用PIL库来读取图像数据,因此这个方法相当于搭建了PIL Image和Tensor的桥梁。另外要强调的是在做数据归一化之前必须要把PIL Image转成Tensor,而其他resize或crop操作则不需要。
class ToTensor(object):
    """Convert a ``PIL Image`` or ``numpy.ndarray`` to tensor.

    Converts a PIL Image or numpy.ndarray (H x W x C) in the range
    [0, 255] to a torch.FloatTensor of shape (C x H x W) in the range [0.0, 1.0].
    """

    def __call__(self, pic):
        """
        Args:
            pic (PIL Image or numpy.ndarray): Image to be converted to tensor.

        Returns:
            Tensor: Converted image.
        """
        return F.to_tensor(pic)

    def __repr__(self):
        return self.__class__.__name__ + '()'
ToPILImage类
ToPILImage顾名思义是从Tensor到PIL Image的过程,和前面ToTensor类的相反的操作。
class ToPILImage(object):
    """Convert a tensor or an ndarray to PIL Image.

    Converts a torch.*Tensor of shape C x H x W or a numpy ndarray of shape
    H x W x C to a PIL Image while preserving the value range.

    Args:
        mode (`PIL.Image mode`_): color space and pixel depth of input data (optional).
            If ``mode`` is ``None`` (default) there are some assumptions made about the input data:
            1. If the input has 3 channels, the ``mode`` is assumed to be ``RGB``.
            2. If the input has 4 channels, the ``mode`` is assumed to be ``RGBA``.
            3. If the input has 1 channel, the ``mode`` is determined by the data type (i,e,
            ``int``, ``float``, ``short``).

    .. _PIL.Image mode: http://pillow.readthedocs.io/en/3.4.x/handbook/concepts.html#modes
    """
    def __init__(self, mode=None):
        self.mode = mode

    def __call__(self, pic):
        """
        Args:
            pic (Tensor or numpy.ndarray): Image to be converted to PIL Image.

        Returns:
            PIL Image: Image converted to PIL Image.

        """
        return F.to_pil_image(pic, self.mode)

    def __repr__(self):
        return self.__class__.__name__ + '({0})'.format(self.mode)
Normalize类
Normalize类是做数据归一化的,一般都会对输入数据做这样的操作,公式也在注释中给出了,比较容易理解。前面提到在调用Normalize的时候,输入得是Tensor,这个从__call__方法的输入也可以看出来了。
class Normalize(object):
    """Normalize an tensor image with mean and standard deviation.
    Given mean: ``(M1,...,Mn)`` and std: ``(S1,..,Sn)`` for ``n`` channels, this transform
    will normalize each channel of the input ``torch.*Tensor`` i.e.
    ``input[channel] = (input[channel] - mean[channel]) / std[channel]``

    Args:
        mean (sequence): Sequence of means for each channel.
        std (sequence): Sequence of standard deviations for each channel.
    """

    def __init__(self, mean, std):
        self.mean = mean
        self.std = std

    def __call__(self, tensor):
        """
        Args:
            tensor (Tensor): Tensor image of size (C, H, W) to be normalized.

        Returns:
            Tensor: Normalized Tensor image.
        """
        return F.normalize(tensor, self.mean, self.std)

    def __repr__(self):
        return self.__class__.__name__ + '(mean={0}, std={1})'.format(self.mean, self.std)
Resize类
Resize类是对PIL Image做resize操作的,几乎都要用到。这里输入可以是int,此时表示将输入图像的短边resize到这个int数,长边则根据对应比例调整,图像的长宽比不变。如果输入是个(h,w)的序列,h和w都是int,则直接将输入图像resize到这个(h,w)尺寸,相当于force resize,所以一般最后图像的长宽比会变化,也就是图像内容被拉长或缩短。
注意,在call方法中调用了functional.py脚本中的resize函数来完成resize操作,因为输入是PIL Image,所以resize函数基本是在调用Image的各种方法。如果输入是Tensor,则对应函数基本是在调用Tensor的各种方法,这就是functional.py中的主要内容。
class Resize(object):
    """Resize the input PIL Image to the given size.

    Args:
        size (sequence or int): Desired output size. If size is a sequence like
            (h, w), output size will be matched to this. If size is an int,
            smaller edge of the image will be matched to this number.
            i.e, if height > width, then image will be rescaled to
            (size * height / width, size)
        interpolation (int, optional): Desired interpolation. Default is
            ``PIL.Image.BILINEAR``
    """

    def __init__(self, size, interpolation=Image.BILINEAR):
        assert isinstance(size, int) or (isinstance(size, collections.Iterable) and len(size) == 2)
        self.size = size
        self.interpolation = interpolation

    def __call__(self, img):
        """
        Args:
            img (PIL Image): Image to be scaled.

        Returns:
            PIL Image: Rescaled image.
        """
        return F.resize(img, self.size, self.interpolation)

    def __repr__(self):
        return self.__class__.__name__ + '(size={0})'.format(self.size)
CenterCrop类
CenterCrop是以输入图的中心点为中心点做指定size的crop操作,一般数据增强不会采用这个,因为当size固定的时候,在相同输入图像的情况下,N次CenterCrop的结果都是一样的。注释里面说明了size为int和序列时候尺寸的定义。
class CenterCrop(object):
    """Crops the given PIL Image at the center.

    Args:
        size (sequence or int): Desired output size of the crop. If size is an
            int instead of sequence like (h, w), a square crop (size, size) is
            made.
    """

    def __init__(self, size):
        if isinstance(size, numbers.Number):
            self.size = (int(size), int(size))
        else:
            self.size = size

    def __call__(self, img):
        """
        Args:
            img (PIL Image): Image to be cropped.

        Returns:
            PIL Image: Cropped image.
        """
        return F.center_crop(img, self.size)

    def __repr__(self):
        return self.__class__.__name__ + '(size={0})'.format(self.size)
RandomCrop类
相比前面的CenterCrop,这个RandomCrop更常用,差别就在于crop时的中心点坐标是随机的,并不是输入图像的中心点坐标,因此基本上每次crop生成的图像都是有差异的。就是通过 i = random.randint(0, h - th)和 j = random.randint(0, w - tw)两行生成一个随机中心点的横纵坐标。注意到在__call__中最后是调用了F.crop(img, i, j, h, w)来完成crop操作,其实前面CenterCrop中虽然是调用 F.center_crop(img, self.size),但是在F.center_crop()函数中只是先计算了中心点坐标,最后还是调用F.crop(img, i, j, h, w)完成crop操作。
class RandomCrop(object):
    """Crop the given PIL Image at a random location.

    Args:
        size (sequence or int): Desired output size of the crop. If size is an
            int instead of sequence like (h, w), a square crop (size, size) is
            made.
        padding (int or sequence, optional): Optional padding on each border
            of the image. Default is 0, i.e no padding. If a sequence of length
            4 is provided, it is used to pad left, top, right, bottom borders
            respectively.
    """

    def __init__(self, size, padding=0):
        if isinstance(size, numbers.Number):
            self.size = (int(size), int(size))
        else:
            self.size = size
        self.padding = padding

    @staticmethod
    def get_params(img, output_size):
        """Get parameters for ``crop`` for a random crop.

        Args:
            img (PIL Image): Image to be cropped.
            output_size (tuple): Expected output size of the crop.

        Returns:
            tuple: params (i, j, h, w) to be passed to ``crop`` for random crop.
        """
        w, h = img.size
        th, tw = output_size
        if w == tw and h == th:
            return 0, 0, h, w

        i = random.randint(0, h - th)
        j = random.randint(0, w - tw)
        return i, j, th, tw

    def __call__(self, img):
        """
        Args:
            img (PIL Image): Image to be cropped.

        Returns:
            PIL Image: Cropped image.
        """
        if self.padding > 0:
            img = F.pad(img, self.padding)

        i, j, h, w = self.get_params(img, self.size)

        return F.crop(img, i, j, h, w)

    def __repr__(self):
        return self.__class__.__name__ + '(size={0})'.format(self.size)
RandomHorizontalFlip类
RandomHorizontalFlip类也是比较常用的,是随机的图像水平翻转,通俗讲就是图像的左右对调。从该类中的__call__方法可以看出水平翻转的概率是0.5。
class RandomHorizontalFlip(object):
    """Horizontally flip the given PIL Image randomly with a probability of 0.5."""

    def __call__(self, img):
        """
        Args:
            img (PIL Image): Image to be flipped.

        Returns:
            PIL Image: Randomly flipped image.
        """
        if random.random() < 0.5:
            return F.hflip(img)
        return img

    def __repr__(self):
        return self.__class__.__name__ + '()'
RandomVerticalFlip类
同样的,RandomVerticalFlip类是随机的图像竖直翻转,通俗讲就是图像的上下对调。
class RandomVerticalFlip(object):
    """Vertically flip the given PIL Image randomly with a probability of 0.5."""

    def __call__(self, img):
        """
        Args:
            img (PIL Image): Image to be flipped.

        Returns:
            PIL Image: Randomly flipped image.
        """
        if random.random() < 0.5:
            return F.vflip(img)
        return img

    def __repr__(self):
        return self.__class__.__name__ + '()'
RandomResizedCrop类
RandomResizedCrop类也是比较常用的,个人非常喜欢用。前面不管是CenterCrop还是RandomCrop,在crop的时候其尺寸是固定的,而这个类则是random size的crop。该类主要用到3个参数:size、scale和ratio,总的来讲就是先做crop(用到scale和ratio),再resize到指定尺寸(用到size)。做crop的时候,其中心点坐标和长宽是由get_params方法得到的,在get_params方法中主要用到两个参数:scale和ratio,首先在scale限定的数值范围内随机生成一个数,用这个数乘以输入图像的面积作为crop后图像的面积;然后在ratio限定的数值范围内随机生成一个数,表示长宽的比值,根据这两个值就可以得到crop图像的长宽了。至于crop图像的中心点坐标,也是类似RandomCrop类一样是随机生成的。
class RandomResizedCrop(object):
    """Crop the given PIL Image to random size and aspect ratio.

    A crop of random size (default: of 0.08 to 1.0) of the original size and a random
    aspect ratio (default: of 3/4 to 4/3) of the original aspect ratio is made. This crop
    is finally resized to given size.
    This is popularly used to train the Inception networks.

    Args:
        size: expected output size of each edge
        scale: range of size of the origin size cropped
        ratio: range of aspect ratio of the origin aspect ratio cropped
        interpolation: Default: PIL.Image.BILINEAR
    """

    def __init__(self, size, scale=(0.08, 1.0), ratio=(3. / 4., 4. / 3.), interpolation=Image.BILINEAR):
        self.size = (size, size)
        self.interpolation = interpolation
        self.scale = scale
        self.ratio = ratio

    @staticmethod
    def get_params(img, scale, ratio):
        """Get parameters for ``crop`` for a random sized crop.

        Args:
            img (PIL Image): Image to be cropped.
            scale (tuple): range of size of the origin size cropped
            ratio (tuple): range of aspect ratio of the origin aspect ratio cropped

        Returns:
            tuple: params (i, j, h, w) to be passed to ``crop`` for a random
                sized crop.
        """
        for attempt in range(10):
            area = img.size[0] * img.size[1]
            target_area = random.uniform(*scale) * area
            aspect_ratio = random.uniform(*ratio)

            w = int(round(math.sqrt(target_area * aspect_ratio)))
            h = int(round(math.sqrt(target_area / aspect_ratio)))

            if random.random() < 0.5:
                w, h = h, w

            if w <= img.size[0] and h <= img.size[1]:
                i = random.randint(0, img.size[1] - h)
                j = random.randint(0, img.size[0] - w)
                return i, j, h, w

        # Fallback
        w = min(img.size[0], img.size[1])
        i = (img.size[1] - w) // 2
        j = (img.size[0] - w) // 2
        return i, j, w, w

    def __call__(self, img):
        """
        Args:
            img (PIL Image): Image to be flipped.

        Returns:
            PIL Image: Randomly cropped and resize image.
        """
        i, j, h, w = self.get_params(img, self.scale, self.ratio)
        return F.resized_crop(img, i, j, h, w, self.size, self.interpolation)

    def __repr__(self):
        return self.__class__.__name__ + '(size={0})'.format(self.size)
FiveCrop类
FiveCrop类,顾名思义就是从一张输入图像中crop出5张指定size的图像,这5张图像包括4个角的图像和一个center crop的图像。曾在TSN算法的看到过这种用法。
class FiveCrop(object):
    """Crop the given PIL Image into four corners and the central crop

    .. Note::
         This transform returns a tuple of images and there may be a mismatch in the number of
         inputs and targets your Dataset returns. See below for an example of how to deal with
         this.

    Args:
         size (sequence or int): Desired output size of the crop. If size is an ``int``
            instead of sequence like (h, w), a square crop of size (size, size) is made.

    Example:
         >>> transform = Compose([
         >>>    FiveCrop(size), # this is a list of PIL Images
         >>>    Lambda(lambda crops: torch.stack([ToTensor()(crop) for crop in crops])) # returns a 4D tensor
         >>> ])
         >>> #In your test loop you can do the following:
         >>> input, target = batch # input is a 5d tensor, target is 2d
         >>> bs, ncrops, c, h, w = input.size()
         >>> result = model(input.view(-1, c, h, w)) # fuse batch size and ncrops
         >>> result_avg = result.view(bs, ncrops, -1).mean(1) # avg over crops
    """

    def __init__(self, size):
        self.size = size
        if isinstance(size, numbers.Number):
            self.size = (int(size), int(size))
        else:
            assert len(size) == 2, "Please provide only two dimensions (h, w) for size."
            self.size = size

    def __call__(self, img):
        return F.five_crop(img, self.size)

    def __repr__(self):
        return self.__class__.__name__ + '(size={0})'.format(self.size)
TenCrop类
TenCrop类和前面FiveCrop类类似,只不过在FiveCrop的基础上,再将输入图像进行水平或竖直翻转,然后再进行FiveCrop操作,这样一张输入图像就能得到10张crop结果。
class TenCrop(object):
    """Crop the given PIL Image into four corners and the central crop plus the flipped version of
    these (horizontal flipping is used by default)

    .. Note::
         This transform returns a tuple of images and there may be a mismatch in the number of
         inputs and targets your Dataset returns. See below for an example of how to deal with
         this.

    Args:
        size (sequence or int): Desired output size of the crop. If size is an
            int instead of sequence like (h, w), a square crop (size, size) is
            made.
        vertical_flip(bool): Use vertical flipping instead of horizontal

    Example:
         >>> transform = Compose([
         >>>    TenCrop(size), # this is a list of PIL Images
         >>>    Lambda(lambda crops: torch.stack([ToTensor()(crop) for crop in crops])) # returns a 4D tensor
         >>> ])
         >>> #In your test loop you can do the following:
         >>> input, target = batch # input is a 5d tensor, target is 2d
         >>> bs, ncrops, c, h, w = input.size()
         >>> result = model(input.view(-1, c, h, w)) # fuse batch size and ncrops
         >>> result_avg = result.view(bs, ncrops, -1).mean(1) # avg over crops
    """

    def __init__(self, size, vertical_flip=False):
        self.size = size
        if isinstance(size, numbers.Number):
            self.size = (int(size), int(size))
        else:
            assert len(size) == 2, "Please provide only two dimensions (h, w) for size."
            self.size = size
        self.vertical_flip = vertical_flip

    def __call__(self, img):
        return F.ten_crop(img, self.size, self.vertical_flip)

    def __repr__(self):
        return self.__class__.__name__ + '(size={0})'.format(self.size)
LinearTransformation类
LinearTransformation类是用一个变换矩阵去乘输入图像得到输出结果。
class LinearTransformation(object):
    """Transform a tensor image with a square transformation matrix computed
    offline.

    Given transformation_matrix, will flatten the torch.*Tensor, compute the dot
    product with the transformation matrix and reshape the tensor to its
    original shape.

    Applications:
    - whitening: zero-center the data, compute the data covariance matrix
                 [D x D] with np.dot(X.T, X), perform SVD on this matrix and
                 pass it as transformation_matrix.

    Args:
        transformation_matrix (Tensor): tensor [D x D], D = C x H x W
    """

    def __init__(self, transformation_matrix):
        if transformation_matrix.size(0) != transformation_matrix.size(1):
            raise ValueError("transformation_matrix should be square. Got " +
                             "[{} x {}] rectangular matrix.".format(*transformation_matrix.size()))
        self.transformation_matrix = transformation_matrix

    def __call__(self, tensor):
        """
        Args:
            tensor (Tensor): Tensor image of size (C, H, W) to be whitened.

        Returns:
            Tensor: Transformed image.
        """
        if tensor.size(0) * tensor.size(1) * tensor.size(2) != self.transformation_matrix.size(0):
            raise ValueError("tensor and transformation matrix have incompatible shape." +
                             "[{} x {} x {}] != ".format(*tensor.size()) +
                             "{}".format(self.transformation_matrix.size(0)))
        flat_tensor = tensor.view(1, -1)
        transformed_tensor = torch.mm(flat_tensor, self.transformation_matrix)
        tensor = transformed_tensor.view(tensor.size())
        return tensor

    def __repr__(self):
        format_string = self.__class__.__name__ + '('
        format_string += (str(self.transformation_matrix.numpy().tolist()) + ')')
        return format_string
ColorJitter类
ColorJitter类也比较常用,主要是修改输入图像的4大参数值:brightness, contrast and saturation,hue,也就是亮度,对比度,饱和度和色度。可以根据注释来合理设置这4个参数。
class ColorJitter(object):
    """Randomly change the brightness, contrast and saturation of an image.

    Args:
        brightness (float): How much to jitter brightness. brightness_factor
            is chosen uniformly from [max(0, 1 - brightness), 1 + brightness].
        contrast (float): How much to jitter contrast. contrast_factor
            is chosen uniformly from [max(0, 1 - contrast), 1 + contrast].
        saturation (float): How much to jitter saturation. saturation_factor
            is chosen uniformly from [max(0, 1 - saturation), 1 + saturation].
        hue(float): How much to jitter hue. hue_factor is chosen uniformly from
            [-hue, hue]. Should be >=0 and <= 0.5.
    """
    def __init__(self, brightness=0, contrast=0, saturation=0, hue=0):
        self.brightness = brightness
        self.contrast = contrast
        self.saturation = saturation
        self.hue = hue

    @staticmethod
    def get_params(brightness, contrast, saturation, hue):
        """Get a randomized transform to be applied on image.

        Arguments are same as that of __init__.

        Returns:
            Transform which randomly adjusts brightness, contrast and
            saturation in a random order.
        """
        transforms = []
        if brightness > 0:
            brightness_factor = np.random.uniform(max(0, 1 - brightness), 1 + brightness)
            transforms.append(Lambda(lambda img: F.adjust_brightness(img, brightness_factor)))

        if contrast > 0:
            contrast_factor = np.random.uniform(max(0, 1 - contrast), 1 + contrast)
            transforms.append(Lambda(lambda img: F.adjust_contrast(img, contrast_factor)))

        if saturation > 0:
            saturation_factor = np.random.uniform(max(0, 1 - saturation), 1 + saturation)
            transforms.append(Lambda(lambda img: F.adjust_saturation(img, saturation_factor)))

        if hue > 0:
            hue_factor = np.random.uniform(-hue, hue)
            transforms.append(Lambda(lambda img: F.adjust_hue(img, hue_factor)))

        np.random.shuffle(transforms)
        transform = Compose(transforms)

        return transform

    def __call__(self, img):
        """
        Args:
            img (PIL Image): Input image.

        Returns:
            PIL Image: Color jittered image.
        """
        transform = self.get_params(self.brightness, self.contrast,
                                    self.saturation, self.hue)
        return transform(img)

    def __repr__(self):
        return self.__class__.__name__ + '()'
RandomRotation类
RandomRotation类是随机旋转输入图像,也比较常用,具体参数可以看注释,在F.rotate()中主要是调用PIL Image的rotate方法。
class RandomRotation(object):
    """Rotate the image by angle.

    Args:
        degrees (sequence or float or int): Range of degrees to select from.
            If degrees is a number instead of sequence like (min, max), the range of degrees
            will be (-degrees, +degrees).
        resample ({PIL.Image.NEAREST, PIL.Image.BILINEAR, PIL.Image.BICUBIC}, optional):
            An optional resampling filter.
            See http://pillow.readthedocs.io/en/3.4.x/handbook/concepts.html#filters
            If omitted, or if the image has mode "1" or "P", it is set to PIL.Image.NEAREST.
        expand (bool, optional): Optional expansion flag.
            If true, expands the output to make it large enough to hold the entire rotated image.
            If false or omitted, make the output image the same size as the input image.
            Note that the expand flag assumes rotation around the center and no translation.
        center (2-tuple, optional): Optional center of rotation.
            Origin is the upper left corner.
            Default is the center of the image.
    """

    def __init__(self, degrees, resample=False, expand=False, center=None):
        if isinstance(degrees, numbers.Number):
            if degrees < 0:
                raise ValueError("If degrees is a single number, it must be positive.")
            self.degrees = (-degrees, degrees)
        else:
            if len(degrees) != 2:
                raise ValueError("If degrees is a sequence, it must be of len 2.")
            self.degrees = degrees

        self.resample = resample
        self.expand = expand
        self.center = center

    @staticmethod
    def get_params(degrees):
        """Get parameters for ``rotate`` for a random rotation.

        Returns:
            sequence: params to be passed to ``rotate`` for random rotation.
        """
        angle = np.random.uniform(degrees[0], degrees[1])

        return angle

    def __call__(self, img):
        """
            img (PIL Image): Image to be rotated.

        Returns:
            PIL Image: Rotated image.
        """

        angle = self.get_params(self.degrees)

        return F.rotate(img, angle, self.resample, self.expand, self.center)

    def __repr__(self):
        return self.__class__.__name__ + '(degrees={0})'.format(self.degrees)
Grayscale类
Grayscale类是用来将输入图像转成灰度图的,这里根据参数num_output_channels的不同有两种转换方式。
class Grayscale(object):
    """Convert image to grayscale.

    Args:
        num_output_channels (int): (1 or 3) number of channels desired for output image

    Returns:
        PIL Image: Grayscale version of the input.
        - If num_output_channels == 1 : returned image is single channel
        - If num_output_channels == 3 : returned image is 3 channel with r == g == b

    """

    def __init__(self, num_output_channels=1):
        self.num_output_channels = num_output_channels

    def __call__(self, img):
        """
        Args:
            img (PIL Image): Image to be converted to grayscale.

        Returns:
            PIL Image: Randomly grayscaled image.
        """
        return F.to_grayscale(img, num_output_channels=self.num_output_channels)

    def __repr__(self):
        return self.__class__.__name__ + '()'
RandomGrayscale类
RandomGrayscale类和前面的Grayscale类类似,只不过变成了按照指定的概率进行转换。
class RandomGrayscale(object):
    """Randomly convert image to grayscale with a probability of p (default 0.1).

    Args:
        p (float): probability that image should be converted to grayscale.

    Returns:
        PIL Image: Grayscale version of the input image with probability p and unchanged
        with probability (1-p).
        - If input image is 1 channel: grayscale version is 1 channel
        - If input image is 3 channel: grayscale version is 3 channel with r == g == b

    """

    def __init__(self, p=0.1):
        self.p = p

    def __call__(self, img):
        """
        Args:
            img (PIL Image): Image to be converted to grayscale.

        Returns:
            PIL Image: Randomly grayscaled image.
        """
        num_output_channels = 1 if img.mode == 'L' else 3
        if random.random() < self.p:
            return F.to_grayscale(img, num_output_channels=num_output_channels)
        return img

    def __repr__(self):
        return self.__class__.__name__ + '()'
基于PyTorch的目标检测数据增强
SSD 中的数据增强顺序如下(其中第 2 和 3 步以 0.5 的概率实施)
- 数据类型和坐标转换
ConvertFromInts(np.float32)ToAbsoluteCoords(bbox coordinates *width and *height accordingly),为下面的几何变换做准备
- 像素内容变换(Photometric Distortions)
- 随机改变图像亮度(
Random Brightness) - 随机改变对比度、色度、饱和度(
Random Contrast, Hue, Saturation) - 随机改变颜色通道(
RandomLightingNoise)
- 随机改变图像亮度(
- 空间几何变换(Geometric Distortions)
- 随机扩展(
RandomExpand) - 随机裁剪(
RandomCrop) - 随机镜像(
RandomMirror)
- 随机扩展(
- 坐标转换、缩放及减均值
ToPercentCoords(bbox coordinates /width and /height accordingly),因为几何变换后图像尺寸改变了Resize(300*300)SubtractMeans(104, 117, 123)
1. 简介
数据增强是目标检测乃至整个深度学习中常用到的提高模型性能的方法。一方面,数据增强可以增加大量的训练数据量,提高模型的泛化能力;同时,对原始数据的增强也可以看作是引入了噪声,从而可以提升模型的鲁棒性。在深度学习中,数据增强一般采用在线增强或离线增强的方法,前者一般应用于训练数据集极小的情况下;后者是常用的方法,在训练过程中采用数据增强技术不显示增加训练数据的数量。**相比于图像分类,目标检测中的数据增强需要同时考虑图像和边界框的变换。**在目标检测中,数据增强又分为两个大类:**针对图像中的像素,针对整幅图像。**下面就这两部分内容分别进行介绍。本文主要介绍目标检测中的常见增强方法,后续会介绍较为复杂和高级的方法。
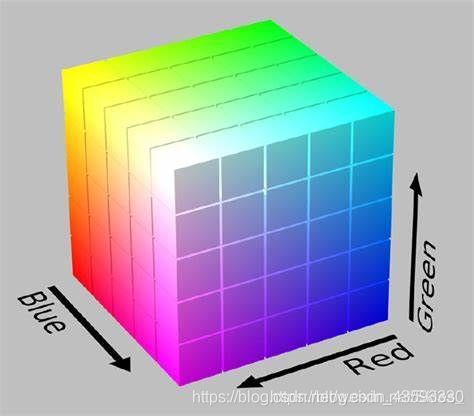
在进行接下来的内容前,我们首先介绍图像的色彩空间。这里我们只介绍本文所涉及的色彩空间RGB和HSV。RGB是我们最熟悉的一种表示图像色彩的方式,三个字母分别代表红、绿、蓝。
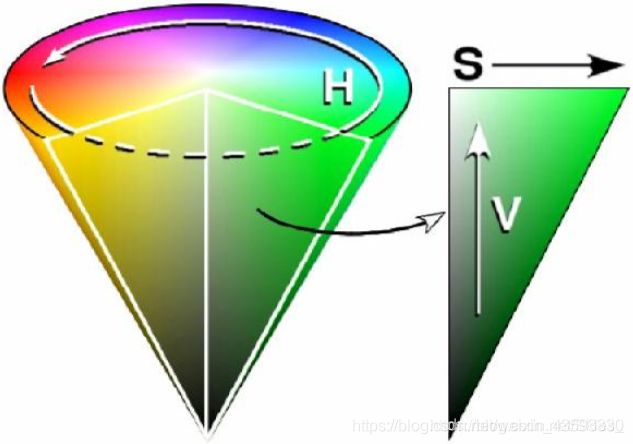
上图正方体上的每一个点在空间中都对应一个三维坐标,坐标的每个值分别表示R、G、B的值,该位置的值等于三者的叠加。使用RGB色彩空间有利于对图像色彩的定量分析,另一种直观的对图像色彩描述的方法是使用HSV色彩空间。其中,三个字母分别表示色调、饱和度、亮度,这种表示方法便于我们直观地分析图像的色彩特征。
与上述RGB色彩空间的表示方法相同,HSV色彩空间中也是使用三个值的迭代得到最后的颜色。
2. 针对像素的数据增强
针对图像像素的数据增强主要是改变原图像中像素的值,而不改变图像目标的形状和图像的大小。经过处理后,图像的饱和度、亮度、明度、颜色通道、颜色空间等会发生发生变化。这类变换不会改变原图中的标注信息,即边界框和类别。
首先,图像对比度的定义是一幅图像中明暗区域最亮的白和最暗的黑之间不同亮度层级的测量,视觉上就是整幅图像的反差。数据增强中的随机对比度的思想是给图像中的每个像素值乘以一个随机因子值,当该因子的值小于1时,图像整体的对比度会减小;当该因子的值大于1时,图像整体的对比度会增大。
class RandomContrast:
    def __init__(self, lower=0.5, upper=1.5):
        self.lower = lower
        self.upper = upper

    def __call__(self, image, boxes=None, labels=None):
        if random.randint(2):
        	# 生成随机因子
            alpha = random.uniform(self.lower, self.upper)
            image *= alpha
        return image, boxes, labels
其次,图像饱和度是指色彩纯度,纯度越高,则看起来更加鲜艳;纯度越低,则看起来较黯淡。如我们常说的红色比淡红色更加“红”,就是说红色的饱和度比淡红色的饱和度更大。数据增强中的随机对比度的思想是在HSV空间内对饱和度这一维的值进行缩放。所以,我们首先需要将图像从RGB空间转换到HSV空间。同时,我们将其乘上一个随机因子,当该因子的值小于1时,图像的饱和度会减小;当该因子的值大于1时,图像的饱和度会变大。
# 转换图像的色彩空间
class ConvertColor:
    def __init__(self, current='BGR', transform='HSV'):
        self.transform = transform
        self.current = current

    def __call__(self, image, boxes=None, labels=None):
        if self.current == 'BGR' and self.transform == 'HSV':
            image = cv2.cvtColor(image, cv2.COLOR_BGR2HSV)
        elif self.current == 'HSV' and self.transform == 'BGR':
            image = cv2.cvtColor(image, cv2.COLOR_HSV2BGR)
        else:
            raise NotImplementedError
        return image, boxes, labels

class RandomSaturation:
    def __init__(self, lower=0.5, upper=1.5):
        self.lower = lower
        self.upper = upper

    def __call__(self, image, boxes=None, labels=None):
        if random.randint(2):
        	# 随机缩放S空间的值
            image[:, :, 1] *= random.uniform(self.lower, self.upper)
        return image, boxes, labels
同理,图像色调变化同上,在HSV空间内对色调这一维的值进行加减。
class RandomHue:
    def __init__(self, delta=18.0):
        self.delta = delta

    def __call__(self, image, boxes=None, labels=None):
        if random.randint(2):
            image[:, :, 0] += random.uniform(-self.delta, self.delta)
            # 规范超过范围的像素值
            image[:, :, 0][image[:, :, 0] > 360.0] -= 360.0
            image[:, :, 0][image[:, :, 0] < 0.0] += 360.0
        return image, boxes, labels
其次,将RGB空间内的像素值均加上或减去一个值就可以改变图像整体的亮度。
class RandomBrightness:
    def __init__(self, delta=32):
        self.delta = delta

    def __call__(self, image, boxes=None, labels=None):
        if random.randint(2):
            delta = random.uniform(-self.delta, self.delta)
            # 图像中的每个像素加上一个随机值
            image += delta
        return image, boxes, labels
最后一种变换是在RGB空间内随机交换通道的值,这样不同值的叠加最后也会得到不同的值。
class SwapChannels(object):
    def __init__(self, swaps):
        self.swaps = swaps

    def __call__(self, image):
        image = image[:, :, self.swaps]
        return image

class RandomLightingNoise:
    def __init__(self):
        self.perms = ((0, 1, 2), (0, 2, 1),
                      (1, 0, 2), (1, 2, 0),
                      (2, 0, 1), (2, 1, 0))

    def __call__(self, image, boxes=None, labels=None):
        if random.randint(2):
            swap = self.perms[random.randint(len(self.perms))]
            shuffle = SwapChannels(swap)
            image = shuffle(image)
        return image, boxes, labels
最后,我们将上述提到的基于针对像素的数据增强方法封装到一个类中。
class PhotometricDistort:
    def __init__(self):
        self.pd = [
            RandomContrast(),  # 随机对比度
            ConvertColor(transform='HSV'),  # 转换色彩空间
            RandomSaturation(),  # 随机饱和度
            RandomHue(),  # 随机色调
            ConvertColor(current='HSV', transform='BGR'),  # 转换色彩空间
            RandomContrast()  # 随机对比度
        ]
        self.rand_brightness = RandomBrightness()  # 随机亮度
        self.rand_light_noise = RandomLightingNoise()  # 随机通道交换

    def __call__(self, image, boxes, labels):
        im = image.copy()
        im, boxes, labels = self.rand_brightness(im, boxes, labels)
        if random.randint(2):
            distort = Compose(self.pd[:-1])
        else:
            distort = Compose(self.pd[1:])
        im, boxes, labels = distort(im, boxes, labels)
        return self.rand_light_noise(im, boxes, labels)
上述只涉及了一部分针对像素的数据增强方法,我们还可以对像素值进行不同的操作或转换到其他颜色空间中等。上述介绍的目标检测数据增强方法不会更改标注信息,下面我们将介绍针对图像的数据增强。我们不仅需要对原始图像进行处理,还要处理标注信息(主要是边界框)。最后给出本节所示用的数据增强的效果:

由于各种基于像素的数据增强方法所得到的结果图在人的视觉上大同小异,这里给出的是综合变换后的结果,即调用PhotometricDistort类得到的实验结果。
3. 针对图像的数据增强
前面提到,针对图像的像素增强不仅需要改变图像本身,还需要考虑标注信息的改变,这里主要指标注的边界框的改变。下面给出几种常见的基于图像的数据增强方法。
3.1 随机镜像
随机镜像相当于将图像沿着竖轴中心翻转即垂直翻转(水平翻转类似),代码及示意图如下:
class RandomMirror:
    def __call__(self, image, boxes, classes=None):
        _, width, _ = image.shape
        if random.randint(2):
            # 图像翻转
            image = image[:, ::-1]
            boxes = boxes.copy()
            # 改变标注框
            boxes[:, 0::2] = width - boxes[:, 2::-2]
        return image, boxes, classes
3.2 随机缩放
缩放图像不改变图像的宽高比,仅改变图像的大小,边界框也随之变动。首先确定一个随机缩放的尺度,然后依次将图像和边界框信息乘以该尺度得到变换后的结果。
class Expand:
    def __init__(self, mean):
        self.mean = mean

    def __call__(self, image, boxes, labels):
        if random.randint(2):
            return image, boxes, labels
        # 获取图像的各个维度
        height, width, depth = image.shape
        # 随机缩放尺度
        ratio = random.uniform(1, 4)
        left = random.uniform(0, width * ratio - width)
        top = random.uniform(0, height * ratio - height)
        # 确定缩放后的图像的维度
        expand_image = np.zeros((int(height * ratio), int(width * ratio), depth),
                                dtype=image.dtype)
        expand_image[:, :, :] = self.mean
        expand_image[int(top): int(top + height), int(left): int(left + width)] = image
        # 返回缩放后的图像
        image = expand_image
        # 将边界框以同等方式缩放
        boxes = boxes.copy()
        boxes[:, :2] += (int(left), int(top))
        boxes[:, 2:] += (int(left), int(top))
        # 返回
        return image, boxes, labels
3.3 随机裁剪
随机裁剪旨在裁掉原图中的一部分,然后检查边界框或目标整体是否被裁掉。如果目标整体被裁掉,则舍弃这次随机过程。
class RandomSampleCrop:
    def __init__(self):
        self.sample_options = (
            None,
            (0.1, None),
            (0.3, None),
            (0.7, None),
            (0.9, None),
            (None, None)
        )

    def __call__(self, image, boxes=None, labels=None):
        height, width, _ = image.shape
        while True:
            # 随机选择一种裁剪方式
            model = random.choice(self.sample_options)
            # 随机到None直接返回
            if model is None:
                return image, boxes, labels
            # 最大IoU和最小IoU
            min_iou, max_iou = model
            if min_iou is None:
                min_iou = float('-inf')
            if max_iou is None:
                max_iou = float('inf')
            # 迭代50次
            for _ in range(50):
                current_image = image
                # 宽和高随机采样
                w = random.uniform(0.3 * width, width)
                h = random.uniform(0.3 * height, height)
                # 宽高比例不当
                if h / w < 0.5 or h / w > 2:
                    continue
                left = random.uniform(width - w)
                top = random.uniform(height - h)
                # 框坐标x1,y1,x2,y2
                rect = np.array([int(left), int(top), int(left + w), int(top + h)])
                # 求iou
                overlap = iou(boxes, rect)
                if overlap.min() < min_iou and max_iou < overlap.max():
                    continue
                # 裁剪图像
                current_image = current_image[rect[1]: rect[3], rect[0]: rect[2], :]
                # 中心点坐标
                centers = (boxes[:, :2] + boxes[:, 2:]) / 2.0
                m1 = (rect[0] < centers[:, 0]) * (rect[1] < centers[:, 1])
                m2 = (rect[2] > centers[:, 0]) * (rect[3] > centers[:, 1])
                # 当m1和m2均为正时才保留
                mask = m1 * m2
                if not mask.any():
                    continue
                current_boxes = boxes[mask, :].copy()
                current_labels = labels[mask]
                # 根据图像变换调整box
                current_boxes[:, :2] = np.maximum(current_boxes[:, :2], rect[:2])
                current_boxes[:, :2] -= rect[:2]
                current_boxes[:, 2:] = np.minimum(current_boxes[:, 2:], rect[2:])
                current_boxes[:, 2:] -= rect[:2]
                # 返回变换后的图像、box和label
                return current_image, current_boxes, current_labels
4. 总结
本文介绍了两类在目标检测中常使用的数据增强的方法,包括基于像素值的增强方法和基于整幅图像的增强方法。其中,在基于像素值的增强方法中,要注意对颜色通道的转换;在基于整幅图像的增强方法中,要注意对标注边界框施以同样的变化。
Pytorch保存和加载模型
Pytorch保存和加载模型后缀:.pt 和.pth
保存整个模型:
torch.save(model,'save.pt')
只保存训练好的权重:
torch.save(model.state_dict(), 'save.pt')
加载模型:
pretrained_dict = torch.load("save.pt")
只加载模型参数:
model.load_state_dict(torch.load("save.pt")) #model.load_state_dict()函数把加载的权重复制到模型的权重中去
加载某一层的训练到的参数
conv1_weight_state = torch.load('save.pt')['conv1.weight']
Pytorch:多GPU训练网络与单GPU训练网络保存模型的区别
在pytorch中,使用多GPU训练网络需要用到nn.DataParallel:
gpu_ids = [0, 1, 2, 3]
device = t.device("cuda:0" if t.cuda.is_available() else "cpu")  # 只能单GPU运行
net = LeNet()
if len(gpu_ids) > 1:
    net = nn.DataParallel(net, device_ids=gpu_ids)
net = net.to(device)
而使用单GPU训练网络:
device = t.device("cuda:0" if t.cuda.is_available() else "cpu")  # 只能单GPU运行
net = LeNet().to(device)
由于多GPU训练使用了 nn.DataParallel(net, device_ids=gpu_ids) 对网络进行封装,因此在原始网络结构中添加了一层module。网络结构如下:
DataParallel(
  (module): LeNet(
    (conv1): Conv2d(3, 6, kernel_size=(5, 5), stride=(1, 1))
    (conv2): Conv2d(6, 16, kernel_size=(5, 5), stride=(1, 1))
    (fc1): Linear(in_features=400, out_features=120, bias=True)
    (fc2): Linear(in_features=120, out_features=84, bias=True)
    (fc3): Linear(in_features=84, out_features=10, bias=True)
  )
)
而不使用多GPU训练的网络结构如下:
LeNet(
  (conv1): Conv2d(3, 6, kernel_size=(5, 5), stride=(1, 1))
  (conv2): Conv2d(6, 16, kernel_size=(5, 5), stride=(1, 1))
  (fc1): Linear(in_features=400, out_features=120, bias=True)
  (fc2): Linear(in_features=120, out_features=84, bias=True)
  (fc3): Linear(in_features=84, out_features=10, bias=True)
)
由于在测试模型时不需要用到多GPU测试,因此在保存模型时应该把module层去掉。如下:
if len(gpu_ids) > 1:
    t.save(net.module.state_dict(), "model.pth")
else:
    t.save(net.state_dict(), "model.pth")
pytorch多卡并行计算保存模型和加载模型 (遗漏module的解决)
今天使用了多卡进行训练,保存的时候直接是用了下面的代码:
torch.save(net.cpu().state_dict(),'epoch1.pth')
我在测试的时候,想要加载这个训练好的模型,但是报错了,说是字典中的关键字不匹配,我就将新创建的模型,和加载的模型中的关键字都打印了出来,发现夹杂的模型的每个关键字都多了module.。解决方式为:
pre_dict = torch.load('./epoch1.pth')
new_pre = {}
for k,v in pre_dict.items():
    name = k[7:]
    new_pre[name] = v
net.load_state_dict(new_pre)
这就相当于是把不同的关键字都设置成相同的关键字,也将参数加载了进来。
Pytorch保留验证集上最好的模型
方法一:
验证集的作用就是在训练的过程中监测是否训练过度,即过拟合。一般可以默认验证集的损失函数值由下降转向上升(即最小值)处,模型的泛化能力最好。
min_loss_val = 10  # 任取一个大数
best_model = None
min_epoch = 100  # 训练至少需要的轮数
for epoch in range(args.epochs):
    loss_val, loss_acc = train(epoch)
    if epoch > min_epoch and loss_val <= min_loss_val:
        min_loss_val = loss_val
        best_model = copy.deepcopy(model)
model = best_model
方法二:
在训练过程中,需要保存模型来供测试使用,以前采用隔几个epoch就保存模型:
if epoch % 50 == 0:
   torch.save(net.state_dict(),'%d.pth' % (epoch))
这样会导致保存的模型数量太多,占用硬盘空间,而且训练完成后寻找最优的模型也需要对照损失函数曲线去寻找,很不方便。 但如果每次都记录下损失函数的值,只保存验证集上损失最小的时候的模型,就更方便使用,其实设置一个判断条件就行。
min_loss = 100000 # 随便设置一个比较大的数
for epoch in range(epochs):
    train()
    val_loss = val()
    if val_loss < min_loss:
        min_loss = val_loss
        print("save model")
        torch.save(net.state_dict(),'model.pth')
后来我发现,这种方式也有不科学之处,因为在测试集上损失最小的那个epoch的模型不一定就是最好的模型,不一定具有最好的泛化能力。
PyTorch学习之六个学习率调整策略
PyTorch学习率调整策略通过torch.optim.lr_scheduler接口实现。PyTorch提供的学习率调整策略分为三大类,分别是
a. 有序调整:等间隔调整(Step),按需调整学习率(MultiStep),指数衰减调整(Exponential)和 余弦退火(CosineAnnealing)。
b. 自适应调整:自适应调整学习率 ReduceLROnPlateau。
c. 自定义调整:自定义调整学习率 LambdaLR。
1、 等间隔调整学习率 StepLR
等间隔调整学习率,调整倍数为gamma倍,调整间隔为 step_size。间隔单位是step。需要注意的是,step通常是指epoch,不要弄成iteration 了。
torch.optim.lr_scheduler.StepLR(optimizer, step_size, gamma=0.1, last_epoch=-1)
参数:
step_size(int)- 学习率下降间隔数,若为 30,则会在 30、 60、 90…个 step 时,将学习率调整为 lr*gamma。
gamma(float)- 学习率调整倍数,默认为 0.1 倍,即下降 10 倍。
last_epoch(int)- 上一个 epoch 数,这个变量用来指示学习率是否需要调整。当last_epoch 符合设定的间隔时,就会对学习率进行调整。当为-1 时,学习率设置为初始值。
2 、按需调整学习率 MultiStepLR
按设定的间隔调整学习率。这个方法适合后期调试使用,观察loss 曲线,为每个实验定制学习率调整时机。
torch.optim.lr_scheduler.MultiStepLR(optimizer, milestones, gamma=0.1, last_epoch=-1)
参数:
milestones(list)- 一个 list,每一个元素代表何时调整学习率, list 元素必须是递增的。如 milestones=[30,80,120]
gamma(float)- 学习率调整倍数,默认为 0.1 倍,即下降 10 倍。
3 、指数衰减调整学习率 ExponentialLR
按指数衰减调整学习率,调整公式: lr=lr∗gamma∗∗epoch
torch.optim.lr_scheduler.ExponentialLR(optimizer, gamma, last_epoch=-1)
参数:
gamma- 学习率调整倍数的底,指数为 epoch,即 gamma**epoch
4 、余弦退火调整学习率 CosineAnnealingLR
以余弦函数为周期,并在每个周期最大值时重新设置学习率。以初始学习率为最大学习率,以 2 ∗ T m a x 2∗Tmax 2∗Tmax为周期,在一个周期内先下降,后上升。
torch.optim.lr_scheduler.CosineAnnealingLR(optimizer, T_max, eta_min=0, last_epoch=-1)
参数:
T_max(int)- 一次学习率周期的迭代次数,即 T_max 个 epoch 之后重新设置学习率。
eta_min(float)- 最小学习率,即在一个周期中,学习率最小会下降到 eta_min,默认值为 0。
5 、自适应调整学习率 ReduceLROnPlateau
当某指标不再变化(下降或升高),调整学习率,这是非常实用的学习率调整策略。
例如,当验证集的loss不再下降时,进行学习率调整;或者监测验证集的accuracy,当accuracy不再上升时,则调整学习率。
torch.optim.lr_scheduler.ReduceLROnPlateau(optimizer, mode='min', factor=0.1, patience=10, verbose=False, threshold=0.0001, threshold_mode='rel', cooldown=0, min_lr=0, eps=1e-08)
参数:
mode(str)- 模式选择,有 min 和 max 两种模式, min 表示当指标不再降低(如监测loss), max 表示当指标不再升高(如监测 accuracy)。
factor(float)- 学习率调整倍数(等同于其它方法的 gamma),即学习率更新为 lr = lr * factor
patience(int)- 忍受该指标多少个 step 不变化,当忍无可忍时,调整学习率。
verbose(bool)- 是否打印学习率信息, print(‘Epoch {:5d}: reducing learning rate of group {} to {:.4e}.’.format(epoch, i, new_lr))
threshold_mode(str)- 选择判断指标是否达最优的模式,有两种模式, rel 和 abs。
当 threshold_mode == rel,并且 mode == max 时, dynamic_threshold = best * ( 1 +threshold );
当 threshold_mode == rel,并且 mode == min 时, dynamic_threshold = best * ( 1 -threshold );
当 threshold_mode == abs,并且 mode== max 时, dynamic_threshold = best + threshold ;
当 threshold_mode == rel,并且 mode == max 时, dynamic_threshold = best - threshold;
threshold(float)- 配合 threshold_mode 使用。
cooldown(int)- “冷却时间“,当调整学习率之后,让学习率调整策略冷静一下,让模型再训练一段时间,再重启监测模式。
min_lr(float or list)- 学习率下限,可为 float,或者 list,当有多个参数组时,可用 list 进行设置。
eps(float)- 学习率衰减的最小值,当学习率变化小于 eps 时,则不调整学习率。
6、 自定义调整学习率 LambdaLR
为不同参数组设定不同学习率调整策略。调整规则为,
lr=base_lr∗lmbda(self.last_epoch)
fine-tune 中十分有用,我们不仅可为不同的层设定不同的学习率,还可以为其设定不同的学习率调整策略。
torch.optim.lr_scheduler.LambdaLR(optimizer, lr_lambda, last_epoch=-1)
参数:
lr_lambda(function or list)- 一个计算学习率调整倍数的函数,输入通常为 step,当有多个参数组时,设为 list。
参考链接
基于Pytorch的目标检测数据加载 https://blog.csdn.net/Skies_/article/details/106455918
PyTorch源码解读之torchvision.transforms https://blog.csdn.net/u014380165/article/details/79167753
基于PyTorch的目标检测数据增强 https://blog.csdn.net/Skies_/article/details/106614981
Pytorch保留验证集上最好的模型 https://blog.csdn.net/weixin_41786536/article/details/103313028
Pytorch保存和加载模型 https://blog.csdn.net/HJC256ZY/article/details/106457461
Pytorch:多GPU训练网络与单GPU训练网络保存模型的区别 https://blog.csdn.net/u013978977/article/details/84844940
PyTorch学习之六个学习率调整策略 https://blog.csdn.net/qq_38410428/article/details/96423592
