Spring+JDBC组合开发
搭建和配置Spring与JDBC整合的环境
使用Spring+JDBC集成步骤如下:
第一步,配置数据源。我们使用DBCP数据库连接池。
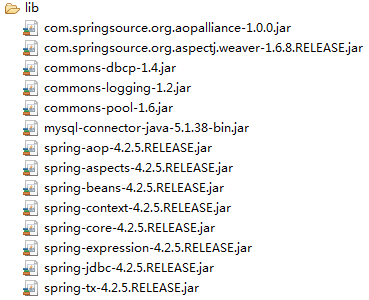
我们首先在Eclipse中新建一个普通的Java Project,名称为springAndJDBC。接着导入所需Jar包到项目中,所需Jar包共有:

然后我们在Sping配置文件中——beans.xml配置数据源,即在beans.xml中加入如下内容:
<bean id="dataSource" class="org.apache.commons.dbcp.BasicDataSource"
    destroy-method="close">
    <property name="driverClassName" value="com.mysql.jdbc.Driver" />
    <property name="url"
        value="jdbc:mysql://localhost:3306/jdbc?useUnicode=true&characterEncoding=UTF-8" />
    <property name="username" value="root" />
    <property name="password" value="yezi" />

    <property name="initialSize" value="1" />

    <property name="maxActive" value="500" />

    <property name="maxIdle" value="2" />

    <property name="minIdle" value="1" />
bean>第二步,配置事务。因为我们打算使用Spring给我们提供的容器来管理事务。配置事务时,需要在XML配置文件中引入用于声明事务的tx命名空间,事务的配置方式有两种:注解方式和基于XML配置方式。
我们首先在Spring配置文件中引入用于声明事务的tx命名空间:
<beans xmlns="http://www.springframework.org/schema/beans"
    xmlns:xsi="http://www.w3.org/2001/XMLSchema-instance"
    xmlns:context="http://www.springframework.org/schema/context"
    xmlns:aop="http://www.springframework.org/schema/aop"
    xmlns:tx="http://www.springframework.org/schema/tx"
    xsi:schemaLocation="http://www.springframework.org/schema/beans
        http://www.springframework.org/schema/beans/spring-beans.xsd
        http://www.springframework.org/schema/context
        http://www.springframework.org/schema/context/spring-context-4.2.xsd
        http://www.springframework.org/schema/aop
        http://www.springframework.org/schema/aop/spring-aop-4.2.xsd
        http://www.springframework.org/schema/tx
        http://www.springframework.org/schema/tx/spring-tx-4.2.xsd">

beans>
接着我们采用注解方式配置声明式事务,需要在Spring配置文件中添加如下内容:
id="txManager" class="org.springframework.jdbc.datasource.DataSourceTransactionManager">
    <property name="dataSource" ref="dataSource" />
以上配置指定了Spring的事务管理器(由于我们打算使用Spring的事务管理功能),这样,我们不再手工控制事务的打开、提交或回滚,而是都交给Spring的事务管理器来管理。
提示:org.springframework.jdbc.datasource.DataSourceTransactionManager是Spring为我们提供的专门针对数据源的事务管理器。
由于我们采用注解——@Transactional的方式来配置声明式事务,所以我们还要在Spring配置文件中添加如下内容:
<tx:annotation-driven transaction-manager="txManager" />以上配置隐式地注册了对注解——@Transactional进行解析的处理器。经过以上两步,Spring与JDBC整合的环境就算搭建好了,Spring配置文件——beans.xml的内容为:
<beans xmlns="http://www.springframework.org/schema/beans"
    xmlns:xsi="http://www.w3.org/2001/XMLSchema-instance"
    xmlns:context="http://www.springframework.org/schema/context"
    xmlns:aop="http://www.springframework.org/schema/aop"
    xmlns:tx="http://www.springframework.org/schema/tx"
    xsi:schemaLocation="http://www.springframework.org/schema/beans
        http://www.springframework.org/schema/beans/spring-beans.xsd
        http://www.springframework.org/schema/context
        http://www.springframework.org/schema/context/spring-context-4.2.xsd
        http://www.springframework.org/schema/aop
        http://www.springframework.org/schema/aop/spring-aop-4.2.xsd
        http://www.springframework.org/schema/tx
        http://www.springframework.org/schema/tx/spring-tx-4.2.xsd">

    <bean id="dataSource" class="org.apache.commons.dbcp.BasicDataSource"
        destroy-method="close">
        <property name="driverClassName" value="com.mysql.jdbc.Driver" />
        <property name="url"
            value="jdbc:mysql://localhost:3306/jdbc?useUnicode=true&characterEncoding=UTF-8" />
        <property name="username" value="root" />
        <property name="password" value="yezi" />

        <property name="initialSize" value="1" />

        <property name="maxActive" value="500" />

        <property name="maxIdle" value="2" />

        <property name="minIdle" value="1" />
    bean>

    <bean id="txManager"
        class="org.springframework.jdbc.datasource.DataSourceTransactionManager">
        <property name="dataSource" ref="dataSource" />
    bean>
    <tx:annotation-driven transaction-manager="txManager" />
beans>
Spring集成的JDBC编码和事务管理
Spring与JDBC整合的环境搭建好之后,我们就要编写JDBC代码了。首先在jdbc数据库中创建一张person表,如下:

接着在src目录下新建一个cn.itcast.bean包,并在该包下新建一个JavaBean——Person.java,其代码为:
public class Person {
    private Integer id;
    private String name;

    public Person() {}

    public Person(String name) {
        this.name = name;
    }

    public Integer getId() {
        return id;
    }

    public void setId(Integer id) {
        this.id = id;
    }

    public String getName() {
        return name;
    }

    public void setName(String name) {
        this.name = name;
    }
}
再接着在src目录下新建一个cn.itcast.service包,并在该包下新建一个接口——PersonService.java,其代码为:
public interface PersonService {
    /**
     * 保存person
     */
    public void save(Person person);

    /**
     * 更新person
     */
    public void update(Person person);

    /**
     * 获取person
     */
    public Person getPerson(Integer personid);

    /**
     * 获取所有person
     */
    public List getPersons();

    /**
     * 删除指定id的person
     */
    public void delete(Integer personid);
} 紧接着在src目录下新建一个cn.itcast.service.impl包,并在该包下新建一个PersonService接口的实现类——PersonServiceBean.java。因为我们要对数据库person表进行增删改查,所以需要通过数据源dataSource进行操作,但是我们最好不要直接通过数据源dataSource进行操作,而是应使用Spring为我们提供的JdbcTemplate类进行JDBC操作,因为这个辅助类封装了比较多的JDBC代码,故PersonServiceBean类的代码应为:
/**
 * 使用JdbcTemplate进行insert/update/delete/select操作
 * @author li ayun
 *
 */
public class PersonServiceBean implements PersonService {
    private JdbcTemplate jdbcTemplate;

    public void setDataSource(DataSource dataSource) {
        this.jdbcTemplate = new JdbcTemplate(dataSource);
    }

    @Override
    public void save(Person person) {
        jdbcTemplate.update("insert into person(name) value(?)", new Object[]{person.getName()},
                new int[]{java.sql.Types.VARCHAR});
    }

    @Override
    public void update(Person person) {
        jdbcTemplate.update("update person set name=? where id=?", new Object[]{person.getName(), person.getId()},
                new int[]{java.sql.Types.VARCHAR, java.sql.Types.INTEGER});
    }

    /**
     * 使用JdbcTemplate获取一条记录
     */
    @Override
    public Person getPerson(Integer personid) {
        return jdbcTemplate.queryForObject("select * from person where id=?", new Object[]{personid},
                new int[]{java.sql.Types.INTEGER}, new PeronRowMapper());
    }

    /**
     * 使用JdbcTemplate获取多条记录
     */
    @Override
    public List getPersons() {
        return jdbcTemplate.query("select * from person", new PeronRowMapper());
    }

    @Override
    public void delete(Integer personid) {
        jdbcTemplate.update("delete from person where id=?", new Object[]{personid},
                new int[]{java.sql.Types.INTEGER});
    }

}
接下来还要在cn.itcast.service.impl包下新建一个类——PeronRowMapper.java,其代码为:
public class PeronRowMapper implements RowMapper<Person> {

    @Override
    public Person mapRow(ResultSet rs, int index) throws SQLException {
        Person person = new Person(rs.getString("name"));
        person.setId(rs.getInt("id"));
        return person;
    }

}有人可能会问,为何mapRow()方法内部一开始不调用一下rs.next()方法?答案是外部调用mapRow()方法时,已经执行了诸如if(rs.next()) { ... } 这样的代码。
然后我们要将PersonServiceBean交给Spring进行管理,即需要在Spring配置文件中添加如下内容:
id="personService" class="cn.itcast.service.impl.PersonServiceBean">
    <property name="dataSource" ref="dataSource" />
最后,我们就要在src目录下新建一个junit.test包,并在该包下新建一个单元测试类——PersonServiceTest.java,对我们编写的业务bean的JDBC代码进行测试。
public class PersonServiceTest {
    private static PersonService personService;

    @BeforeClass
    public static void setUpBeforeClass() throws Exception {
        try {
            ApplicationContext cxt = new ClassPathXmlApplicationContext("beans.xml");
            personService = (PersonService) cxt.getBean("personService");
        } catch (Exception e) { // 若出错,则打印在控制台上
            e.printStackTrace();
        }
    }

    @Test
    public void save() {
        personService.save(new Person("李阿昀"));
    }

    @Test
    public void getPerson() {
        Person person = personService.getPerson(1);
        System.out.println(person.getName());
    }

    @Test
    public void update() {
        Person person = personService.getPerson(1);
        person.setName("李子");
        personService.update(person);
    }

    @Test
    public void delete() {
        personService.delete(1);
    }

    @Test
    public void save_5() {
        for (int i = 1; i <= 5; i++) {
            personService.save(new Person("李阿昀" + i));
        }
    }

    @Test
    public void getBeans() {
        for (Person person : personService.getPersons()) {
            System.out.println(person.getName());
        }
    }
}
分别测试以上方法,都顺利通过,大发!
从PersonServiceBean类的代码中我们可以看出该PersonServiceBean并没有受Spring的事务管理,因为我们没有为PersonServiceBean标注@Transactional注解,若要是不定义这个@Transactional注解,那么像save()方法中的每条sql语句都会在各自的事务中进行执行。若save()方法中有2条语句,例如:
public void save(Person person) {
    jdbcTemplate.update("insert into person(name) value(?)", new Object[]{person.getName()},
            new int[]{java.sql.Types.VARCHAR});

    jdbcTemplate.update("insert into person(name) value(?)", new Object[]{person.getName()},
            new int[]{java.sql.Types.VARCHAR});
}
这样,2条语句都会在各自的事务中执行,他们是无法保证在同一个事务中执行的,从而会出现一些问题。因此为了保证多条语句在同一个事务中执行,我们应该使用Spring容器给我们提供的声明式事务,即在该PersonServiceBean加上@Transactional注解。这样,该PersonServiceBean的所有业务方法在方法执行前打开事务,方法执行后关闭事务。
使用属性占位符方式配置数据源
在使用Spring+JDBC组合开发过程中,有人喜欢把数据库连接等信息放在一个属性文件中,接着使用属性占位符方式将属性文件中的内容引用进来。
现在类路径底下新建一个属性文件——jdbc.properties,其内容为:

接着,我们就要将Spring的配置文件修改为:
<beans xmlns="http://www.springframework.org/schema/beans"
    xmlns:xsi="http://www.w3.org/2001/XMLSchema-instance"
    xmlns:context="http://www.springframework.org/schema/context"
    xmlns:aop="http://www.springframework.org/schema/aop"
    xmlns:tx="http://www.springframework.org/schema/tx"
    xsi:schemaLocation="http://www.springframework.org/schema/beans
        http://www.springframework.org/schema/beans/spring-beans.xsd
        http://www.springframework.org/schema/context
        http://www.springframework.org/schema/context/spring-context-4.2.xsd
        http://www.springframework.org/schema/aop
        http://www.springframework.org/schema/aop/spring-aop-4.2.xsd
        http://www.springframework.org/schema/tx
        http://www.springframework.org/schema/tx/spring-tx-4.2.xsd">

    <context:property-placeholder location="classpath:jdbc.properties" />
    <bean id="dataSource" class="org.apache.commons.dbcp.BasicDataSource"
        destroy-method="close">
        <property name="driverClassName" value="${jdbc.driverClassName}" />
        <property name="url" value="${jdbc.url}" />
        <property name="username" value="${jdbc.username}" />
        <property name="password" value="${jdbc.password}" />

        <property name="initialSize" value="${jdbc.initialSize}" />

        <property name="maxActive" value="${jdbc.maxActive}" />

        <property name="maxIdle" value="${jdbc.maxIdle}" />

        <property name="minIdle" value="${jdbc.minIdle}" />
    bean>

    <bean id="txManager"
        class="org.springframework.jdbc.datasource.DataSourceTransactionManager">
        <property name="dataSource" ref="dataSource" />
    bean>
    <tx:annotation-driven transaction-manager="txManager" />

    <bean id="personService" class="cn.itcast.service.impl.PersonServiceBean">
        <property name="dataSource" ref="dataSource" />
    bean>
beans>此时再来测试PersonServiceTest类中的各个方法,仍然都会顺利通过。如须查看源码,可点击Spring+JDBC组合开发进行下载。