【theano-windows】学习笔记十三——去噪自编码器
前言
上一章节学习了卷积的写法,主要注意的是其实现在theano.tensor.nnet和theano.sandbox.cuda.dnn中都有对应函数实现, 这一节就进入到无监督或者称为半监督的网络构建中. 首先是自编码器(Autoencoders)和降噪自编码器(denoising Autoencoders)
国际惯例, 参考网址:
Denoising Autoencoders (dA)
Learning deep architectures for {AI}
Extracting and Composing Robust Features with Denoising Autoencoders
降噪自动编码器(Denoising Autoencoder)
理论
自编码器
其实就是先将 d d 维输入数据 x∈[0,1] x ∈ [ 0 , 1 ] 映射到 d′ d ′ 维的隐层 y∈[0,1] y ∈ [ 0 , 1 ] , 然后再重构回去得到 d d 维的 z z 的过程. 这两步的数学表达式为:
依据第三个参考文献 ,这里面 x x 代表输入数据, W W 代表输入层到隐层的 (d′×d) ( d ′ × d ) 维权重, bh b h 是隐层偏置, s s 代表激活函数,所以编码层参数就是 θ=(W,b) θ = ( W , b ) , 反向映射(隐层到重构层)的权重 W′ W ′ 可以被约束为 W′=WT W ′ = W T , 称为绑定权重(
tied weights),所以解码层的参数就是
θ′=(W′,b′) θ ′ = ( W ′ , b ′ )
损失函数可以是平均重构误差
其中 L L 可以是传统的方差损失
如果 x x 和 z z 是位向量或者位(伯努利)概率向量,那么损失就可以是重构交叉熵
而根据第二篇参考博客所说, 如果隐层是线性的, 且以均方误差为损失去训练网络,那么 k k 个隐单元学到的就是将输入投影到数据的前 k k 个主分量中, 可以看成是一个PCA了.
自编码器所期望的是隐层的分布表示能够捕捉到数据变化的主要因素, 对于所有的输入 x x , 它会是一个很好的有损压缩,学习使得它对训练数据的压缩更好,而且也希望对其它数据也更好, 当然并非是针对任意的输入.
有一个严重的问题是,如果没有其他任何的限制,具有 n n 维输入的自编码和至少 n n 维的隐单元(编码层), 那么可能学习到的就是恒等函数(‘identity function ‘), 很多隐神经元就没用了(仅仅是将输入数据复制了一遍), 令人惊讶的是, 实际上如果我们使用随机梯度下降训练方法, 即使是具有比输入层神经元数更多的隐单元(过完备overcomplete)的非线性自编码器, 也产生了有用的特征表示, 一个简单的原因是提前停止的随机梯度下降算法与 l2 l 2 正则项很像. 为了达到对连续数据更好的重构效果,具有非线性隐单元层的自编码器在第一层需要很小的权重(将隐单元的非线性引入到它们线性状态中), 第二层需要很大的权重. 如果是二值输入, 需要非常大的权重去完全最小化重构误差.但是由于显式或者隐式的正则化很难得到较大的权重解, 优化算法找到的编码单元(隐层)仅仅对于训练集相似的样本效果好, 这就是我们希望的. 这也就以为这特征表示在探索训练集的统计规律而非去学习恒等函数.
有很多方法去阻止自编码器学习到恒等函数, 同时在隐层表示中获取到有用的知识. 除了给自编码器添加隐式或者显式的权重正则, 另一个方法是给编码层增加噪声.这实际上是RBM所做的东东. 另一个方法是基于编码的稀疏约束. 但是稀疏或者正则化为了避免学习到恒等函数而降低了表达能力, RBM相对来说表达能力很强, 也不会学习恒等函数, 因为它不仅编码输入, 也通过生成模型的极大似然估计逼近方法捕捉到了输入的统计结构.
降噪自编码器
有一种自编码器就共享了RBM的这个特性,称为降噪自编码器(denoising auto-encoder), 它是最小化对输入的随机损坏变换的重构误差, 最小化生成模型的对数似然的下界.
降噪自编码器做了两件事情:
- 尝试编码输入
- 尝试重做对输入的随机损坏处理操作
后者仅仅可以通过捕捉输入之间的非统计依赖.实际上, 随机损坏过程包含将输入的某些值置零.因而降噪自编码器尝试对丢失值进行预测. 训练标准就是重构对数似然
其中 x x 是无损的输入, x^ x ^ 是随机有损输入, c(x^) c ( x ^ ) 是从 x^ x ^ 获得的编码.
降噪自编码两个有趣的属性就是:
- 它与生成模型对应, 它的训练准则就是生成模型的对数似然的一个界限
- 他能够被用于修复丢失数据或者多模数据, 因为它就是在有损数据上训练的
代码实现
模型构建与训练
先引入相关库,这里要注意引入一个theano中的随机数生成器,主要用于对数据的有损处理
import theano
import theano.tensor as T
import numpy as np
import os
import cPickle,gzip
from theano.tensor.shared_randomstreams import RandomStreams
然后读数据没啥好说的
#定义读数据的函数,把数据丢入到共享区域
def load_data(dataset):
    data_dir,data_file=os.path.split(dataset)
    if os.path.isfile(dataset):
        with gzip.open(dataset,'rb') as f:
            train_set,valid_set,test_set=cPickle.load(f)
    #共享数据集
    def shared_dataset(data_xy,borrow=True):
        data_x,data_y=data_xy
        shared_x=theano.shared(np.asarray(data_x,dtype=theano.config.floatX),borrow=borrow)
        shared_y=theano.shared(np.asarray(data_y,dtype=theano.config.floatX),borrow=borrow)
        return shared_x,T.cast(shared_y,'int32')
    #定义三个元组分别存储训练集,验证集,测试集
    train_set_x,train_set_y=shared_dataset(train_set)
    valid_set_x,valid_set_y=shared_dataset(valid_set)
    test_set_x,test_set_y=shared_dataset(test_set)
    rval=[(train_set_x,train_set_y),(valid_set_x,valid_set_y),(test_set_x,test_set_y)]
    return rval
初始化网络结构, 虽然代码长,但是按部就班地写就可以了, 和所有的神经网络定义方法一样, 先初始化参数权重偏置, , 随后定义梯度更新方法, 只不过自编码的提取更新涉及到编码和解码两个阶段, 所以再额外对这两个操作进行定义, 而在输入的时候, 为了切换是去噪自编码还是普通的自编码器, 加入一个有损函数去随机对输入置零
class dA(object):
    #初始化所需参数,随机初始化,输入,输入单元数,隐单元数, 权重,偏置
    def __init__(self,rng,input=None,n_visible=784,n_hidden=500,W=None,h_b=None,v_b=None):
        self.n_visible=n_visible
        self.n_hidden=n_hidden
        if not W:
            initial_W=np.asarray(rng.uniform(low=-4*np.sqrt(6./(n_hidden+n_visible)),
                                            high=4*np.sqrt(6./(n_hidden+n_visible)),
                                            size=(n_visible,n_hidden)),
                                 dtype=theano.config.floatX)
            W=theano.shared(initial_W,name='W',borrow=True)
        if not h_b:
            h_b=theano.shared(np.zeros(n_hidden,dtype=theano.config.floatX),borrow=True)
        if not v_b:
            v_b=theano.shared(np.zeros(n_visible,dtype=theano.config.floatX),borrow=True)

        self.W=W
        self.vb=v_b
        self.hb=h_b
        self.W_prime=self.W.T

        if input is None:
            self.x=T.dmatrix(name='input')
        else:
            self.x=input

        self.params=[self.W,self.vb,self.hb]

    #编码阶段
    def get_hidden_value(self,input):
        return T.nnet.sigmoid(T.dot(input,self.W)+self.hb)
    #解码阶段
    def get_reconstructed_input(self,hidden):
        return T.nnet.sigmoid(T.dot(hidden,self.W_prime)+self.vb)

    #是否有损输入,如果是有损输入就是降噪自编码器了
    def get_corrupted_input(self,input,corruption_level):
        srng=RandomStreams(np.random.randint(2**30))
        return srng.binomial(size=input.shape,n=1,p=1-corruption_level,dtype=theano.config.floatX)*input
    #更新参数
    def get_cost_updates(self,corruption_level,learning_rate):
        tilde_x=self.get_corrupted_input(self.x,corruption_level)#有损数据
        y=self.get_hidden_value(tilde_x)#编码
        z=self.get_reconstructed_input(y)#解码
        #损失函数
        L=-T.sum(self.x*T.log(z)+(1-self.x)*T.log(1-z),axis=1)
        cost=T.mean(L)
        #参数梯度
        gparams=T.grad(cost,self.params)
        #更新权重偏置
        updates=[(param,param-learning_rate*gparam) for param,gparam in zip(self.params,gparams)]

        return (cost,updates)
定义训练过程,这里就不用那个提前停止算法了,直接让他训练15次, 训练方法照旧, 重点注意的是模型结构的定义, 建议将前面的MLP和CNN的博客对网络结构的定义部分与dA的网络结构的定义对比着看. 保存模型这里直接保存权重和偏置算了.
#定义训练过程
def test_dA(learning_rate=0.1,
            n_epoches=15,
            dataset='mnist.pkl.gz',
            n_visible=28*28,
            n_hidden=500,
            corruption_level=0.3,
            batch_size=20):
    #数据集
    datasets=load_data(dataset=dataset)
    train_set_x,train_set_y=datasets[0]
    valide_set_x,valide_set_y=datasets[1]
    test_set_x,test_set_y=datasets[2]
    #计算小批数据的批数
    n_train_batches=train_set_x.get_value(borrow=True).shape[0]//batch_size
    n_valid_batches=valide_set_x.get_value(borrow=True).shape[0]//batch_size
    n_test_batches=test_set_x.get_value(borrow=True).shape[0]//batch_size

    index=T.iscalar()#批索引
    x=T.matrix('x')
    rng=np.random.RandomState(123)
    #初始化一个去噪自编码器
    da=dA(rng=rng,
          input=x,
          n_visible=n_visible,
          n_hidden=n_hidden)
    #参数更新
    cost,updates=da.get_cost_updates(corruption_level=0,learning_rate=learning_rate)
    #训练函数
    train_model=theano.function([index],cost,updates=updates,givens={
        x:train_set_x[index*batch_size:(index+1)*batch_size]
    })
    #训练
    for epoch in range(n_epoches):
        c=[]
        for batch_index in range(n_train_batches):
            c.append(train_model(batch_index))
        print ('Training epoch %d, cost' % epoch,np.mean(c,dtype='float32'))
        save_file=open('best_model_dA.pkl','wb')
        model=[da.params]
        cPickle.dump( model,save_file)
最后就可以进行模型训练了
test_dA()
#输出
'''
('Training epoch 0, cost', 63.23605)
('Training epoch 1, cost', 55.798237)
('Training epoch 2, cost', 54.78653)
('Training epoch 3, cost', 54.273125)
('Training epoch 4, cost', 53.922806)
('Training epoch 5, cost', 53.654221)
('Training epoch 6, cost', 53.436089)
('Training epoch 7, cost', 53.253082)
('Training epoch 8, cost', 53.096138)
('Training epoch 9, cost', 52.95927)
('Training epoch 10, cost', 52.838261)
('Training epoch 11, cost', 52.730087)
('Training epoch 12, cost', 52.632538)
('Training epoch 13, cost', 52.543911)
('Training epoch 14, cost', 52.462799)
'''
小插曲
期间发生了一件有趣的事情,初始化权重的时候我使用了
initial_W=np.asarray(rng.uniform(low=-4*np.sqrt(6./(n_hidden+n_visible)),
                                            high=4*np.sqrt(6./n_hidden+n_visible),
                                            size=(n_visible,n_hidden)),
                                 dtype=theano.config.floatX)
而不是
initial_W=np.asarray(rng.uniform(low=-4*np.sqrt(6./(n_hidden+n_visible)),
                                            high=4*np.sqrt(6./(n_hidden+n_visible)),
                                            size=(n_visible,n_hidden)),
                                 dtype=theano.config.floatX)
也就是说我的权重应该是蛮大的, 最小的权重也比28*28的值大, 结果训练的时候出现了以下状况
('Training epoch 0, cost', 2455178.8)
('Training epoch 1, cost', 8450.71)
('Training epoch 2, cost', 7065.3008)
('Training epoch 3, cost', 6342.0913)
('Training epoch 4, cost', 5833.1704)
('Training epoch 5, cost', 5438.9961)
...
('Training epoch 292, cost', 146.0446)
('Training epoch 293, cost', 145.98045)
('Training epoch 294, cost', 145.89928)
('Training epoch 295, cost', 145.86646)
('Training epoch 296, cost', 145.71715)
('Training epoch 297, cost', 145.62868)
('Training epoch 298, cost', 145.54076)
('Training epoch 299, cost', 145.44417)
('Training epoch 300, cost', 145.35019)
('Training epoch 301, cost', 145.3033)
('Training epoch 302, cost', 145.21727)
('Training epoch 303, cost', 145.02127)
('Training epoch 304, cost', 144.89236)
('Training epoch 305, cost', 144.8385)
('Training epoch 306, cost', 144.68234)
('Training epoch 307, cost', 144.59572)
...
所以, 说实话, 权重的初始化对模型的训练的收敛情况有很大影响啊,以后权重初始化最好还是用fan_in,fan_out准则, 前面博客有讲这两个公式
使用模型
首先想一下这个best_model_dA.pkl里面存的是什么?依据我对python的菜鸟级想法, da.params应该就是self.params里面的一个权重和两个偏置, 然后我们去pychar中调试一波看看
果然是的, 那么我们就有谱怎么调用了.
先初始化一个测试网络结构, 用于对输入图像进行编码和解码
#使用模型
model_params=cPickle.load(open('best_model_dA.pkl'))
rng=np.random.RandomState(123)
x=T.matrix('x')
coder=T.matrix('coder')
single_input=x.reshape((1,28*28))
da_test=dA(rng=rng,input=single_input,n_visible=28*28,n_hidden=model_params[0][0].get_value().shape[1])
#权重赋值
da_test.W=model_params[0][0].get_value()
da_test.vb=model_params[0][1].get_value()
da_test.hb=model_params[0][2].get_value()
#重构计算
forward_compute=theano.function([single_input],
                                da_test.get_reconstructed_input(coder),
                                givens={
                                    coder:da_test.get_hidden_value(single_input)
                                })
然后我们使用一张图片做做测试
#输入一张图片试试
from PIL import Image
import pylab
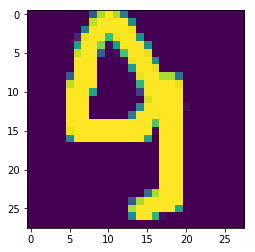
img=Image.open('E:\\code_test\\theano\\binarybmp\\9.bmp')
img_w,img_h=img.size#图像的宽和高
img=np.asarray(img,dtype='float32')
pylab.imshow(img)
pylab.show()
#原始图片是28*28,要增加两个维度
img=img.reshape((1,28*28))
重构一波试试
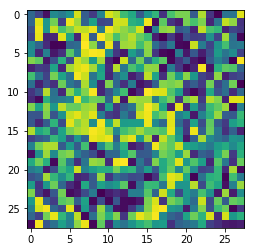
data_recon=forward_compute(img)
data_recon=data_recon.reshape(28,28)
data_recon=np.asarray(data_recon,dtype='float32')
pylab.imshow(data_recon)
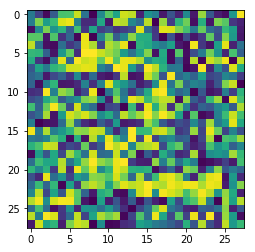
pylab.show()我只想说”这。。。。。诞生了一个什么鬼哦”,再测试一个数字2.bmp试试
吾有一橘麻麦皮,不知当桨不当桨
不过嘛毕竟是最最最基本的自编码器,可能效果就是这样,毕竟上面我们也能看出来重构的分别是9和2. 虽然有点勉强。。。。。。如果是代码错误,希望各位指正
更新日志2018-8-15
后面用TensorFlow写了一下自编码,发现数据归一化对结果影响很大,这篇博客效果差的原因极有可能是数据未归一化问题,有兴趣的可以试试,不过我转型TensorFlow了暂时,所以这个代码就不折腾了o(╯□╰)o
博客code打包:链接: https://pan.baidu.com/s/1nvGDkTj 密码: ykid
官方code打包:链接: https://pan.baidu.com/s/1eRQK4nS 密码: yemn


