Windows下实现ffmpeg+nginx+rtmp+hls实现直播推流拉流(低延时)
一、简介:
Nginx是一款轻量级的Web 服务器/反向代理服务器及电子邮件(IMAP/POP3)代理服务器。 nginx-rmtp-module是Nginx服务器的流媒体插件。nginx通过rtmp模块提供rtmp服务, ffmpeg推送一个rtmp流到nginx, 然后客户端通过访问nginx来收看实时视频流。
二、官网:
FFmpeg项目的官方网址为:https://ffmpeg.org/ nginx官网:http://nginx.org/
三、配置FFmpeg
1、解压下载的FFmpeg压缩包得到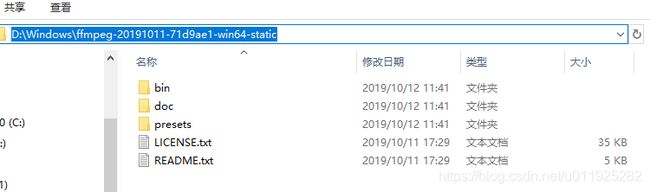
2、进入bin文件夹获取路径
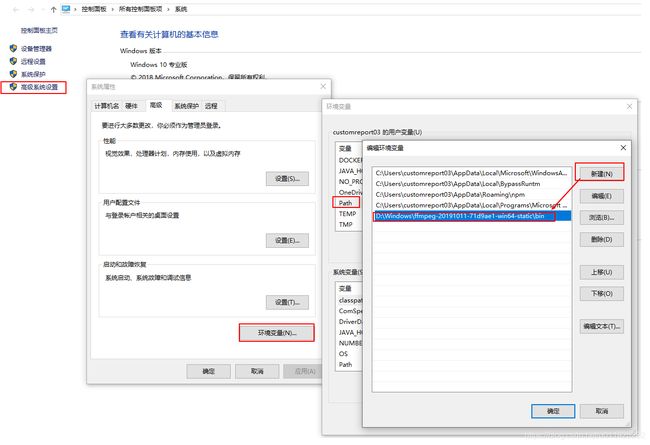
3、找到我的电脑→右击→属性→选择【高级系统设置】-->弹出框中选择【环境变量-】→找到【path】双击→弹出框中选择 【新建】→将复制的bin文件夹的路径粘贴进来点击保存。
4、验证ffmpeg的配置,调用命令行(windows+R输入cmd)输入“ffmpeg –version”,如果出现如下说明配置成功

四、nginx配置
1、下载nginx http://nginx-win.ecsds.eu/download/nginx 1.7.11.3 Gryphon.zip,下载完成后解压到需要盘符, 将解压后的目录 命名为nginx-1.7.11.3-Gryphon
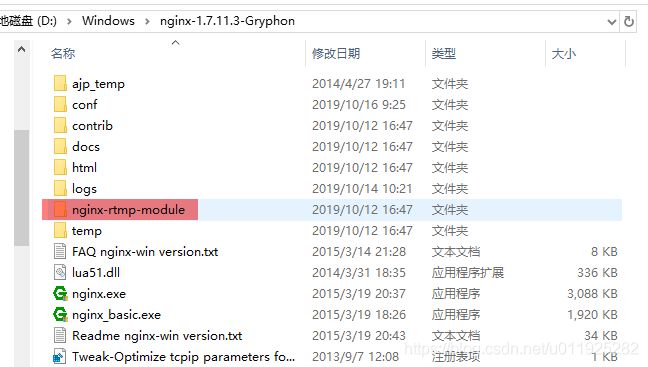
2、下载nginx-rtmp-module插件 https://github.com/arut/nginx-rtmp-module/ 下载完成后解压到刚刚解压的nginx-1.7.11.3-Gryphon目录中
3、配置nginx-1.7.11.3-Gryphon文件下 conf\nginx-win-rtmp.conf 内容:
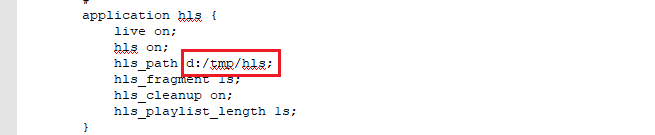
为了降低HLS的延迟,您需要设置此设置hls_fragment和hls_playlist_length,网上很多设置的hls_playlist_length为3秒,我自己验证了一下,HLS延时为5秒左右,改成1s 延时还有3秒左右 如下所示:
application hls {
live on;
hls on;
hls_path d:/tmp/hls;
hls_fragment 1s;
hls_cleanup on;
hls_playlist_length 1s;
}
hls_path:hls 路径路径 设置HLS播放列表和片段目录。 如果目录不存在,它将被创建。
hls_cleanup: on|off 默认是开着的,是否删除列表中已经没有的媒体块
hls_fragment:hls_fragment 片段时间 设置HLS片段长度。 默认为5秒。
hls_playlist_length:hls_playlist_length 时间 设置HLS播放列表长度。 默认为30秒。
解决跨域问题:
location / {
root html;
index index.html index.htm;
add_header Access-Control-Allow-Origin *;
add_header Access-Control-Allow-Headers "Origin, X-Requested-With, Content-Type, Accept";
add_header Access-Control-Allow-Methods "GET, POST, OPTIONS";
}
完整nginx-win-rtmp.conf 内容如下:
#user  nobody;
worker_processes  1;

#error_log  logs/error.log;
#error_log  logs/error.log  notice;
#error_log  logs/error.log  info;

#pid        logs/nginx.pid;


events {
    worker_connections  1024;
}

rtmp{
    server {
        listen 1935;
        chunk_size 4000;

        #RTMP
        application live {
             live on;

             # record first 1K of stream
             record all;
             record_path d:/tmp/av;
             record_max_size 1K;

             # append current timestamp to each flv
             record_unique on;

             # publish only from localhost
             allow publish 127.0.0.1;
             deny publish all;

             #allow play all;
        }

        #HLS
        # For HLS to work please create a directory in tmpfs (/tmp/app here)
        # for the fragments. The directory contents is served via HTTP (see
        # http{} section in config)
        #
        # Incoming stream must be in H264/AAC. For iPhones use baseline H264
        # profile (see ffmpeg example).
        # This example creates RTMP stream from movie ready for HLS:
        #
        # ffmpeg -loglevel verbose -re -i movie.avi  -vcodec libx264
        #    -vprofile baseline -acodec libmp3lame -ar 44100 -ac 1
        #    -f flv rtmp://localhost:1935/hls/movie
        #
        # If you need to transcode live stream use 'exec' feature.
        #
        application hls {
            live on;
            hls on;
            hls_path d:/tmp/hls;
            hls_fragment 1s;
			hls_cleanup on;
			hls_playlist_length 1s;
        }
		application hls2 {
            live on;
            hls on;
            hls_path d:/tmp/hls2;
            hls_fragment 1s;
			hls_cleanup on;
			hls_playlist_length 1s;
        }
		application hls3 {
            live on;
            hls on;
            hls_path d:/tmp/hls3;
            hls_fragment 1s;
			hls_cleanup on;
			hls_playlist_length 1s;
        }
		application hls4 {
            live on;
            hls on;
            hls_path d:/tmp/hls4;
            hls_fragment 1s;
			hls_cleanup on;
			hls_playlist_length 1s;
        }
    }
}

http{
    server {
        listen 8765;
        server_name  localhost;

		#charset koi8-r;

        #access_log  logs/host.access.log  main;

        location / {
            root   html;
            index  index.html index.htm;
            add_header Access-Control-Allow-Origin *;
            add_header Access-Control-Allow-Headers "Origin, X-Requested-With, Content-Type, Accept";
            add_header Access-Control-Allow-Methods "GET, POST, OPTIONS";
        }

        location /hls {
            # Serve HLS fragments
            types {
                application/vnd.apple.mpegurl m3u8;
                video/mp2t ts;
            }
            alias d:/tmp/hls;
            expires -1;
			add_header Cache-Control no-cache;
            add_header Access-Control-Allow-Origin *;
            add_header Access-Control-Allow-Headers "Origin, X-Requested-With, Content-Type, Accept";
            add_header Access-Control-Allow-Methods "GET, POST, OPTIONS";
        }

		location /hls2 {
            # Serve HLS fragments
            types {
                application/vnd.apple.mpegurl m3u8;
                video/mp2t ts;
            }
            alias d:/tmp/hls2;
            expires -1;
			add_header Cache-Control no-cache;
            add_header Access-Control-Allow-Origin *;
            add_header Access-Control-Allow-Headers "Origin, X-Requested-With, Content-Type, Accept";
            add_header Access-Control-Allow-Methods "GET, POST, OPTIONS";
        }
		location /hls3 {
            # Serve HLS fragments
            types {
                application/vnd.apple.mpegurl m3u8;
                video/mp2t ts;
            }
            alias d:/tmp/hls3;
            expires -1;
			add_header Cache-Control no-cache;
            add_header Access-Control-Allow-Origin *;
            add_header Access-Control-Allow-Headers "Origin, X-Requested-With, Content-Type, Accept";
            add_header Access-Control-Allow-Methods "GET, POST, OPTIONS";
        }
		location /hls4 {
            # Serve HLS fragments
            types {
                application/vnd.apple.mpegurl m3u8;
                video/mp2t ts;
            }
            alias d:/tmp/hls4;
            expires -1;
			add_header Cache-Control no-cache;
            add_header Access-Control-Allow-Origin *;
            add_header Access-Control-Allow-Headers "Origin, X-Requested-With, Content-Type, Accept";
            add_header Access-Control-Allow-Methods "GET, POST, OPTIONS";
        }
		location /stat {
            rtmp_stat all;
            rtmp_stat_stylesheet stat.xsl;
       }

       location /stat.xsl {
           root /usr/local/extend_module/nginx-rtmp-module/;
       }

        error_page   500 502 503 504  /50x.html;

        location = /50x.html {
            root   html;
        }

    }
}
4、打开cmd窗口进入nginx-1.7.11.3-Gryphon目录输入【nginx.exe -c conf\nginx-win-rtmp.conf 】 启动命令

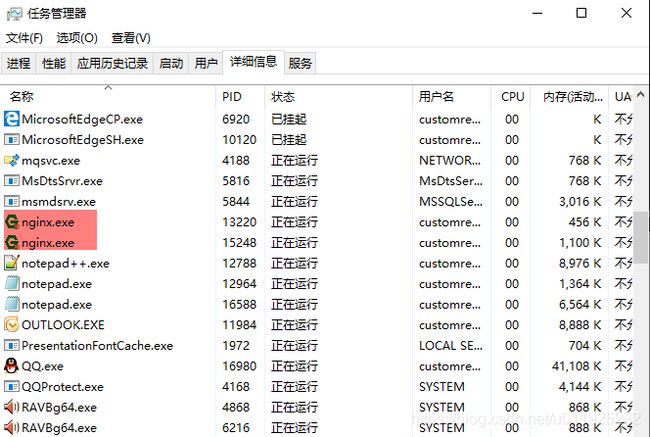
5、打开任务管理器查看nginx服务是否启动,有如下图nginx.exe所示说明已经成功启动。
五、ffmpeg命令推送HLS流
1、打开cmd窗口进入到到ffmpeg.exe目录下,输入ffmpeg命令进行推流
--hls版本
ffmpeg -i rtsp://admin:[email protected]:554/h264/ch4/main/av_stream -fflags flush_packets -max_delay 1 -an -flags -global_header -hls_time 1 -hls_list_size 3 -hls_wrap 3 -vcodec copy -f flv -r 25 -an rtmp://localhost:1935/hls/cctv1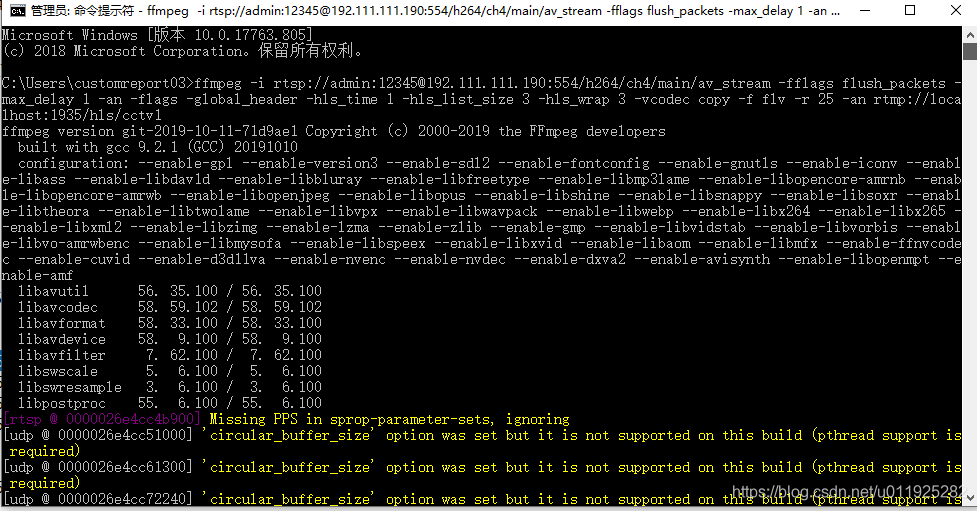
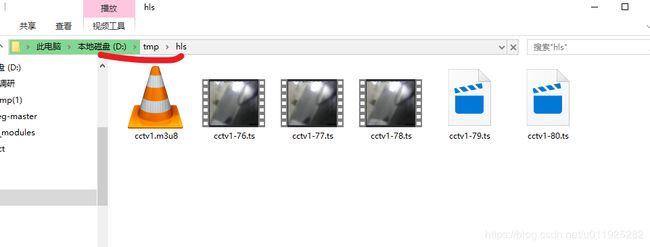
2、根据D:\Windows\nginx-1.7.11.3-Gryphon\conf路径下nginx-win-rtmp.conf的配置信息查找对应的路径看是否生成HLS所需的.ts和.m3u8文件,如果生成说明推流成功
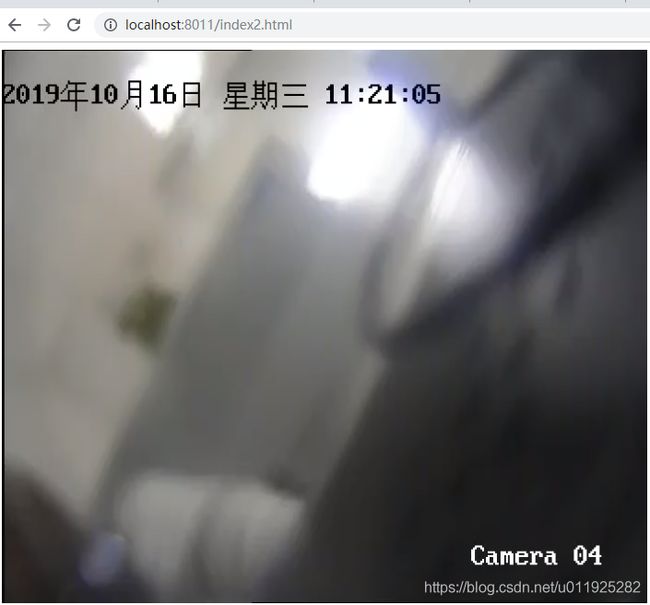
六、谷歌浏览器中,网页播放海康威视摄像头

成功播放~~~