android 开发零起步学习笔记(十一):界面切换+几种常用界面切换效果
两种方法实现界面的切换:
方法1、layout切换(通过setContentView切换layout)
方法2、Activity切换
方法3、Android之fragment点击切换和滑动切换
方法1、layout切换(通过setContentView切换layout)
有以下步骤:
①新建一个界面的layout的xml文件
②触发某一控件(如Button),该控件已经加载监听器,监听器通过setContentView函数切换layout
这样的实现整个过程都是在一个Activity上面实现,所有变量都在同一状态,因此所有变量都可以在这个Activity状态中获得。
代码如下:
[java]
public void onCreate(Bundle savedInstanceState) {
super.onCreate(savedInstanceState);
setContentView(R.layout.main);
Button button = (Button) this.findViewById(R.id.button1);
//给按钮设置监听器
button.setOnClickListener(new OnClickListener() {
@Override
public void onClick(View v) {
//通过调用setContentView函数切换layout
setContentView(R.layout.login);
}
});
}
另一篇《多个layout界面之间的切换》 http://www.cnblogs.com/tt_mc/archive/2010/06/22/1762794.html
方法2、Activity切换 及切换效果
通过转换到另一个Activity,步骤如下
①建一个Activity类
②把该类注册到AndroidManifest.xml,如下
③在原来的Activity上面通过创建Intent类来进行Activity的切换,代码如下
[java]
public void onCreate(Bundle savedInstanceState) {
super.onCreate(savedInstanceState);
setContentView(R.layout.main);
Button button_activity = (Button) this.findViewById(R.id.button2);
button_activity.setOnClickListener(new OnClickListener()){
@Override
public void onClick(View v) {
Intent intent = new Intent(MainActivity.this, LoginActivity.class);
startActivity(intent);
}
});
}
--------------Activity切换的几种方法-----------------------------
1.无参数Activity跳转
Intent it = new Intent(Activity.Main.this, Activity2.class);
startActivity(it);

2.向下一个Activity传递数据(使用Bundle和Intent.putExtras)

Intent it = new Intent(Activity.Main.this, Activity2.class);
Bundle bundle=new Bundle();
bundle.putString("name", "This is from MainActivity!");
it.putExtras(bundle);       // it.putExtra(“test”, "shuju”);
startActivity(it);            // startActivityForResult(it,REQUEST_CODE);

对于数据的获取可以采用:

Bundle bundle=getIntent().getExtras();
String name=bundle.getString("name");

3.向上一个Activity返回结果(使用setResult,针对startActivityForResult(it,REQUEST_CODE)启动的Activity)

        Intent intent=getIntent();
        Bundle bundle2=new Bundle();
        bundle2.putString("name", "This is from ShowMsg!");
        intent.putExtras(bundle2);
        setResult(RESULT_OK, intent);

4.回调上一个Activity的结果处理函数(onActivityResult)

@Override
    protected void onActivityResult(int requestCode, int resultCode, Intent data) {
        // TODO Auto-generated method stub
        super.onActivityResult(requestCode, resultCode, data);
        if (requestCode==REQUEST_CODE){
            if(resultCode==RESULT_CANCELED)
                  setTitle("cancle");
            else if (resultCode==RESULT_OK) {
                 String temp=null;
                 Bundle bundle=data.getExtras();
                 if(bundle!=null)   temp=bundle.getString("name");
                 setTitle(temp);
            }
        }
    }
{它包括两个部分:
一部分是第一个activity退出时的动画;
另外一部分时第二个activity进入时的动画;
在Android的2.0版本之后,有了一个函数来帮我们实现这个动画。这个函数就是overridePendingTransition
@Override
public void onCreate(Bundle savedInstanceState) {
super.onCreate(savedInstanceState);
setContentView(R.layout.SplashScreen);
new Handler().postDelayed(new Runnable() {
@Override
public void run() {
Intent mainIntent = new Intent(SplashScreen.this, AndroidNews.class);
SplashScreen.this.startActivity(mainIntent);
SplashScreen.this.finish();
overridePendingTransition(R.anim.mainfadein,
R.anim.splashfadeout);
}
}, 3000);
}
上面的代码只是闪屏的一部分。
getWindow (). setWindowAnimations ( int );
这可没有上个好但是也可以 。
实现淡入淡出的效果1
overridePendingTransition(R.anim.splash_screen_fade, R.anim.splash_screen_hold);
实现淡入淡出的效果2
由左向右滑入的效果
实现zoomin和zoomout,即类似iphone的进入和退出时的效果
overridePendingTransition(R.anim.zoomin, R.anim.zoomout);
新建zoomin.xml文件
Android:pivotX="50%p" android:pivotY="50%p"
Android:duration="@android:integer/config_mediumAnimTime" />
新建zoomout.xml文件
Android:zAdjustment="top">
Android:pivotX="50%p" android:pivotY="50%p"
Android:duration="@android:integer/config_mediumAnimTime" />
学了一小段时间的Android,主要接触的是UI设计,打交道最多莫过于fragment了吧。在Android3.0引入了fragment的概念后,几乎在所以的Android的应用中都可以看见其身影,已经有很多前辈高人都已经详细介绍过fragmrnt,我这里就不多说什么了。
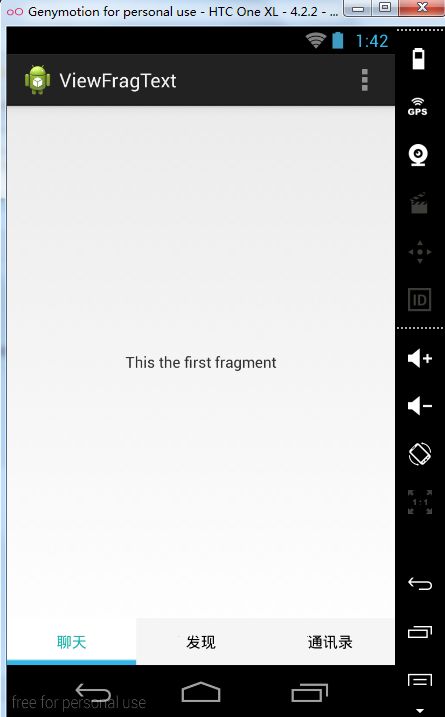
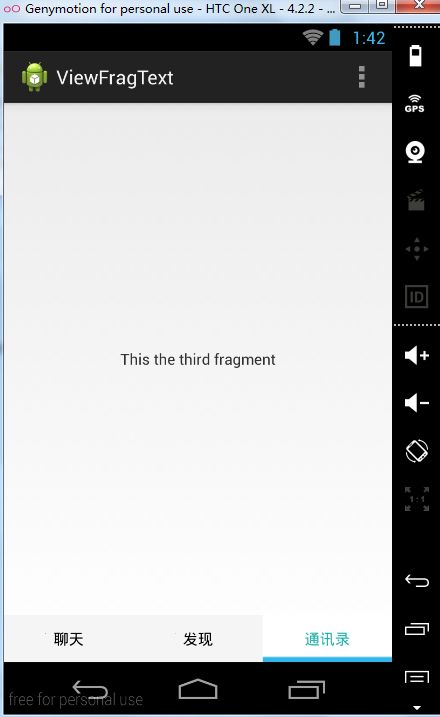
这里本来是想模仿一下微信的切换效果,怎奈水平不足,这里就献丑贴出半成品的代码,希望有大神能指点一下。废话不多说,上代码。先从简单的开始吧,这里是我一共用了3个fragment,这里就只贴出第一个的fragment的布局,别的两个基本一样,比较简朴。
<LinearLayout
    android:layout_width="fill_parent"
    android:layout_height="fill_parent"
    android:orientation="vertical"
    android:gravity="center_horizontal|center_vertical"
     xmlns:android="http://schemas.android.com/apk/res/android">
    <TextView
        android:layout_width="wrap_content"
        android:layout_height="wrap_content"
        android:text="This the first fragment"
        />
接下来的是使用fragment片段,这里也只贴出第一个的。
package com.example.fragments;

import com.example.viewfragtext.R;

import android.os.Bundle;
import android.support.v4.app.Fragment;
import android.view.LayoutInflater;
import android.view.View;
import android.view.ViewGroup;

public class Fragmentone extends Fragment
{
    @Override
    public View onCreateView(LayoutInflater inflater, ViewGroup container,
            Bundle savedInstanceState) {
        // TODO Auto-generated method stub
        return inflater.inflate(R.layout.fragment1, container, false);
    }
}
接下来便要开始实现切换的功能,这里是底部切换组件(tabfoot)的布局。
<LinearLayout
    android:layout_width="fill_parent"
    android:layout_height="44dp"
    android:orientation="horizontal"
    android:background="@drawable/tabfootbg"
    xmlns:android="http://schemas.android.com/apk/res/android">
    <LinearLayout
         android:id="@+id/lay1"
         android:layout_width="match_parent"
         android:layout_height="match_parent"
         android:layout_weight="1"
         style="@style/Linearlayout_Style"
        >
        <TextView
            android:layout_width="wrap_content"
            android:layout_height="wrap_content"
            android:id="@+id/fratext1"
            android:text="@string/chat"
            android:textColor="@color/black"
            />

    <LinearLayout
         android:id="@+id/lay2"
         android:layout_width="match_parent"
         android:layout_height="match_parent"
         android:layout_weight="1"
         style="@style/Linearlayout_Style">
        <TextView
            android:layout_width="wrap_content"
            android:layout_height="wrap_content"
            android:id="@+id/fratext2"
            android:text="@string/find"
            android:textColor="@color/black"/>

    <LinearLayout
         android:id="@+id/lay3"
         android:layout_width="match_parent"
         android:layout_height="match_parent"
         android:layout_weight="1"
         style="@style/Linearlayout_Style">
         <TextView
            android:layout_width="wrap_content"
            android:layout_height="wrap_content"
            android:id="@+id/fratext3"
            android:text="@string/tongxunlu"
            android:textColor="@color/black"/>
这里分别是自定义的style和color的代码。
#20b2aa
#000000
别的设计都完成了,马上对应的是MainActivity的设计,这是其布局
<LinearLayout
    android:layout_width="fill_parent"
    android:layout_height="fill_parent"
    android:orientation="vertical"
    xmlns:android="http://schemas.android.com/apk/res/android">


    <fragment
        android:name="com.example.fragments.Fragmentone"
        android:id="@+id/fragment1"
        android:layout_height="0dp"
        android:layout_weight="1.0"
        android:layout_width="fill_parent"
        />
     <fragment
        android:name="com.example.fragments.Fragmenttwo"
        android:id="@+id/fragment2"
        android:layout_height="0dp"
        android:layout_weight="1.0"
        android:layout_width="fill_parent"
        />
         <fragment
        android:name="com.example.fragments.Fragmentthree"
        android:id="@+id/fragment3"
        android:layout_height="0dp"
        android:layout_weight="1.0"
        android:layout_width="fill_parent"

        />
最后遍是实现在主活动中实现点击底部切换和滑动的换的功能。这里滑动功能我是采用手势(Gesture)实现的。
  1 package com.example.viewfragtext;
  2
  3 import android.os.Bundle;
  4 import android.support.v4.app.Fragment;
  5 import android.support.v4.app.FragmentActivity;
  6 import android.view.GestureDetector;
  7 import android.view.GestureDetector.OnGestureListener;
  8 import android.view.Menu;
  9 import android.view.MotionEvent;
 10 import android.view.View;
 11 import android.widget.LinearLayout;
 12 import android.widget.TextView;
 13
 14 public class MainActivity extends FragmentActivity implements OnGestureListener
 15 {
 16     public static Fragment[] fragments;
 17     public static LinearLayout[] linearLayouts;
 18     public static TextView[] textViews;
 19     /**定义手势检测实例*/
 20     public static GestureDetector detector;
 21     /**做标签,记录当前是哪个fragment*/
 22     public int MARK=0;
 23     /**定义手势两点之间的最小距离*/
 24     final int DISTANT=50;
 25
 26
 27     @Override
 28     protected void onCreate(Bundle savedInstanceState) {
 29         super.onCreate(savedInstanceState);
 30         setContentView(R.layout.activity_main);
 31         //分别实例化和初始化fragement、lineatlayout、textview
 32         setfragment();
 33         setlinearLayouts();
 34         settextview();
 35         //创建手势检测器
 36         detector=new GestureDetector(this);
 37
 38     }
 39
 40     @Override
 41     public boolean onCreateOptionsMenu(Menu menu) {
 42         // Inflate the menu; this adds items to the action bar if it is present.
 43         getMenuInflater().inflate(R.menu.main, menu);
 44         return true;
 45     }
 46     /**初始化fragment*/
 47     public void setfragment()
 48     {
 49         fragments=new Fragment[3];
 50         fragments[0]=getSupportFragmentManager().findFragmentById(R.id.fragment1);
 51         fragments[1]=getSupportFragmentManager().findFragmentById(R.id.fragment2);
 52         fragments[2]=getSupportFragmentManager().findFragmentById(R.id.fragment3);
 53         getSupportFragmentManager().beginTransaction().hide(fragments[0]).hide(fragments[1]).hide(fragments[2])
 54         .show(fragments[0]).commit();
 55
 56     }
 57      /**初始化linerlayout*/
 58     public void setlinearLayouts()
 59     {
 60         linearLayouts=new LinearLayout[3];
 61         linearLayouts[0]=(LinearLayout)findViewById(R.id.lay1);
 62         linearLayouts[1]=(LinearLayout)findViewById(R.id.lay2);
 63         linearLayouts[2]=(LinearLayout)findViewById(R.id.lay3);
 64         linearLayouts[0].setBackgroundResource(R.drawable.lay_select_bg);
 65     }
 66      /**初始化textview*/
 67     public void settextview()
 68     {
 69         textViews=new TextView[3];
 70         textViews[0]=(TextView)findViewById(R.id.fratext1);
 71         textViews[1]=(TextView)findViewById(R.id.fratext2);
 72         textViews[2]=(TextView)findViewById(R.id.fratext3);
 73         textViews[0].setTextColor(getResources().getColor(R.color.lightseagreen));
 74     }
 75     /**点击底部linerlayout实现切换fragment的效果*/
 76     public void LayoutOnclick(View v)
 77     {
 78         resetlaybg();//每次点击都重置linearLayouts的背景、textViews字体颜色
 79         switch (v.getId()) {
 80         case R.id.lay1:
 81              getSupportFragmentManager().beginTransaction().hide(fragments[0]).hide(fragments[1]).hide(fragments[2])
 82                 .show(fragments[0]).commit();
 83             linearLayouts[0].setBackgroundResource(R.drawable.lay_select_bg);
 84             textViews[0].setTextColor(getResources().getColor(R.color.lightseagreen));
 85             MARK=0;
 86             break;
 87
 88         case R.id.lay2:
 89             getSupportFragmentManager().beginTransaction().hide(fragments[0]).hide(fragments[1]).hide(fragments[2])
 90             .show(fragments[1]).commit();
 91             linearLayouts[1].setBackgroundResource(R.drawable.lay_select_bg);
 92             textViews[1].setTextColor(getResources().getColor(R.color.lightseagreen));
 93             MARK=1;
 94             break;
 95         case R.id.lay3:
 96             getSupportFragmentManager().beginTransaction().hide(fragments[0]).hide(fragments[1]).hide(fragments[2])
 97             .show(fragments[2]).commit();
 98             linearLayouts[2].setBackgroundResource(R.drawable.lay_select_bg);
 99             textViews[2].setTextColor(getResources().getColor(R.color.lightseagreen));
100             MARK=2;
101         break;
102         default:
103             break;
104         }
105     }
106     /**重置linearLayouts、textViews*/
107     public void resetlaybg()
108     {
109         for(int i=0;i<3;i++)
110         {
111             linearLayouts[i].setBackgroundResource(R.drawable.tabfootbg);
112             textViews[i].setTextColor(getResources().getColor(R.color.black));
113         }
114
115     }
116
117     @Override
118     public boolean onTouchEvent(MotionEvent event) {
119         // TODO Auto-generated method stub
120         //将该Activity上触碰事件交给GestureDetector处理
121         return detector.onTouchEvent(event);
122     }
123     @Override
124     public boolean onDown(MotionEvent arg0) {
125         // TODO Auto-generated method stub
126         return false;
127     }
128
129     /**滑动切换效果的实现*/
130     @Override
131     public boolean onFling(MotionEvent arg0, MotionEvent arg1, float arg2,
132             float arg3) {
133         // TODO Auto-generated method stub
134         resetlaybg();
135         //当是Fragment0的时候
136         if(MARK==0)
137         {
138             if(arg1.getX()>arg0.getX()+DISTANT)
139             {
140                 getSupportFragmentManager().beginTransaction().hide(fragments[0]).hide(fragments[1]).hide(fragments[2])
141                 .show(fragments[1]).commit();
142                 linearLayouts[1].setBackgroundResource(R.drawable.lay_select_bg);
143                 textViews[1].setTextColor(getResources().getColor(R.color.lightseagreen));
144                 MARK=1;
145             }
146             else
147             {
148                 linearLayouts[0].setBackgroundResource(R.drawable.lay_select_bg);
149                 textViews[0].setTextColor(getResources().getColor(R.color.black));
150             }
151
152         }
153         //当是Fragment1的时候
154         else if (MARK==1)
155         {
156             if(arg1.getX()>arg0.getX()+DISTANT)
157             {
158                 getSupportFragmentManager().beginTransaction().hide(fragments[0]).hide(fragments[1]).hide(fragments[2])
159                 .show(fragments[2]).commit();
160                 linearLayouts[2].setBackgroundResource(R.drawable.lay_select_bg);
161                 textViews[2].setTextColor(getResources().getColor(R.color.lightseagreen));
162                 MARK=2;
163             }
164             else if(arg0.getX()>arg1.getX()+DISTANT)
165             {
166                 getSupportFragmentManager().beginTransaction().hide(fragments[0]).hide(fragments[1]).hide(fragments[2])
167                 .show(fragments[0]).commit();
168                 linearLayouts[0].setBackgroundResource(R.drawable.lay_select_bg);
169                 textViews[0].setTextColor(getResources().getColor(R.color.lightseagreen));
170                 MARK=0;
171             }
172             else
173             {
174               linearLayouts[1].setBackgroundResource(R.drawable.lay_select_bg);
175                 textViews[1].setTextColor(getResources().getColor(R.color.black));
176             }
177         }
178         //当是Fragment2的时候
179         else if(MARK==2)
180         {
181             if(arg0.getX()>arg1.getX()+DISTANT)
182             {
183              getSupportFragmentManager().beginTransaction().hide(fragments[0]).hide(fragments[1]).hide(fragments[2])
184              .show(fragments[1]).commit();
185              linearLayouts[1].setBackgroundResource(R.drawable.lay_select_bg);
186                 textViews[1].setTextColor(getResources().getColor(R.color.lightseagreen));
187              MARK=1;
188             }
189             else
190             {
191              linearLayouts[2].setBackgroundResource(R.drawable.lay_select_bg);
192                 textViews[2].setTextColor(getResources().getColor(R.color.black));
193             }
194         }
195         return false;
196     }
197
198     @Override
199     public void onLongPress(MotionEvent arg0) {
200         // TODO Auto-generated method stub
201
202     }
203
204     @Override
205     public boolean onScroll(MotionEvent arg0, MotionEvent arg1, float arg2,
206             float arg3) {
207         // TODO Auto-generated method stub
208         return false;
209     }
210
211     @Override
212     public void onShowPress(MotionEvent arg0) {
213         // TODO Auto-generated method stub
214
215     }
216
217     @Override
218     public boolean onSingleTapUp(MotionEvent arg0) {
219         // TODO Auto-generated method stub
220         return false;
221     }
222
223 }
最后的效果图
转载请注明出处:http://www.cnblogs.com/zhrxidian/p/3801545.html
Android页面切换方法和区别
通用的页面跳转方法有两种:
1、Intent
Intent适合Activity与Activity之间的跳转,按返回键可以直接返回前一页面
缺点:需要到Manifest注册Activity
2、setContentView
适合同一Activity里的不同View之间跳转
优点:按返回键不会返回到前一页面,需要自己添加按键监听代码来实现
只切换Layout运行速度会快点,因为启动activity是最耗时的。
数据传递也简单,不用Intent.setExtra之类的。
缺点是所有控件的事件处理、加载之类的操作全集中由activity管理,拆分不够清晰
import android.app.Activity;
import android.content.Intent;
import android.os.Bundle;
import android.view.KeyEvent;
import android.view.View;
import android.view.View.OnClickListener;
import android.widget.*;

public class IntentTest extends Activity {

private LinearLayout mainView=null;
private Button button1=null;
private Button button2=null;

private LinearLayout layout=null;
private TextView tv=null;

/*
     * 由于setContentVeiw()函数返回是void,系统中没有提供获取当前View的函数
     * 所以此处添加一个整形变量用来指示当前View的id
*/
private int currentViewId;

public void onCreate(Bundle savedInstanceState) {
super.onCreate(savedInstanceState);
//tv初始化
        tv=new TextView(this);
        tv.setText("这是layout里面的tv");
//layout初始化
        layout=new LinearLayout(this);
        layout.setId(100);//这里需要指定id,否则默认的id会和mainView一样,都是-1
        layout.setLayoutParams(new LinearLayout.LayoutParams(-1,-1));
        layout.addView(tv);
//button1初始化
        button1=new Button(this);
        button1.setLayoutParams(new LinearLayout.LayoutParams(-2,-2));
        button1.setText("Intent方式跳转");
        button1.setOnClickListener(new OnClickListener(){
public void onClick(View v) {
/*此处用Intent来实现Activity与Activity之间的跳转*/
                Intent intent=new Intent();
                intent.setClass(IntentTest.this,MyActivity.class);
//Intent intent=new Intent(IntentTest.this,MyActivity.class);
                startActivity(intent);
            }
        });
//button2初始化
        button2=new Button(this);
        button2.setLayoutParams(new LinearLayout.LayoutParams(-2,-2));
        button2.setText("setContentView方式跳转");
        button2.setOnClickListener(new OnClickListener(){
public void onClick(View v) {
//此处用setContentView方式来实现统一Activity不同View跳转
                setCurrentView(layout);
            }
        });
//mianView初始化
        mainView=new LinearLayout(this);
        mainView.setId(1000);//指定id
        mainView.setLayoutParams(new LinearLayout.LayoutParams(-1,-1));
        mainView.setOrientation(LinearLayout.VERTICAL);
        mainView.addView(button1);
        mainView.addView(button2);
//显示mainView
        setCurrentView(mainView);
    }

/*
     * 这里重写onKeyDown()函数,实现返回键的监听
     * 如果通过显示的View对keyListener进行监听,则返回键监听不到
     * 所以此处是通过在Activity里面重写onKeyDown()函数来实现监听
     * 此处如果不拦截监听的话,在显示layout后按返回键则直接执行退出程序
*/
public boolean onKeyDown(int keyCode, KeyEvent event) {
if (keyCode == KeyEvent.KEYCODE_BACK) {
if(currentViewId==layout.getId()){
                setCurrentView(mainView);
            }else{
                System.exit(0);
            }
return false;
        }
return false;
    }

/*自定义函数setCurrentView()*/
public void setCurrentView(View view){
        currentViewId=view.getId();
//此处用setContentView方式来实现统一Activity不同View跳转
        setContentView(view);
    }
}
import android.app.Activity;
import android.os.Bundle;
import android.widget.TextView;

public class MyActivity extends Activity{
public void onCreate(Bundle savedInstanceState) {
super.onCreate(savedInstanceState);
        TextView tv=new TextView(this);
        tv.setText("我是MyActivity里的tv");
        setContentView(tv);
    }
}


