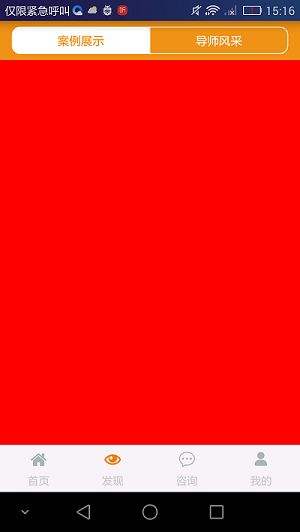
android仿ios实现分段选择控件UISegmentedControl
在ios7中有一种扁平风格的控件叫做分段选择控件UISegmentedControl,控件上横放或竖放着几个被简单线条隔开的按钮,每次点击能切换不同的按钮和按钮所对应的界面,比如qq客户端V6.5.3版本中消息页与电话页分离就是用的这种原理。但是很可惜的是Android系统并没有自带这种控件,不过我们也可以通过自定义RadioGroup实现该类效果,幸运的是Github上已有开源:https://github.com/Kaopiz/android-segmented-control
实现步骤如下:
第一步,在as中导入依赖:
dependencies {
compile ‘info.hoang8f:android-segmented:1.0.6’
}
第二步,在布局中引用控件:
<LinearLayout xmlns:android="http://schemas.android.com/apk/res/android"
    xmlns:segmentedgroup="http://schemas.android.com/apk/res-auto"
    android:layout_width="match_parent"
    android:layout_height="match_parent"
    android:orientation="vertical">


    <RelativeLayout
        android:layout_width="match_parent"
        android:layout_height="@dimen/dimenActionBarHeight"
        android:background="@color/colorActionbar"
        android:gravity="center"
        android:minHeight="40dp">

        <info.hoang8f.android.segmented.SegmentedGroup
            android:id="@+id/mSegmentedGroup"
            android:layout_width="match_parent"
            android:layout_height="wrap_content"
            android:layout_marginLeft="14dp"
            android:layout_marginRight="14dp"
            android:gravity="center_vertical"
            android:orientation="horizontal"
            segmentedgroup:sc_border_width="1dp"
            segmentedgroup:sc_checked_text_color="@color/colorActionbar"
            segmentedgroup:sc_corner_radius="10dp"
            segmentedgroup:sc_tint_color="@color/colorWhite">

            <RadioButton
                android:id="@+id/radioButtonOne"
                style="@style/RadioButton"
                android:layout_width="0dp"
                android:layout_height="wrap_content"
                android:layout_weight="1"
                android:text="案例展示" />

            <RadioButton
                android:id="@+id/radioButtonTwo"
                style="@style/RadioButton"
                android:layout_width="0dp"
                android:layout_height="wrap_content"
                android:layout_weight="1"
                android:text="导师风采" />
        info.hoang8f.android.segmented.SegmentedGroup>
    RelativeLayout>


    <FrameLayout
        android:id="@+id/foundFrameLayout"
        android:layout_width="match_parent"
        android:layout_height="match_parent" />

LinearLayout>
第三步,在代码中绑定碎片(Fragment):
public class FoundActivity extends AppCompatActivity implements RadioGroup.OnCheckedChangeListener{

    private SegmentedGroup mSegmentedGroup;
    private RadioButton radioButtonOne, radioButtonTwo;

    @Override
    protected void onCreate(Bundle savedInstanceState) {
        super.onCreate(savedInstanceState);
        setContentView(R.layout.activity_found);

        initWidget();//初始化组件
        initData();//初始化数据
        initEvent();//初始化是事件

    }

    private void initEvent() {
        radioButtonOne.setChecked(true);//默认选择第一个(案例展示碎片)
    }

    private void initData() {
    }

    private void initWidget() {
        mSegmentedGroup = (SegmentedGroup) findViewById(R.id.mSegmentedGroup);//控件组
        radioButtonOne = (RadioButton) findViewById(R.id.radioButtonOne);//单选按钮一
        radioButtonTwo = (RadioButton) findViewById(R.id.radioButtonTwo);//单选按钮二

        mSegmentedGroup.setTintColor(Color.WHITE);//设置默认线条颜色及背景色
        mSegmentedGroup.setOnCheckedChangeListener(this);//绑定单选按钮选择监听

    }

    @Override
    public void onCheckedChanged(RadioGroup group, int checkedId) {
        switch (checkedId) {
            case R.id.radioButtonOne:
                FragmentManager fm = this.getSupportFragmentManager();//获得碎片管理器
                FragmentTransaction tr = fm.beginTransaction();//Transaction事物
                //将fragment碎片添加到对应的帧布局中
                tr.replace(R.id.foundFrameLayout, new CaseShowFragment());//案例展示碎片
                tr.commit();//提交
                break;
            case R.id.radioButtonTwo:
                FragmentManager fm2 = this.getSupportFragmentManager();
                FragmentTransaction tr2 = fm2.beginTransaction();
                tr2.replace(R.id.foundFrameLayout, new TutorStyleFragment());//导师咨询碎片
                tr2.commit();
                break;
        }
    }
}
好了,代码写到这里相信就已经达到了我们想要的效果,是不是很开ing呢?,哈哈,休息之余,不要忘记看看源码哦:
第四步,自定义RadioGroup源码分析:
public class SegmentedGroup extends RadioGroup {
    private int mMarginDp;
    private Resources resources = this.getResources();
    private int mTintColor;
    private int mCheckedTextColor = -1;
    private SegmentedGroup.LayoutSelector mLayoutSelector;
    private Float mCornerRadius;

    public SegmentedGroup(Context context) {
        super(context);
        this.mTintColor = this.resources.getColor(color.radio_button_selected_color);
        this.mMarginDp = (int)this.getResources().getDimension(dimen.radio_button_stroke_border);
        this.mCornerRadius = Float.valueOf(this.getResources().getDimension(dimen.radio_button_conner_radius));
        this.mLayoutSelector = new SegmentedGroup.LayoutSelector(this.mCornerRadius.floatValue());
    }

    private void initAttrs(AttributeSet attrs) {
        TypedArray typedArray = this.getContext().getTheme().obtainStyledAttributes(attrs, styleable.SegmentedGroup, 0, 0);

        try {
            this.mMarginDp = (int)typedArray.getDimension(styleable.SegmentedGroup_sc_border_width, this.getResources().getDimension(dimen.radio_button_stroke_border));
            this.mCornerRadius = Float.valueOf(typedArray.getDimension(styleable.SegmentedGroup_sc_corner_radius, this.getResources().getDimension(dimen.radio_button_conner_radius)));
            this.mTintColor = typedArray.getColor(styleable.SegmentedGroup_sc_tint_color, this.getResources().getColor(color.radio_button_selected_color));
            this.mCheckedTextColor = typedArray.getColor(styleable.SegmentedGroup_sc_checked_text_color, this.getResources().getColor(17170443));
        } finally {
            typedArray.recycle();
        }

    }

    public SegmentedGroup(Context context, AttributeSet attrs) {
        super(context, attrs);
        this.mTintColor = this.resources.getColor(color.radio_button_selected_color);
        this.mMarginDp = (int)this.getResources().getDimension(dimen.radio_button_stroke_border);
        this.mCornerRadius = Float.valueOf(this.getResources().getDimension(dimen.radio_button_conner_radius));
        this.initAttrs(attrs);
        this.mLayoutSelector = new SegmentedGroup.LayoutSelector(this.mCornerRadius.floatValue());
    }

    protected void onFinishInflate() {
        super.onFinishInflate();
        this.updateBackground();
    }

    public void setTintColor(int tintColor) {
        this.mTintColor = tintColor;
        this.updateBackground();
    }

    public void setTintColor(int tintColor, int checkedTextColor) {
        this.mTintColor = tintColor;
        this.mCheckedTextColor = checkedTextColor;
        this.updateBackground();
    }

    public void updateBackground() {
        int count = super.getChildCount();

        for(int i = 0; i < count; ++i) {
            View child = this.getChildAt(i);
            this.updateBackground(child);
            if(i == count - 1) {
                break;
            }

            LayoutParams initParams = (LayoutParams)child.getLayoutParams();
            LayoutParams params = new LayoutParams(initParams.width, initParams.height, initParams.weight);
            if(this.getOrientation() == 0) {
                params.setMargins(0, 0, -this.mMarginDp, 0);
            } else {
                params.setMargins(0, 0, 0, -this.mMarginDp);
            }

            child.setLayoutParams(params);
        }

    }

    private void updateBackground(View view) {
        int checked = this.mLayoutSelector.getSelected();
        int unchecked = this.mLayoutSelector.getUnselected();
        ColorStateList colorStateList = new ColorStateList(new int[][]{{16842919}, {-16842919, -16842912}, {-16842919, 16842912}}, new int[]{-7829368, this.mTintColor, this.mCheckedTextColor});
        ((Button)view).setTextColor(colorStateList);
        Drawable checkedDrawable = this.resources.getDrawable(checked).mutate();
        Drawable uncheckedDrawable = this.resources.getDrawable(unchecked).mutate();
        ((GradientDrawable)checkedDrawable).setColor(this.mTintColor);
        ((GradientDrawable)checkedDrawable).setStroke(this.mMarginDp, this.mTintColor);
        ((GradientDrawable)uncheckedDrawable).setStroke(this.mMarginDp, this.mTintColor);
        ((GradientDrawable)checkedDrawable).setCornerRadii(this.mLayoutSelector.getChildRadii(view));
        ((GradientDrawable)uncheckedDrawable).setCornerRadii(this.mLayoutSelector.getChildRadii(view));
        StateListDrawable stateListDrawable = new StateListDrawable();
        stateListDrawable.addState(new int[]{-16842912}, uncheckedDrawable);
        stateListDrawable.addState(new int[]{16842912}, checkedDrawable);
        if(VERSION.SDK_INT >= 16) {
            view.setBackground(stateListDrawable);
        } else {
            view.setBackgroundDrawable(stateListDrawable);
        }

    }

    private class LayoutSelector {
        private int children;
        private int child;
        private final int SELECTED_LAYOUT;
        private final int UNSELECTED_LAYOUT;
        private float r;
        private final float r1;
        private final float[] rLeft;
        private final float[] rRight;
        private final float[] rMiddle;
        private final float[] rDefault;
        private final float[] rTop;
        private final float[] rBot;
        private float[] radii;

        public LayoutSelector(float cornerRadius) {
            this.SELECTED_LAYOUT = drawable.radio_checked;
            this.UNSELECTED_LAYOUT = drawable.radio_unchecked;
            this.r1 = TypedValue.applyDimension(1, 0.1F, SegmentedGroup.this.getResources().getDisplayMetrics());
            this.children = -1;
            this.child = -1;
            this.r = cornerRadius;
            this.rLeft = new float[]{this.r, this.r, this.r1, this.r1, this.r1, this.r1, this.r, this.r};
            this.rRight = new float[]{this.r1, this.r1, this.r, this.r, this.r, this.r, this.r1, this.r1};
            this.rMiddle = new float[]{this.r1, this.r1, this.r1, this.r1, this.r1, this.r1, this.r1, this.r1};
            this.rDefault = new float[]{this.r, this.r, this.r, this.r, this.r, this.r, this.r, this.r};
            this.rTop = new float[]{this.r, this.r, this.r, this.r, this.r1, this.r1, this.r1, this.r1};
            this.rBot = new float[]{this.r1, this.r1, this.r1, this.r1, this.r, this.r, this.r, this.r};
        }

        private int getChildren() {
            return SegmentedGroup.this.getChildCount();
        }

        private int getChildIndex(View view) {
            return SegmentedGroup.this.indexOfChild(view);
        }

        private void setChildRadii(int newChildren, int newChild) {
            if(this.children != newChildren || this.child != newChild) {
                this.children = newChildren;
                this.child = newChild;
                if(this.children == 1) {
                    this.radii = this.rDefault;
                } else if(this.child == 0) {
                    this.radii = SegmentedGroup.this.getOrientation() == 0?this.rLeft:this.rTop;
                } else if(this.child == this.children - 1) {
                    this.radii = SegmentedGroup.this.getOrientation() == 0?this.rRight:this.rBot;
                } else {
                    this.radii = this.rMiddle;
                }

            }
        }

        public int getSelected() {
            return this.SELECTED_LAYOUT;
        }

        public int getUnselected() {
            return this.UNSELECTED_LAYOUT;
        }

        public float[] getChildRadii(View view) {
            int newChildren = this.getChildren();
            int newChild = this.getChildIndex(view);
            this.setChildRadii(newChildren, newChild);
            return this.radii;
        }
    }
}
第五步,效果图:
