PaddleHub实战——人像美颜
文章目录
- 环境
- 一、加载待美颜图片,检测关键点
- 二、实现美颜方法
- 1. 瘦脸
- 2. 大眼
- 3. 红唇
- 4. 美白
- 项目地址
随着AI时代的进步,如今各式各类的美颜相机出现在大众面前。今天作者带领大家深入了解下AI美颜的背后技术原理。
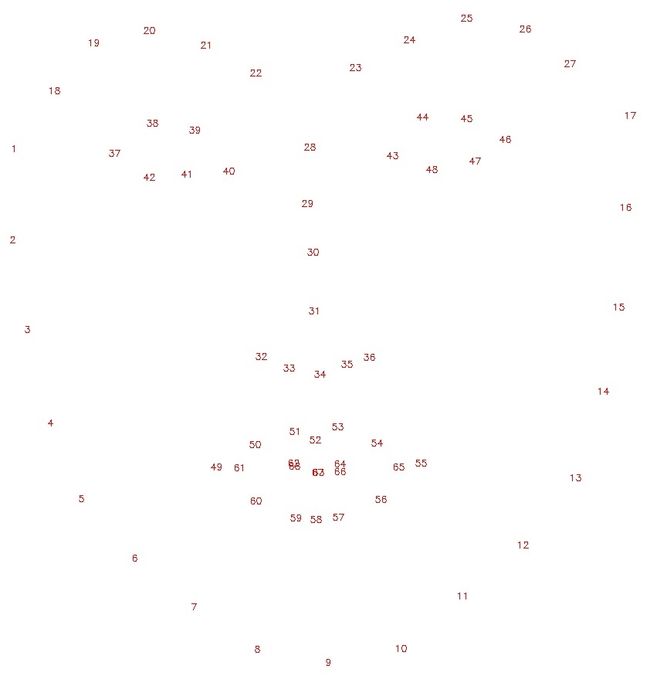
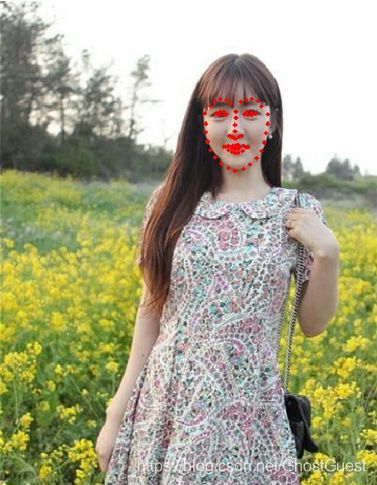
AI美颜核心技术之一就是人脸关键点检测。PaddleHub已经开源了人脸关键点检测模型face_landmark_localization。人脸关键点检测是人脸识别和分析领域中的关键一步,它是诸如自动人脸识别、表情分析、三维人脸重建及三维动画等其它人脸相关问题的前提和突破口。该模型转换自 https://github.com/lsy17096535/face-landmark ,支持同一张图中的多个人脸检测。它可以识别人脸中的68个关键点。
那么如何利用人脸关键点检测模型完成美颜功能呢?
环境
百度云端环境(免费):AI Studio
框架:PaddleHub
语言:Python3.7
一、加载待美颜图片,检测关键点
以教程中的示例图片为例展示检测到的人脸关键点。
NOTE:在运行本教程代码时,由于本代码示例是效果叠加的演示,美颜效果叠加代码请勿重复运行,否则出现怪异的图片展示属于正常情况。
import cv2
import paddlehub as hub
import matplotlib.pyplot as plt
import matplotlib.image as mpimg
import numpy as np
import math

src_img = cv2.imread('./test_sample.jpg')

module = hub.Module(name="face_landmark_localization")
result = module.keypoint_detection(images=[src_img])

tmp_img = src_img.copy()
for index, point in enumerate(result[0]['data'][0]):
   # cv2.putText(img, str(index), (int(point[0]), int(point[1])), cv2.FONT_HERSHEY_COMPLEX, 3, (0,0,255), -1)
   cv2.circle(tmp_img, (int(point[0]), int(point[1])), 2, (0, 0, 255), -1)

res_img_path = 'face_landmark.jpg'
cv2.imwrite(res_img_path, tmp_img)

img = mpimg.imread(res_img_path)
# 展示预测68个关键点结果
plt.figure(figsize=(10,10))
plt.imshow(img)
plt.axis('off')
plt.show()
[2020-04-17 00:39:19,108] [ INFO] - Installing face_landmark_localization module
[2020-04-17 00:39:19,110] [ INFO] - Module face_landmark_localization already installed in /home/aistudio/.paddlehub/modules/face_landmark_localization
[2020-04-17 00:39:19,111] [ INFO] - Installing ultra_light_fast_generic_face_detector_1mb_640 module
[2020-04-17 00:39:19,144] [ INFO] - Module ultra_light_fast_generic_face_detector_1mb_640 already installed in /home/aistudio/.paddlehub/modules/ultra_light_fast_generic_face_detector_1mb_640
二、实现美颜方法
1. 瘦脸
首先介绍如何利用识别到的68个关键点完成瘦脸功能。 利用其中3号点到5号点距离作为瘦左脸距离,13号点到15号点距离作为瘦右脸距离。同时利用局部平移算法完成瘦脸.
def thin_face(image, face_landmark):
    """
    实现自动人像瘦脸
    image: 人像图片
    face_landmark: 人脸关键点
    """
    end_point = face_landmark[30]

    # 瘦左脸,3号点到5号点的距离作为瘦脸距离
    dist_left = np.linalg.norm(face_landmark[3] - face_landmark[5])
    image = local_traslation_warp(image, face_landmark[3], end_point, dist_left)

    # 瘦右脸,13号点到15号点的距离作为瘦脸距离
    dist_right = np.linalg.norm(face_landmark[13] - face_landmark[15])
    image = local_traslation_warp(image, face_landmark[13], end_point, dist_right)
    return image
def local_traslation_warp(image, start_point, end_point, radius):
"""
局部平移算法
"""
radius_square = math.pow(radius, 2)
image_cp = image.copy()
dist_se = math.pow(np.linalg.norm(end_point - start_point), 2)
height, width, channel = image.shape
for i in range(width):
for j in range(height):
# 计算该点是否在形变圆的范围之内
# 优化,第一步,直接判断是会在(start_point[0], start_point[1])的矩阵框中
if math.fabs(i - start_point[0]) > radius and math.fabs(j - start_point[1]) > radius:
continue
distance = (i - start_point[0]) * (i - start_point[0]) + (j - start_point[1]) * (j - start_point[1])
if (distance < radius_square):
# 计算出(i,j)坐标的原坐标
# 计算公式中右边平方号里的部分
ratio = (radius_square - distance) / (radius_square - distance + dist_se)
ratio = ratio * ratio
# 映射原位置
new_x = i - ratio * (end_point[0] - start_point[0])
new_y = j - ratio * (end_point[1] - start_point[1])
new_x = new_x if new_x >=0 else 0
new_x = new_x if new_x < height-1 else height-2
new_y = new_y if new_y >= 0 else 0
new_y = new_y if new_y < width-1 else width-2.4
# 根据双线性插值法得到new_x, new_y的值
image_cp[j, i] = bilinear_insert(image, new_x, new_y)
return image_cp
def bilinear_insert(image, new_x, new_y):
"""
双线性插值法
"""
w, h, c = image.shape
if c == 3:
x1 = int(new_x)
x2 = x1 + 1
y1 = int(new_y)
y2 = y1 + 1
part1 = image[y1, x1].astype(np.float) * (float(x2) - new_x) * (float(y2) - new_y)
part2 = image[y1, x2].astype(np.float) * (new_x - float(x1)) * (float(y2) - new_y)
part3 = image[y2, x1].astype(np.float) * (float(x2) - new_x) * (new_y - float(y1))
part4 = image[y2, x2].astype(np.float) * (new_x - float(x1)) * (new_y - float(y1))
insertValue = part1 + part2 + part3 + part4
return insertValue.astype(np.int8)face_landmark = np.array(result[0]['data'][0], dtype='int')
src_img = thin_face(src_img, face_landmark)
res_img_path = 'res.jpg'
cv2.imwrite(res_img_path, src_img)
img = mpimg.imread(res_img_path)
# 展示瘦脸图片
plt.figure(figsize=(10,10))
plt.imshow(img)
plt.axis('off')
plt.show()2. 大眼
完成瘦脸之后,我们还可以对人像中的眼睛进行放大。在识别到的左右眼中的一个位置,对其进行缩放(图像局部缩放),实现大眼。
def enlarge_eyes(image, face_landmark, radius=15, strength=10):
    """
    放大眼睛
    image: 人像图片
    face_landmark: 人脸关键点
    radius: 眼睛放大范围半径
    strength:眼睛放大程度
    """
    # 以左眼最低点和最高点之间的中点为圆心
    left_eye_top = face_landmark[37]
    left_eye_bottom = face_landmark[41]
    left_eye_center = (left_eye_top + left_eye_bottom)/2
    # 以右眼最低点和最高点之间的中点为圆心
    right_eye_top = face_landmark[43]
    right_eye_bottom = face_landmark[47]
    right_eye_center = (right_eye_top + right_eye_bottom)/2

    # 放大双眼
    local_zoom_warp(image, left_eye_center, radius=radius, strength=strength)
    local_zoom_warp(image, right_eye_center, radius=radius, strength=strength)
def local_zoom_warp(image, point, radius, strength):
"""
图像局部缩放算法
"""
height = image.shape[0]
width = image.shape[1]
left =int(point[0] - radius) if point[0] - radius >= 0 else 0
top = int(point[1] - radius) if point[1] - radius >= 0 else 0
right = int(point[0] + radius) if point[0] + radius < width else width-1
bottom = int(point[1] + radius) if point[1] + radius < height else height-1
radius_square = math.pow(radius, 2)
for y in range(top, bottom):
offset_y = y - point[1]
for x in range(left, right):
offset_x = x - point[0]
dist_xy = offset_x * offset_x + offset_y * offset_y
if dist_xy <= radius_square:
scale = 1 - dist_xy / radius_square
scale = 1 - strength / 100 * scale
new_x = offset_x * scale + point[0]
new_y = offset_y * scale + point[1]
new_x = new_x if new_x >=0 else 0
new_x = new_x if new_x < height-1 else height-2
new_y = new_y if new_y >= 0 else 0
new_y = new_y if new_y < width-1 else width-2
image[y, x] = bilinear_insert(image, new_x, new_y)# 在瘦脸的基础上,继续放大双眼
enlarge_eyes(src_img, face_landmark, radius=13, strength=13)
cv2.imwrite(res_img_path, src_img)
img = mpimg.imread(res_img_path)
plt.figure(figsize=(10,10))
plt.imshow(img)
plt.axis('off')
plt.show()3. 红唇
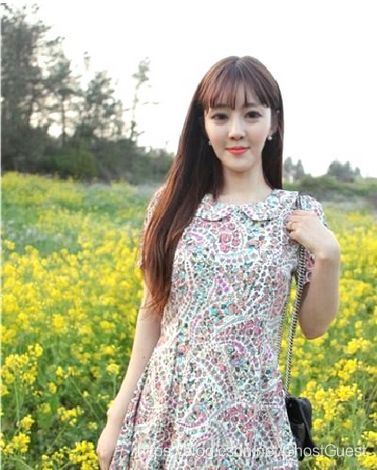
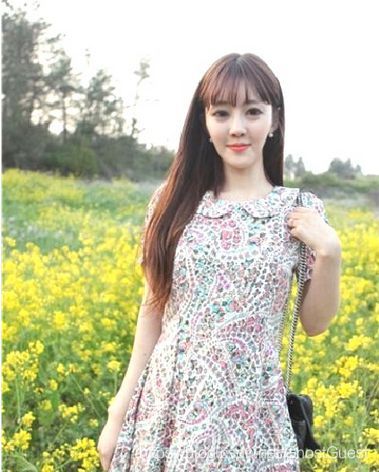
目前已经叠加了瘦脸、大眼的美颜功能,我们还可以给人像增添气色,给人像画上红唇。我们只需将识别到的唇部位置给涂上红色即可达到相应的目的。
def rouge(image, face_landmark, ruby=True):
    """
    自动涂口红
    image: 人像图片
    face_landmark: 人脸关键点
    ruby:是否需要深色口红
    """
    image_cp = image.copy()

    if ruby:
        rouge_color = (0,0,255)
    else:
       rouge_color = (0,0,200)

    points=face_landmark[48:68]

    hull = cv2.convexHull(points)
    cv2.drawContours(image, [hull], -1, rouge_color, -1)
    cv2.addWeighted(image, 0.2, image_cp, 0.9, 0, image_cp)
    return image_cp
# 继续叠加红唇
src_img = rouge(src_img, face_landmark)
cv2.imwrite(res_img_path, src_img)
img = mpimg.imread(res_img_path)
plt.figure(figsize=(10,10))
plt.imshow(img)
plt.axis('off')
plt.show()4. 美白
人像涂上了口红吗,显得气色更佳了些。同时,很多人还会追求白皙的皮肤。最后我们还可以加上美肤功能。由于标记出来的68个关键点没有涵盖额头的位置,我们需要预估额头位置。为了简单估计二头所在区域,本教程以0号、16号点所在线段为直径的半圆为额头位置。
def whitening(img, face_landmark):
   """
   美白
   """
   # 简单估计额头所在区域
   # 根据0号、16号点画出额头(以0号、16号点所在线段为直径的半圆)
   radius=(np.linalg.norm(face_landmark[0] - face_landmark[16]) / 2).astype('int32')
   center_abs=tuple(((face_landmark[0] + face_landmark[16]) / 2).astype('int32'))
   angle=np.degrees(np.arctan((lambda l:l[1]/l[0])(face_landmark[16]-face_landmark[0]))).astype('int32')
   face = np.zeros_like(img)
   cv2.ellipse(face,center_abs,(radius,radius),angle,180,360,(255,255,255),2)

   points=face_landmark[0:17]
   hull = cv2.convexHull(points)
   cv2.polylines(face, [hull], True, (255,255,255), 2)

   index = face >0
   face[index] = img[index]
   dst = np.zeros_like(face)
   # v1:磨皮程度
   v1 = 3
   # v2: 细节程度
   v2 = 2

   tmp1 = cv2.bilateralFilter(face, v1 * 5, v1 * 12.5, v1 * 12.5)
   tmp1 = cv2.subtract(tmp1,face)
   tmp1 = cv2.add(tmp1,(10,10,10,128))
   tmp1 = cv2.GaussianBlur(tmp1,(2*v2-1, 2*v2-1),0)
   tmp1 = cv2.add(img,tmp1)
   dst = cv2.addWeighted(img, 0.1, tmp1, 0.9, 0.0)
   dst = cv2.add(dst,(10, 10, 10,255))

   index = dst>0
   img[index] = dst[index]

   return img
# 美白
src_img = whitening(src_img, face_landmark)
cv2.imwrite(res_img_path, src_img)
img = mpimg.imread(res_img_path)
plt.figure(figsize=(10,10))
plt.imshow(img)
plt.axis('off')
plt.show()项目地址
PaddleHub实战人像美颜


