小白科研笔记:简析CVPR2020论文SA-SSD的网络搭建细节
1. 引言
现有的3D目标检测的算法的实现都比较复杂。在深入网络细节之前,需要弄清楚数据的输入输出流,数据以怎样的format输入到核心算法模块,又以怎样的format输出,以及评价算法模块的指标又有哪些,等等基础问题。为什么需要了解这些基础问题?笔者觉得,分析他人代码的唯一目的就是搭建自己的代码。否则了解大概就足够了。不以自己实际需求为主纯粹地分析代码多少有些浪费时间(笑哭)。多多少少有些功利,哈哈。我的前一篇博客讨论了KITTI3D目标检测数据集的预处理,3D目标检测评估指标,cfg文件,以及SA-SSD训练和测试的大体代码。我的上一篇博客深入讨论了SA-SSD使用mmdetection框架生成训练集的代码细节。前两篇博客相当于回答了三个基础问题:
- 什么是3D目标检测数据集,数据集怎样预处理,3D目标检测评估指标有哪些?;
mmdetection框架怎样训练和测试现成网络的?;mmdetection框架是怎样生成训练集的?以及训练集的数据是怎样喂入网络的?;
这篇博客将分析第四个问题:
SA-SSD怎样依靠mmdetection框架搭建起来的?
2. 理解SA-SSD网络细节
2.1 单阶段目标检测的mmdetection实现
单阶段目标检测称为Single Stage Object Detection(简称为SSD)。多阶段目标检测称为Two Stage Object Dectection。引用这篇博客的一段话,无论是单/多阶段目标检测,mmdetection搭建的检测模型基本分为四个部分,形象地称之为:
- 骨干(
backbone):通常通过全连接网络来提取特征映射图,例如:ResNet。 - 脖颈(
neck):连接骨干和头的部分,例如:FPN、ASPP。 - 头(
head):用于特定任务,例如:候选框的预测(记作bbox_head)、掩膜的预测。 - 兴趣区域提取器(
RoI extractor):该部分组件用于在特征映射图上提取特征,例如:RoI Align。(它主要用于多阶段目标检测)
目标检测中常用术语介绍。 ResNet网络是Residue Network缩写,指残差连接网络。FPN网络是Feature Pyramid Networks的缩写,指金字塔特征提取层;ASPP是Atrous Spatial Pyramid Pooling的缩写,可参考这篇博客。RoI Align是ROI Pool的改进。可参考这篇博客。RPN网络指Region Proposal Network,指候选框预测网络,它常和非极大值抑制(Non-Maximum Suppression,简称NMS)组合在一起,可参考这篇博客。
来看一下mmdetection框架下单阶段目标检测类的初始化:
# BaseDetector是所有检测器的基类,是虚基类
# RPNTestMixin 和 BBoxTestMixin 和 MaskTestMixin 用途不太明白,代码好像没有调用它们
# 总之, SingleStageDetector类继承自上述这些类
class SingleStageDetector(BaseDetector, RPNTestMixin, BBoxTestMixin,
                       MaskTestMixin):
	# 单阶段目标检测由 Backbone, Neck, Bbox_head,Extra_head组成
	# 它们的实现需要设计者自己设计
    def __init__(self,
                 backbone,
                 neck=None,
                 bbox_head=None,
                 extra_head=None,
                 train_cfg=None,
                 test_cfg=None,
                 pretrained=None):
        super(SingleStageDetector, self).__init__()

		# 初始化 Backbone
        self.backbone = builder.build_backbone(backbone)

		# 初始化 Neck
        if neck is not None:
            self.neck = builder.build_neck(neck)
        else:
            raise NotImplementedError

		# 初始化 bbox_head
        if bbox_head is not None:
            self.rpn_head = builder.build_single_stage_head(bbox_head)

		# 初始化 extra_head
        if extra_head is not None:
            self.extra_head = builder.build_single_stage_head(extra_head)

		# 加载训练参数和测试参数(都是关于RPN参数的)
        self.train_cfg = train_cfg
        self.test_cfg = test_cfg

		# 加载上次训练的模型
        self.init_weights(pretrained)
然后看一下它用于做训练的前向计算代码:
	# 这是 SA-SSD 修改后的代码, 输入是点云, 不包含RGB图像
    def forward_train(self, img, img_meta, **kwargs):

        batch_size = len(img_meta)

		# 提取 Input 和 Ground Truth 3D框
        ret = self.merge_second_batch(kwargs)

        vx = self.backbone(ret['voxels'], ret['num_points'])
        (x, conv6), point_misc = self.neck(vx, ret['coordinates'], batch_size)

        losses = dict()

        aux_loss = self.neck.aux_loss(*point_misc, gt_bboxes=ret['gt_bboxes'])
        losses.update(aux_loss)

        # RPN forward and loss
        if self.with_rpn:
            rpn_outs = self.rpn_head(x)
            rpn_loss_inputs = rpn_outs + (ret['gt_bboxes'], ret['gt_labels'], ret['anchors'], ret['anchors_mask'], self.train_cfg.rpn)
            rpn_losses = self.rpn_head.loss(*rpn_loss_inputs)
            losses.update(rpn_losses)
            guided_anchors = self.rpn_head.get_guided_anchors(*rpn_outs, ret['anchors'], ret['anchors_mask'], ret['gt_bboxes'], thr=0.1)
        else:
            raise NotImplementedError

        # bbox head forward and loss
        if self.extra_head:
            bbox_score = self.extra_head(conv6, guided_anchors)
            refine_loss_inputs = (bbox_score, ret['gt_bboxes'], ret['gt_labels'], guided_anchors, self.train_cfg.extra)
            refine_losses = self.extra_head.loss(*refine_loss_inputs)
            losses.update(refine_losses)

        return losses
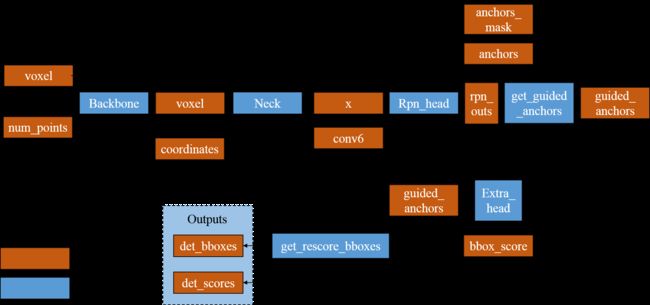
我绘制了训练阶段的前向计算图,如下所示:
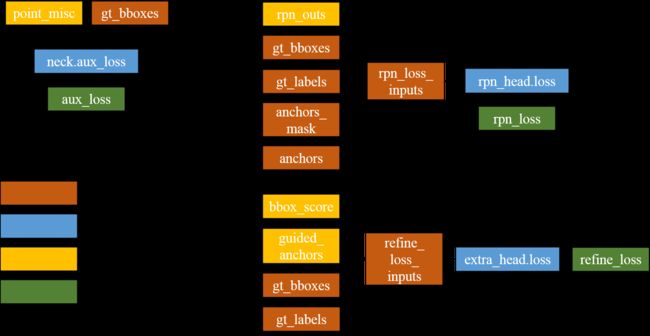
训练阶段的误差计算图如下所示(主要有三种误差):
我绘制了测试阶段的前向计算图,如下所示:

图3:SA-SSD中测试阶段的前向计算图(做推断时候,Neck的结构会与做训练时候的Neck不太一样,这是SA-SSD的辅助网络机制。在2.3节介绍。)。在get_rescore_bboxes使用NMS。
2.2 单阶段目标检测的损失函数
mmdetection框架并没有直接定义了图2中的三个损失函数。损失函数和单阶段目标检测的三个函数都是设计者自己定义的。mmdetection框架提供了一些底层的常见loss,供设计者使用。后续会依次讨论它们的具体定义方式。
2.3 SA-SSD网络介绍
貌似Arxiv网站上还没能看到SA-SSD: Structure Aware Single-stage 3D Object Detection from Point Cloud,等CVPR2020正式放出再去研究岂不是黄花菜都凉了(笑哭)。有关这篇文章的报道只有一些媒体网站,比如媒体报道1和媒体报道2。在具体讲解SA-SSD核心代码之前,有必要获取它从理论上的了解。
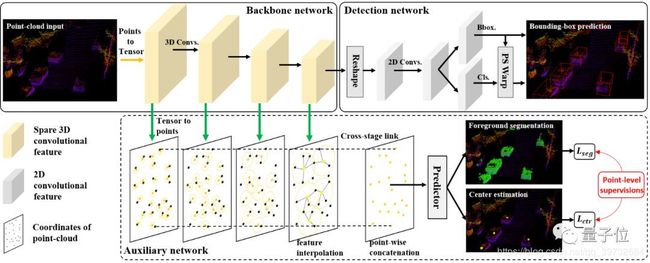
SA-SSD的网络框架图如下所示:
媒体报道2中的摘抄:
在他们的模型中,用于部署的检测器, 即推断网络, 由一个骨干网络(Backbone)和检测头(Detection Head)组成。骨干网络用3D的稀疏网络实现,用于提取含有高语义的体素特征。检测头将体素特征压缩成鸟瞰图(BEV)表示,并在上面运行2D全卷积网络来预测3D物体框。
辅助网络如图4中虚线框所示。用于回归3D目标的中心位置和目标点云分割。辅助网络只参与网络的训练过程,不参与推断过程。辅助网络的用意是指导Backbone Network的学习。辅助网络的设计是作者把多阶段目标检测细化到单阶段目标检测的体现。图4中的Backbone Network和Detection Network并不是和mmdetection框架中的Backbone和Head是对应的。框图是为了方便说明。具体代码怎么实现后面会做分析。
媒体报道1中的摘抄:
这是一段对SA-SSD创新点概括的话:
目前业界主要以单阶段检测器为主,这样能保证检测器能高效地在实时系统上进行。我们提出的方案将两阶段检测器中对特征进行细粒度刻画的思想移植到单阶段检测中,通过在训练中利用一个辅助网络将单阶段检测器中的体素特征转化为点级特征,并施加一定的监督信号,从而使得卷积特征也具有结构感知能力,进而提高检测精度。而在做模型推断时,辅助网络并不参与计算(detached), 进而保证了单阶段检测器的检测效率。另外我们提出一个工程上的改进,Part-sensitive Warping (PSWarp), 用于处理单阶段检测器中存在的「框-置信度-不匹配」问题。
2.4 构造SA-SSD网络
回顾train.py,构造SA-SDD需要一行代码:
    model = build_detector(
        cfg.model, train_cfg=cfg.train_cfg, test_cfg=cfg.test_cfg)
cfg.model指模型的超参数,我贴在下面:
model = dict(
    type='SingleStageDetector',
    backbone=dict(
        type='SimpleVoxel',
        num_input_features=4,
        use_norm=True,
        num_filters=[32, 64],
        with_distance=False),

    neck=dict(
        type='SpMiddleFHD',
        output_shape=[40, 1600, 1408],
        num_input_features=4,
        num_hidden_features=64 * 5,
    ),
    bbox_head=dict(
        type='SSDRotateHead',
        num_class=1,
        num_output_filters=256,
        num_anchor_per_loc=2,
        use_sigmoid_cls=True,
        encode_rad_error_by_sin=True,
        use_direction_classifier=True,
        box_code_size=7,
    ),
    extra_head=dict(
        type='PSWarpHead',
        grid_offsets = (0., 40.),
        featmap_stride=.4,
        in_channels=256,
        num_class=1,
        num_parts=28,
    )
)
可见,SA-SSD属于SingleStageDetector。在SA-SSD网络中,backbone是SimpleVoxel,neck是SpMiddleFHD,bbox_head是SSDRotateHead,extra_head是PSWarpHead。
build_detector是一个精心设计的迭代函数,用于构建一个单阶段目标检测器。后面讨论这个检测器的几个部分。
2.5 Backbone
backbone是SimpleVoxel。话不多说,贴代码:
class SimpleVoxel(nn.Module):
    def __init__(self,
                 num_input_features=4,
                 use_norm=True,
                 num_filters=[32, 128],
                 with_distance=False,
                 name='VoxelFeatureExtractor'):
        super(SimpleVoxel, self).__init__()
        self.name = name
        self.num_input_features = num_input_features

	# features 是 N*K*3 的张量,跟 pointnet++ 的 sample 和 group 很像
	# 它在 KITTILiDAR 类中就已经做过了处理
	# num_voxels 是 N*1 的张量
    def forward(self, features, num_voxels):
        return features
        # features: [concated_num_points, num_voxel_size, 3(4)]
        # num_voxels: [concated_num_points]

		# points_mean 是 K 个近邻点的中心点位置,
		# points_mean 在后续网络中没有使用,这是因为在 KITTILiDAR 中已经算过一遍了,
		# 保存在 coordinate 变量中
        points_mean = features[:, :, :self.num_input_features].sum(
            dim=1, keepdim=False) / num_voxels.type_as(features).view(-1, 1)
        return points_mean.contiguous()
SimpleVoxel输出一个 N ∗ K ∗ 4 N*K*4 N∗K∗4的体素化点云, 4 4 4代表点云xyz值和雷达强度项。总之言之,Backbone啥也没做。
2.6 Neck
neck是SpMiddleFHD。neck非常关键,它对应图4中的Backbone Network以及下面的辅助网络。具体的细节会逐一道来。首先看这一层的初始化代码:
class SpMiddleFHD(nn.Module):
    def __init__(self,
                 output_shape, # cfg中,output_shape=[40, 1600, 1408]
                 num_input_features=4,
                 num_hidden_features=128, # cfg中,num_hidden_features=64 * 5,
                 ):

        super(SpMiddleFHD, self).__init__()

        print(output_shape)
        self.sparse_shape = output_shape

        self.backbone = VxNet(num_input_features)
        self.fcn = BEVNet(in_features=num_hidden_features, num_filters=256)
在Neck中,VxNet对应图4中的Backbone Network和虚线框的辅助网络。当is_test=False时(训练模式),VxNet开启辅助网络。当is_test=True时(推断模式),VxNet关闭辅助网络,只剩下一个Backbone Network。BEVNet属于图4中的Detection network的一部分,意图是把Backbone提取的点云特征转换为BEV特征,为BEV图下3D目标检测做准备。
来看看VxNet的前向计算:
	# x 是体素点云,是一个 N*K*4 的张量
	# points_mean 是 N*3 的张量,表示近邻点的中心位置
	# is_test=False 表示是训练模式, True 表示推断模式
    def forward(self, x, points_mean, is_test=False):

        x = self.conv0(x)
        x = self.down0(x)  # sp
        x = self.conv1(x)  # 2x sub

        if not is_test:
            vx_feat, vx_nxyz = tensor2points(x, voxel_size=(.1, .1, .2))
            p1 = nearest_neighbor_interpolate(points_mean, vx_nxyz, vx_feat)

        x = self.down1(x)
        x = self.conv2(x)

        if not is_test:
            vx_feat, vx_nxyz = tensor2points(x, voxel_size=(.2, .2, .4))
            p2 = nearest_neighbor_interpolate(points_mean, vx_nxyz, vx_feat)

        x = self.down2(x)
        x = self.conv3(x)

        if not is_test:
            vx_feat, vx_nxyz = tensor2points(x, voxel_size=(.4, .4, .8))
            p3 = nearest_neighbor_interpolate(points_mean, vx_nxyz, vx_feat)

		# Backbone Network 输出,是一连串的 down 和 conv 的组合
        out = self.extra_conv(x)

        if is_test:
            return out, None

		# 辅助网络的输出,回归每个点是不是3D目标,以及利用每一个点回归3D目标中心点
		# points_misc 是 (points_mean, point_cls, point_reg) 的统称
        pointwise = self.point_fc(torch.cat([p1, p2, p3], dim=-1))
        point_cls = self.point_cls(pointwise)
        point_reg = self.point_reg(pointwise)
        return out, (points_mean, point_cls, point_reg)
上述代码中,conv和down的底层实现依赖于spconv(流形上的稀疏卷积,一篇CVPR2018的文章)。nearest_neighbor_interpolate大概是近邻点加权平均求特征的方法。它的实现依据PointNet++中的interpolation实现。point_fc,point_cls,point_reg都是简单的线性层。至于辅助层的loss计算留在后面介绍。
整体Neck的前向计算:
    def forward(self, voxel_features, coors, batch_size, is_test=False):

        points_mean = torch.zeros_like(voxel_features)
        points_mean[:, 0] = coors[:, 0]
        points_mean[:, 1:] = voxel_features[:, :3]

        coors = coors.int()
        x = spconv.SparseConvTensor(voxel_features, coors, self.sparse_shape, batch_size)
        x, point_misc = self.backbone(x, points_mean, is_test)

		# 这一段对应图4框图中的 Reshape
        x = x.dense()
        N, C, D, H, W = x.shape
        x = x.view(N, C * D, H, W)

		# 把 Reshape 后的特征喂入 BEVNet 中
        x = self.fcn(x)

        if is_test:
            return x

        return x, point_misc
self.fcn就是BEVNet,这一层的构造比较平庸,是一些列卷积池化BN的组合,就不贴代码了。
2.7 bbox_head
bbox_head是SSDRotateHead。源代码位于文件夹single_stage_heads中。对应图4中的bbox和cls初次结果。类SSDRotateHead的初始化如下所示。与它相关的参数都以注释的形式写在代码中。
class SSDRotateHead(nn.Module):
    def __init__(self,
                 num_class=1, # 3D 目标检测类别,一类,车类
                 num_output_filters=768, # cfg 中是 256
                 num_anchor_per_loc=2, # 单元位置中 Anchor 的数量,如果是两个,那就是横放的 Anchor 和竖放的 Anchor。
                 use_sigmoid_cls=True, # 使用 sigmoid 函数用于分类
                 encode_rad_error_by_sin=True, # 使用 sin 函数计算误差角
                 use_direction_classifier=True, # 对方向进行分类(正对相机,背对相机)
                 box_coder='GroundBox3dCoder', # 有关 3D框 的参数
                 box_code_size=7, # 用 7 个参数表述一个 3D 框,分别是 xyzhwl 以及 score
                 ):
        super(SSDRotateHead, self).__init__()
        self._num_class = num_class
        self._num_anchor_per_loc = num_anchor_per_loc
        self._use_direction_classifier = use_direction_classifier
        self._use_sigmoid_cls = use_sigmoid_cls
        self._encode_rad_error_by_sin = encode_rad_error_by_sin
        self._use_direction_classifier = use_direction_classifier
        self._box_coder = getattr(boxCoders, box_coder)()
        self._box_code_size = box_code_size
        self._num_output_filters = num_output_filters

		# 如果使用 sigmoid,num_cls 意思是每个位置的 Anchor 都要判别类别
        if use_sigmoid_cls:
            num_cls = num_anchor_per_loc * num_class
        else:
            num_cls = num_anchor_per_loc * (num_class + 1)

		# 从通道数为 num_output_filters 的特征卷积出通道数 num_cls 的特征,作为类别预测结果;
		# 若 num_cls = 1, 可以说大于 0.5 就是目标类。
        self.conv_cls = nn.Conv2d(num_output_filters, num_cls, 1)
        # 从通道数为 num_output_filters 的特征卷积出通道数 num_anchor_per_loc * box_code_size 的特征,作为 3D框 的回归结果;
        # 每一个位置上的每一个Anchor都要回归出一个 3D框 和它的置信度 score
        self.conv_box = nn.Conv2d(
            num_output_filters, num_anchor_per_loc * box_code_size, 1)
        # 从通道数为 num_output_filters 的特征卷积出通道数 num_anchor_per_loc * 2 的特征,作为类别预测结果;
        # 每一个位置上的每一个Anchor都要回归出 2 个方向,即面向相机,还是背对相机
        if use_direction_classifier:
            self.conv_dir_cls = nn.Conv2d(
                num_output_filters, num_anchor_per_loc * 2, 1)
然后看前向计算过程。比较直观,输出每个位置每个Anchor的3D框预测结果和置信度(合在box_preds),以及所在类别cls_preds和朝向判断dir_cls_preds。
    def forward(self, x):
        box_preds = self.conv_box(x)
        cls_preds = self.conv_cls(x)
        # [N, C, y(H), x(W)]
        box_preds = box_preds.permute(0, 2, 3, 1).contiguous()
        cls_preds = cls_preds.permute(0, 2, 3, 1).contiguous()

        if self._use_direction_classifier:
            dir_cls_preds = self.conv_dir_cls(x)
            dir_cls_preds = dir_cls_preds.permute(0, 2, 3, 1).contiguous()

        return box_preds, cls_preds, dir_cls_preds
2.8 简析PS Warp
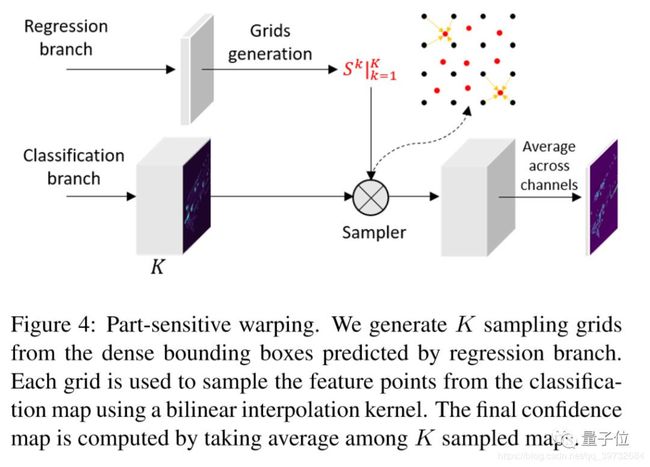
为了便于对2.9节代码的理解,需要讲解SA-SSD使用PS Warp的机制。这一段介绍参考了媒体报道1:在单阶段检测中,feature map 和 anchor 的对齐问题是普遍存在的问题,这样会导致预测出来的边界框的定位质量与置信度不匹配,这会影响在后处理阶段(NMS)时,高置信度但低定位质量的框被保留,而定位质量高却置信度低的框被丢弃。在 two-stage 的目标检测算法中,RPN 提取 proposal,然后会在 feature map 上对应的的位置提取特征(roi-pooling 或者 roi-align),这个时候新的特征和对应的 proposal 是对齐的。我们提出了一个基于 PSRoIAlign 的改进,Part-sensitive Warping (PSWarp), 用来对预测框进行重打分。
这一段介绍参考了媒体报道2:用于处理单阶段检测器中存在的 “框-置信度-不匹配” 问题。核心思路是:利用采样器, 用生成的采样网格在对应的局部敏感特征图上进行采样,生成对齐好的特征图。最终能反映置信度的特征图,是K个对齐好特征图的平均。
2.9 extra_head
extra_head是PSWarpHead。源代码位于文件夹single_stage_heads中。对应图4中的PS Warp。该类的初始化如下所示。
class PSWarpHead(nn.Module):
	# 根据 cfg 文件,grid_offsets = (0., 40.),featmap_stride = 0.4,
	# in_channels = 256, num_parts = 28, num_class = 1
    def __init__(self, grid_offsets, featmap_stride, in_channels, num_class=1, num_parts=49):
        super(PSWarpHead, self).__init__()
        self._num_class = num_class
        out_channels = num_class * num_parts # 28*1 = 28

		# 应该是定义采样区域的函数
        self.gen_grid_fn = partial(gen_sample_grid, grid_offsets=grid_offsets, spatial_scale=1 / featmap_stride)

        self.convs = nn.Sequential(
            nn.Conv2d(in_channels, out_channels, 3, 1, padding=1, bias=False),
            nn.BatchNorm2d(out_channels, eps=1e-3, momentum=0.01),
            nn.ReLU(inplace=True),
            nn.Conv2d(out_channels, out_channels, 1, 1, padding=0, bias=False)
        )
看看前向计算:
	# guided_anchors 来自 bbox_head,参考图 3
	# guided_anchors 大概是根据置信度做的筛选
    def forward(self, x, guided_anchors, is_test=False):
        x = self.convs(x)
        bbox_scores = list()
        # 对每一个候选 Anchor
        for i, ga in enumerate(guided_anchors):
            if len(ga) == 0:
                bbox_scores.append(torch.empty(0).type_as(x))
                continue
            # 采样出 K 个区域
            (xs, ys) = self.gen_grid_fn(ga[:, [0, 1, 3, 4, 6]])
            im = x[i]
            # 做类似 ROIAlign 操作
            out = bilinear_interpolate_torch_gridsample(im, xs, ys)
            # 计算把 K 个区域的特征的平均值
            score = torch.mean(out, 0).view(-1)
            bbox_scores.append(score)

		# 如果是推断阶段,还会把 guided_anchors 留下来,后续还会使用,参考图 3
        if is_test:
            return bbox_scores, guided_anchors
        else:
            return torch.cat(bbox_scores, 0)
2.10 阶段性小结
SA-SSD在网络搭建上有些复杂。再分析后面局部网络的时候,需要时不时看一下Single Stage Detection的计算图,比如图1和图3。做训练还是做推断,计算图是有变化的。
3. 简析Loss
从第2节的讨论中,我理清楚了SA-SSD的Backbone,Neck,Head,以及辅助网络的输入输出流。做训练的时候,需要定义损失函数。loss这块做改动的可能不大,就简要分析。loss这块代码也挺复杂的。
3.1 辅助网络的Loss计算
首先看辅助网络SpMiddleFHD的`aux_loss。话不多说,直接上代码:
	# points 指输入点云
	# point_cls 指预测的 3D目标 的点云
	# point_reg 指预测的 3D目标 的中心点
	# gt_bboxes 真值 3D目标框
    def aux_loss(self, points, point_cls, point_reg, gt_bboxes):

        N = len(gt_bboxes) # 该点云中 3D目标 的总数

		# 根据 3D目标框 真值,获取 3D目标 的中心点,和 3D目标 的分割点云
        pts_labels, center_targets = self.build_aux_target(points, gt_bboxes)

        rpn_cls_target = pts_labels.float()
        pos = (pts_labels > 0).float()
        neg = (pts_labels == 0).float()

        pos_normalizer = pos.sum()
        pos_normalizer = torch.clamp(pos_normalizer, min=1.0)

        cls_weights = pos + neg
        cls_weights = cls_weights / pos_normalizer

        reg_weights = pos
        reg_weights = reg_weights / pos_normalizer

		# 分割点云损失函数,使用加权 sigmoid_focal_loss
        aux_loss_cls = weighted_sigmoid_focal_loss(point_cls.view(-1), rpn_cls_target, weight=cls_weights, avg_factor=1.)
        aux_loss_cls /= N

		# 中心点预测损失函数,使用加权 smoothl1
        aux_loss_reg = weighted_smoothl1(point_reg, center_targets, beta=1 / 9., weight=reg_weights[..., None], avg_factor=1.)
        aux_loss_reg /= N

        return dict(
            aux_loss_cls = aux_loss_cls,
            aux_loss_reg = aux_loss_reg,
        )
底层loss函数由mmdetection框架实现,比较方便。
3.2 检测头的Loss计算
在SA-SSD中有两个检测头,分别是SSDRotateHead和PSWarpHead,每一个检测头都要算loss。
首先看SSDRotatedHead的loss计算。翠花上代码(狗头):
	# loss 函数的输入自变量好理解,就不多说
    def loss(self, box_preds, cls_preds, dir_cls_preds, gt_bboxes, gt_labels, anchors, anchors_mask, cfg):

        batch_size = box_preds.shape[0]

		# 这一顿操作的目的是召唤 Ground Truth
        labels, targets, ious = multi_apply(create_target_torch,
                                            anchors, gt_bboxes,
                                            anchors_mask, gt_labels,
                                            similarity_fn=getattr(iou3d_utils, cfg.assigner.similarity_fn)(),
                                            box_encoding_fn = second_box_encode,
                                            matched_threshold=cfg.assigner.pos_iou_thr,
                                            unmatched_threshold=cfg.assigner.neg_iou_thr,
                                            box_code_size=self._box_code_size)


        labels = torch.stack(labels,)
        targets = torch.stack(targets)

		# 计算权重
        cls_weights, reg_weights, cared = self.prepare_loss_weights(labels)

        cls_targets = labels * cared.type_as(labels)

		# 位置误差:预测值是 box_preds, 真值是 reg_targets,权值是 cls_targets,使用weighted_smoothl1
		# 类别误差:预测值是 cls_preds, 真值是 reg_weights,权值是 cls_weights,使用weighted_sigmoid_focal_loss
        loc_loss, cls_loss = self.create_loss(
            box_preds=box_preds,
            cls_preds=cls_preds,
            cls_targets=cls_targets,
            cls_weights=cls_weights,
            reg_targets=targets,
            reg_weights=reg_weights,
            num_class=self._num_class,
            encode_rad_error_by_sin=self._encode_rad_error_by_sin,
            use_sigmoid_cls=self._use_sigmoid_cls,
            box_code_size=self._box_code_size,
        )

		# 计算平均然后相加
        loc_loss_reduced = loc_loss / batch_size
        loc_loss_reduced *= 2

        cls_loss_reduced = cls_loss / batch_size
        cls_loss_reduced *= 1

        loss = loc_loss_reduced + cls_loss_reduced

		# 朝向分类是一个分类问题,用交叉熵很正常
        if self._use_direction_classifier:
            dir_labels = self.get_direction_target(anchors, targets, use_one_hot=False).view(-1)
            dir_logits = dir_cls_preds.view(-1, 2)
            weights = (labels > 0).type_as(dir_logits)
            weights /= torch.clamp(weights.sum(-1, keepdim=True), min=1.0)
            dir_loss = weighted_cross_entropy(dir_logits, dir_labels,
                                              weight=weights.view(-1),
                                              avg_factor=1.)

            dir_loss_reduced = dir_loss / batch_size
            dir_loss_reduced *= .2
            loss += dir_loss_reduced

        return dict(rpn_loc_loss=loc_loss_reduced, rpn_cls_loss=cls_loss_reduced, rpn_dir_loss=dir_loss_reduced)
这段代码看上去很吓人。其实也还好吧。
再看PSWarpHead的loss计算(主要计算3D目标前景点分类的loss,使用focal loss):
    def loss(self, cls_preds, gt_bboxes, gt_labels, anchors, cfg):

        batch_size = len(anchors)

        labels, targets, ious = multi_apply(create_target_torch,
                                            anchors, gt_bboxes,
                                            (None,) * batch_size, gt_labels,
                                            similarity_fn=getattr(iou3d_utils, cfg.assigner.similarity_fn)(),
                                            box_encoding_fn = second_box_encode,
                                            matched_threshold=cfg.assigner.pos_iou_thr,
                                            unmatched_threshold=cfg.assigner.neg_iou_thr)

        labels = torch.cat(labels,).unsqueeze_(1)

        # soft_label = torch.clamp(2 * ious - 0.5, 0, 1)
        # labels = soft_label * labels.float()

        cared = labels >= 0
        positives = labels > 0
        negatives = labels == 0
        negative_cls_weights = negatives.type(torch.float32)
        cls_weights = negative_cls_weights + positives.type(torch.float32)

        pos_normalizer = positives.sum().type(torch.float32)
        cls_weights /= torch.clamp(pos_normalizer, min=1.0)

        cls_targets = labels * cared.type_as(labels)
        cls_preds = cls_preds.view(-1, self._num_class)

        cls_losses = weighted_sigmoid_focal_loss(cls_preds, cls_targets.float(), \
                                                 weight=cls_weights, avg_factor=1.)

        cls_loss_reduced = cls_losses / batch_size

        return dict(loss_cls=cls_loss_reduced,)
3.3 阶段性小结
对3D目标前景点分类的误差函数是focal loss,这个主意源自PointRCNN。
4. 小结
纸上得来终觉浅,得知此事要躬行。SA-SSD终于分析完了,其实还有很多具体操作细节没有分析。这些细节等到调试运行代码的时候再看不迟。


