从零搭建SSM之——SpringMVC的单独使用以及Spring整合MVC
前几篇文章整合了Spring+Mybatis,这篇文章将最终整合SpringMVC,最终形成SSM基础框架。本篇文章与之前文章结构类似,先单独搭建SpringMVC,再统一整合Spring+Mybatis。
SpringMVC的单独搭建与使用
之前几篇的项目我都是以一个普通的项目在运行程序,但是如果运行SpringMVC的首要条件是项目必须是一个Web项目,所以,我首先要将原项目更改成一个Web项目:添加Web module。
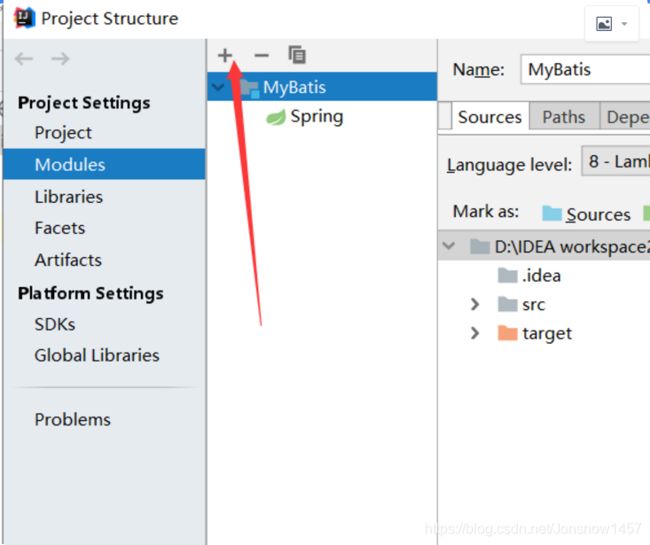
(1)打开project structure设置,选择添加module
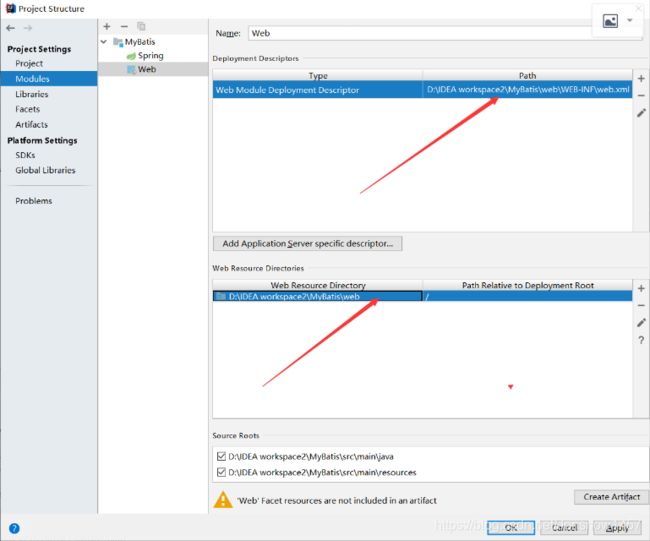
(2)更改目录

(3)pom文件添加打包方式为war
![]()
OK,现在这个项目已经是一个Web项目了。开始搭建SpringMVC。
1.环境准备
(1)导入SpringMVC的jar包
            org.springframework
            spring-webmvc
            ${spring.version}
(2)编写web.xml配置
web程序运行在web容器中必须要实现至少一个Servlet,并且需要配置在web.xml中。SpringMVC搭建需要在web.xml中配置自己的组件。
        spring-dispatcher
        org.springframework.web.servlet.DispatcherServlet

            contextConfigLocation
            classpath:springmvc.xml


        spring-dispatcher

        /


        encodingFilter
        org.springframework.web.filter.CharacterEncodingFilter

            encoding
            UTF-8


            forceEncoding
            true


        encodingFilter
        /


        default
        *.jpg


        default

        *.png


        default
        *.ico


        default
        *.gif


        default
        *.js


        default
        *.css
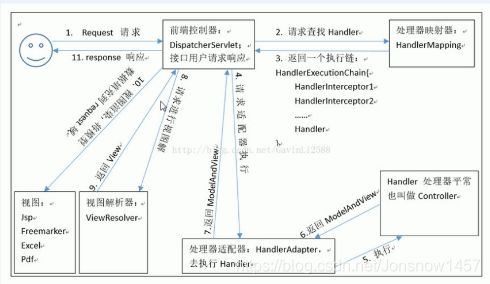
SpringMVC最重要的就是DispatcherServlet,他是SpringMVC的核心,管理者所有的请求,所以我们只需要配置这一个Servlet,交由tomcat反射代理执行,即可完成转发处理请求。
SpringMVC的流程图(网图):
2.程序编写
SpringMVC的基础环境搭建完成,那么可以开始编写controller测试是否可以成功运行:
(1)Controller:
package WholeSSM.controller;


import org.springframework.stereotype.Controller;
import org.springframework.web.bind.annotation.RequestMapping;

@Controller
@RequestMapping("myController")
public class MyController {


    @RequestMapping("test")
    public String test()
    {
        System.out.println("SpringMVC运行成功!");
        return "test";
    }


}
(2)jsp:
<%@ page contentType="text/html;charset=UTF-8" language="java" %>
<html>
<head>
    <title>Title</title>
</head>
<body>
SpringMVC运行成功!
</body>
</html>
(3)部署tomcat
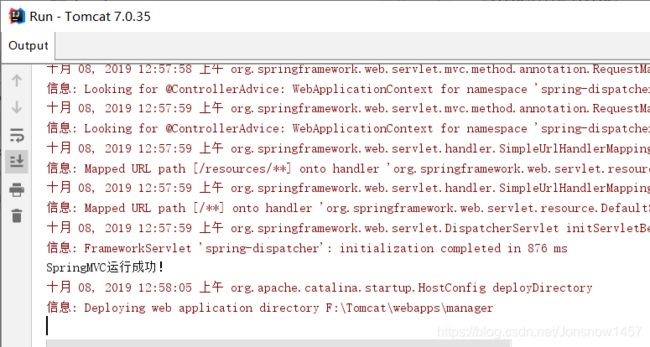
3.运行结果
Spring整合SpringMVC以及Mybatis
Spring整合SpringMVC的重点是该项目已经成为一个Web项目,Web项目的一个特点是没有main函数,所有方法的执行都是依靠web容器,所以ApplicationContext的创建就要使用其他方法:
(1)
配置一个监听器,在web容器创建的时候启动Spring容器完成扫描以及创建Bean对象并存储。这种情况适用于MVC框架是其他厂商的产品时。
(2)
直接使用DispatcherServlet加载Spring容器。
1.环境准备
(1)方法一:配置监听器启动Spring
    org.springframework.web.context.ContextLoaderListener


        contextConfigLocation
        classpath:ApplicationContext.xml
在web.xml配置此监听器。
(2)SpringMVC直接一起加载Spring容器。
更改加载参数:
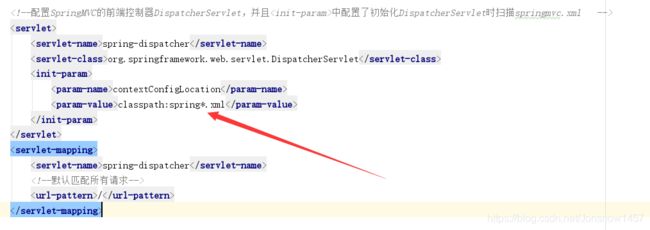
在这里的初始加载文件由springmvc改成了spring*,代表所有符合spring前缀的xml全部加载。
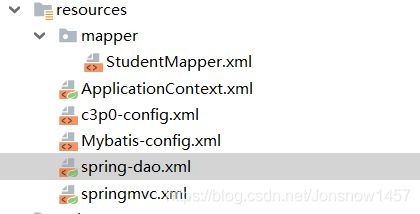
所以DispatcherServlet还一起加载了springdao。
springdao.xml:
所以,service以及mapper的接口也都被异同加载了。
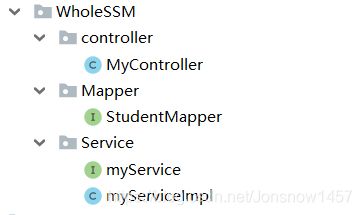
2.代码
package WholeSSM.controller;


import Entity.StudentEntity;
import Mapper.StudentMapper;
import WholeSSM.Service.myService;
import org.springframework.beans.factory.annotation.Autowired;
import org.springframework.stereotype.Controller;
import org.springframework.web.bind.annotation.RequestMapping;

import java.util.List;

@Controller
@RequestMapping("myController")
public class MyController {


    @Autowired
    myService service;

    @RequestMapping("test")
    public String test()
    {
        System.out.println("SpringMVC运行成功!");
        List<StudentEntity> list= service.selectAll();
        for (StudentEntity studentEntity : list) {
            System.out.println(studentEntity);
        }
        return "test";
    }
}
package WholeSSM.Mapper;

import Entity.StudentEntity;

import java.util.List;

public interface StudentMapper {

    List<StudentEntity> selectAll();

    void update(StudentEntity student);
}
package WholeSSM.Service;

import Entity.StudentEntity;
import org.springframework.stereotype.Repository;

import java.util.List;

public interface myService {

    List<StudentEntity> selectAll();

    void update(StudentEntity student);
}
package WholeSSM.Service;

import Entity.StudentEntity;
import WholeSSM.Mapper.StudentMapper;
import org.springframework.beans.factory.annotation.Autowired;
import org.springframework.stereotype.Service;

import java.util.List;

@Service("Service")
public class myServiceImpl implements myService {

    @Autowired
    StudentMapper mapper;

    public List<StudentEntity> selectAll()
    {
        return mapper.selectAll();
    }

    public void update(StudentEntity student)
    {
        mapper.update(student);
    }
}
3.运行结果
OK,到此,SSM框架搭建完成。

