- 前言:基于毕业季的线上实习课程项目而学习使用QT开发环境,实习项目是基于树莓派的人脸佩戴口罩检测系统。摄像头设备的选择使用等功能是必选项,下面简单展示QCamera的一些特性的使用。
准备工作
- 1、安装QT开发环境,可选mingw或vs系列的编译环境,小编使用的是开源mingw环境。。。
- 2、新建项目,建立项目完成后在项目文件(.pro)文件的第一行修改为:
QT += core gui multimedia multimediawidgets
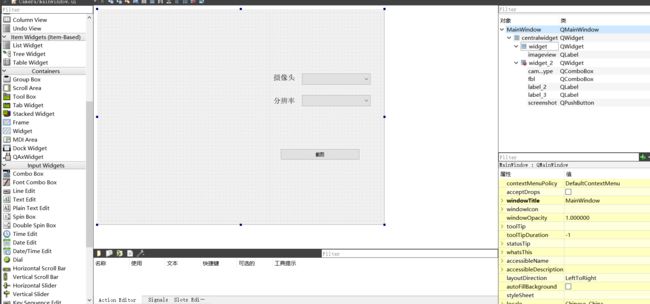
- 3、ui设计,点击ui文件,在ui文件里添加如下标签:
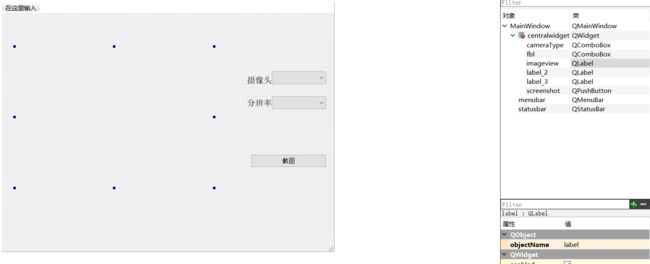
然后对于按钮与下拉菜单都添加槽值(反馈函数)
获取摄像头信息
- 在MianWindowcpp文件的构造函数中添加以下代码并运行:
	QList cameras = QCameraInfo::availableCameras();
    foreach(const QCameraInfo &cameraInfo, cameras) {
        qDebug() << "CameraInfo:" << cameraInfo;
    }


- 从上可以看出有两个摄像头,摄像头其他信息如上图所示。
显示默认摄像头影像
- 首先在mainwindow.h文件里添加私有变量:camera和viewfind;
private:
    Ui::MainWindow *ui;
    QCamera *camera;
    QCameraViewfinder *viewfind;
- 接着在mainwindow.cpp文件里的构造函数里添加camera和viewfind初始化的代码
MainWindow::MainWindow(QWidget *parent)
    : QMainWindow(parent)
    , ui(new Ui::MainWindow)
{
    ui->setupUi(this);

    QList cameras = QCameraInfo::availableCameras();
    foreach(const QCameraInfo &cameraInfo, cameras) {
        qDebug() << "CameraInfo:" << cameraInfo;
    }
    //添加内容
    camera = new QCamera(this);
    viewfind = new QCameraViewfinder();
    viewfind->show();
    camera->setViewfinder(viewfind);
    camera->start();
}
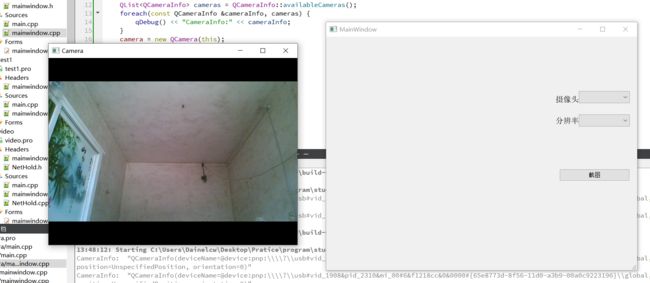
摄像头设备的选择
- 设备选择项设置在可选下拉菜单里(QComboBox),双击ui文件,选择摄像头后的可选菜单按钮右键选择转到槽,选择activated(int)槽函数,然后相应的.h和.cpp文件会添加槽函数的内容,然后按照下面的代码修改.h和.cpp文件。
- mainwindow.h
private:
    Ui::MainWindow *ui;
    QCamera *camera;
    QCameraViewfinder *viewfind;
    QList cameras;
MainWindow::MainWindow(QWidget *parent)
    : QMainWindow(parent)
    , ui(new Ui::MainWindow)
{
    ui->setupUi(this);

    QComboBox *cameraType = new QComboBox();
    cameraType = ui->cameraType;
    cameraType->clear();
     cameras = QCameraInfo::availableCameras();
    foreach(const QCameraInfo &cameraInfo, cameras) {
        qDebug() << "CameraInfo:" << cameraInfo;
        cameraType->addItem(cameraInfo.description());
    }
    camera = new QCamera(this);
    viewfind = new QCameraViewfinder();
    viewfind->show();
    camera->setViewfinder(viewfind);
    camera->start();
}

MainWindow::~MainWindow()
{
    delete ui;
}


void MainWindow::on_cameraType_activated(int index)
{
    index = ui->cameraType->currentIndex();
    qDebug()<<"Index"<< index <<": "<< ui->cameraType->currentText();
    camera->stop();
    camera = new QCamera(cameras[index]);
    camera->setCaptureMode(QCamera::CaptureVideo);
    camera->setViewfinder(viewfind);
    camera->start();
}
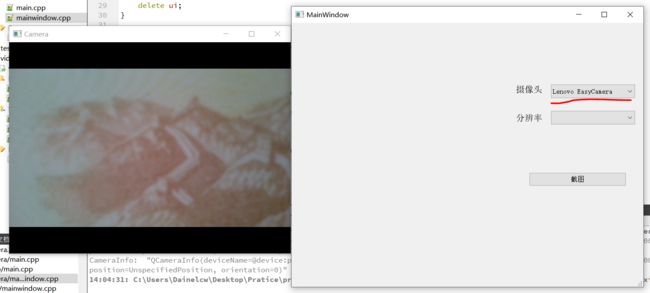
- 运行,如下图所示,在摄像头后的选择菜单按钮即可切换不同的摄像头机位。

截图显示
- 添加QCameraImageCapture这个属性,即可实现截图,实现逻辑为,当点击截图按钮时,将获取截图到imageview控件上显示。
- 修改后代码如下:
#ifndef MAINWINDOW_H
#define MAINWINDOW_H
#include
#include
#include
#include
QT_BEGIN_NAMESPACE
namespace Ui { class MainWindow; }
QT_END_NAMESPACE
class MainWindow : public QMainWindow
{
Q_OBJECT
public:
MainWindow(QWidget *parent = nullptr);
~MainWindow();
private slots:
void on_screenshot_clicked();
void on_cameraType_activated(int index);
void on_imageCaptured(int id, const QImage &preview);
private:
Ui::MainWindow *ui;
QCamera *camera;
QCameraViewfinder *viewfind;
QList<QCameraInfo> cameras;
QCameraImageCapture *imageCapture;
};
#endif
#include "mainwindow.h"
#include "ui_mainwindow.h"
#include
#include
MainWindow::MainWindow(QWidget *parent)
: QMainWindow(parent)
, ui(new Ui::MainWindow)
{
ui->setupUi(this);
QComboBox *cameraType = new QComboBox();
cameraType = ui->cameraType;
cameraType->clear();
cameras = QCameraInfo::availableCameras();
foreach(const QCameraInfo &cameraInfo, cameras) {
qDebug() << "CameraInfo:" << cameraInfo;
cameraType->addItem(cameraInfo.description());
}
camera = new QCamera(this);
viewfind = new QCameraViewfinder();
viewfind->show();
camera->setViewfinder(viewfind);
imageCapture = new QCameraImageCapture(camera);
camera->start();
connect(imageCapture, SIGNAL(imageCaptured(int, QImage)), this, SLOT(on_imageCaptured(int, QImage)));
}
MainWindow::~MainWindow()
{
delete ui;
}
void MainWindow::on_cameraType_activated(int index)
{
index = ui->cameraType->currentIndex();
qDebug()<<"Index"<< index <<": "<< ui->cameraType->currentText();
camera->stop();
camera = new QCamera(cameras[index]);
camera->setCaptureMode(QCamera::CaptureVideo);
camera->setViewfinder(viewfind);
imageCapture = new QCameraImageCapture(camera);
camera->start();
connect(imageCapture, SIGNAL(imageCaptured(int, QImage)), this, SLOT(on_imageCaptured(int, QImage)));
}
void MainWindow::on_imageCaptured(int id, const QImage &preview){
ui->imageview->setPixmap(QPixmap::fromImage(preview));
}
void MainWindow::on_screenshot_clicked()
{
qDebug()<<"ScreenShot";
imageCapture->capture();
}
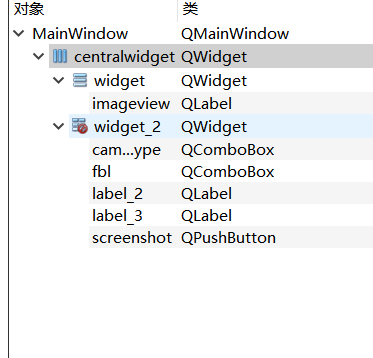
- 发现一个问题,截的图只显示部分,不显示完全,这是因为我们没有使用布局管理,点击ui文件,将所有控件的布局整理为下图的方式:
void MainWindow::on_imageCaptured(int id, const QImage &preview){
int with = ui->imageview->width();
int height = ui->imageview->height();
QPixmap pixmap = QPixmap::fromImage(preview);
QPixmap fitpixmap = pixmap.scaled(with, height, Qt::KeepAspectRatio, Qt::SmoothTransformation);
ui->imageview->setPixmap(fitpixmap);
}
显示分辨率设定
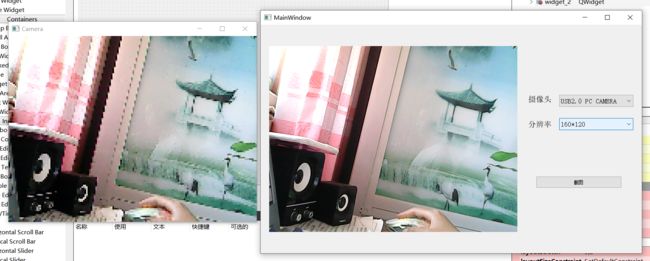
- 设定分辨率与设定摄像头设备的基本思路是一样的,如下图所示,我使用usb摄像头的最高分辨率600480截好图,然后调整分辨率为160120,在左边实时画面中可以明显感觉到分辨率降低。
整体代码如下:
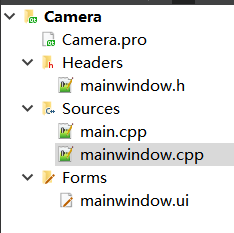
# Camera.pro
QT       += core gui multimedia multimediawidgets

greaterThan(QT_MAJOR_VERSION, 4): QT += widgets

CONFIG += c++11

# The following define makes your compiler emit warnings if you use
# any Qt feature that has been marked deprecated (the exact warnings
# depend on your compiler). Please consult the documentation of the
# deprecated API in order to know how to port your code away from it.
DEFINES += QT_DEPRECATED_WARNINGS

# You can also make your code fail to compile if it uses deprecated APIs.
# In order to do so, uncomment the following line.
# You can also select to disable deprecated APIs only up to a certain version of Qt.
#DEFINES += QT_DISABLE_DEPRECATED_BEFORE=0x060000    # disables all the APIs deprecated before Qt 6.0.0

SOURCES += \
    main.cpp \
    mainwindow.cpp

HEADERS += \
    mainwindow.h

FORMS += \
    mainwindow.ui

# Default rules for deployment.
qnx: target.path = /tmp/$${TARGET}/bin
else: unix:!android: target.path = /opt/$${TARGET}/bin
!isEmpty(target.path): INSTALLS += target
#ifndef MAINWINDOW_H
#define MAINWINDOW_H
#include
#include
#include
#include
#include
QT_BEGIN_NAMESPACE
namespace Ui { class MainWindow; }
QT_END_NAMESPACE
class MainWindow : public QMainWindow
{
Q_OBJECT
public:
MainWindow(QWidget *parent = nullptr);
~MainWindow();
void setfblComobox(QCamera *camera);
private slots:
void on_screenshot_clicked();
void on_cameraType_activated(int index);
void on_imageCaptured(int id, const QImage &preview);
void on_fbl_activated(int index);
private:
Ui::MainWindow *ui;
QCamera *camera;
QCameraViewfinder *viewfind;
QList<QCameraInfo> cameras;
QCameraImageCapture *imageCapture;
QList<QSize> mResSize = {};
QComboBox *box;
};
#endif
#include "mainwindow.h"
#include "ui_mainwindow.h"
#include
#include
MainWindow::MainWindow(QWidget *parent)
: QMainWindow(parent)
, ui(new Ui::MainWindow)
{
ui->setupUi(this);
QComboBox *cameraType = new QComboBox();
box = ui->fbl;
cameraType = ui->cameraType;
cameraType->clear();
cameras = QCameraInfo::availableCameras();
foreach(const QCameraInfo &cameraInfo, cameras) {
qDebug() << "CameraInfo:" << cameraInfo;
cameraType->addItem(cameraInfo.description());
}
camera = new QCamera(this);
viewfind = new QCameraViewfinder();
viewfind->show();
camera->setViewfinder(viewfind);
imageCapture = new QCameraImageCapture(camera);
camera->start();
connect(imageCapture, SIGNAL(imageCaptured(int, QImage)), this, SLOT(on_imageCaptured(int, QImage)));
setfblComobox(camera);
}
MainWindow::~MainWindow()
{
delete ui;
}
void MainWindow::on_cameraType_activated(int index)
{
index = ui->cameraType->currentIndex();
qDebug()<<"Index"<< index <<": "<< ui->cameraType->currentText();
camera->stop();
camera = new QCamera(cameras[index]);
camera->setCaptureMode(QCamera::CaptureVideo);
camera->setViewfinder(viewfind);
imageCapture = new QCameraImageCapture(camera);
camera->start();
connect(imageCapture, SIGNAL(imageCaptured(int, QImage)), this, SLOT(on_imageCaptured(int, QImage)));
setfblComobox(camera);
}
void MainWindow::on_imageCaptured(int id, const QImage &preview){
ui->imageview->setPixmap(QPixmap::fromImage(preview));
}
void MainWindow::on_screenshot_clicked()
{
qDebug()<<"ScreenShot";
imageCapture->capture();
}
void MainWindow::on_fbl_activated(int index){
index = ui->fbl->currentIndex();
qDebug()<<"Index"<< index <<": "<< ui->fbl->currentText();
qDebug()<<"mResSize:"<<mResSize[index];
QCameraViewfinderSettings set;
set.setResolution(mResSize[index]);
camera->setViewfinderSettings(set);
}
void MainWindow::setfblComobox(QCamera *camera){
mResSize.clear();
mResSize = camera->supportedViewfinderResolutions();
box->clear();
int i=0;
foreach (QSize msize, mResSize) {
qDebug()<<msize;
box->addItem(QString::number(msize.width(),10)+"*"+QString::number(msize.height(),10), i++);
}
box->setCurrentIndex(i-1);
}
#include "mainwindow.h"

#include

int main(int argc, char *argv[])
{
    QApplication a(argc, argv);
    MainWindow w;
    w.show();
    return a.exec();
}
<ui version="4.0">
 <class>MainWindowclass>
 <widget class="QMainWindow" name="MainWindow">
  <property name="geometry">
   <rect>
    <x>0x>
    <y>0y>
    <width>800width>
    <height>600height>
   rect>
  property>
  <property name="windowTitle">
   <string>MainWindowstring>
  property>
  <widget class="QWidget" name="centralwidget">
   <property name="font">
    <font>
     <pointsize>7pointsize>
    font>
   property>
   <layout class="QHBoxLayout" stretch="3,2">
    <property name="sizeConstraint">
     <enum>QLayout::SetDefaultConstraintenum>
    property>
    <item>
     <widget class="QWidget" name="widget" native="true">
      <layout class="QVBoxLayout" name="verticalLayout">
       <item>
        <widget class="QLabel" name="imageview">
         <property name="text">
          <string/>
         property>
        widget>
       item>
      layout>
     widget>
    item>
    <item>
     <widget class="QWidget" name="widget_2" native="true">
      <widget class="QComboBox" name="fbl">
       <property name="geometry">
        <rect>
         <x>90x>
         <y>230y>
         <width>191width>
         <height>31height>
        rect>
       property>
       <property name="font">
        <font>
         <pointsize>10pointsize>
        font>
       property>
      widget>
      <widget class="QLabel" name="label_2">
       <property name="geometry">
        <rect>
         <x>10x>
         <y>170y>
         <width>61width>
         <height>21height>
        rect>
       property>
       <property name="font">
        <font>
         <pointsize>12pointsize>
        font>
       property>
       <property name="text">
        <string>摄像头string>
       property>
      widget>
      <widget class="QComboBox" name="cameraType">
       <property name="geometry">
        <rect>
         <x>90x>
         <y>170y>
         <width>191width>
         <height>31height>
        rect>
       property>
       <property name="font">
        <font>
         <pointsize>10pointsize>
        font>
       property>
      widget>
      <widget class="QPushButton" name="screenshot">
       <property name="geometry">
        <rect>
         <x>30x>
         <y>380y>
         <width>221width>
         <height>31height>
        rect>
       property>
       <property name="text">
        <string>截图string>
       property>
      widget>
      <widget class="QLabel" name="label_3">
       <property name="geometry">
        <rect>
         <x>10x>
         <y>230y>
         <width>61width>
         <height>31height>
        rect>
       property>
       <property name="font">
        <font>
         <pointsize>12pointsize>
        font>
       property>
       <property name="text">
        <string>分辨率string>
       property>
      widget>
     widget>
    item>
   layout>
  widget>
 widget>
 <resources/>
 <connections/>
ui>
- 以上代码个人通过多方渠道搜集学习得来,不免有些问题,如有问题请留言交流~


