Nginx安装使用
简要说明
这里介绍一下Linux下安装Nginx,平时总是听说Nginx多么牛,但是好像自己从来没有仔细研究过。这里我刚好有这样一个机会,把整个操作过程记录一下,供大家参考学习,如有不对之处,望不吝赐教。
环境准备
- Centos7.2操作系统
- 英文版系统
- Linux内核版本3.10
- 用户:root
- 密码:123456
- 主机名:study
个人准备了一台Centos7的Linux服务器,X86 64位操作系统,最小化安装。静态IP:192.168.1.200
系统检查
[root@study ~]# cat /etc/redhat-release
CentOS Linux release 7.2.1511 (Core)

[root@study ~]# uname -a
Linux study 3.10.0-327.el7.x86_64 #1 SMP Thu Nov 19 22:10:57 UTC 2015 x86_64 x86_64 x86_64 GNU/Linux
Nginx两种安装方式
- rpm包安装
- 源码安装
[1] rpm包安装
Centos7系统库中默认没有Nginx的rpm包,如果想使用rpm安装方式首先要更新rpm依赖库
- 安装Nginx相关库
[root@study ~]# rpm -Uvh http://nginx.org/packages/centos/7/noarch/RPMS/nginx-release-centos-7-0.el7.ngx.noarch.rpm

Retrieving http://nginx.org/packages/centos/7/noarch/RPMS/nginx-release-centos-7-0.el7.ngx.noarch.rpm
warning: /var/tmp/rpm-tmp.ACOW2J: Header V4 RSA/SHA1 Signature, key ID 7bd9bf62: NOKEY
Preparing...                          ################################# [100%]
Updating / installing...
   1:nginx-release-centos-7-0.el7.ngx ################################# [100%]
- 安装Nginx
[root@study ~]# yum install nginx -y

.....

  Verifying  : 1:openssl-libs-1.0.2k-8.el7.x86_64                                                            2/5
  Verifying  : 1:openssl-1.0.2k-8.el7.x86_64                                                                 3/5
  Verifying  : 1:openssl-1.0.1e-42.el7.9.x86_64                                                              4/5
  Verifying  : 1:openssl-libs-1.0.1e-42.el7.9.x86_64                                                         5/5

Installed:
  nginx.x86_64 1:1.12.2-1.el7_4.ngx
Dependency Updated:
  openssl.x86_64 1:1.0.2k-8.el7                        openssl-libs.x86_64 1:1.0.2k-8.el7
Complete!
- 启动Nginx
[root@study ~]# systemctl start nginx
- 检测Nginx是否启动成功
[root@study ~]# systemctl status nginx

● nginx.service - nginx - high performance web server
   Loaded: loaded (/usr/lib/systemd/system/nginx.service; disabled; vendor preset: disabled)
   Active: active (running) since Tue 2017-12-26 14:35:23 CST; 13s ago
     Docs: http://nginx.org/en/docs/
  Process: 10693 ExecStart=/usr/sbin/nginx -c /etc/nginx/nginx.conf (code=exited, status=0/SUCCESS)
  Process: 10691 ExecStartPre=/usr/sbin/nginx -t -c /etc/nginx/nginx.conf (code=exited, status=0/SUCCESS)
 Main PID: 10695 (nginx)
   CGroup: /system.slice/nginx.service
           ├─10695 nginx: master process /usr/sbin/nginx -c /etc/nginx/nginx.conf
           └─10696 nginx: worker process

Dec 26 14:35:23 study systemd[1]: Starting nginx - high performance web server...
Dec 26 14:35:23 study nginx[10691]: nginx: the configuration file /etc/nginx/nginx.conf syntax is ok
Dec 26 14:35:23 study nginx[10691]: nginx: configuration file /etc/nginx/nginx.conf test is successful
Dec 26 14:35:23 study systemd[1]: Started nginx - high performance web server.
[2] 源码安装
- 安装依赖软件
[root@study ~]# yum install -y openssl openssl-devel gcc-c++ pcre pcre-devel zlib zlib-devel

[root@study ~]# yum install wget lsof -y
- 下载源码(这里使用1.12.2版本)
[root@study ~]# cd /usr/local/
[root@study ~]# wget http://nginx.org/download/nginx-1.12.2.tar.gz

[root@study ~]# tar -zxvf nginx-1.12.2.tar.gz

[root@study ~]# cd nginx-1.12.2
- 编译安装
[root@study ~]# ./configure
[root@study ~]# make && make install
- 启动Nginx
[root@study ~]# cd ../nginx
[root@study ~]# ./sbin/nginx
- 验证
[root@study ~]# lsof -i :80

COMMAND   PID   USER   FD   TYPE DEVICE SIZE/OFF NODE NAME
nginx   21774   root    6u  IPv4  41391      0t0  TCP *:http (LISTEN)
nginx   21775 nobody    6u  IPv4  41391      0t0  TCP *:http (LISTEN)
- 浏览器访问
关闭防火墙
[root@study ~]# systemctl stop firewalld

[root@study ~]# systemctl disable firewalld

[root@study ~]# systemctl status firewalld
结果验证
浏览器地址栏中输入:http://192.168.1.200/
Welcome to nginx!
If you see this page, the nginx web server is successfully installed and working. Further configuration is required.

For online documentation and support please refer to nginx.org.
Commercial support is available at nginx.com.

Thank you for using nginx.
Nginx安装完成,一般使用Nginx都是为了做负载均衡或者做反向代理。
同一台Linux机器Nginx代理多个Tomcat应用
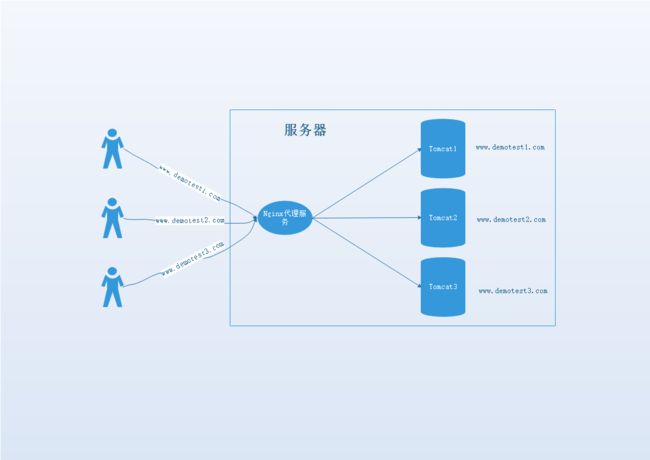
一些企业的官网,访问量不是很大,但是只部署一个应用在一台服务器上,怎么感觉都是浪费。这时候一般都是一台服务器上部署多个应用,使用不同的域名进行访问。基于这个需求,给大家分享一下“一个Nginx服务器代理多个Tomcat(一个Tomcat单个应用)站点”的反向代理配置,实现节省服务器开支
需要安装的软件
- 安装JDK
- 安装Tomcat
- 安装Nginx
验证以上安装的软件已经是正常工作
- Java
[root@study ~]# java -version

java version "1.8.0_152"
Java(TM) SE Runtime Environment (build 1.8.0_152-b16)
Java HotSpot(TM) 64-Bit Server VM (build 25.152-b16, mixed mode)
- Tomcat(默认端口8080)
[root@study ~]# lsof -i :8080

COMMAND   PID USER   FD   TYPE DEVICE SIZE/OFF NODE NAME
java    10718 root   45u  IPv6  30491      0t0  TCP *:webcache (LISTEN)
- Nginx(默认端口80)
[root@study ~]# lsof -i :80

COMMAND   PID  USER   FD   TYPE DEVICE SIZE/OFF NODE NAME
nginx   17946  root    6u  IPv4  41378      0t0  TCP *:http (LISTEN)
nginx   17947 nginx    6u  IPv4  41378      0t0  TCP *:http (LISTEN)
以下我用三个网站项目工程做Demo
1.Demo1(单独部署时,访问根如:http://localhost:8080/ 出现页面显示“这是Demo1项目”)
2.Demo2(单独部署时,访问根如:http://localhost:8080/ 出现页面显示“这是Demo2项目”)
3.Demo3(单独部署时,访问根如:http://localhost:8080/ 出现页面显示“这是Demo3项目”)
以下我用三个域名来对应三个项目
1.www.demotest1.com对应Demo1项目
2.www.demotest2.com对应Demo2项目
3.www.demotest3.com对应Demo3项目
整体架构
准备三个Tomcat的Web服务器
[root@study ~]# cd /opt/install

[root@study install]# cp -r tomcat7/ tomcat1
[root@study install]# cp -r tomcat7/ tomcat2
[root@study install]# cp -r tomcat7/ tomcat3
[root@study install]# ls
jdk1.8  tomcat1  tomcat2  tomcat3  tomcat7

停掉之前启动的tomcat7,并删除掉
[root@study install]# ./tomcat1/bin/shutdown.sh
Using CATALINA_BASE:   /opt/install/tomcat7
Using CATALINA_HOME:   /opt/install/tomcat7
Using CATALINA_TMPDIR: /opt/install/tomcat7/temp
Using JRE_HOME:        /opt/install/jdk1.8/jre
Using CLASSPATH:       /opt/install/tomcat7/bin/bootstrap.jar:/opt/install/tomcat7/bin/tomcat-juli.jar

[root@study install]# rm -fr tomcat7/
[root@study install]# ls
jdk1.8  tomcat1  tomcat2  tomcat3
查看默认配置
[root@study install]# cd tomcat1/conf/
[root@study conf]# vi server.xml
修改一下一些地方,使同一个Linux服务器中同时可以启动多个Tomcat
先把默认修改的地方列出来:
1.执行命令关闭的端口号,这个不能冲突
2.对外提供Web访问的端口
5.虚拟主机
修改配置三个Tomcat配置
三个Demo我按照顺序进行修改
Demo1


Demo2


Demo3
部署项目
rm -fr /opt/install/tomcat1/webapps/*
rm -fr /opt/install/tomcat2/webapps/*
rm -fr /opt/install/tomcat3/webapps/*

上传Demo1的项目ROOT.war到/opt/install/tomcat1/webapps/
上传Demo2的项目ROOT.war到/opt/install/tomcat2/webapps/
上传Demo3的项目ROOT.war到/opt/install/tomcat3/webapps/
启动三个Tomcat
这里的三个tomcat是复制过来的,所有bin目录下的命令都有权限执行
./opt/install/tomcat1/bin/start.sh
./opt/install/tomcat2/bin/start.sh
./opt/install/tomcat3/bin/start.sh
验证三个Tomcat能通过IP和端口正常访问
使用curl命令 若没有找到curl命令,使用[yum install curl -y] 进行安装

[root@study install]# curl http://localhost:8070


Demo1


	这是Demo1项目


[root@study install]# curl http://localhost:8080


Demo2


	这是Demo2项目


[root@study install]# curl http://localhost:8090


Demo3


	这是Demo3项目

修改Nginx
添加配置
- 编辑主配置文件
vi /etc/nginx/nginx.conf

....

http {
    include       /etc/nginx/mime.types;
    default_type  application/octet-stream;

    log_format  main  '$remote_addr - $remote_user [$time_local] "$request" '
                      '$status $body_bytes_sent "$http_referer" '
                      '"$http_user_agent" "$http_x_forwarded_for"';

    access_log  /var/log/nginx/access.log  main;

    sendfile        on;
    #tcp_nopush     on;

    keepalive_timeout  65;

    #gzip  on;

    include /etc/nginx/conf.d/*.conf;
}

这一行"include /etc/nginx/conf.d/*.conf;" 如果是注释起来的,打开即可。我使用的版本默认是打开的
- 创建配置文件
cd /conf.d
vi demotest.conf

upstream tomcat_server1 {
    server localhost:8070;
}

upstream tomcat_server2 {
    server localhost:8080;
}

upstream tomcat_server3 {
    server localhost:8090;
}

server {
    listen       80;
    server_name  www.demotest1.com;
    location / {
        proxy_pass http://tomcat_server1;
        index index.jsp index.html index.htm;
    }
}

server {
    listen       80;
    server_name  www.demotest2.com;
    location / {
        proxy_pass http://tomcat_server2;
        index index.jsp index.html index.htm;
    }
}

server {
    listen       80;
    server_name  www.demotest3.com;
    location / {
        proxy_pass http://tomcat_server3;
        index index.jsp index.html index.htm;
    }
}
重启Nginx
systemctl restart nginx
lsof -i :80
COMMAND   PID  USER   FD   TYPE DEVICE SIZE/OFF NODE NAME
nginx   18083  root    6u  IPv4  43040      0t0  TCP *:http (LISTEN)
nginx   18084 nginx    6u  IPv4  43040      0t0  TCP *:http (LISTEN)
修改服务器本地映射
vi /etc/hosts

127.0.0.1   localhost localhost.localdomain localhost4 localhost4.localdomain4
::1         localhost localhost.localdomain localhost6 localhost6.localdomain6

192.168.1.200 www.demotest1.com
192.168.1.200 www.demotest2.com
192.168.1.200 www.demotest3.com
修改window本地映射
为什么要配置这里呢?
因为这里的域名是不是真正的经过DNS服务器转发的域名,所以通过配置hosts文件进行本地装发来模拟域名访问
进入【C盘】--> 【Windows】 --> 【System32】 --> 【drivers】 --> 【etc】下

修改hosts文件,添加如下信息
192.168.1.200   www.demotest1.com
192.168.1.200   www.demotest2.com
192.168.1.200   www.demotest3.com
验证
浏览器中访问:

http://www.demotest1.com/
http://www.demotest2.com/
http://www.demotest3.com/
出现:

原因
1.防火墙不让访问

2.Selinux不让通过
解决
第一可能问题:
[root@study install]# systemctl stop firewalld
[root@study install]# systemctl disable firewalld
[root@study install]# systemctl status firewalld
● firewalld.service - firewalld - dynamic firewall daemon
   Loaded: loaded (/usr/lib/systemd/system/firewalld.service; disabled; vendor preset: enabled)
   Active: inactive (dead)

Dec 26 14:21:05 study systemd[1]: Starting firewalld - dynamic firewall daemon...
Dec 26 14:21:07 study systemd[1]: Started firewalld - dynamic firewall daemon.
Dec 26 14:47:06 study systemd[1]: Stopping firewalld - dynamic firewall daemon...
Dec 26 14:47:07 study systemd[1]: Stopped firewalld - dynamic firewall daemon.
Dec 26 16:53:08 study systemd[1]: Stopped firewalld - dynamic firewall daemon.
Dec 26 19:00:28 study systemd[1]: Starting firewalld - dynamic firewall daemon...
Dec 26 19:00:29 study systemd[1]: Started firewalld - dynamic firewall daemon.
Dec 26 19:00:47 study systemd[1]: Stopping firewalld - dynamic firewall daemon...
Dec 26 19:00:49 study systemd[1]: Stopped firewalld - dynamic firewall daemon.

访问还是出现这个问题

第二可能问题:

/usr/sbin/setsebool httpd_can_network_connect true
或者
setenforce 0
或者
[root@study install]# vi /etc/selinux/config
SELINUX=disabled

验证成功
结果
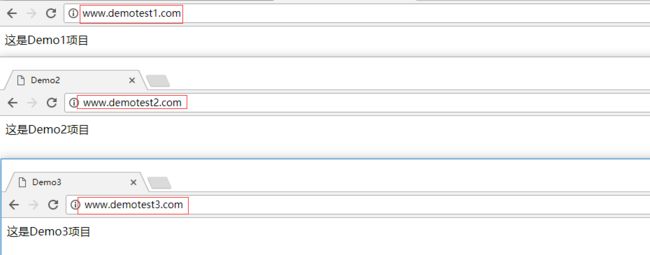
本案例讲解的是使用同一台服务器,模拟一个Nginx代理三个tomcat的应用,通过上面顺序步骤的配置,即可实现此功能
之后还会有一个Nginx代理一个Tomcat的多个应用及一个应用的负载配置,敬请关注