confd的安装与使用
一、概述
当系统变的复杂,配置项越来越多,一方面配置管理变得繁琐,另一方面配置修改后需要重新上线同样十分痛苦。这时候,需要有一套集中化配置管理系统,一方面提供统一的配置管理,另一方面提供配置变更的自动下发,及时生效。
说道统一配置管理系统,大家应该比较熟悉,常见的:zookeeper、etcd、consul、git等等。
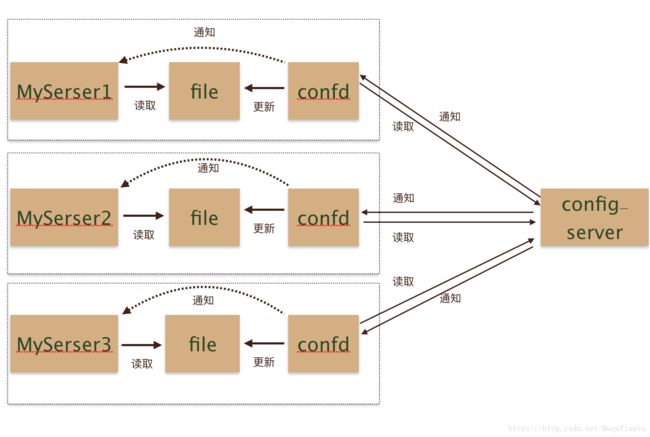
上述的集中配置中心使用的时候,部署图大致是这样的:
server端只需要调用config-server对应客户端获取配置,和监听配置变更就可以了。总体来说没有太大难度。
接下来要说一下confd,它提供了一种新的集成思路。confd的存在有点类似于快递员,买了东西不需要自己到店去取货了,confd这个快递员回把货取过来,然后送到家里,并且通知你货已经送到了。加入confd之后的架构大致是这样的:
二、confd是如何工作的
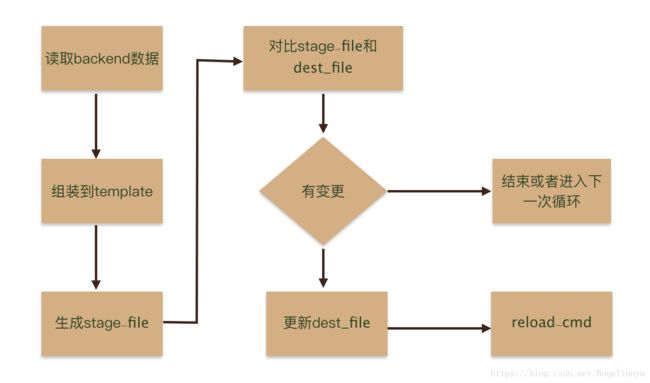
confd使用时有几个概念需要熟悉,并且熟悉他们之间的依赖关系,才能理解如何配置confd,不然会比较懵。这里我们先看一下confd配置的几个概念之间是如何交互的:
三、confd的部署
以下Linux系统为例。
下载confd的二进制文件,下载地址为:https://github.com/kelseyhightower/confd/releases。例如:
# Download the binary
wget https://github.com/kelseyhightower/confd/releases/download/v0.16.0/confd-0.16.0-linux-amd64

# 重命名二进制文件,并移动到PATH的目录下
mv confd-0.16.0-linux-amd64 /usr/local/bin/confd
chmod +x /usr/local/bin/confd

# 验证是否安装成功
confd --help
四、confd的配置
Confd通过读取后端存储的配置信息来动态更新对应的配置文件,对应的后端存储可以是etcd,redis等,其中etcd的v3版本对应的存储后端为etcdv3。
1. 创建confdir
confdir底下包含两个目录:
conf.d:confd的配置文件,主要包含配置的生成逻辑,例如模板源,后端存储对应的keys,命令执行等。templates:配置模板Template,即基于不同组件的配置,修改为符合 Golang text templates的模板文件。
sudo mkdir -p /etc/confd/{conf.d,templates}2. Template Resources
模板源配置文件是TOML格式的文件,主要包含配置的生成逻辑,例如模板源,后端存储对应的keys,命令执行等。默认目录在/etc/confd/conf.d。
参数说明:
必要参数
dest(string) - The target file.keys(array of strings) - An array of keys.src(string) - The relative path of a configuration template.
可选参数
gid(int) - The gid that should own the file. Defaults to the effective gid.mode(string) - The permission mode of the file.uid(int) - The uid that should own the file. Defaults to the effective uid.reload_cmd(string) - The command to reload config.check_cmd(string) - The command to check config. Use{{.src}}to reference the rendered source template.prefix(string) - The string to prefix to keys.
例子
例如:/etc/confd/conf.d/myapp-nginx.toml
[template]
prefix = "/myapp"
src = "nginx.tmpl"
dest = "/tmp/myapp.conf"
owner = "nginx"
mode = "0644"
keys = [
  "/services/web"
]
check_cmd = "/usr/sbin/nginx -t -c {{.src}}"
reload_cmd = "/usr/sbin/service nginx reload"
3. Template
Template定义了单一应用配置的模板,默认存储在/etc/confd/templates目录下,模板文件符合Go的text/template格式。
模板文件常用函数有base,get,gets,lsdir,json等。具体可参考https://github.com/kelseyhightower/confd/blob/master/docs/templates.md。
例子:
/etc/confd/templates/nginx.tmpl
{{range $dir := lsdir "/services/web"}}
upstream {{base $dir}} {
    {{$custdir := printf "/services/web/%s/*" $dir}}{{range gets $custdir}}
    server {{$data := json .Value}}{{$data.IP}}:80;
    {{end}}
}

server {
    server_name {{base $dir}}.example.com;
    location / {
        proxy_pass {{base $dir}};
    }
}
{{end}}
五、 创建后端存储的配置数据
以etcdv3存储为例,在etcd中创建以下数据。
etcdctl --endpoints=$endpoints put /services/web/cust1/2 '{"IP": "10.0.0.2"}'
etcdctl --endpoints=$endpoints put /services/web/cust2/2 '{"IP": "10.0.0.4"}'
etcdctl --endpoints=$endpoints put /services/web/cust2/1 '{"IP": "10.0.0.3"}'
etcdctl --endpoints=$endpoints put /services/web/cust1/1 '{"IP": "10.0.0.1"}'
六、 启动confd的服务
confd支持以daemon或者onetime两种模式运行,当以daemon模式运行时,confd会监听后端存储的配置变化,并根据配置模板动态生成目标配置文件。
如果以daemon模式运行,则执行以下命令:
confd -watch -backend etcdv3 -node http://172.16.5.4:12379 &以下以onetime模式运行为例。其中对应的后端存储类型是etcdv3。
# 执行命令
confd -onetime -backend etcdv3 -node http://172.16.5.4:12379

# output
2018-05-11T18:04:59+08:00 k8s-dbg-master-1 confd[35808]: INFO Backend set to etcdv3
2018-05-11T18:04:59+08:00 k8s-dbg-master-1 confd[35808]: INFO Starting confd
2018-05-11T18:04:59+08:00 k8s-dbg-master-1 confd[35808]: INFO Backend source(s) set to http://172.16.5.4:12379
2018-05-11T18:04:59+08:00 k8s-dbg-master-1 confd[35808]: INFO /root/myapp/twemproxy/conf/twemproxy.conf has md5sum 6f0f43abede612c75cb840a4840fbea3 should be 32f48664266e3fd6b56ee73a314ee272
2018-05-11T18:04:59+08:00 k8s-dbg-master-1 confd[35808]: INFO Target config /root/myapp/twemproxy/conf/twemproxy.conf out of sync
2018-05-11T18:04:59+08:00 k8s-dbg-master-1 confd[35808]: INFO Target config /root/myapp/twemproxy/conf/twemproxy.conf has been updated
七、查看生成的配置文件
在/etc/confd/conf.d/myapp-nginx.toml中定义的配置文件的生成路径为/tmp/myapp.conf。
[root@k8s-dbg-master-1 dest]# cat myapp.conf
upstream cust1 {
    server 10.0.0.1:80;
    server 10.0.0.2:80;
}

server {
    server_name cust1.example.com;
    location / {
        proxy_pass cust1;
    }
}

upstream cust2 {
    server 10.0.0.3:80;
    server 10.0.0.4:80;
}

server {
    server_name cust2.example.com;
    location / {
        proxy_pass cust2;
    }
}
八、confd动态更新twemproxy
1. twemproxy.toml
confd的模板源文件配置:/etc/confd/conf.d/twemproxy.toml
[template]
src = "twemproxy.tmpl"
dest = "/root/myapp/twemproxy/conf/twemproxy.conf"
keys = [
  "/twemproxy/pool"
]
check_cmd = "/usr/local/bin/nutcracker -t -c /root/myapp/twemproxy/conf/twemproxy.conf"
reload_cmd = "bash /root/myapp/twemproxy/reload.sh"
2. twemproxy.tmpl
模板文件:/etc/confd/templates/twemproxy.tmpl
global:
  worker_processes: 4         # 并发进程数, 如果为0, 这 fallback 回原来的单进程模型(不支持 config reload!)
  user: nobody                # worker 进程的用户, 默认 nobody. 只要主进程是 root 用户启动才生效.
  group: nobody               # worker 进程的用户组
  worker_shutdown_timeout: 30 # 单位为秒. 用于 reload 过程中在改时间段之后强制退出旧的 worker 进程.

pools: {{range gets "/twemproxy/pool/*"}}
  {{base .Key}}: {{$pool := json .Value}}
    listen: {{$pool.ListenAddr.IP}}:{{$pool.ListenAddr.Port}}
    hash: fnv1a_64 # 选择实例的 hash 规则
    distribution: ketama
    auto_eject_hosts: true # server 有问题是否剔除
    redis: true # 是否为 Redis 协议
    {{if $pool.Password}}redis_auth: {{$pool.Password}}{{end}}
    server_retry_timeout: 5000 # 被剔除多长时间后会重试
    server_connections: 25 # NOTE: server 连接池的大小, 默认为 1, 建议调整
    server_failure_limit: 5 # 失败多少次后暂时剔除
    timeout: 1000 # Server 超时时间, 1 sec
    backlog: 1024 # 连接队列大小
    preconnect: true # 预连接大小
    servers:{{range $server := $pool.Servers}}
     - {{$server.IP}}:{{$server.Port}}:1 {{if $server.Master}}master{{end}}
    {{end}}
{{end}}
3. etcd中的配置格式
etcd中的配置通过一个map来定义为完整的配置内容。其中key是twemproxy中pool的名称,value是pool的所有内容。
配置对应go结构体如下:
type Pool struct{
    ListenAddr  ListenAddr `json:"ListenAddr,omitempty"`
    Servers []Server `json:"Servers,omitempty"`
    Password string `json:"Password,omitempty"`
}

type ListenAddr struct {
    IP string `json:"IP,omitempty"`
    Port string `json:"Port,omitempty"`
}

type Server struct {
    IP string `json:"IP,omitempty"`
    Port string `json:"Port,omitempty"`
    Master bool `json:"Master,omitempty"`
}配置对应JSON格式如下:
{
    "ListenAddr": {
        "IP": "192.168.5.7",
        "Port": "22225"
    },
    "Servers": [
        {
            "IP": "10.233.116.168",
            "Port": "6379",
            "Master": true
        },
        {
            "IP": "10.233.110.207",
            "Port": "6379",
            "Master": false
        }
    ],
    "Password": "987654"
}
4. 生成twemproxy配置文件
global:
  worker_processes: 4         # 并发进程数, 如果为0, 这 fallback 回原来的单进程模型(不支持 config reload!)
  user: nobody                # worker 进程的用户, 默认 nobody. 只要主进程是 root 用户启动才生效.
  group: nobody               # worker 进程的用户组
  worker_shutdown_timeout: 30 # 单位为秒. 用于 reload 过程中在改时间段之后强制退出旧的 worker 进程.

pools:
  redis1:
    listen: 192.168.5.7:22223
    hash: fnv1a_64 # 选择实例的 hash 规则
    distribution: ketama
    auto_eject_hosts: true # server 有问题是否剔除
    redis: true # 是否为 Redis 协议
    redis_auth: 987654
    server_retry_timeout: 5000 # 被剔除多长时间后会重试
    server_connections: 25 # NOTE: server 连接池的大小, 默认为 1, 建议调整
    server_failure_limit: 5 # 失败多少次后暂时剔除
    timeout: 1000 # Server 超时时间, 1 sec
    backlog: 1024 # 连接队列大小
    preconnect: true # 预连接大小
    servers:
     - 10.233.116.169:6379:1


  redis2:
    listen: 192.168.5.7:22224
    hash: fnv1a_64 # 选择实例的 hash 规则
    distribution: ketama
    auto_eject_hosts: true # server 有问题是否剔除
    redis: true # 是否为 Redis 协议
    redis_auth: 987654
    server_retry_timeout: 5000 # 被剔除多长时间后会重试
    server_connections: 25 # NOTE: server 连接池的大小, 默认为 1, 建议调整
    server_failure_limit: 5 # 失败多少次后暂时剔除
    timeout: 1000 # Server 超时时间, 1 sec
    backlog: 1024 # 连接队列大小
    preconnect: true # 预连接大小
    servers:
     - 10.233.110.223:6379:1 master

     - 10.233.111.21:6379:1
九、定时自动更新配置
- 使用confd的定时执行机制,启动confd时执行:
confd -interval 60 -backend file -file /tmp/myapp.yamlinterval单位是秒,默认值是600秒。
- 使用操作系统的crontab定时执行:
crontab -e
0 * * * * confd -onetime -backend file -file /tmp/myapp.yaml

