ShardingSphere分库分表存储组件
关系数据库在信息化系统的存储方面起到举足轻重的作用,但存在IO和计算密集型瓶颈,于是出现很多对关系数据库提供分库分表存储的框架,其中ShardingSphere就是其中之一,并且对排序、分布式事务提供解决方案,ShardingSphere包括三个独立组件,你可以使用其中任意一个实现分库分表逻辑,
ShardingSphere-JDBC
ShardingSphere-Proxy
ShardingSphere-Sidecar(TODO)
ShardingSphere-JDBC是以独立Jar形式提供,在客户端系统配置分库分表策略,定义多个数据源,ShardingSphere就可以实现分库分表。
ShardingSphere-Proxy是独立的服务,相对于数据库的代理,在其配置分库分表策略,后台连接多个数据源即可,你的客户端系统不直接连接数据库,而是连接ShardingSphere-Proxy代理,客户端对数据的接口不需要做任何变化,分库分表的业务逻辑由ShardingSphere-Proxy,对客户端系统是透明的。
ShardingSphere-Sidecar(TODO)正在开发测试。
ShardingSphere-JDBC为例演示如何使用ShardingSphere分库分表
1、新建Maven工程,引入ShardingSphere-JDBC依赖
		<dependency>
		    <groupId>org.apache.shardingsphere</groupId>
		    <artifactId>sharding-jdbc-core</artifactId>
		    <version>4.1.0</version>
		</dependency>
        <dependency>
            <groupId>org.apache.commons</groupId>
            <artifactId>commons-pool2</artifactId>
        </dependency>
		<dependency>
		    <groupId>org.apache.commons</groupId>
		    <artifactId>commons-dbcp2</artifactId>
		    <version>2.7.0</version>
		</dependency>
	    <dependency>
	        <groupId>com.alibaba</groupId>
	        <artifactId>druid</artifactId>
	        <version>1.1.6</version>
	    </dependency>
	    <dependency>
	        <groupId>mysql</groupId>
	        <artifactId>mysql-connector-java</artifactId>
	    </dependency>
2、设计测试类,并定义分库分表策略
package com.hk.sec.db;

import java.sql.Connection;
import java.sql.Statement;
import java.util.ArrayList;
import java.util.HashMap;
import java.util.List;
import java.util.Map;
import java.util.Properties;

import javax.sql.DataSource;

import org.apache.commons.dbcp2.BasicDataSource;
import org.apache.shardingsphere.api.config.sharding.ShardingRuleConfiguration;
import org.apache.shardingsphere.api.config.sharding.TableRuleConfiguration;
import org.apache.shardingsphere.api.config.sharding.strategy.InlineShardingStrategyConfiguration;
import org.apache.shardingsphere.shardingjdbc.api.ShardingDataSourceFactory;

public class Db {
	public static DataSource getDb() throws Exception
	{
	    // 配置真实数据源
	    Map<String, DataSource> dataSourceMap = new HashMap<>();

	    // 配置第一个数据源
	    BasicDataSource dataSource1 = new BasicDataSource();
	    dataSource1.setDriverClassName("com.mysql.jdbc.Driver");
	    dataSource1.setUrl("jdbc:mysql://localhost:3306/ds0");
	    dataSource1.setUsername("root");
	    dataSource1.setPassword("root");
	    dataSourceMap.put("ds0", dataSource1);

	    // 配置第二个数据源
	    BasicDataSource dataSource2 = new BasicDataSource();
	    dataSource2.setDriverClassName("com.mysql.jdbc.Driver");
	    dataSource2.setUrl("jdbc:mysql://localhost:3306/ds1");
	    dataSource2.setUsername("root");
	    dataSource2.setPassword("root");
	    dataSourceMap.put("ds1", dataSource2);

	    // 配置Order表规则
	    //逻辑表t_order分别对应数据源ds0.t_order0和ds1.t_order1
	    TableRuleConfiguration orderTableRuleConfig = new TableRuleConfiguration("t_order","ds${0..1}.t_order${0..1}");

	    // 配置分库 + 分表策略
	    // 以t_order表上的user_id列为分库的依据,user_id是Int类型,如果user_id%2=0此记录存储到ds0上,如果user_id%2=1此记录存储到ds1上,
	    orderTableRuleConfig.setDatabaseShardingStrategyConfig(new InlineShardingStrategyConfiguration("user_id", "ds${user_id % 2}"));
	    // 以t_order表上的order_id列为分表的依据,order_id是Int类型,,如果order_id%2=0此记录存储到ds0.t_order0上,如果order_id%2=1此记录存储到ds1.t_order1上,
	    orderTableRuleConfig.setTableShardingStrategyConfig(new InlineShardingStrategyConfiguration("order_id", "t_order${order_id % 2}"));

	    // 配置分片规则
	    ShardingRuleConfiguration shardingRuleConfig = new ShardingRuleConfiguration();
	    shardingRuleConfig.getTableRuleConfigs().add(orderTableRuleConfig);


	    // 获取数据源对象
	    DataSource dataSource = ShardingDataSourceFactory.createDataSource(dataSourceMap, shardingRuleConfig, new Properties());
	    return dataSource;
	}

	public static void main(String[] args) throws Exception
	{
		//在数据库ds0上创建
		//create table t_order0(order_id int,user_id int,dt datetime);
		//在数据库ds1上创建
		//create table t_order1(order_id int,user_id int,dt datetime);
		DataSource ds = Db.getDb();
		Connection conn = ds.getConnection();
		Statement stat = conn.createStatement();
		String sql0 = "insert into t_order(order_id,user_id,dt) values(0,0,'2020-01-01 00:00:01')";
		stat.executeUpdate(sql0);

		String sql2 = "insert into t_order(order_id,user_id,dt) values(1,1,'2020-01-01 00:00:01')";
		stat.executeUpdate(sql2);


	}
}
3、创建两个数据库进行测试
//在数据库ds0上创建
//create table t_order0(order_id int,user_id int,dt datetime);
//在数据库ds1上创建
//create table t_order1(order_id int,user_id int,dt datetime);
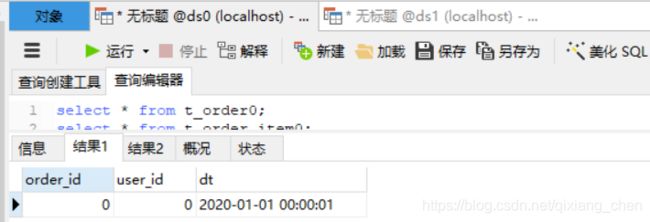
4、向数据库写入两条数据,检查是否按照约定分库分表存储
	public static void main(String[] args) throws Exception
	{
		//在数据库ds0上创建
		//create table t_order0(order_id int,user_id int,dt datetime);
		//在数据库ds1上创建
		//create table t_order1(order_id int,user_id int,dt datetime);
		DataSource ds = Db.getDb();
		Connection conn = ds.getConnection();
		Statement stat = conn.createStatement();
		String sql0 = "insert into t_order(order_id,user_id,dt) values(0,0,'2020-01-01 00:00:01')";
		stat.executeUpdate(sql0);

		String sql2 = "insert into t_order(order_id,user_id,dt) values(1,1,'2020-01-01 00:00:01')";
		stat.executeUpdate(sql2);

	}
关联表分库分表存储解决方案
关系紧密的数据通常需要存储一个数据节点上,这样便于查询,比如订单表t_order与订单明细表t_order_item中的数据,我们期望它们中相关数据存储相同的数据节点上,关联查询时执行一次SQL即可检索出全部的数据,如何实现关联的存储,ShardingSphere也给出了相应的解决方案。
通过设定两个表的绑定关系实现
package com.hk.sec.db;

import java.sql.Connection;
import java.sql.Statement;
import java.util.ArrayList;
import java.util.HashMap;
import java.util.List;
import java.util.Map;
import java.util.Properties;

import javax.sql.DataSource;

import org.apache.commons.dbcp2.BasicDataSource;
import org.apache.shardingsphere.api.config.sharding.ShardingRuleConfiguration;
import org.apache.shardingsphere.api.config.sharding.TableRuleConfiguration;
import org.apache.shardingsphere.api.config.sharding.strategy.InlineShardingStrategyConfiguration;
import org.apache.shardingsphere.shardingjdbc.api.ShardingDataSourceFactory;

public class Db {
	public static DataSource getDb() throws Exception
	{
	    // 配置真实数据源
	    Map<String, DataSource> dataSourceMap = new HashMap<>();

	    // 配置第一个数据源
	    BasicDataSource dataSource1 = new BasicDataSource();
	    dataSource1.setDriverClassName("com.mysql.jdbc.Driver");
	    dataSource1.setUrl("jdbc:mysql://localhost:3306/ds0");
	    dataSource1.setUsername("root");
	    dataSource1.setPassword("root");
	    dataSourceMap.put("ds0", dataSource1);

	    // 配置第二个数据源
	    BasicDataSource dataSource2 = new BasicDataSource();
	    dataSource2.setDriverClassName("com.mysql.jdbc.Driver");
	    dataSource2.setUrl("jdbc:mysql://localhost:3306/ds1");
	    dataSource2.setUsername("root");
	    dataSource2.setPassword("root");
	    dataSourceMap.put("ds1", dataSource2);

	    // 配置Order表规则
	    //逻辑表t_order分别对应数据源ds0.t_order0和ds1.t_order1
	    TableRuleConfiguration orderTableRuleConfig = new TableRuleConfiguration("t_order","ds${0..1}.t_order${0..1}");

	    // 配置分库 + 分表策略
	    // 以t_order表上的order_id列为分库的依据,order_id是Int类型,如果order_id%2=0此记录存储到ds0上,如果order_id%2=1此记录存储到ds1上,
	    orderTableRuleConfig.setDatabaseShardingStrategyConfig(new InlineShardingStrategyConfiguration("order_id", "ds${order_id % 2}"));
	    // 以t_order表上的order_id列为分表的依据,order_id是Int类型,,如果order_id%2=0此记录存储到ds0.t_order0上,如果order_id%2=1此记录存储到ds1.t_order1上,
	    orderTableRuleConfig.setTableShardingStrategyConfig(new InlineShardingStrategyConfiguration("order_id", "t_order${order_id % 2}"));

	    // 配置分片规则
	    ShardingRuleConfiguration shardingRuleConfig = new ShardingRuleConfiguration();
	    shardingRuleConfig.getTableRuleConfigs().add(orderTableRuleConfig);

	    // 省略配置order_item表规则...
	    // 配置OrderItem表规则
	    TableRuleConfiguration orderItemTableRuleConfig = new TableRuleConfiguration("t_order_item","ds${0..1}.t_order_item${0..1}");
	    orderItemTableRuleConfig.setDatabaseShardingStrategyConfig(new InlineShardingStrategyConfiguration("order_id", "ds${order_id % 2}"));
	    orderItemTableRuleConfig.setTableShardingStrategyConfig(new InlineShardingStrategyConfiguration("order_id", "t_order_item${order_id % 2}"));
	    shardingRuleConfig.getTableRuleConfigs().add(orderItemTableRuleConfig);

	    //将表t_order与t_order_item设置绑定关系
	    List<String> bindingTableGroups = new ArrayList<String>();
	    bindingTableGroups.add("t_order");
	    bindingTableGroups.add("t_order_item");
	    shardingRuleConfig.setBindingTableGroups(bindingTableGroups);


	    // 获取数据源对象
	    DataSource dataSource = ShardingDataSourceFactory.createDataSource(dataSourceMap, shardingRuleConfig, new Properties());
	    return dataSource;
	}

	public static void main(String[] args) throws Exception
	{
		//create table t_order0(order_id int,user_id int,dt datetime);
		//create table t_order1(order_id int,user_id int,dt datetime);
		//create table t_order_item0(item_id int,order_id int,prdt_id int,num int);
		//create table t_order_item1(item_id int,order_id int,prdt_id int,num int);
		DataSource ds = Db.getDb();
		Connection conn = ds.getConnection();
		Statement stat = conn.createStatement();
		String sql0 = "insert into t_order(order_id,user_id,dt) values(0,0,'2020-01-01 00:00:01')";
		stat.executeUpdate(sql0);
		String sql1 = "insert into t_order_item(item_id,order_id,prdt_id,num) values(0,0,0,10)";
		stat.executeUpdate(sql1);

		String sql2 = "insert into t_order(order_id,user_id,dt) values(1,1,'2020-01-01 00:00:01')";
		stat.executeUpdate(sql2);
		String sql3 = "insert into t_order_item(item_id,order_id,prdt_id,num) values(1,1,0,20)";
		stat.executeUpdate(sql3);


	}
}
ShardingSphere-Proxy为例演示如何使用ShardingSphere分库分表
主要配置ShardingSphere-Proxy,设置分库分表策略,启动ShardingSphere-Proxy充当数据库代理,客户端程序连接ShardingSphere-Proxy,不直接操作数据库。
1、配置ShardingSphere-Proxy的配置文件
server.yaml
#
# Licensed to the Apache Software Foundation (ASF) under one or more
# contributor license agreements.  See the NOTICE file distributed with
# this work for additional information regarding copyright ownership.
# The ASF licenses this file to You under the Apache License, Version 2.0
# (the "License"); you may not use this file except in compliance with
# the License.  You may obtain a copy of the License at
#
#     http://www.apache.org/licenses/LICENSE-2.0
#
# Unless required by applicable law or agreed to in writing, software
# distributed under the License is distributed on an "AS IS" BASIS,
# WITHOUT WARRANTIES OR CONDITIONS OF ANY KIND, either express or implied.
# See the License for the specific language governing permissions and
# limitations under the License.
#

######################################################################################################
#
# If you want to configure orchestration, authorization and proxy properties, please refer to this file.
#
######################################################################################################
#
#orchestration:
#  orchestration_ds:
#    orchestrationType: registry_center,config_center,distributed_lock_manager
#    instanceType: zookeeper
#    serverLists: localhost:2181
#    namespace: orchestration
#    props:
#      overwrite: false
#      retryIntervalMilliseconds: 500
#      timeToLiveSeconds: 60
#      maxRetries: 3
#      operationTimeoutMilliseconds: 500
#
authentication:
  users:
    root:
      password: root
#    sharding:
#      password: sharding
#      authorizedSchemas: sharding_db
#
#props:
#  max.connections.size.per.query: 1
#  acceptor.size: 16  # The default value is available processors count * 2.
#  executor.size: 16  # Infinite by default.
#  proxy.frontend.flush.threshold: 128  # The default value is 128.
#    # LOCAL: Proxy will run with LOCAL transaction.
#    # XA: Proxy will run with XA transaction.
#    # BASE: Proxy will run with B.A.S.E transaction.
#  proxy.transaction.type: LOCAL
#  proxy.opentracing.enabled: false
#  proxy.hint.enabled: false
#  query.with.cipher.column: true
#  sql.show: false
#  allow.range.query.with.inline.sharding: false
config-sharding.yaml
#
# Licensed to the Apache Software Foundation (ASF) under one or more
# contributor license agreements.  See the NOTICE file distributed with
# this work for additional information regarding copyright ownership.
# The ASF licenses this file to You under the Apache License, Version 2.0
# (the "License"); you may not use this file except in compliance with
# the License.  You may obtain a copy of the License at
#
#     http://www.apache.org/licenses/LICENSE-2.0
#
# Unless required by applicable law or agreed to in writing, software
# distributed under the License is distributed on an "AS IS" BASIS,
# WITHOUT WARRANTIES OR CONDITIONS OF ANY KIND, either express or implied.
# See the License for the specific language governing permissions and
# limitations under the License.
#

######################################################################################################
#
# Here you can configure the rules for the proxy.
# This example is configuration of sharding rule.
#
# If you want to use sharding, please refer to this file;
# if you want to use master-slave, please refer to the config-master_slave.yaml.
#
######################################################################################################
#
schemaName: sharding_db
#
#dataSources:
#  ds_0:
#    url: jdbc:postgresql://127.0.0.1:5432/demo_ds_0?serverTimezone=UTC&useSSL=false
#    username: postgres
#    password: postgres
#    connectionTimeoutMilliseconds: 30000
#    idleTimeoutMilliseconds: 60000
#    maxLifetimeMilliseconds: 1800000
#    maxPoolSize: 50
#  ds_1:
#    url: jdbc:postgresql://127.0.0.1:5432/demo_ds_1?serverTimezone=UTC&useSSL=false
#    username: postgres
#    password: postgres
#    connectionTimeoutMilliseconds: 30000
#    idleTimeoutMilliseconds: 60000
#    maxLifetimeMilliseconds: 1800000
#    maxPoolSize: 50
#
#shardingRule:
#  tables:
#    t_order:
#      actualDataNodes: ds_${0..1}.t_order_${0..1}
#      tableStrategy:
#        inline:
#          shardingColumn: order_id
#          algorithmExpression: t_order_${order_id % 2}
#      keyGenerator:
#        type: SNOWFLAKE
#        column: order_id
#    t_order_item:
#      actualDataNodes: ds_${0..1}.t_order_item_${0..1}
#      tableStrategy:
#        inline:
#          shardingColumn: order_id
#          algorithmExpression: t_order_item_${order_id % 2}
#      keyGenerator:
#        type: SNOWFLAKE
#        column: order_item_id
#  bindingTables:
#    - t_order,t_order_item
#  defaultDatabaseStrategy:
#    inline:
#      shardingColumn: user_id
#      algorithmExpression: ds_${user_id % 2}
#  defaultTableStrategy:
#    none:

######################################################################################################
#
# If you want to connect to MySQL, you should manually copy MySQL driver to lib directory.
#
######################################################################################################

#schemaName: sharding_db
#
dataSources:
  ds0:
    url: jdbc:mysql://127.0.0.1:3306/ds0?serverTimezone=UTC&useSSL=false
    username: root
    password: root
    connectionTimeoutMilliseconds: 30000
    idleTimeoutMilliseconds: 60000
    maxLifetimeMilliseconds: 1800000
    maxPoolSize: 50
  ds1:
    url: jdbc:mysql://127.0.0.1:3306/ds1?serverTimezone=UTC&useSSL=false
    username: root
    password: root
    connectionTimeoutMilliseconds: 30000
    idleTimeoutMilliseconds: 60000
    maxLifetimeMilliseconds: 1800000
    maxPoolSize: 50

shardingRule:
  tables:
    t_order:
      actualDataNodes: ds${0..1}.t_order${0..1}
      tableStrategy:
        inline:
          shardingColumn: order_id
          algorithmExpression: t_order${order_id % 2}
      keyGenerator:
        type: SNOWFLAKE
        column: order_id
    t_order_item:
      actualDataNodes: ds${0..1}.t_order_item${0..1}
      tableStrategy:
        inline:
          shardingColumn: order_id
          algorithmExpression: t_order_item${order_id % 2}
      keyGenerator:
        type: SNOWFLAKE
        column: order_item_id

  bindingTables:
    - t_order,t_order_item
  defaultDatabaseStrategy:
    inline:
      shardingColumn: order_id
      algorithmExpression: ds${order_id % 2}
  defaultTableStrategy:
    none:
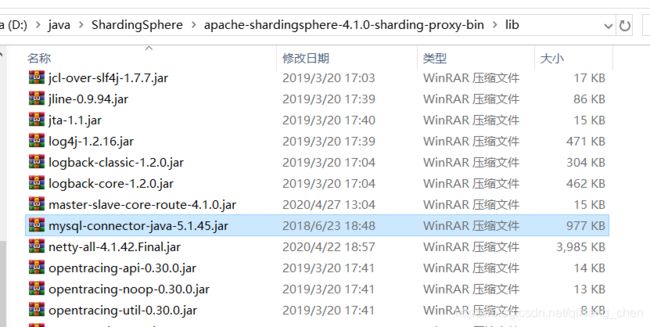
2、复制Mysql驱动到ShardingSphere-Proxy的lib目录下

3、客户端程序
package com.hk.sec.db;

import java.sql.Connection;
import java.sql.Statement;
import java.util.ArrayList;
import java.util.HashMap;
import java.util.List;
import java.util.Map;
import java.util.Properties;

import javax.sql.DataSource;

import org.apache.commons.dbcp2.BasicDataSource;
import org.apache.shardingsphere.api.config.sharding.ShardingRuleConfiguration;
import org.apache.shardingsphere.api.config.sharding.TableRuleConfiguration;
import org.apache.shardingsphere.api.config.sharding.strategy.InlineShardingStrategyConfiguration;
import org.apache.shardingsphere.shardingjdbc.api.ShardingDataSourceFactory;

public class DbProxy {
	public static DataSource getDb() throws Exception
	{
	    // 配置真实数据源
	    Map<String, DataSource> dataSourceMap = new HashMap<>();

	    // 配置第一个数据源
	    BasicDataSource dataSource1 = new BasicDataSource();
	    dataSource1.setDriverClassName("com.mysql.jdbc.Driver");
	    dataSource1.setUrl("jdbc:mysql://localhost:3307/sharding_db");
	    dataSource1.setUsername("root");
	    dataSource1.setPassword("root");
	    return dataSource1;
	}

	public static void main(String[] args) throws Exception
	{
		//create table t_order0(order_id int,user_id int,dt datetime);
		//create table t_order1(order_id int,user_id int,dt datetime);
		//create table t_order_item0(item_id int,order_id int,prdt_id int,num int);
		//create table t_order_item1(item_id int,order_id int,prdt_id int,num int);
		DataSource ds = DbProxy.getDb();
		Connection conn = ds.getConnection();
		Statement stat = conn.createStatement();
		String sql0 = "insert into t_order(order_id,user_id,dt) values(0,0,'2020-01-01 00:00:01')";
		stat.executeUpdate(sql0);
		String sql1 = "insert into t_order_item(item_id,order_id,prdt_id,num) values(0,0,0,10)";
		stat.executeUpdate(sql1);

		String sql2 = "insert into t_order(order_id,user_id,dt) values(1,1,'2020-01-01 00:00:01')";
		stat.executeUpdate(sql2);
		String sql3 = "insert into t_order_item(item_id,order_id,prdt_id,num) values(1,1,0,20)";
		stat.executeUpdate(sql3);


	}
}
工程代码以及修改过配置的ShardingSphere-Proxy可以从云盘下载,验证ShardingSphere分库分表功能
工程代码
链接:https://pan.baidu.com/s/10CyMMspoxvSoe__DZo5E_g
提取码:o0u5
修改过配置的ShardingSphere-Proxy下载
链接:https://pan.baidu.com/s/1ITyVJgfSv-iXpgLgPWxWcw
提取码:sosc

