Unity3D 实现深度相机 Depth Camera
工作原因,又把Unity3D捡起来了,需要实现一个深度相机。网上查了查资料,整理如下。
参考:http://williamchyr.com/2013/11/unity-shaders-depth-and-normal-textures/
我的代码在:
https://github.com/NianLi71/Camera-Util-Unity3D/tree/master/DepthCamera
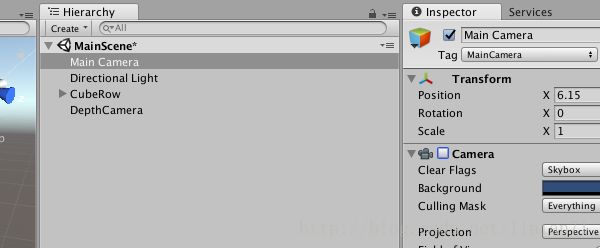
一、如下建立场景,做一排cube放入一个CubeRow中。放好MainCamera位置,然后复制出DepthCamera,这样两个相机的位置视角一致,方便后续调试。
新建一个shader,参考链接中的地址,输入代码:
// Upgrade NOTE: replaced 'mul(UNITY_MATRIX_MVP,*)' with 'UnityObjectToClipPos(*)'

Shader "Custom/DepthGrayscale" {
SubShader {
Tags { "RenderType"="Opaque" }

Pass{
CGPROGRAM
#pragma vertex vert
#pragma fragment frag
#include "UnityCG.cginc"

sampler2D _CameraDepthTexture;

struct v2f {
   float4 pos : SV_POSITION;
   float4 scrPos:TEXCOORD1;
};

//Vertex Shader
v2f vert (appdata_base v){
   v2f o;
   o.pos = UnityObjectToClipPos (v.vertex);
   o.scrPos=ComputeScreenPos(o.pos);
   //for some reason, the y position of the depth texture comes out inverted
   //o.scrPos.y = 1 - o.scrPos.y;
   return o;
}

//Fragment Shader
half4 frag (v2f i) : COLOR{
   float depthValue = Linear01Depth (tex2Dproj(_CameraDepthTexture, UNITY_PROJ_COORD(i.scrPos)).r);
   half4 depth;

   depth.r = depthValue;
   depth.g = depthValue;
   depth.b = depthValue;

   depth.a = 1;
   return depth;
}
ENDCG
}
}
FallBack "Diffuse"
}
新建一个Material,并选择刚刚建好的shader文件
给DepthCamera添加脚本文件,输入以下代码:
using System.Collections;
using System.Collections.Generic;
using UnityEngine;

[ExecuteInEditMode]   // 可以在编辑界面看到深度绘制效果
public class MainCameraDepth : MonoBehaviour {

	public Material mat;
	public int width = 512;
	public int height= 512;

	private Camera cam;
	private RenderTexture rt;
	private int image_id = 0;

	void Start () {
		cam = GetComponent();   //获取当前绑定到脚本的相机

		cam.depthTextureMode = DepthTextureMode.Depth;

		//		rt = new RenderTexture (width, height, 24);  // 24 bit depth
		//		cam.targetTexture = rt;
	}

	void OnRenderImage (RenderTexture source, RenderTexture destination){
		Graphics.Blit(source,destination,mat);
		//mat is the material which contains the shader
		//we are passing the destination RenderTexture to
	}

	// Update is called once per frame
	void Update () {

	}
}
二、回到Unity主界面,将material文件拖拽给DepthCamera相机脚本,并将Audio Listener取消勾选。
之后,如图将Main Camera的Camera方框取消勾选:
在编辑界面即可看到深度图输出:
看到全黑的cube原因是相机的远裁剪平面设置的太远了。将DepthCamera的Clipping Planes far调整近一些:
即可看到灰度深度图:
三、保存深度图到文件Duplicate复制DepthCamera,并重新命名SnapDepthCamera,再添加一个脚本文件SnapDepthCamera.cs,输入以下代码:
using System.Collections;
using System.Collections.Generic;
using UnityEngine;

[ExecuteInEditMode]   // 可以在编辑界面看到深度绘制效果
public class SnapDepthCamera : MonoBehaviour {

	public Material mat;
	public int width = 512;
	public int height= 512;

	private Camera cam;
	private RenderTexture rt;
	private int image_id = 0;
	private bool SnapFlag = false;

	void Start () {
		cam = GetComponent();   //获取当前绑定到脚本的相机

		cam.depthTextureMode = DepthTextureMode.Depth;

		rt = new RenderTexture (width, height, 24);  // 24 bit depth
		cam.targetTexture = rt;
	}

	void OnRenderImage (RenderTexture source, RenderTexture destination){
		Graphics.Blit(source,destination,mat);
		//mat is the material which contains the shader
		//we are passing the destination RenderTexture to

		if(SnapFlag) {
			RenderTexture currentRT = RenderTexture.active;   // save current active rendertexture
			RenderTexture.active = destination;

			Texture2D image = new Texture2D(destination.width, destination.height,TextureFormat.RGB24, false);
			image.ReadPixels(new Rect(0, 0, destination.width, destination.height), 0, 0);
			image.Apply();

			savePNG (image, "./depthImages/camera_image" + image_id + ".png");

			image_id++;
			RenderTexture.active = currentRT; // restore
		}
	}

	private void savePNG(Texture2D image, string path_file) {
		// store the texture into a .PNG file
		byte[] bytes = image.EncodeToPNG ();

		// save the encoded image to a file
		System.IO.File.WriteAllBytes (path_file, bytes);
	}

	// Update is called once per frame
	void Update () {
		if (Input.GetKeyDown ("p")) {
			SnapFlag = true;
		} else
			SnapFlag = false;
	}
}
之后在项目首页新建文件夹:depthImages/,之后运行程序,按'p'键即可保存深度图。


