UnityShader_倒影,水波倒影(代码已更新)(2)
相较于上一个水波倒影,这个水波倒影要更为复杂,但也更为真实,大体思路如下
利用脚本抓取水面的镜像,并在Shader中进行处理
先上个Gif解解馋,代码后面整理好再上传,最近实在事情多,早上优化到晚上的工作
原理剖析:
首先镜面反射的原理: 如下图,入射光经过表面光滑的平面产生关于平面法线的反射光,人眼收集到反射光产生成像

使用上面原理,我们只需要收集 从物体发出的反射光即可,看下图
我们从镜面看到的倒影其实是从 图中物体反射光方向 发出的光,因此,我们可以在视角方向关于镜面对称的位置 A 设置一个相机,方向与物体反射光方向反向,然后将 A 位置渲染的图像映在镜面,即产生我们的倒影。

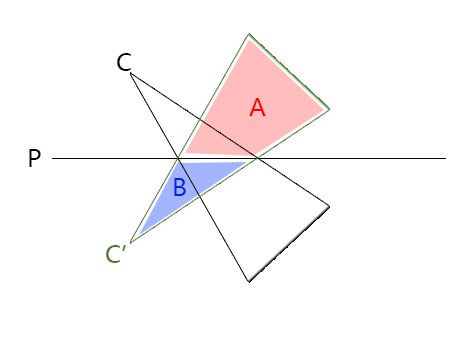
问题: 当出现如下图,C’为反射相机,C为视角方向,P为镜面。
此时C’的相机范围能够照射到AB两个区域的物体,但是实际上,B区域的物体不应该被渲染出来,因为被P镜面挡住了,此时我们应该更改C’反射相机的剪裁面,将近剪裁面改成P所在的平面。(关于远近剪裁面详见《Unity Shader入门精要 4.6.7》,第二张图是关于远近剪裁面的简易图)

以上就是在镜面中的两个核心问题。下面我们来看看如何将上面问题解决并用于代码中。
关于问题1,反射矩阵:
如下图(加粗为矢量),Q为被反射点,Q’为反射点,P为镜面,n为镜面的单位法线,d为平面到原点的距离
设k为平面P到Q点的方向向量,M为k所在直线与平面P的交点,且k与n平行
则 n M+d=0 ,(M是平面上任意一点的时候也满足上式)
∴Q’ = Q - 2kn
∵k= Qn - Mn
∴Q’ = Q - 2n(Qn -(-d))= Q-2n(Qn + d)
即
Q’x = (1-2nxnx)Qx-2nxnyQy-2nxnzQz-2nxd
Q’y = -2nxnyQx+(1-2nyny)Qy-2nynzQz-2nyd
Q’z = -2nxnzQx-2nynzQy+(1-2nznz)Qz-2nz*d
上式可以写成如下
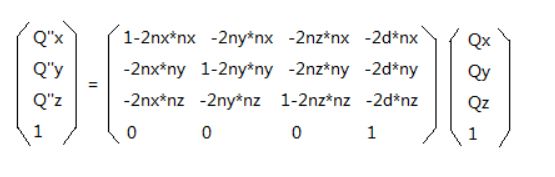
反射矩阵就是中间那个矩阵。

一篇同样关于反射矩阵的描写
关于问题2,替换剪裁平面:
剪裁矩阵的相关计算链接
C#的取镜面代码
using UnityEngine;
using System.Collections;
[ExecuteInEditMode]
public class Mirror : MonoBehaviour
{
public bool m_DisablePixelLights = true;
public int m_TextureSize = 256;
public float m_ClipPlaneOffset = 0.07f;
public bool m_IsFlatMirror = true;
public Vector3 offset = new Vector3(0,0,0);
public LayerMask m_ReflectLayers = -1;
private Hashtable m_ReflectionCameras = new Hashtable();
private RenderTexture m_ReflectionTexture = null;
private int m_OldReflectionTextureSize = 0;
//是否已经在渲染
private static bool s_InsideRendering = false;
public void OnWillRenderObject()
{
if( !enabled || !GetComponent<Renderer>() || !GetComponent<Renderer>().sharedMaterial || !GetComponent<Renderer>().enabled )
return;
Camera cam = Camera.current;//玩家视角相机
if( !cam )
return;
if( s_InsideRendering )
return;
s_InsideRendering = true;
Camera reflectionCamera;//反射相机
CreateMirrorObjects( cam, out reflectionCamera );
Vector3 pos = transform.position + offset;
Vector3 normal;
if(m_IsFlatMirror){
normal = transform.up;
}
else{
normal= transform.position - cam.transform.position ;
normal.Normalize();
}
int oldPixelLightCount = QualitySettings.pixelLightCount;//限制像素光的数量
if( m_DisablePixelLights )
QualitySettings.pixelLightCount = 0;
UpdateCameraModes( cam, reflectionCamera );
float d = -Vector3.Dot (normal, pos) - m_ClipPlaneOffset;
Vector4 reflectionPlane = new Vector4 (normal.x, normal.y, normal.z, d);
Matrix4x4 reflection = Matrix4x4.zero;//反射矩阵
CalculateReflectionMatrix (ref reflection, reflectionPlane);
Vector3 oldpos = cam.transform.position;
Vector3 newpos = reflection.MultiplyPoint( oldpos );//反射相机的位置?
reflectionCamera.worldToCameraMatrix = cam.worldToCameraMatrix * reflection;//反射相机的worldToCameraMatrix矩阵进行反射
// 计算剪切面(把原相机的位置及法线经上面计算的反射矩阵变化)
Vector4 clipPlane = CameraSpacePlane( reflectionCamera, pos, normal, 1.0f );
Matrix4x4 projection = cam.projectionMatrix; //投影矩阵
CalculateObliqueMatrix (ref projection, clipPlane);//计算出剪切面相关的投影矩阵,剪切面以下内容不显示
reflectionCamera.projectionMatrix = projection;
reflectionCamera.cullingMask = ~(1<<4) & m_ReflectLayers.value; //设置可以反射的物体,已经忽略了本身
reflectionCamera.targetTexture = m_ReflectionTexture;
//注意当相机镜像后,其渲染的模型的顶点绕序也会镜像,需要将背面裁剪设置为正面裁剪,渲染结束后再修改回来
GL.invertCulling = true;
reflectionCamera.transform.position = newpos;
Vector3 euler = cam.transform.eulerAngles;
reflectionCamera.transform.eulerAngles = new Vector3(0, euler.y, euler.z);
reflectionCamera.Render();
reflectionCamera.transform.position = oldpos;
GL.invertCulling = false;
Material[] materials = GetComponent<Renderer>().sharedMaterials;
foreach( Material mat in materials ) {
if( mat.HasProperty("_Ref") )
mat.SetTexture( "_Ref", m_ReflectionTexture );
}
if( m_DisablePixelLights )
QualitySettings.pixelLightCount = oldPixelLightCount;
s_InsideRendering = false;
}
void OnDisable()
{
if( m_ReflectionTexture ) {
DestroyImmediate( m_ReflectionTexture );
m_ReflectionTexture = null;
}
foreach( DictionaryEntry kvp in m_ReflectionCameras )
DestroyImmediate( ((Camera)kvp.Value).gameObject );
m_ReflectionCameras.Clear();
}
/// Vector4( cam平面法线, -cpos的法线 )
private Vector4 CameraSpacePlane (Camera cam, Vector3 pos, Vector3 normal, float sideSign)
{
Vector3 offsetPos = pos + normal * m_ClipPlaneOffset;
Matrix4x4 m = cam.worldToCameraMatrix;
Vector3 cpos = m.MultiplyPoint( offsetPos );
Vector3 cnormal = m.MultiplyVector( normal ).normalized * sideSign;
return new Vector4( cnormal.x, cnormal.y, cnormal.z, -Vector3.Dot(cpos,cnormal) );
}
/// Shader中的渲染代码
Shader "Mirrors/Bumped Specular"
{
	Properties {
		_Color ("Main Color", Color) = (1,1,1,1)
		_MainTex ("Base (RGB) Gloss (A)", 2D) = "white" {}
		[NoScaleOffset] _NoiseTex ("NoiseTex", 2D) = "white" {}             // 噪点图
		_BlendLevel("Main Material Blend Level",Range(0,1))=1
		_SpecColor ("Specular Color", Color) = (0.5, 0.5, 0.5, 1)
		_Shininess ("Shininess", Range (0.03, 128)) = 0.078125
		_BumpMap ("Normalmap", 2D) = "bump" {}
		_Bumpness ("Bump Rate",Range(0,10))= 0.5
		_Ref ("Auto Generate!", 2D) = "white" {}
		_RefColor("Reflection Color",Color) = (1,1,1,1)
		_RefRate ("Reflective Rate", Range (0, 1)) = 1
		_Distortion ("Reflective Distortion", Range (0, 1)) = 0				// 镜面扭曲程度
		_NoiseScaleX ("NoiseScaleX", Range(0, 1)) = 0.1                     // 水平噪点放大系数
		_NoiseScaleY ("NoiseScaleY", Range(0, 1)) = 0.1                     // 垂直放大系数
		_NoiseSpeedX ("NoiseSpeedX", Range(0, 10)) = 1                      // 水平扰动速度
		_NoiseSpeedY ("NoiseSpeedY", Range(0, 10)) = 1                      // 垂直扰动速度
		_NoiseBrightOffset ("NoiseBrightOffset", Range(0, 0.9)) = 0.25      // 噪点图整体的数值偏移
		// _NoiseFalloff ("NoiseFalloff", Range(0, 1)) = 1                     // 扰动衰减
		// _MirrorRange ("MirrorRange", Range(0, 1)) = 1
	}
	SubShader
	{
		Pass
		{
			Tags {"LightMode" = "ForwardBase" "RenderType"="Opaque" }
			LOD 400

			CGPROGRAM
			// #pragma surface surf BlinnPhong
			#pragma multi_compile_fwdbase
			//顶点函数定义
			#pragma vertex vert
			//片元函数定义
			#pragma fragment frag
			// #pragma target 3.0
			// #pragma debug
			//引入必要的Unity库 如下面的UnityObjectToClipPos 就是库中函数
			#include "UnityCG.cginc"
			//引入光照库 _LightColor0需要用
			#include "Lighting.cginc"

			sampler2D _MainTex;
			sampler2D _BumpMap;
			sampler2D _NoiseTex;
			sampler2D _Ref;
			float4 _MainTex_ST;//图片的(平铺和偏移系数)如果要使图片的Tilling和Offset生效就必须定义
			float4 _BumpMap_ST;
			float4 _NoiseTex_ST;
			fixed4 _Color;
			half _Shininess;
			half _RefRate;
			half _Bumpness;
			half _BlendLevel;
			half _Distortion;
			fixed4 _RefColor;
			fixed _NoiseScaleX, _NoiseScaleY;
			fixed _NoiseSpeedX, _NoiseSpeedY;
			fixed _NoiseBrightOffset;
			// fixed _NoiseFalloff;
			// float _MirrorRange;

			struct appdata
			{
				float4 vertex : POSITION;//每个顶点结构体必须有的
				float3 normal : NORMAL;//定义法线
				float4 tangent :TANGENT;//定义切线
				float4 maintex : TEXCOORD0;//存储主贴图纹理的坐标信息
				float4 noisetex : TEXCOORD1;//存储噪声纹理的坐标信息
				float4 bumptex : TEXCOORD2;//存储法线纹理的坐标信息
				float2 reftex : TEXCOORD3;//存储相机拍摄纹理的坐标信息
			};

			struct v2f
			{
				float4 pos : SV_POSITION;//每个片元结构体必须有的
				float3 lightDir : TEXCOORD0;
				float3 viewDir : TEXCOORD1;
				float4 uv1 : TEXCOORD2;//用于存储主贴图、噪声纹理信息
				float4 uv2 : TEXCOORD3;//用于存储法线、相机拍摄纹理信息
				float4 projPos :TEXCOORD4;
			};

			v2f vert (appdata v)
			{
				v2f o;
				o.pos = UnityObjectToClipPos(v.vertex);//把顶点从模型空间转换到剪裁空间
				o.uv1.xy = TRANSFORM_TEX(v.maintex, _MainTex);
				o.uv1.zw = TRANSFORM_TEX(v.noisetex, _NoiseTex);
				o.uv2.xy = TRANSFORM_TEX(v.bumptex, _BumpMap);
				o.projPos = ComputeGrabScreenPos(o.pos);
				// o.uv2.zw = v.reftex;
				//这里是UnityCG.cginc 库里面定义函数,利用normal和tangent生成对应的rotation矩阵(模型空间转到切线空间的变换矩阵)
				//这也是在上面必须定义normal和tangent的原因
				TANGENT_SPACE_ROTATION;
				o.lightDir = mul(rotation,ObjSpaceLightDir(v.vertex));//将模型顶点的光照方向转到切线空间
				o.viewDir = mul(rotation,ObjSpaceViewDir(v.vertex));//将模型顶点的视角方向转到切线空间
				return o;
			}

			fixed4 frag (v2f i) : SV_Target//返回一个RGBA到模型上
			{
				fixed3 lightDir = normalize(i.lightDir);
				fixed3 viewDir = normalize(i.viewDir);

				//这里十分奇怪,要在片元着色器里面计算下面的才不会发生偏移,如果在顶点着色器中计算的话下面的会发生随视角靠近扭曲的现象
				i.uv2.zw = i.projPos.xy/i.projPos.w;

				fixed2 ouvxy = fixed2( // 噪点图采样,用于主纹理的UV偏移的
				tex2D(_NoiseTex, i.uv1.zw + fixed2(_Time.x * _NoiseSpeedX, 0)).r,
				tex2D(_NoiseTex, i.uv1.zw + fixed2(0, _Time.x * _NoiseSpeedY)).r);
				ouvxy -= _NoiseBrightOffset; // 0~1 to ==> -_NoiseBrightOffset~ 1 - _NoiseBrightOffset
				ouvxy *= fixed2(_NoiseScaleX, _NoiseScaleY);    // 扰动放大系数

				// float scale = i.projPos.x / _MirrorRange;          // 用距离来作为扰动衰减
				// scale = lerp(scale, 1, (1 - _NoiseFalloff));    // 距离越近扰动越是衰减(即:与镜面距离越近,基本是不扰动的,所以我们可以看到边缘与镜面的像素是吻合的)
				// ouvxy *= scale;

				fixed4 packedNormal = tex2D(_BumpMap,i.uv2.xy + ouvxy);//采样_BumpMap里面的法线信息
				//UnpackNormal英文含义就是 解压法线 将法线从颜色信息里面解压出来
				//这里涉及到一个知识点 为什么法线贴图是蓝色调的
				//法线贴图里面法线都是存储在切线空间里面的
				//详细请看文末提到的博客
				fixed3 tangentNormal = UnpackNormal(packedNormal);
				//切线空间的法线是单位长度为1的,所以只要求出其中两个就可以利用长度求出另一个值
				tangentNormal.xy *= _Bumpness;
				tangentNormal.z = sqrt(1-saturate(dot(tangentNormal.xy,tangentNormal.xy)));


				fixed3 albedo = tex2D(_MainTex,i.uv1.xy).rgb * _Color * _BlendLevel;//采样主贴图的纹理颜色
				//半罗伯特反射
				fixed3 diffuse = _LightColor0.rgb * albedo * (1+dot(lightDir,tangentNormal))/2;
				//Blinn-Phong模型高光
				fixed3 halfView = normalize(lightDir + viewDir);
				fixed3 specular = _LightColor0.rgb * _SpecColor * pow(saturate(dot(tangentNormal,halfView)),_Shininess);

				fixed3 reflect = tex2D(_Ref,i.uv2.zw + tangentNormal.xy*_Distortion + ouvxy).rgb * _RefRate ;
				return fixed4(diffuse + specular + reflect,1);
			}
			ENDCG
		}
	}
	FallBack "Specular"
}
下图为QualitySettings.pixelLightCount参数设置的含义

完整代码百度盘,提取码:oyy9