ConstraintLayout&MotionLayout
最近编辑于2018年9月7日
ConstraintLayout
顾名思义,约束布局———在constraintLayout下的子控件都会受到外来的“力”,从而确定该子控件的位置。
一、constraintLayout来自支持库,所以要想使用先要在gradle中引入
repositories {
    google()
}
dependencies {
    implementation 'com.android.support.constraint:constraint-layout:1.1.2'
}
二、“力”的发出者,作用点,作用方向
举个例子:
app:layout_constraintLeft_toLeftOf="parent"parent:发出者是parent;
constraintLeft:作用在该子控件的左侧;
toLeftOf constraintLeft:从parent的左侧拉住该子控件的左侧。
“力”的发出者:
parent:包含此控件的constraintLayout;
@+id/button8:其他子控件;
@+id/guideline3:准线———一条用于定位的不可见的线;
举个例子:
android:orientation="vertical":这是一条从上至下的准线;
app:layout_constraintGuide_percent="0.5":该准线位于constraintLayout的50%处;
这条准线从中间把constraintLayout分成左右两半;
@+id/barrier7:屏障———由几个控件组成的一道不可见的“墙”;
举个例子:
app:constraint_referenced_ids="textView2,textView1":由 textView2,textView1组成的“墙”;
app:barrierDirection="end":在textView2,textView1的尾部(一般指右侧);
app:layout_constraintStart_toEndOf="@+id/barrier7":这个墙的尾部(写toStartOf一样的效果,因为“墙”只是一条线,不分首尾)拉住textView3的头部;
最后效果图:
“力”的方向与作用点:
layout_constraintLeft_toLeftOf
layout_constraintLeft_toRightOf
layout_constraintRight_toLeftOf
layout_constraintRight_toRightOf
layout_constraintTop_toTopOf
layout_constraintTop_toBottomOf
layout_constraintBottom_toTopOf
layout_constraintBottom_toBottomOf
layout_constraintBaseline_toBaselineOf
layout_constraintStart_toEndOf
layout_constraintStart_toStartOf
layout_constraintEnd_toStartOf
layout_constraintEnd_toEndOf
layout_constraintBaseline_toBaselineOf:文字基准线对齐文字基准线,这个这么理解;
另外:constraintlayout中的app:layout_constraintLeft_toLeftOf="parent"和app:layout_constraintEnd_toEndOf="parent"配合起来用会使布局靠近parent的右侧。
        android:layout_width="wrap_content"
        app:layout_constraintEnd_toEndOf="parent"
        app:layout_constraintHorizontal_bias="1.0"
        app:layout_constraintStart_toStartOf="parent"
等价于
        android:layout_width="0dp"//或者wrap_content
        app:layout_constraintLeft_toLeftOf="parent"
        app:layout_constraintEnd_toEndOf="parent"
效果图如下:

三、“力”的大小与bias:
默认情况下,左右的力是相同大小的,上下的力是相同大小的;
左右居中只需要如下:
                 app:layout_constraintLeft_toLeftOf="parent"
                 app:layout_constraintRight_toRightOf="parent
那么如何更偏左一点,加大左边的力?那不是直接拉到最左边了?假设控件处于一个左右横置的管子中,那么只要减少左边的压强,那么控件就会往左跑。跑到哪里?还是不确定。Google提供了更简单的方法是控件停在需要的位置:
                 app:layout_constraintHorizontal_bias="0.3"
                 app:layout_constraintLeft_toLeftOf="parent"
                 app:layout_constraintRight_toRightOf="parent
app:layout_constraintHorizontal_bias="0.3":该控件会停在左边占空白30%,右侧占空白70%的位置。
四、边距:
和原来一样的边距表示方式:
android:layout_marginStart
android:layout_marginEnd
android:layout_marginLeft
android:layout_marginTop
android:layout_marginRight
android:layout_marginBottom
另外还提供当某一个方向上的“力”的发出者消失的情况的边距:
layout_goneMarginStart
layout_goneMarginEnd
layout_goneMarginLeft
layout_goneMarginTop
layout_goneMarginRight
layout_goneMarginBottom
举个例子:
android:layout_marginRight="10dp":button4 visiable或invisiable时button5距离button4 10dp;
app:layout_goneMarginRight="110dp":当button4 gone时button5距离button4变成的点 110dp。
五、圆定位:
效果如下: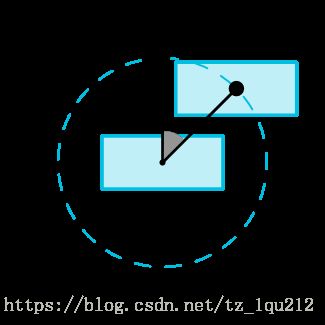
六、控件的大小:
和原来一样的方式设置最大最小宽高
android:minWidth
android:minHeight
android:maxWidth
android:maxHeight
设置宽高的三种方式:
具体尺寸;
WRAP_CONTENT:包含内容大小;
0dp:相当于原来的MATCH_CONSTRAINT。
使用比例设置宽高:
如下两例,高将根据宽的长度来设置:
七、链(chain)
几个在横向或者竖向上相邻的两两控件互相作用的几个控件构成链。
链头是就是最左边或者最上面的那个控件,关于链的整体属性设置都需要在链头中设置,在其他链结中设置无效。

chainStyle决定链中元素互相之间的位置关系
spread:默认方式,链结会舒展开;
spread_inside:链结会舒展,链的两头会一直舒展到parent边;
packed:链结会聚在一起。
图示,以及相应代码如下:
MotionLayout
motionlayout是一种根据动作进行动画的布局。
一、motionlayout是constraintlayout支持库2.0版本推出的,想要使用需要先引入:
implementation 'com.android.support.constraint:constraint-layout:2.0.0-alpha2'
二、所需元素:
以MotionLayout为根布局指定需要进行动画的布局;
使用app:layoutDescription="@xml/scene_01"指定动画文件;
在xml文件夹下新建MotionScene为根节点的动画文件;
举个例子:
三、MotionScene文件
Transition节点:motionScene文件必须包含的节点,使用motion:constraintSetStart和motion:constraintSetEnd来指定动画的第一帧和最后一帧。
        motion:constraintSetStart="@layout/motion_01_cl_start"
        motion:constraintSetEnd="@layout/motion_01_cl_end"
可以指定第一帧和最后一帧在layout文件下;
        motion:constraintSetEnd="@+id/end"
        motion:constraintSetStart="@+id/start"
也可以指定第一帧和最后一帧在对应id的ConstraintSet节点下。
ConstraintSet节点:节点下包含多个Constraint节点,每个Constraint节点代表对应id的控件在第一帧或最后一帧的位置。
Constraint节点除了指定位置大小信息外,可以使用
            android:alpha="1.0"
            android:scaleX="1.1"
            android:scaleY="1.1"
            android:rotation="-45.0"
            android:translationY="8dp"
指定控件透明度、放大倍数、旋转角度、移动距离,还可以
通过CustomAttribute节点指定控件的属性。
来个例子:
OnSwipe节点:使用motion:dragDirection="dragLeft"指定动作方向(动作需要在motionLayout布局中进行),使用motion:touchAnchorId="@id/button"指定需要动画的控件(多个需要动画的控件时任意选择一个id)。
KeyFrameSet节点:指定中间关键帧,其下有KeyPosition、KeyAttribute、KeyCycle三种节点分别用来指定控件的位置、属性、三角函数式位置。但KeyCycle不能与KeyPosition不能同时使用(同时使用只有KeyPosition生效)。
四、ImageFilterView
android.support.constraint.utils.ImageFilterView控件是一个图片渐变动画控件;
他有两种形式;
1、使用android:src="@drawable/roard"、app:altSrc="@drawable/hoford"设置两张图片;
同时使用Crossfade属性指定第一帧或最后一帧的图片是src还是altSrc(0为src图片,1为altSrc图片)。
2、使用一张图片只指定src;
同时使用Saturation属性指定第一帧或者最后一帧的图片是黑白的还是彩色的(0为黑白的,1为彩色的)。
五、使用其他动作来指挥动画
1、只有motionLayout才能只能指挥动画,我们根布局必须使用motionLayout或者其子类,所以我们新建一个类继承motionLayout;
2、需要什么样的动作,就要继承该动作的接口,例如抽屉的抽拉动作接口DrawerLayout.DrawerListener,并在onAttachedToWindow时就监听这个动作;
3、使用该动作的进度设置motionLayout的进度,调用setProgress()方法。
举个例子:
import android.content.Context;
import android.support.constraint.motion.MotionLayout;
import android.support.design.widget.AppBarLayout;
import android.util.AttributeSet;

public class CollapsibleToolbar extends MotionLayout implements AppBarLayout.OnOffsetChangedListener {
    public CollapsibleToolbar(Context context) {
        super(context);
    }

    public CollapsibleToolbar(Context context, AttributeSet attrs) {
        super(context, attrs);
    }

    public CollapsibleToolbar(Context context, AttributeSet attrs, int defStyleAttr) {
        super(context, attrs, defStyleAttr);
    }

    @Override
    public void onOffsetChanged(AppBarLayout appBarLayout, int i) {
        setProgress(-(float) i / (float) (appBarLayout.getTotalScrollRange()));
    }

    @Override
    protected void onAttachedToWindow() {
        super.onAttachedToWindow();
        ((AppBarLayout) getParent()).addOnOffsetChangedListener(this);
    }
}
六、ConstraintHelper
放置在MotionLayout中可以监听并操作子控件;
使用app:constraint_referenced_ids="imageView9"指示需要监听操作的控件:
自定义ConstraintHelper重写updatePreLayout、updatePostLayout、updatePostMeasure、updatePostConstraints:
import android.animation.ObjectAnimator;
import android.content.Context;
import android.support.constraint.ConstraintHelper;
import android.support.constraint.ConstraintLayout;
import android.util.AttributeSet;
import android.view.View;
import android.view.animation.BounceInterpolator;

public class ExampleFlyinBounceHelper extends ConstraintHelper {
    protected ConstraintLayout mContainer;

    public ExampleFlyinBounceHelper(Context context) {
        super(context);
    }

    public ExampleFlyinBounceHelper(Context context, AttributeSet attrs) {
        super(context, attrs);
    }

    public ExampleFlyinBounceHelper(Context context, AttributeSet attrs, int defStyleAttr) {
        super(context, attrs, defStyleAttr);
    }

    @Override
    public void updatePreLayout(ConstraintLayout container) {
        if (mContainer!=container) {
            View[] views = getViews(container);
            for (int i = 0; i < mCount; i++) {
                View view = views[i];
                ObjectAnimator animator = ObjectAnimator.ofFloat(view, "translationX", - 2000, 0).setDuration(1000);
                animator.setInterpolator(new BounceInterpolator());
                animator.start();
            }
        }
        mContainer = container;
    }
}
这里进行了一个界面初始化时弹性移动的动画。
七、LottieAnimationView
可以使用MotionLayout动作的进度控制LottieAnimationView动画的进度。
1、先引入三方包:
implementation 'com.airbnb.android:lottie:2.5.1'2、使用LottieAnimationView控件并指定app:lottie_rawRes="@raw/walkthrough"
关于Lottie动画的制作与更多使用,可以参考https://airbnb.design/lottie/ https://www.jianshu.com/p/d0f4c823fa06
https://github.com/airbnb/lottie-android
关于VectorDrawables的制作与使用,可以参考https://jingyan.baidu.com/article/7f766daf8775df4101e1d0e1.html
https://developer.android.com/guide/topics/graphics/vector-drawable-resources
更多参考:https://github.com/googlesamples/android-ConstraintLayoutExamples
https://github.com/1qu212/androidMotionLayoutExamplesmaster
https://developer.android.com/reference/android/support/constraint/ConstraintLayout
https://developer.android.com/reference/android/support/constraint/motion/MotionLayout