Binder - 向ServiceManager注册服务 和 获取服务
1.注册服务 SM(ServiceManager)
SystemServiceRegistry 这个类在加载的时候注册了n多服务 registerService(Context.ACTIVITY_SERVICE, ActivityManager.class,
new CachedServiceFetcher() {
@Override
public ActivityManager createService(ContextImpl ctx) {
return new ActivityManager(ctx.getOuterContext(), ctx.mMainThread.getHandler());
}}); CachedServiceFetcher 这个类在第一次调用getService 的时候会调用createService,并返回。
以上面的ActivityManager为例,这里的注册只是创建了一个 AM 实例放到Map里面保存名称和对象。
进入到AM 里面
 /**
     * @hide
     */
    public static IActivityManager getService() {
        return IActivityManagerSingleton.get();
    }

    private static final Singleton IActivityManagerSingleton =
            new Singleton() {
                @Override
                protected IActivityManager create() {
                    final IBinder b = ServiceManager.getService(Context.ACTIVITY_SERVICE);
                    final IActivityManager am = IActivityManager.Stub.asInterface(b);
                    return am;
                }
            };
这里可以看到原来在AM里面有个静态变量,看名称应该是一个单例的。最终也是通过SM 来获取服务,这里其实跟注册就不沾边了,因为我们是客户端怎么会去注册服务!这里的注册应该理解成从服务端获取服务的代理类,然后用map保存,这样就不用频繁去SM中取了。这个并非注册!
只好去SystemServer 里面找注册的相关信息了,main 函数里面开启了很多服务
1.开启服务
   // Start services.
        try {
            traceBeginAndSlog("StartServices");
            startBootstrapServices();
            startCoreServices();
            startOtherServices();
            SystemServerInitThreadPool.shutdown();
        } catch (Throwable ex) {
            Slog.e("System", "******************************************");
            Slog.e("System", "************ Failure starting system services", ex);
            throw ex;
        } finally {
            traceEnd();
        }
2.
private void startBootstrapServices() {

        // Activity manager runs the show.
        traceBeginAndSlog("StartActivityManager");
        mActivityManagerService = mSystemServiceManager.startService(
                ActivityManagerService.Lifecycle.class).getService();

        // Set up the Application instance for the system process and get started.
        mActivityManagerService.setSystemProcess();

    }
ActivityManagerService 相关 ,
1.创建service实例
  Constructor constructor = serviceClass.getConstructor(Context.class);
                service = constructor.newInstance(mContext);
 startService(service);
 // Register it.
        mServices.add(service);
        // Start it.
        long time = SystemClock.elapsedRealtime();
        try {
            service.onStart();
        } catch (RuntimeException ex) {
            throw new RuntimeException("Failed to start service " + service.getClass().getName()
                    + ": onStart threw an exception", ex);
        }
        warnIfTooLong(SystemClock.elapsedRealtime() - time, service, "onStart");
public static final class Lifecycle extends SystemService {
private final ActivityManagerService mService;
public Lifecycle(Context context) {
super(context);
mService = new ActivityManagerService(context);
}
@Override
public void onStart() {
mService.start();
}上面的没什么好说的,只是创建了一个AMS实例调用它的start
2.setSystemProcess 只关心 ASM 相关的
 public void setSystemProcess() {
        try {
            ServiceManager.addService(Context.ACTIVITY_SERVICE, this, /* allowIsolated= */ true,
                    DUMP_FLAG_PRIORITY_CRITICAL | DUMP_FLAG_PRIORITY_NORMAL | DUMP_FLAG_PROTO);

    }
可以看到还是调用ServiceManager.addService(name,Binder) 然后把自己当参数传进去
新版的ServiceManager.addService 已经看不到了,根据以前的做法
ServiceManagerNative.asInterface(BinderInternal.getContextObject())BinderInternal.getContextObject() 是jni 层的方法,会调用native 层的 ProcessState.getContextObject,并且封装成一个BinderProxy对象即BinderProxy(BpBinder(0))
asInterface 就会new ServiceManagerProxy并将它返回
最终调用SMP.addService(name,Binder)
就目前来看Binder所有的跨进程通信都有三步1.将data 写入 pacel 2.transact 发送到binder 驱动 3.readParcel
1.写入Parcel ,将Binder 写如Parcel ,这里会将Binder 封装成为一个native 层的BBinder得到flattern_binder_object
2.transact 将Binder_transaction_data 传入Binder驱动之后 会查找是否存在这个BBinder 对象,不存在就会保存,并将索引handle 赋值给flattern_binder_object 的handle
3.进入SM 进程,解析数据 构建一个SVCINFO 信息保存本地链表
获取服务的时候,不需要传Binder 对象,只用基本数据即可,同样写数据,然后transact
进入SM之后 根据名字找到SVCINFO 并将它的handle 值写道reply里
客户端接收到数据就会readStrongBinder 就是跟获取BpBinder(0) 的过程差不多,只不过这次handle 的值不是0
最关键的地方
以ActivityManagerService 为例:
服务端 system_server ->ServiceManager.addService
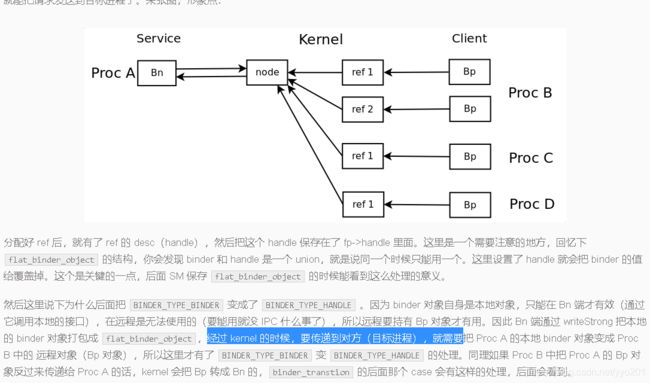
binder 驱动: 收到flattern_binder_object 之后 先去查 之前是否有为 这个binder 创建过 node,没有的话就创建一个node,
node->proc == target->proc 关联server进程,然后分配目标进程对这个node 的引用ref,如果是SM,binder ref = 0,其他从1 开始
flattern-binder-object->handle = ref,这里已经将server 端发送过来的数据覆盖掉了,比如此时已经从BINDER_TYPE_BINDER
转变成了handle ,这个ref 是SM进程的sm1;
举个例子:bindService 的时候传了好几个 binder (Parcel 是一块连续的内存空间 根据写入对象的个数 和大小顺序写入和读取),所以其实是写入了 几个flat_binder_object,也即 在Binder驱动里创建了 几个 node(关联进程),为sm 进程创建ref->handle = 1
到servicemanager 的时候其实已经不是之前的flat_binder_object 对象了,到解析的时候 只是取出对应的信息 生成svcinfo 保存在
sm 的本地链表中
获取服务的过程:
客户端跟SM 通信通过名字获取在sm进程的ref,在binder驱动 为客户端创建一个新的ref,返回handle-> 构建成BinderProxy对象
调用服务的过程 :通过客户端的 handle在 binder 驱动里面 找到 ref 获取node->binder, node->proc 最终在 service 的进程调用binder 对象的相关方法
至于前面说的handle 值有误,并不是那么简单,进程通过红黑树保存 ref,这个ref 可以通过handle 来找到,具体红黑树是怎样保存,又是怎样通过handle 值来找到的,还没研究过。不过一个handle 对应一个 ref 来看,肯定不会有重复的。其实感觉保存ref 的地址应该也可以。
总结:
1.server进程会用红黑树来创建保存Service 的node(包含BBinder 对象)
2.binder驱动会为每个传进来的BBinder对象创建node,其他进程想使用这个BBinder 只能通过binder驱动为它创建的ref。binder 驱动会改写flat_binder_object的内容,如果是BBinder 对象查找或者创建 关联server 的node,比如bindService传进来的
connection 对象,会给他创建node 关联 client进程,实际传到server 的是它的ref(远程引用Bp->handle)
另外:SM 是开启了binder_loop 一直在轮询Binder驱动查看是否有客户端请求;
那么system_server 是否也开启了轮询呢?例如ActivityManagerService 在把自己添加到 SM 之后,是否也需要一个地方开启轮询来和Binder 驱动交互?或者binder 驱动是不是能直接切换进程然后调用?
