SpringBoot2.X快速构建和配置
这篇文章旨在快速了解springboot,能快速进入学习微服务而写的.基本相关的涉及都有所介绍但是都不深入,所以分类放在了springcloud里面了,现在开启了springboot的深入学习,后面有每个章节对springboot的深入介绍,现在也移到了springboot分类中
1、SpringBoot是什么?
SpringBoot用于简化Spring应用配置,采用“约定优于配置”的方式开发,可以快速构建Spring应用。
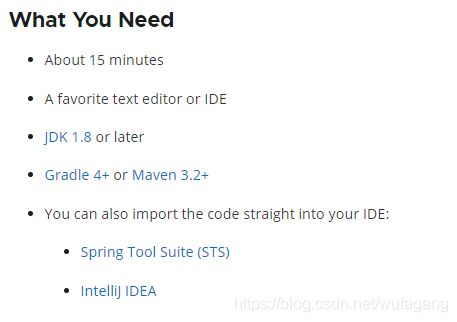
2、准备工作
3,HelloWord环境搭建
3.1官方向导搭建boot应用
-
地址:http://start.spring.io/
-
解压,拷贝到工作空间,导入maven项目
-
写Controller: HelloController.java
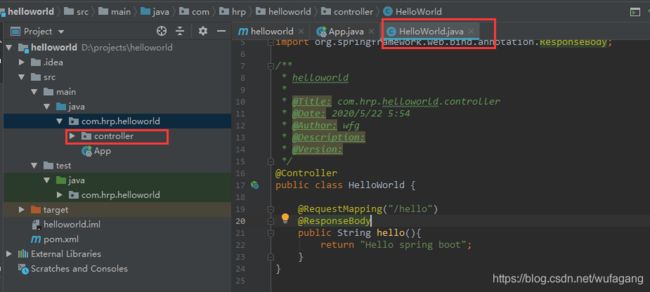
注意: 这个controller也可以不写就可以直接启动应用,写一定要写在app的同一级目录,或者子目录,后面再说写在其他地方的办法
3.2普通maven工程搭建boot应用
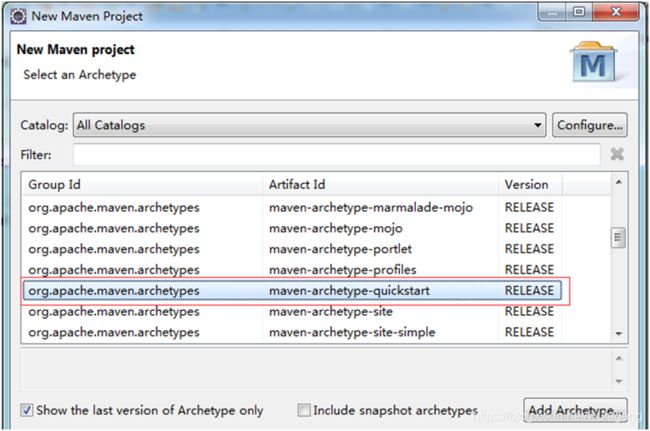
- 新建一个普通的maven工程,选择quickstart
【注意:Spring boot是web工程,但是我们这里只需要建立quickstart即可,因为spring boot内嵌了servlert容器】
或者不用这个模板也是可以,只是后面自己手工添加相关代码就可以了
. 拷贝依赖的父pom到自己的工程pom文件中:
所有Spring Boot组件的基础引用
 <parent>
    <groupId>org.springframework.boot</groupId>
    <artifactId>spring-boot-starter-parent</artifactId>
    <version>2.3.0.RELEASE</version>
    <relativePath/> <!-- lookup parent from repository -->
  </parent>
提供web的支持
<dependency>
      <groupId>org.springframework.boot</groupId>
      <artifactId>spring-boot-starter-web</artifactId>
    </dependency>
maven 打包插件
<plugin>
          <groupId>org.springframework.boot</groupId>
          <artifactId>spring-boot-maven-plugin</artifactId>
        </plugin>
添加编译环境,一般都有
<properties>
    <project.build.sourceEncoding>UTF-8</project.build.sourceEncoding>
    <maven.compiler.source>1.8</maven.compiler.source>
    <maven.compiler.target>1.8</maven.compiler.target>
  </properties>
Run as --> Java Application启动SampleController.java
浏览器输入:http://localhost:8080/ 即可
完整的pom文件
<?xml version="1.0" encoding="UTF-8"?>

<project xmlns="http://maven.apache.org/POM/4.0.0" xmlns:xsi="http://www.w3.org/2001/XMLSchema-instance"
  xsi:schemaLocation="http://maven.apache.org/POM/4.0.0 http://maven.apache.org/xsd/maven-4.0.0.xsd">
  <modelVersion>4.0.0</modelVersion>

  <parent>
    <groupId>org.springframework.boot</groupId>
    <artifactId>spring-boot-starter-parent</artifactId>
    <version>2.3.0.RELEASE</version>
    <relativePath/> <!-- lookup parent from repository -->
  </parent>

  <groupId>com.hrp.helloworld</groupId>
  <artifactId>helloworld</artifactId>
  <version>1.0-SNAPSHOT</version>

  <name>helloworld</name>
  <!-- FIXME change it to the project's website -->
  <url>http://www.example.com</url>

  <properties>
    <project.build.sourceEncoding>UTF-8</project.build.sourceEncoding>
    <maven.compiler.source>1.8</maven.compiler.source>
    <maven.compiler.target>1.8</maven.compiler.target>
  </properties>

  <dependencies>
    <dependency>
      <groupId>junit</groupId>
      <artifactId>junit</artifactId>
      <version>4.11</version>
      <scope>test</scope>
    </dependency>

    <dependency>
      <groupId>org.springframework.boot</groupId>
      <artifactId>spring-boot-starter-web</artifactId>
    </dependency>

  </dependencies>

  <build>
    <pluginManagement><!-- lock down plugins versions to avoid using Maven defaults (may be moved to parent pom) -->
      <plugins>
        <plugin>
          <groupId>org.springframework.boot</groupId>
          <artifactId>spring-boot-maven-plugin</artifactId>
        </plugin>

        <!-- clean lifecycle, see https://maven.apache.org/ref/current/maven-core/lifecycles.html#clean_Lifecycle -->
        <plugin>
          <artifactId>maven-clean-plugin</artifactId>
          <version>3.1.0</version>
        </plugin>
        <!-- default lifecycle, jar packaging: see https://maven.apache.org/ref/current/maven-core/default-bindings.html#Plugin_bindings_for_jar_packaging -->
        <plugin>
          <artifactId>maven-resources-plugin</artifactId>
          <version>3.0.2</version>
        </plugin>
        <plugin>
          <artifactId>maven-compiler-plugin</artifactId>
          <version>3.8.0</version>
        </plugin>
        <plugin>
          <artifactId>maven-surefire-plugin</artifactId>
          <version>2.22.1</version>
        </plugin>
        <plugin>
          <artifactId>maven-jar-plugin</artifactId>
          <version>3.0.2</version>
        </plugin>
        <plugin>
          <artifactId>maven-install-plugin</artifactId>
          <version>2.5.2</version>
        </plugin>
        <plugin>
          <artifactId>maven-deploy-plugin</artifactId>
          <version>2.8.2</version>
        </plugin>
        <!-- site lifecycle, see https://maven.apache.org/ref/current/maven-core/lifecycles.html#site_Lifecycle -->
        <plugin>
          <artifactId>maven-site-plugin</artifactId>
          <version>3.7.1</version>
        </plugin>
        <plugin>
          <artifactId>maven-project-info-reports-plugin</artifactId>
          <version>3.0.0</version>
        </plugin>
      </plugins>
    </pluginManagement>
  </build>
</project>
当然,除了以上两种方式搭建boot工程,也可以通过其它工具快速生成,例如idea , sts,spring boot cli等
这些工具集成了spring boot特性 ,可以一键生成springboot工程骨架
4. SpringBoot的目录结构
5.springboot测试类
- 添加测试支持依赖:spring-boot-starter-test
<dependency>
<groupId>org.springframework.boot</groupId>
<artifactId>spring-boot-starter-test</artifactId>
<scope>test</scope>
</dependency>
注意:加入这个依赖之后,junit包就可以不用了,因为test的starter中包含了junit
2.在测试包中建立测试程序类,测试App
@SpringBootTest    //spring boot test 支持
@WebAppConfiguration  //按照web方式进行启动
@RunWith(SpringJUnit4ClassRunner.class) //使用spring junit测试
public class AppTest
{
   @Autowired
   private HelloController helloController;

    @Test
    public void shouldAnswerWithTrue()
    {
        TestCase.assertEquals(helloController.hello(),"Hello spring boot");
    }
}
6.SpringBoot常用配置
6.1修改端口
application.properties:
server.port=8888
另外,也可以直接在运行jar包的时候修改
java -jar xx.jar --server.port=8888
6.2 自定义属性及获取
@Value("${属性名}")获取对应的属性值
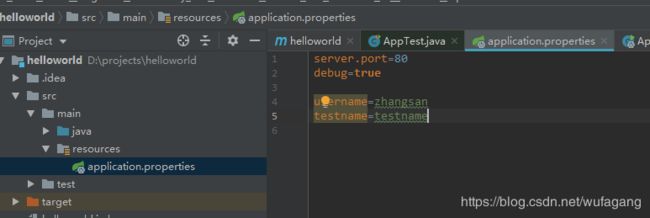

不过一个有趣的事情是:username获取的不是自己配置的信息
![]()
难得username这个变量是特殊变量? 先不深究
6.3参数引用
application.properties
teacher.id=1
teacher.name=zhangsan
teacher.info=Teacher ${teacher.name}'s number is ${teacher.id}
6.4 随机内容生成
随机字符串
random.string=${random.value}
随机int
random.number=${random.int}
随机long
random.long=${random.long}
1-20的随机数
random.b=${random.int[1,20]}
6.5 多环境配置
我们在开发应用时,通常一个项目会被部署到不同的环境中,比如:开发、测试、生产等。其中每个环境的数据库地址、服务器端口等等配置都会不同,对于多环境的配置,大部分构建工具或是框架解决的基本思路是一致的,通过配置多份不同环境的配置文件,再通过打包命令指定需要打包的内容之后进行区分打包,Spring Boot也提供了支持
在Spring Boot中多环境配置文件名需要满足application-{profile}.properties的格式,其中{profile}对应你的环境标识,比如:
application-dev.properties:开发环境
application-test.properties:测试环境
application-prod.properties:生产环境
至于哪个具体的配置文件会被加载,需要在application.properties文件中通过spring.profiles.active属性来设置,其值对应{profile}值。
比如:spring.profiles.active=dev就会加载application-dev.properties配置文件中的内容
案例:
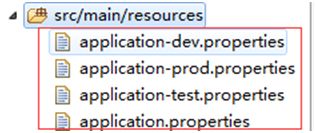
在dev, test, prod这三个文件均都设置不同的server.port端口属性,如:dev环境设置为8081,test环境设置为8082,prod环境设置为8083
application.properties中设置spring.profiles.active=dev,就是说默认以dev环境设置
总结:
1.application.properties中配置通用内容,并设置spring.profiles.active=dev,以开发环境为默认配置
2.application-{profile}.properties中配置各个环境不同的内容
其他的spring的全部配置参考配置文档
6.6 配置文件还有一种方式yml
yml配置
SpringBoot支持两种格式的配置文件
属性文件:application.properties
Yml:application.yml
yml是一种简介的非标记语言。yml以数据为中心,使用空白,缩进,分行组织数据,从而使得表示更加简洁易读。
yml语法格式:
标准格式:key:(空格)value
使用空格代表层级关系,以“:”结束
yml和properties同时都存在时,以properties为主。
7 Banner
Banner是指SpringBoot启动时显示的字符画,默认是“spring”。我们可以新建resources/banner.txt进行修改。
关闭banner:
一般情况下,我们会借助第三方工具帮忙转化内容,如网站http://www.network-science.de/ascii/将文字转化成字符串,网站:http://www.degraeve.com/img2txt.php可以将图片转化成字符串。
自己修成自己比较喜欢的 调情用
8 Spring boot 日志
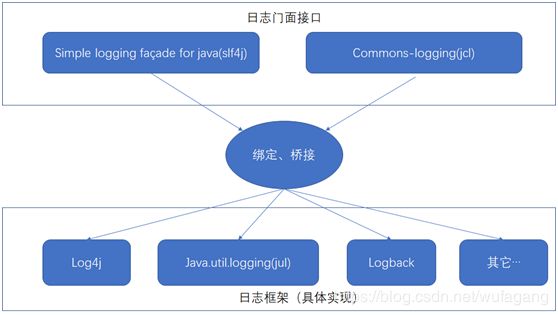
ava 有很多日志系统,例如,Java Util Logging, Log4J, Log4J2, Logback 等。Spring Boot 也提供了不同的选项,比如日志框架可以用 logback 或 log4j ,log4j2等。
常用配置项
日志常用配置项 默认值 备注
logging.file 日志输出的文件地址
logging.level.ROOT info 设置日志的输出级别
logging.level.* info 定义指定包的输出级别
logging.config logback-spring.xml 日志的配置文件
注意:SpringBoot默认并没有进行文件输出,只在控制台中进行了打印。
日志级别:debug>info>warn>error,默认情况下springboot日志级别为info
如果设置了debug=true时,日志会降级为debug
