利用Tensorflow训练CIFAR-10数据集的训练部分源码详细分析
利用Tensorflow训练CIFAR-10数据集的训练部分源码详细分析
实验环境
ubuntu16.04
python2.7
tensorflow1.4
代码
代码一共有三个文件,分别是cifar10_input.py, cifar10.py, cifar_train.py。首先是cifar10_input.py,代码如下:
# coding:utf-8
# 绝对引入
from __future__ import absolute_import
# 导入精确除法
from __future__ import division
# 导入print函数,print要使用括号
from __future__ import print_function

import os

from six.moves import xrange  # pylint: disable=redefined-builtin
import tensorflow as tf

IMAGE_SIZE = 24
NUM_EXAMPLES_PER_EPOCH_FOR_TRAIN = 50000
NUM_EXAMPLES_PER_EPOCH_FOR_EVAL = 10000
# 总类别数
NUM_CLASSES = 10

# 定义read.cifar10函数,将数据弄成图像形式
def read_cifar10(filename_queue):
    # 定义类
    class CIFAR10Record(object):
        pass
    result = CIFAR10Record()

    # 标签字节数
    label_bytes = 1
    # 图片的高
    result.height = 32
    # 图片的宽
    result.width = 32
    # 图片的深度
    result.depth = 3
    # 一张图片的字节数
    image_bytes = result.height * result.width * result.depth
    # 标签加图片的字节数
    record_bytes = label_bytes + image_bytes
    # 定义每次读多少字节
    reader = tf.FixedLengthRecordReader(record_bytes=record_bytes)
    # 读取文件队列名中的数据
    result.key, value = reader.read(filename_queue)

    # tf.decode_raw函数是将原来编码为字符串类型的变量重新变回来
    record_bytes = tf.decode_raw(value, tf.uint8)
    # tf.strided_slice(input_, begin, end)提取张量的一部分
    result.label = tf.cast(tf.strided_slice(record_bytes, [0], [label_bytes]), tf.int32)
    depth_major = tf.reshape(tf.strided_slice(record_bytes, [label_bytes], [label_bytes + image_bytes]),
                             [result.depth, result.width, result.height])
    # transpose函数是将矩阵进行转置操做,[0, 1, 2]中0表示高(深度),1表示行,2表示列。
    # [1, 2, 0]表示将原来的行作为高,列作为行,高作为列,对矩阵进行转置。
    # [1, 2, 0]刚好将矩阵变为了  行×列×深度  的矩阵。
    result.uint8image = tf.transpose(depth_major, [1, 2, 0])

    return result


# 定义数据增强函数
def distorted_inputs(data_dir, batch_size):
    # 读取数据
    filenames = [os.path.join(data_dir, 'data_batch_%d.bin' % i) for i in range(1,6)]
    for f in filenames:
        if not tf.gfile.Exists(f):
            raise ValueError('Failed to find file: ' + f)
    # 生成文件队列名,每一个文件就是一个data_batch
    filename_queue = tf.train.string_input_producer(filenames)
    # 调用cifar10_read函数,将数据变为图像形式
    read_input = read_cifar10(filename_queue)
    # 转换数据格式,从而得到训练使用的原始数据
    reshaped_image = tf.cast(read_input.uint8image, tf.float32)

    height = IMAGE_SIZE
    width = IMAGE_SIZE

    # 随机裁剪图片,从32×32变为24×24
    distorted_image = tf.random_crop(reshaped_image, [height, width, 3])
    # 随机翻转图片。50%的概率翻转
    distorted_image = tf.image.random_flip_left_right(distorted_image)
    # 随机改变亮度,在(-63,63)区间内调整
    distorted_image = tf.image.random_brightness(distorted_image, max_delta=63)
    # 随机调整对比度,在(0.2,1.8)区间内选择对比因子
    distorted_image = tf.image.random_contrast(distorted_image, lower=0.2, upper=1.8)

    # 返回具有零均值和单位范数的标准化图片,将像素值的大小限制到一个范围内,加速训练
    float_image = tf.image.per_image_standardization(distorted_image)

    # 设置输入图像的格式
    float_image.set_shape([height, width, 3])
    read_input.label.set_shape([1])

    # 队列中最少图像个数
    min_fraction_of_examples_in_queue = 0.4
    min_queue_examples = int(NUM_EXAMPLES_PER_EPOCH_FOR_TRAIN*min_fraction_of_examples_in_queue)
    print('Filling queue with %d CIFAR images befor starting to train.'
          'This will take a a few minutes' % min_queue_examples)

    # 返回一个batch的图像和对应的标签,shuffle:打乱
    return _generate_image_and_label_batch(float_image, read_input.label,
                                           min_queue_examples, batch_size, shuffle=True)


# 定义构建图像和标签文件名队列的函数
def _generate_image_and_label_batch(image, label, min_queue_examples, batch_size, shuffle):
    # num_tfreads的值
    num_preprocess_tfreads = 16
    if shuffle:
        # tf.train.shuffle_batch函数中,设置num_threads的值大于1,则使用多个线程在tensor_list中读取文件。
        # capacity:队列中最大的元素数,一定要比min_after_dequeue的值大,决定了可以进行预处理操做元素的最大值。
        # min_after_dequeue:当一次出列操做完成后,取出的队列中元素的最小数量,用来定义混合级别。
        images, label_batch = tf.train.shuffle_batch([image, label], batch_size=batch_size,
                                                     num_threads=num_preprocess_tfreads,
                                                     capacity=min_queue_examples + 3 * batch_size,
                                                     min_after_dequeue=min_queue_examples)
    else:
        images, label_batch = tf.train.batch([image, label], batch_size=batch_size,
                                             num_threads=num_preprocess_tfreads,
                                             capacity=min_queue_examples + 3 * batch_size)
    # 在tensorboard中可视化训练图像
    tf.summary.image('images', images)
    # 返回图像和标签, tf.reshape返回的是一个张量
    return images, tf.reshape(label_batch, [batch_size])


# 创建CIFAR测试用的输入函数?
def inputs(eval_data, data_dir, batch_size):
    # eval_data是测试数据?
    if not eval_data:
        filenames = [os.path.join(data_dir, 'data_batch_%d.bin' % i) for i in xrange(1, 6)]
        # 总的训练样本数
        num_examples_per_epoch = NUM_EXAMPLES_PER_EPOCH_FOR_TRAIN
    else:
        filenames = [os.path.join(data_dir, 'test_batch.bin')]
        num_examples_per_epoch = NUM_EXAMPLES_PER_EPOCH_FOR_EVAL

    for f in filenames:
        if not tf.gfile.Exists(f):
            raise ValueError('Failed to find file: ' + f)

    filename_queue = tf.train.string_input_producer(filenames)

    # 从队列中读取样本
    read_input = read_cifar10(filename_queue)
    reshaped_image = tf.cast(read_input.uint8image, tf.float32)

    height = IMAGE_SIZE
    width = IMAGE_SIZE
    # tf.image.resize_image_with_crop_or_pad:裁剪或将图像填充到目标宽度和高度
    # inputs函数是用于测试集的?识别时要将图片裁剪到和训练集一样大?
    resized_image = tf.image.resize_image_with_crop_or_pad(reshaped_image, height, width)

    # 图像标准化
    float_image = tf.image.per_image_standardization(resized_image)

    float_image.set_shape([height, width, 3])
    read_input.label.set_shape([1])

    min_fraction_of_examples_in_queue = 0.4
    min_queue_examples = int(num_examples_per_epoch * min_fraction_of_examples_in_queue)

    return _generate_image_and_label_batch(float_image, read_input.label,
                                           min_queue_examples, batch_size,
                                           shuffle=False)
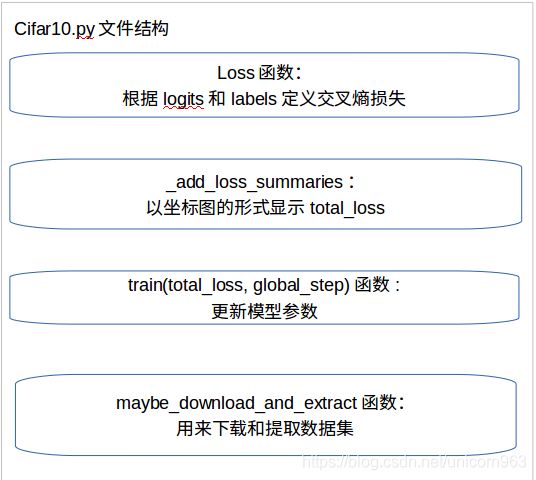
该代码结构如下:
 再是cifar10.py文件,代码如下:
# coding:utf-8
from __future__ import absolute_import
from __future__ import division
from __future__ import print_function

import os
import tensorflow as tf
# 导入正则表达式模块
import re
# sys模块包含了与Python解释器和它的环境有关的函数
import sys
# tarfile模块用于处理压缩包
import tarfile
# urllib:下载模块?
from six.moves import urllib
import cifar10_input

# tf.app.flags.FLAGS从对应的命令行参数取出参数
FLAGS = tf.app.flags.FLAGS

# 模型基本参数
tf.app.flags.DEFINE_integer('batch_size', 128, docstring='Number of images to process in a batch.')
# /tmp/cifar10_data是系统默认的cifar下载路径
tf.app.flags.DEFINE_string('data_dir', '/tmp/cifar10_data', docstring='Patch to the CIFAR-10 data directory.')
# fp16:半浮点精度运算
tf.app.flags.DEFINE_boolean('use_fp16', False, docstring='Train the model using fp16.')

# 设置图像大小
IMAGE_SIZE = cifar10_input.IMAGE_SIZE
# 总类别数
NUM_CLASSES = cifar10_input.NUM_CLASSES
# 训练样本数
NUM_EXAMPLES_PER_EPOCH_FOR_TRAIN = cifar10_input.NUM_EXAMPLES_PER_EPOCH_FOR_TRAIN
# 测试样本数
NUM_EXAMPLES_PER_EPOCH_FOR_EVAl = cifar10_input.NUM_EXAMPLES_PER_EPOCH_FOR_EVAL

# 描述训练过程的常量
# 移动平均值衰减(用于移动平均线的衰减)
MOVING_AVERAGE_DECAY = 0.9999
# 每NUM_EPOCH_PER_DECAY个epoch后,学习率下降一次
NUM_EPOCHS_PER_DECAY = 350.0
# 学习率衰减因子
LEARNING_RATE_DECAY_FACTOR = 0.1
# 初始学习率
INITIAL_LEANING_RATE = 0.1


# 可视化模型时summaries的名字
TOWER_NAME = 'tower'

# cifar10数据集的下载地址
DATA_URL = 'http://www.cs.toronto.edu/~kriz/cifar-10-binary.tar.gz'


# 定义创建summary的函数
def _action_summary(x):
    # re.sub(pattern, repl, string)是利用正则表达式对输入的字符串进行替换,并返回处理后的字符串
    # 这里是将x.op.name里面的TOWER_NAME[0-9]用''替换
    # 什么时x.op.name
    tensor_name = re.sub('%s_[0-9]*/' % TOWER_NAME, '', x.op.name)
    # 将一个张量在训练中的分布情况以直方图的形式在TensorBoard直方图仪表板上显示
    # .name:生成的节点名称.作为TensorBoard中的一个系列名称.values:一个实数张量.用于构建直方图的值.
    tf.summary.histogram(name=tensor_name + '/activations', values=x)
    # scalar函数:对变量数据汇总和记录
    # tf.nn.zero_fraction()的作用是返回输入的Tensor中0元素在所有元素中所占的比值
    # 可以用来衡量relu激活函数的有效性
    tf.summary.scalar(tensor_name + '/sparsity', tf.nn.zero_fraction(x))


# 创建存储在cpu上的变量
def _variable_on_cpu(name, shape, initializer):
    # tf.device(device_name)指定运行设备,其中‘0’指设备号
    with tf.device('/cpu:0'):
        # 如果默认设置里面设置的计算精度为fp16,则数据类型为tf.float16,否则dtype设置为tf.float32
        dtype = tf.float16 if FLAGS.use_fp16 else tf.float32
        # tf.get_variable(name, shape, initializer, dtype)获取已存在的变量(要求不仅名字,而且初始化方法等各个参数都一样),
        # 如果不存在,就新建一个,name就是变量的名称,shape是变量的维度,initializer是变量初始化的方式, dtype是数据类型
        var = tf.get_variable(name, shape, initializer=initializer, dtype=dtype)
    return var


# 创建具有权值衰减的初始化变量
def _variable_with_weight_decay(name, shape, stddev, wd):
    # 设置数据类型
    dtype = tf.float16 if FLAGS.use_fp16 else tf.float32
    # 创建在cpu中的变量
    # tf.truncated_normal_initializer的意思是:从截断的正态分布中输出随机值。stddev为方差
    var = _variable_on_cpu(name, shape,
                           tf.truncated_normal_initializer(stddev=stddev, dtype=dtype))
    if wd is not None:
        # tf.nn.l2_loss函数的输出为sum(var**2)/2,即张量中的每一个元素进行平方,然后求和,再乘以1/2
        weight_decay = tf.multiply(tf.nn.l2_loss(var), wd, name='weight_loss')
        # tf.add_to_collection:把变量放入一个集合,把很多变量变成一个列表
        tf.add_to_collection('losses', weight_decay)
    return var


# 创建增强数据积集的函数
def distorted_inputs():
    if not FLAGS.data_dir:
        raise ValueError('Please supply a data_dir')
    # 设置数据存储的文件夹
    data_dir = os.path.join(FLAGS.data_dir, 'cifar-10-batches-bin')
    # 提取images labels
    images, labels = cifar10_input.distorted_inputs(data_dir=data_dir, batch_size=FLAGS.batch_size)

    # 转换格式
    if FLAGS.use_fp16:
        images = tf.cast(images, tf.float16)
        labels = tf.cast(labels, tf.float16)
    return images, labels


# 输入函数
def inputs(eval_data):
    if not FLAGS.data_dir:
        raise ValueError('Please supply a data_dir')
    data_dir = os.path.join(FLAGS.data_dir, 'cifar-10-batches-bin')
    images, labels = cifar10_input.inputs(data_dir=data_dir, batch_size=FLAGS.batch_size)

    # 转换格式
    if FLAGS.use_fp16:
        images = tf.cast(images, tf.float16)
        labels = tf.cast(labels, tf.float16)
    return images, labels


# 创建模型
def inference(images):
    # 建立第一层卷积
    with tf.variable_scope('conv1') as scope:
        # 在cpu中创建变量,wd=0.0,不进行l2正则化
        kernel = _variable_with_weight_decay('weight', shape=[5, 5, 3, 64],
                                             stddev=5e-2, wd=0.0)
        # 卷积
        conv = tf.nn.conv2d(images, kernel, [1, 1, 1, 1], padding='SAME')
        # 偏置
        biases = _variable_on_cpu('biases', [64], tf.constant_initializer(0.0))

        pre_activation = tf.nn.bias_add(conv, biases)
        conv1 = tf.nn.relu(pre_activation, name=scope.name)

        # 将输出报告到tensorboard
        _action_summary(conv1)

    # 池化
    pool1 = tf.nn.max_pool(conv1, ksize=[1, 3, 3, 1], strides=[1, 2, 2, 1],
                           padding='SAME', name='pool1')
    # 局部响应标准化,防止relu激励后过拟合
    norm1 = tf.nn.lrn(pool1, 4, bias=1.0, alpha=0.001/9.0, beta=0.75, name='norm1')

    # 建立第二层卷积
    with tf.variable_scope('conv2') as scope:
        # 在cpu中创建变量,wd=0.0
        kernel = _variable_with_weight_decay('weight', shape=[5, 5, 64, 64],
                                             stddev=5e-2, wd=0.0)
        # 卷积
        conv = tf.nn.conv2d(norm1, kernel, [1, 1, 1, 1], padding='SAME')
        # 偏置
        biases = _variable_on_cpu('biases', [64], tf.constant_initializer(0.1))

        pre_activation = tf.nn.bias_add(conv, biases)
        conv2 = tf.nn.relu(pre_activation, name=scope.name)

        # 将输出报告到tensorboard
        _action_summary(conv2)

    # 局部响应标准化,防止relu激励后过拟合
    norm2 = tf.nn.lrn(conv2, 4, bias=1.0, alpha=0.001 / 9.0, beta=0.75, name='norm2')
    # 池化
    pool2 = tf.nn.max_pool(norm2, ksize=[1, 3, 3, 1], strides=[1, 2, 2, 1],
                           padding='SAME', name='pool2')

    # 全连接层1
    with tf.variable_scope('local3') as scope:
        reshape = tf.reshape(pool2, [FLAGS.batch_size, -1])
        # 获取列数
        dim = reshape.get_shape()[1].value
        weights = _variable_with_weight_decay('weights', shape=[dim, 384], stddev=0.04, wd=0.004)
        biases = _variable_on_cpu('biases', [384], tf.constant_initializer(0.1))
        local3 = tf.nn.relu(tf.matmul(reshape, weights) + biases, name=scope.name)
        _action_summary(local3)

    # 全连接层2
    with tf.variable_scope('local4') as scope:
        weights = _variable_with_weight_decay('weights', shape=[384, 192], stddev=0.04, wd=0.004)
        biases = _variable_on_cpu('biases', [192], tf.constant_initializer(0.1))
        local4 = tf.nn.relu(tf.matmul(local3, weights) + biases, name=scope.name)
        _action_summary(local4)

    # softmax分类,但不在这里进行softmax,只输出变换前的logit
    with tf.variable_scope('softmax_linear') as scope:
        weights = _variable_with_weight_decay('weights', [192, NUM_CLASSES],
                                              stddev=1/192.0, wd=0.0)
        biases = _variable_on_cpu('biases', [NUM_CLASSES],
                                  tf.constant_initializer(0.0))
        softmax_linear = tf.add(tf.matmul(local4, weights), biases, name=scope.name)
        _action_summary(softmax_linear)

    return softmax_linear


# 定义损失函数
def loss(logits, labels):
    """Add L2 Loss to all the trainable variables.
      Add summary for "Loss" and "Loss/avg".
      Args:
        logits: Logits from inference().
        labels: Labels from distorted_inputs or inputs(). 1-D tensor of shape [batch_size]
      Returns:
        Loss tensor of type float.
    """
    # 计算批次中的平均交叉熵
    labels = tf.cast(labels, tf.int64)
    # 一个样本的误差
    cross_entropy = tf.nn.sparse_softmax_cross_entropy_with_logits(labels=labels, logits=logits,
                                                                   name='cross_entropy_per_example')
    # 一个批次所有的样本的平均交叉熵?
    cross_entropy_mean = tf.reduce_mean(cross_entropy, name='cross_entropy')
    # 交叉熵损失列表,tf.add_to_collection:把变量放入一个集合,把很多变量变成一个列表
    tf.add_to_collection('losses', cross_entropy_mean)
    # 总损失定义为交叉熵损失加上所有权重衰减项
    # tf.add_n能将多个列表对应位置相加,tf.get_collection()返回列表名称为losses的列表
    return tf.add_n(tf.get_collection('losses'), name='total_loss')


# 添加CIFAR-10模型中的损失摘要
def _add_loss_summaries(total_loss):
    # 计算所有单个损失的移动平均值和总损失
    # tf.train.ExponentialMovingAverage这个函数用于更新参数,就是采用滑动平均的方法更新参数
    loss_averages = tf.train.ExponentialMovingAverage(0.9, name='avg')
    losses = tf.get_collection('losses')
    loss_averages_op = loss_averages.apply(losses + [total_loss])

    for l in losses + [total_loss]:
        # tf.summary.scalar在tensorboard中以坐标图显示
        tf.summary.scalar(l.op.name + '(raw)', l)
        tf.summary.scalar(l.op.name, loss_averages.average(l))
    return loss_averages_op


# 训练函数
def train(total_loss, global_step):
    # 影响学习率的变量
    # 每一个epoch的batch数
    num_batches_per_epoch = NUM_EXAMPLES_PER_EPOCH_FOR_TRAIN / FLAGS.batch_size
    # 衰减速度(每过多少步衰减一次学习率)
    decay_steps = int(num_batches_per_epoch * NUM_EPOCHS_PER_DECAY)

    # 根据步数以指数方式衰减学习率
    # tf.train.exponential_decay函数的表达式为:
    # learning_rate=INITIAL_LEANING_RATE*LEARNING_RATE_DECAY_FACTOR^(global_step/decay_steps)
    # 定义衰减函数,LEARNING_RATE_DECAY_FACTOR = 0.1
    # staircase - 若 ‘ True ’ ,则学习率衰减呈 ‘ 离散间隔 ’
    # 若为 ’ False ‘ ,则更新学习率的值是一个连续的过程,每步都会更新学习率
    lr = tf.train.exponential_decay(INITIAL_LEANING_RATE, global_step, decay_steps,
                                    LEARNING_RATE_DECAY_FACTOR, staircase=True)

    # tf.summary.scalar用来显示标量信息
    tf.summary.scalar('laarning_rate', lr)

    # 生成所有损失和相关摘要的移动平均值
    loss_averages_op = _add_loss_summaries(total_loss)

    # 计算梯度
    # tf.control_dependencies()指定某些操作执行的依赖关系,返回一个上下文管理器,
    # 只有将括号里的的内容执行了,才会执行里面的内容
    with tf.control_dependencies([loss_averages_op]):
        opt = tf.train.GradientDescentOptimizer(lr)
        grads = opt.compute_gradients(total_loss)

    # 应用梯度,apply_gradients函数将compute_gradients()返回值作为输入参数对variable进行更新
    apply_gradient_op = opt.apply_gradients(grads, global_step=global_step)

    # 添加可训练变量的直方图,tf.trainable_variables返回的时需要训练的变量列表
    for var in tf.trainable_variables():
        tf.summary.histogram(var.op.name, var)
    # 添加梯度的直方图
    for grad, var in grads:
        if grad is not None:
            tf.summary.histogram(var.op.name + 'gradients', grad)

    # 跟踪所有可训练变量的移动平均值
    # tf.train.ExponentialMovingAverage这个函数用于更新参数,就是采用滑动平均的方法更新参数
    # MOVING_AVERAGE_DECAY = 0.9999
    variable_averages = tf.train.ExponentialMovingAverage(MOVING_AVERAGE_DECAY, global_step)
    variable_averages_op = variable_averages.apply(tf.trainable_variables())

    with tf.control_dependencies([apply_gradient_op, variable_averages_op]):
        # tf.no_op()表示执行完apply_gradient_op, variable_averages_op后什么都不做
        train_op = tf.no_op(name='train')

    return train_op


# 定义下载函数
def maybe_download_and_extract():
    dest_directory = FLAGS.data_dir
    if not os.path.exists(dest_directory):
        os.makedirs(dest_directory)

    # DATA_URL = 'http://www.cs.toronto.edu/~kriz/cifar-10-binary.tar.gz'
    # split() 通过指定分隔符对字符串进行切片,如果参数 num 有指定值,则分隔 num+1 个子字符串
    filename = DATA_URL.split('/')[-1]
    filepath = os.path.join(dest_directory, filename)

    if not os.path.exists(filepath):
        def _progress(count, block_size, total_size):
            sys.stdout.write('\r>>Downloading %s %.1f%%' % (filename, float(count*block_size) * 100.0))
            # 刷新输出
            sys.stdout.flush()
        filepath, _ =urllib.request.urlretrieve(DATA_URL, filepath, _progress)
        print()
        statinfo = os.stat(filepath)
        print('Successfully downloaded', filename, statinfo.st_size, 'bytes.')
    extracted_dir_path = os.path.join(dest_directory, 'cifar-10-batches-bin')
    if not os.path.exists(extracted_dir_path):
        tarfile.open(filepath, 'r:gz').extractall(dest_directory)
该代码结构如下:

 最后是cifar10_train.py文件,代码如下:
# coding:utf-8
from __future__ import absolute_import
from __future__ import division
from __future__ import print_function

# 获取当前日期和时间的模块
from datetime import datetime
import time
import tensorflow as tf
import cifar10

FLAGS = tf.app.flags.FLAGS
# 定义存放日志信息的文件夹
tf.app.flags.DEFINE_string('train_dir', '/tmp/cifar10_train',
                           """Directory where to write event logs and checkpoint""")
# 最大训练步数
tf.app.flags.DEFINE_integer('max_steps', 100000, """Number of batches to run.""")
# 是否记录设备状态
tf.app.flags.DEFINE_boolean('log_device_placement', False, """Whether to log device placement.""")
# 记录频率,每10步记录一次
tf.app.flags.DEFINE_integer('log_frequency', 10, """How often to log results to the console.""")


def train():
    # tf.Graph()表示实例化一个类,一个用于 tensorflow 计算和表示用的数据流图,
    # 通俗来讲就是:在代码中添加的操作(画中的结点)和数据(画中的线条)都是画在纸上的“画”,而图就是呈现这些画的纸
    # tf.Graph().as_default() 表示将这个类实例,也就是新生成的图作为整个 tensorflow 运行环境的默认图
    with tf.Graph().as_default():
        # 创建全局变量global_step
        global_step = tf.contrib.framework.get_or_create_global_step()

        # 从distorted_inputs函数中读取增强后的数据
        images, labels = cifar10.distorted_inputs()
        # 输入图片,运行模型,得到softmax_liner
        logits = cifar10.inference(images)
        # 计算交叉熵损失
        loss = cifar10.loss(logits, labels)

        # 创建一个Graph,训练一个batch的样本,并且更新模型参数
        train_op = cifar10.train(loss, global_step)

        # tf.train.SessionRunHook类似于Session的一个处理初始化, 恢复和hooks的功能
        class _LoggerHook(tf.train.SessionRunHook):
            # 记录损失和runtime
            # 开始时间
            def begin(self):
                self._step = -1
                self._start_time = time.time()

            # 返回损失值
            def before_run(self, run_context):
                self._step += 1
                return tf.train.SessionRunArgs(loss)

            def after_run(self, run_context, run_values):
                # 当前步数是10的整数倍
                if self._step % FLAGS.log_frequency == 0:
                    # 获取当前时间
                    current_time = time.time()
                    # 耗时等于当前时间减去开始时间
                    duration = current_time - self._start_time
                    # 自开始时间
                    self._start_time = current_time
                    # 记录损失值
                    loss_value = run_values.results
                    # 每个样本的耗时
                    examples_per_sec = FLAGS.log_frequency * FLAGS.batch_size / duration
                    # 每个batch的耗时
                    sec_per_batch = float(duration / FLAGS.log_frequency)

                    # 输出信息格式
                    format_str = ('%s: step %d, loss = %.2f (%.1f examples/sec; %.3f sec/batch)')
                    # 输出
                    print(format_str % (datetime.now(), self._step, loss_value,
                                        examples_per_sec, sec_per_batch))

        # tf.train.MonitoredTrainingSession是用于监控训练的会话
        # checkpoint_dir表示存放checkpoint文件的位置
        # hooks是SessionRunHook对象的可选列表,tf.train.StopAtStepHook:设置训练停止的条件
        # tf.train.NanTensorHook(loss):如果loss的值为Nan则停止训练
        # config:用于配置会话tf.ConfigProto的实例。它是tf.Session的构造函数的config参数
        # log_device_placement=Flase,故看不到tensor,op是在哪台设备、哪颗CPU上运行的
        with tf.train.MonitoredTrainingSession(checkpoint_dir=FLAGS.train_dir,
                                               hooks=[tf.train.StopAtStepHook(last_step=FLAGS.max_steps),
                                                      tf.train.NanTensorHook(loss),
                                                      _LoggerHook()],
                                               config=tf.ConfigProto(
                                                   log_device_placement=FLAGS.log_device_placement)) as mon_sess:
            # 在未达到训练停止条件前,循环运行train_op,更新网络系数
            while not mon_sess.should_stop():
                mon_sess.run(train_op)


# 定于主函数
def main(argv=None):
    # 首先检测数据集有没有下载好,没有就执行下载提取操做
    cifar10.maybe_download_and_extract()
    # 删除已经存在的与训练文件夹同名的文件夹
    if tf.gfile.Exists(FLAGS.train_dir):
        # tf.gfile.DeleteRecursively递归删除所有目录及其文件
        tf.gfile.DeleteRecursively(FLAGS.train_dir)
    # 创建新的训练文件夹
    tf.gfile.MakeDirs(FLAGS.train_dir)
    # 执行train函数
    train()

# python文件有两种使用方法,一种是直接作为脚本执行,另一种是被其他的Python脚本作为模块调用
# if __name__ == '__main__':表示只用当该脚本被直接执行时才会运行if __name__ == '__main__':里面的代码
# 而该脚本被作为模块引用时,则不会运行if __name__ == '__main__':里面的代码
# 原理是,每个python文件都包含内置的变量__name__,当该文件被直接执行时,__name__等于文件名(包含后缀.py)
# 如果该文件被import到其他文件中,则该文件的__name__等于文件名(不包含后缀.py)
# __main__始终等于当前执行文件的名称(包含后缀.py)
if __name__ == '__main__':
    # tf.app.run()表示处理flag解析,然后执行main函数
    tf.app.run()
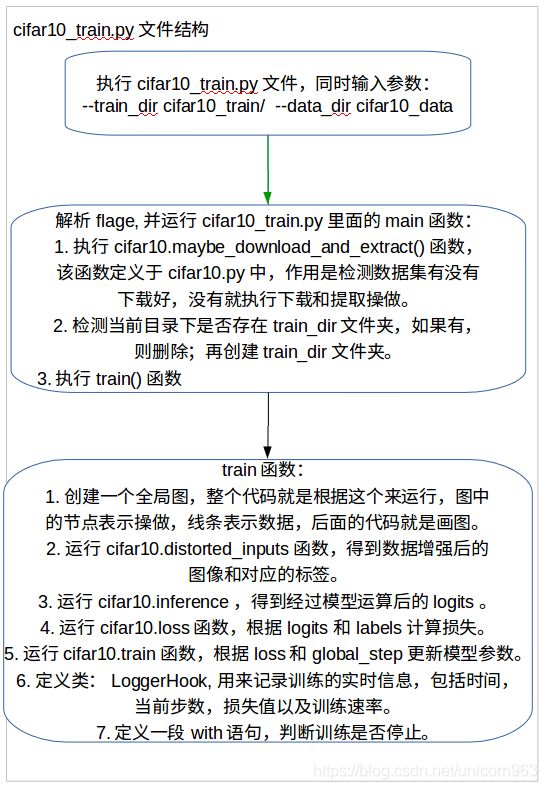
该代码结构如下:
实验结果
运行下面的指令,执行cifar10_train.py文件
python cifar10_train.py --train_dir cifar10_train/ --data_dir cifar_data/
结果如下:
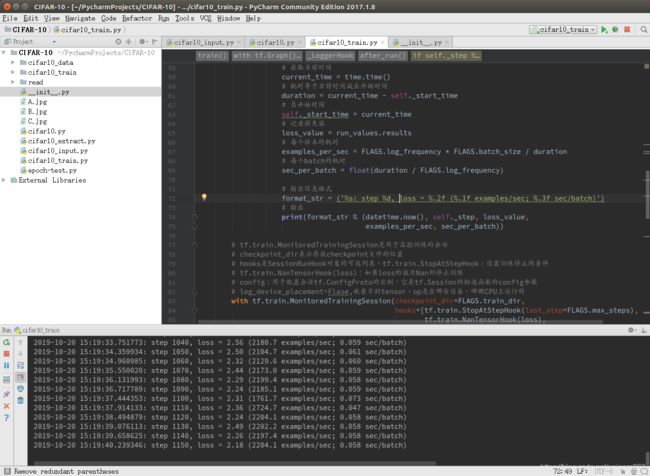 可以看到,训练时,屏幕上会显示日志信息,包括时间,步数,损失值,训练速率。
此时打开运行目录,可以看到以日志文件夹:cifar10_train/(即data_dir),运行目录下打开命令行窗口执行下面的指令:
tensorboard --logdir cifar10_train/
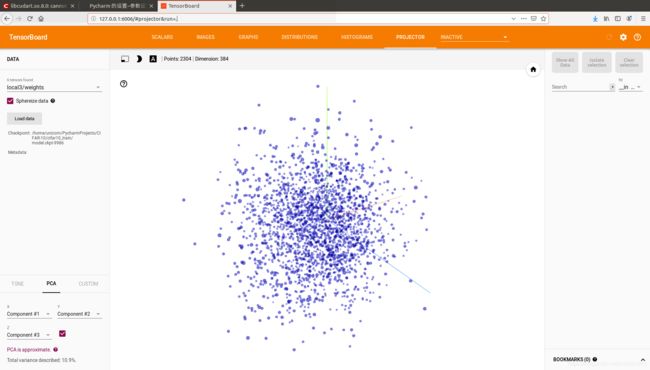
然后打开浏览器,输入地址:http://127.0.0.1:6006,可以看到一下的结果:
 结果图1
结果图1
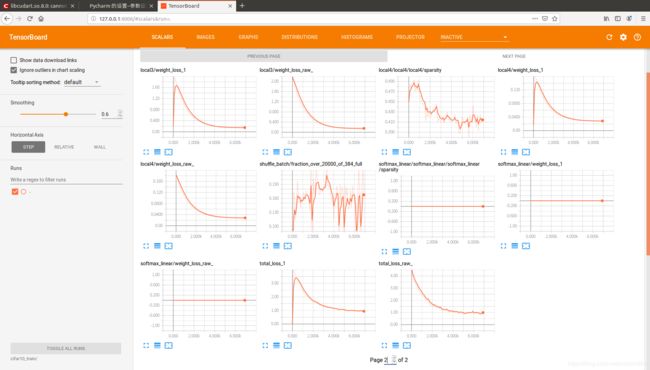 结果图2:可视化参数值
 结果图3:可视化训练图像
 结果图4
结果图4
 结果图5:直方图可视化
 结果图6
结果图6
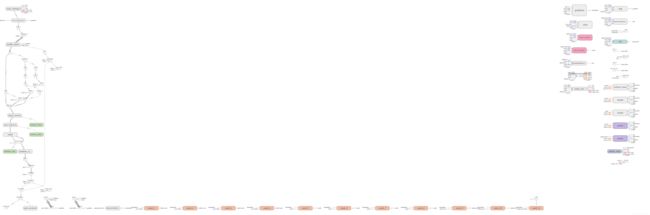 结果图7:整个的结构图。
打开cifar_train文件夹,可以看到类似下面的结果:
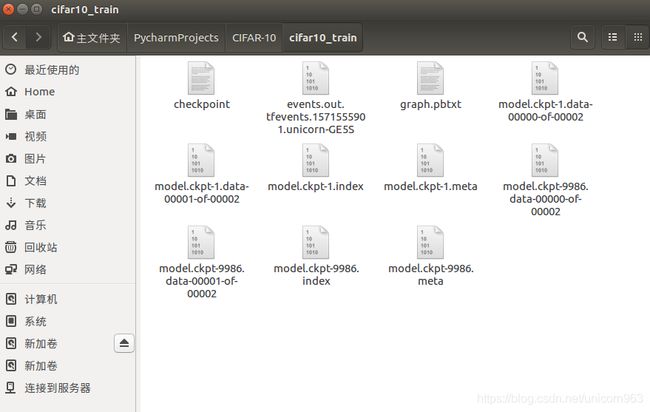 其中,checkpoint文件保存着模型的参数,model.ckpt是保存的模型。