iOS 音视频高级编程:AVAssetReaderTrackOutput改变CMFormatDescription导致Video Toolbox解码失败与不解码GPU直接显示H.264帧
本文档描述配置AVAssetReaderTrackOutput的输出像素格式与源像素格式不符导致导致Video Toolbox解码失败、并讨论不解码直接在OpenGL ES显示H.264帧问题。所有数据均在iPad Air 2、iPhone 6真机上验证通过。
1、AVAssetReader读取MP4
AVFoundation支持MP4文件读取,RTSP等协议并不支持,所以这里不引入FFmpeg,示例代码如下所示。
#define Check_Error(error) if (error) {\\
NSLog(@"%@", error.localizedDescription);\\
return; }

NSURL *url = [[NSBundle mainBundle] URLForResource:@"4k.mp4" withExtension:nil];
NSDictionary *options = @{AVURLAssetPreferPreciseDurationAndTimingKey : @YES};
AVURLAsset *inputAsset = [[AVURLAsset alloc] initWithURL:url options:options];
[inputAsset loadValuesAsynchronouslyForKeys:@[@"tracks"] completionHandler:^{
    dispatch_async(dispatch_get_global_queue(DISPATCH_QUEUE_PRIORITY_DEFAULT, 0), ^{
        NSError *error = nil;
        if ( AVKeyValueStatusLoaded != [inputAsset statusOfValueForKey:@"tracks" error:&error]) {
            Check_Error(error)
        }
        AVAssetReader *reader = [AVAssetReader assetReaderWithAsset:inputAsset error:&error];
        Check_Error(error)
        // 配置AVAssetReaderTrackOutput
}
AVAsset *asset = [AVAsset assetWithURL: url];也实例化AVURLAsset对象,因为这是类簇方法。
2、AVAssetReaderTrackOutput读取视频格式描述CMFormatDescription
outputSettings用于指定采样输出的属性,视音视频轨道而定,可在`AVAudioSettings.h`、`AVVideoSettings.h`找到对应的属性键进行设置。传递nil表示使用源格式。
AVAssetReaderTrackOutput *videoTrackOutput =
[AVAssetReaderTrackOutput assetReaderTrackOutputWithTrack:[inputAsset tracksWithMediaType:AVMediaTypeVideo].firstObject
                                           outputSettings:nil];
if ([reader canAddOutput:videoTrackOutput]) {
    [reader addOutput:videoTrackOutput];
}

if (![reader startReading]) {
    return;
}
3、使用Video Toolbox解码
3.1、先配置解码回调函数。
VTDecompressionSessionRef decompressSession;
void didDecompress(
                   void *decompressionOutputRefCon,
                   void *sourceFrameRefCon,
                   OSStatus status,
                   VTDecodeInfoFlags infoFlags,
                   CVImageBufferRef imageBuffer,
                   CMTime presentationTimeStamp,
                   CMTime presentationDuration ) {
 // 解码后续操作
}
3.2、创建解码会话。
CMFormatDescriptionRef formatDesc = (CMFormatDescriptionRef)[[inputAsset tracksWithMediaType:AVMediaTypeVideo].firstObject formatDescriptions].firstObject;

VTDecompressionOutputCallbackRecord outputCallback = {
    .decompressionOutputCallback = didDecompress,
    .decompressionOutputRefCon = NULL
};
OSType status = VTDecompressionSessionCreate(NULL, formatDesc, NULL, NULL, &outputCallback, &decompressSession);
3.3、开始解码
这里写代码片while (true) {
    CMSampleBufferRef sampleBuffer = [videoTrackOutput copyNextSampleBuffer];
    if(sampleBuffer) {
        OSType status = VTDecompressionSessionDecodeFrame(decompressSession, sampleBuffer, !kVTDecodeFrame_EnableAsynchronousDecompression, NULL, NULL);
        NSLog(@"status = %i", status);
        CMSampleBufferInvalidate(sampleBuffer);
        CFRelease(sampleBuffer);
    } else {
        break;
    }
}
在解码回调函数中可发现视频的源像素格式为
420f(kCVPixelFormatType_420YpCbCr8BiPlanarVideoRange),实际是FullRange,说明真机上iOS会作格式转换,如下图所示。
目前为止,一切正常。下面,修改AVAssetReader的输出像素格式。
4、配置AVAssetReaderTrackOutput
指定为kCVPixelFormatType_420YpCbCr8BiPlanarFullRange。
NSDictionary *outputSettings = @{(id) kCVPixelBufferPixelFormatTypeKey : @(kCVPixelFormatType_420YpCbCr8BiPlanarFullRange)};
AVAssetReaderTrackOutput *videoTrackOutput =
[AVAssetReaderTrackOutput assetReaderTrackOutputWithTrack:[inputAsset tracksWithMediaType:AVMediaTypeVideo].firstObject
                                           outputSettings:outputSettings];
5、Video Toolbox解码异常kVTFormatDescriptionChangeNotSupportedErr
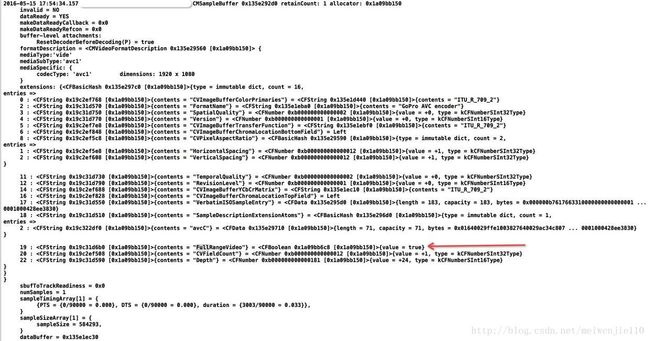
再解码时,VTDecompressionSessionDecodeFrame的返回值为-12916(kVTFormatDescriptionChangeNotSupportedErr)。下图对比了从AVAssetReaderTrackOutput、copyNextSampleBuffer各自读取的信息差异。
6、重新创建解码会话
当CMFormatDescription改变时,若是小变化,比如H.264的PPS变化了,可使用VTDecompressionSessionCanAcceptFormatDescription查询解码器是否可接受新格式描述数据;变化较大时,需强制刷新编解码器缓冲区,且释放现在解码会话资源,然后重新创建格式描述数据。
6.1、CMFormatDescriptionEqual比较CMFormatDescription
CMFormatDescriptionRef currentFormatDesc = CMSampleBufferGetFormatDescription(sampleBuffer);
if (!CMFormatDescriptionEqual(formatDesc, currentFormatDesc)) {
    if (!VTDecompressionSessionCanAcceptFormatDescription(decompressSession, currentFormatDesc)) {
        // 后续操作
    }
}
6.2、重建解码会话
formatDesc = currentFormatDesc;
status = VTDecompressionSessionWaitForAsynchronousFrames(decompressSession); // 内部调用VTDecompressionSessionFinishDelayedFrames
VTDecompressionSessionInvalidate(decompressSession);
status = VTDecompressionSessionCreate(NULL, formatDesc, NULL, NULL, &outputCallback, &decompressSession);
NSLog(@"status = %i", status);
再次运行,
VTDecompressionSessionCreate的返回值为-12906(kVTCouldNotFindVideoDecoderErr)。从第5节的图可知,指定AVAssetReaderTrackOutput的outputSettings属性后,格式描述已发生变化,导致找不到解码器的具体原因是avcC数据丢失,且codecType为'420f',而非avc1或avcC。
6.3、VTDecompressionSessionCreate指定创建的解码器
若只是codecType发生变化,导致Video Toolbox无法自动匹配解码器,尝试在VTDecompressionSessionCreate手动指定使用的解码器。
NSDictionary *videoDecoderSpecification = @{AVVideoCodecKey: AVVideoCodecH264};
VTDecompressionSessionCreate(NULL, formatDesc, (__bridge CFDictionaryRef)videoDecoderSpecification, NULL, &outputCallback, &decompressSession);
6.4、重建CMFormatDescriptionRef和VTDecompressionSessionRef
CMFormatDescriptionRef没提供设置属性函数,CMFormatDescriptionGetExtension也总是出现内存读取问题,只能通过CMFormatDescriptionGetExtensions获取avcC数据。
NSDictionary *formerFormatDescExtensions = (__bridge NSDictionary *)CMFormatDescriptionGetExtensions(formatDesc);
NSData *avcC = (__bridge NSData *)formerFormatDescExtensions[@"SampleDescriptionExtensionAtoms"];
由于CMFormatDescriptionGetExtensions返回不可变字典,没法直接将avcC存入它,需重新创建。
6.4.1、使用SPS、PPS创建CMFormatDescriptionRef
方便起见,从原avcC数据读取SPS、PPS数据。
const uint8_t *sps = NULL;
size_t sps_size = 0;
CMVideoFormatDescriptionGetH264ParameterSetAtIndex(formatDesc, 0, &sps, &sps_size, NULL, NULL);

const uint8_t *pps = NULL;
size_t pps_size = 0;
CMVideoFormatDescriptionGetH264ParameterSetAtIndex(formatDesc, 1, &pps, &pps_size, NULL, NULL);
创建CMFormatDescriptionRef。
const uint8_t *params[] = {sps, pps};
const size_t params_size[] = {sps_size, pps_size};
status = CMVideoFormatDescriptionCreateFromH264ParameterSets(NULL, 2, params, params_size, 4, &formatDesc);
6.4.2、使用原avcC数据创建CMFormatDescriptionRef
使用avcC创建是相对麻烦的,因为要操作Core Founation数据结构,不过,利用Foundation与Core Foundation之间的转换是更省事的做法。
CMFormatDescriptionRef fmtDesc = NULL;
OSStatus status;

// CVPixelAspectRatio
NSDictionary *par = @{
                      @"HorizontalSpacing" : @0,
                      @"VerticalSpacing" : @0};
// SampleDescriptionExtensionAtoms
NSMutableDictionary *atoms = @{@"avcC" : avcC};
NSDictionary *newExtensions = @{
                                @"CVImageBufferChromaLocationBottomField" : @"left",
                                @"CVImageBufferChromaLocationTopField" : @"left",
                                @"FullRangeVideo" : @FALSE,
                                @"CVPixelAspectRatio" : par,
                                @"SampleDescriptionExtensionAtoms" : atoms};

status = CMVideoFormatDescriptionCreate(NULL, kCMVideoCodecType_H264, 1920, 1080, (__bridge CFDictionaryRef)newExtensions, &fmtDesc);
7、iOS直接显示H.264数据
早在Video Toolbox开放前就能不解码H.264,并用OpenGL ES直接渲染H.264。下面介绍具体实现办法。
7.1、AVAssetReaderTrackOutput修改视频像素格式
使用
AVAssetReaderTrackOutput将输出数据改为iOS支持的两个像素格式:
- kCVPixelFormatType_420YpCbCr8BiPlanarFullRange
- kCVPixelFormatType_420YpCbCr8BiPlanarVideoRange
CVPixelBuffer.h中还列举了其他格式,上面这两个格式,苹果提供了一个创建OpenGL ES Fragment Shader示例。其余格式,如YUV420p需自行处理片段着色器,示例代码如下(注意颜色转换矩阵),YUV三个通道需独立处理,对应的纹理也要分三次上传。数据量一样,但是UV一起提供,在我看来,少了一次GPU调用且UV数据一起存储方便内存拷贝,性能略有提高。
varying highp vec2 v_texcoord;
 uniform sampler2D s_texture_y;
 uniform sampler2D s_texture_u;
 uniform sampler2D s_texture_v;

 void main()
 {
     highp float y = texture2D(s_texture_y, v_texcoord).r;
     highp float u = texture2D(s_texture_u, v_texcoord).r - 0.5;
     highp float v = texture2D(s_texture_v, v_texcoord).r - 0.5;

     highp float r = y +             1.402 * v;
     highp float g = y - 0.344 * u - 0.714 * v;
     highp float b = y + 1.772 * u;

     gl_FragColor = vec4(r,g,b,1.0);
 }
7.2、获取CMSampleBuffer的图像地址
CVImageBufferRef imageBuffer = CMSampleBufferGetImageBuffer(sampleBuffer);注意,在真机上才能得到内存地址,模拟器返回NULL。
7.3、创建OpenGL ES Texture
CoreVideo提供了一个从CVPixelBuffer创建Texture的接口CVOpenGLESTextureCacheCreateTextureFromImage,省去自己拷贝YUV通道。

需要注意的是,`CVOpenGLESTextureCacheCreateTextureFromImage`对于OpenGL ES 2可以使用GL_RED_EXT、GL_RG_EXT创建Y、UV通道,而OpenGL ES 3只能使用GL_LUMINANCE、GL_LUMINANCE_ALPHA,后面这两个值对于ES 2也是支持的。
现在问题来了,既然可以不解码,为何要多此一举?
7.4、性能比较

可见,未解码直接创建纹理GPU负载较大,意味着手机更容易发烫,同时消耗更多GPU资源。


