Tomcat启动过程都干了啥
Tomcat是一个Web容器,用于接收HTTP请求并作出响应。我们都知道它是使用ServerSocket、Socket使用TCP链接达到通信的目的。但这个过程是如何做到的呢?我们在webapps下放的那些Web应用又是如何被监听起来的呢?配置webApp时有多种配置方式,如何正确的使用它们呢?web.xml为什么要那么配置呢,我们是否可以自定义一些元素呢?
这些都是接下来,我要研究的课题。在此之前,我们还是先让Tomcat能够启动起来吧。
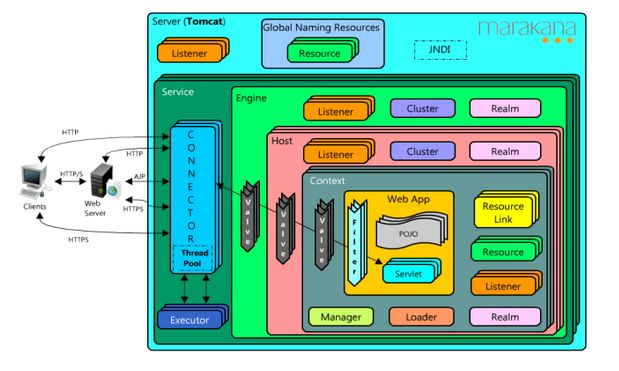
在了解Tomcat启动过程之前,最好还是上网查查Tomcat有哪些顶层的接口,也就是Tomcat的设计架构,不然晕着头就去调试代码,是看不出什么来的。
通过网上的了解,知道了Tomcat主要的接口有:
·Server、Service、Container、Connector、Lifecycle、Executor、Engine
、Host、Context、Wrapper、Value以及他们之间的关系。
其他的:
Realm、MBean等等。
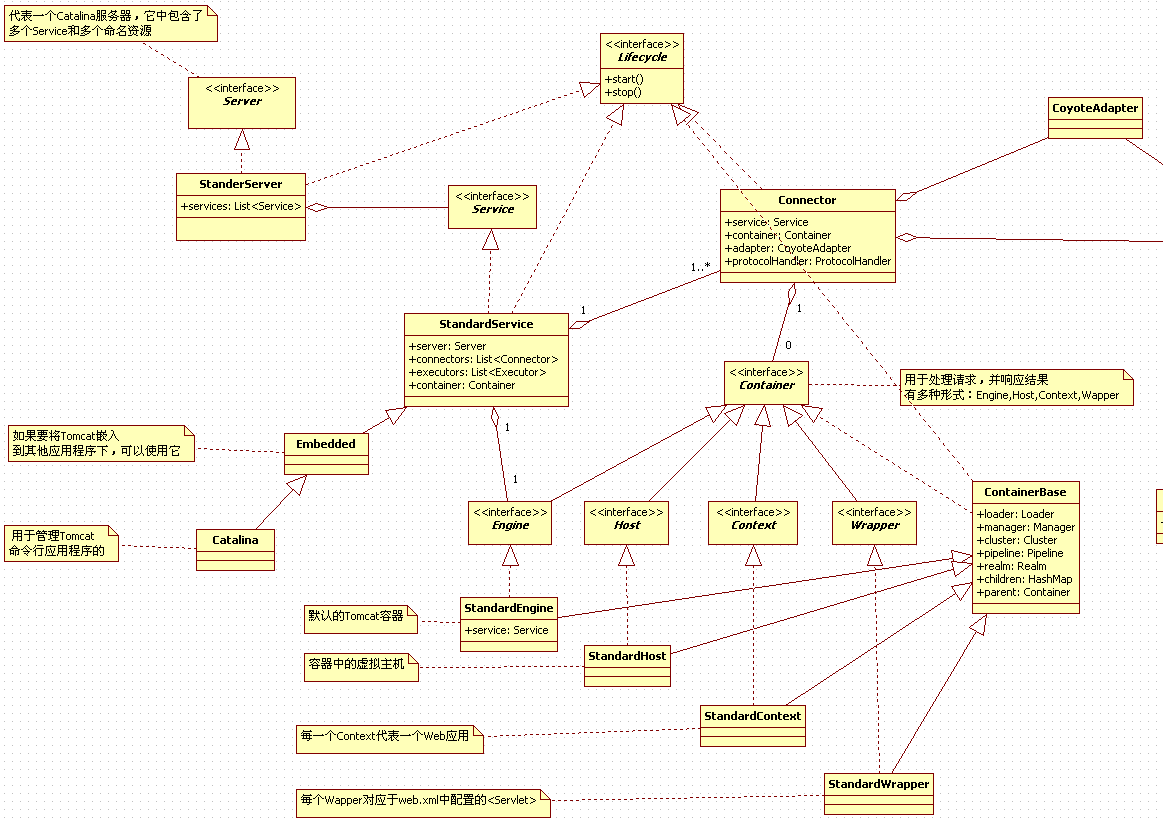
紧接着大致的浏览了一下这些顶级接口,以及他们之间的关系,画了一张类图,如下:
通过这个类图,就可以快速的了解这些主要接口之间的关系了。
接下来,开始Tomcat启动过程的源码调试,如何启动调试,上一浓ky"http://www.it165.net/qq/" target="_blank" class="keylink">qqyqc7E0tG+rcu1tcS63Mfls/7By6GjPC9wPgo8cD6198rUyrGjrMjrv9rU2kJvb3RzdHJhcCNtYWluKCk8L3A+Cgo8aW1nIGlkPQ=="code_img_closed_4ad30836-8149-461d-8988-f83a0261708c" class="code_img_closed" src="http://www.it165.net/uploadfile/files/2014/0928/2014092818483481.gif" alt="" />
public static void main(String args[]) {

        if (daemon == null) {

            daemon = new Bootstrap();

            try {

// 初始化守护进程,其实就是初始化类加载器

                daemon.init();

            } catch (Throwable t) {

                t.printStackTrace();

                return;

            }

        }


        try {

            String command = "start";

            if (args.length > 0) {

                command = args[args.length - 1];

            }


            if (command.equals("startd")) {

                args[args.length - 1] = "start";

                daemon.load(args);

                daemon.start();

            } else if (command.equals("stopd")) {

                args[args.length - 1] = "stop";

                daemon.stop();

            } else if (command.equals("start")) {

                daemon.setAwait(true);

// 加载相关配置文件,初始化几个主要的顶层接口实例

                daemon.load(args);

// 启动那些有生命周期的顶层实例,监听用户请求

                daemon.start();

            } else if (command.equals("stop")) {

                daemon.stopServer(args);

            } else {

                log.warn("Bootstrap: command \"" + command + "\" does not exist.");

            }

        } catch (Throwable t) {

            t.printStackTrace();

        }


    }
从这个方法看,Tomcat启动过程可以简化为3个步骤:
1)初始化守护进程,其实就是初始化类加载器
2)加载相关配置文件,初始化几个主要的顶层接口实例,简单了说,就是服务器初始化。
3)启动那些有生命周期的顶层实例,监听用户请求,简单了说,就是启动服务器。
接下来,就针对这三个过程分别说明:
1、初始化类加载器
public void init()

        throws Exception

    {


        // Set Catalina path

// 根据环境变量CATALINA_HOME来初始化Tomcat的安装路径,相关配置文件路径

        setCatalinaHome();

        setCatalinaBase();

// 初始化类加载器,用于加载tomcat/lib目录下的jar包和class文件,或者从网络上加载class文件。

        initClassLoaders();

        Thread.currentThread().setContextClassLoader(catalinaLoader);


// 从tomcat/lib目录下加载org.apache.catalina.startup.Catalina类

// 用于开启Tomcat的真正的启动过程

        SecurityClassLoad.securityClassLoad(catalinaLoader);


        // Load our startup class and call its process() method

        if (log.isDebugEnabled())

            log.debug("Loading startup class");

        Class startupClass =

            catalinaLoader.loadClass

            ("org.apache.catalina.startup.Catalina");

        Object startupInstance = startupClass.newInstance();


        // Set the shared extensions class loader

        if (log.isDebugEnabled())

            log.debug("Setting startup class properties");

        String methodName = "setParentClassLoader";

        Class paramTypes[] = new Class[1];

        paramTypes[0] = Class.forName("java.lang.ClassLoader");

        Object paramValues[] = new Object[1];

        paramValues[0] = sharedLoader;

        Method method =

            startupInstance.getClass().getMethod(methodName, paramTypes);

        method.invoke(startupInstance, paramValues);


        catalinaDaemon = startupInstance;


    }
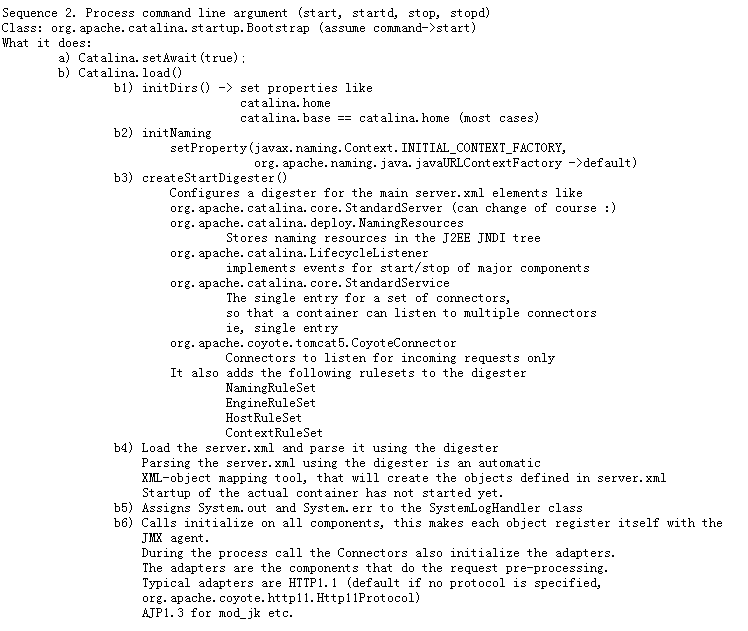
Tomcat官方描述这个过程
类加载器初始化过程到这里也介绍完毕了,这里贴出来Tomcat官方文档中是如何介绍这个过程的:
2、服务器初始化
在调试这个过程之前,最好先了解一下配置文件server.xml如何配置,各个部分代表什么,下面是讲tomcat默认的server.xml写下来了。
代码调试:
1)加载server.xml,并创建出那些顶层对象
public void load() {
// 设置初始化开始时间,用于最后统计初始化过程用了多长时间
long t1 = System.nanoTime();
// 这一步是再次初始化Tomcat的安装目录等
initDirs();
// Before digester - it may be needed
initNaming();
// 这是一个XML文档解析器,用于解析server.xml、server-embed.xml
// Create and execute our Digester
Digester digester = createStartDigester();
InputSource inputSource = null;
InputStream inputStream = null;
File file = null;
try {
// file就是server.xml
file = configFile();
inputStream = new FileInputStream(file);
inputSource = new InputSource("file://" + file.getAbsolutePath());
} catch (Exception e) {
;
}
if (inputStream == null) {
try {
inputStream = getClass().getClassLoader()
.getResourceAsStream(getConfigFile());
inputSource = new InputSource
(getClass().getClassLoader()
.getResource(getConfigFile()).toString());
} catch (Exception e) {
;
}
}
// This should be included in catalina.jar
// Alternative: don't bother with xml, just create it manually.
// 当tomcat作为一个独立的应用服务器是解析server.xml
// 当tomcat嵌入到其他应用中时,解析server-embed.xml
if( inputStream==null ) {
try {
inputStream = getClass().getClassLoader()
.getResourceAsStream("server-embed.xml");
inputSource = new InputSource
(getClass().getClassLoader()
.getResource("server-embed.xml").toString());
} catch (Exception e) {
;
}
}
if ((inputStream == null) && (file != null)) {
log.warn("Can't load server.xml from " + file.getAbsolutePath());
if (file.exists() && !file.canRead()) {
log.warn("Permissions incorrect, read permission is not allowed on the file.");
}
return;
}
// 配置文件解析,解析的过程中,就会根据配置文件中的 例如server.xml中有
与这些元素相关的顶层对象都会被创建。这些对象创建完毕,并且也设置依赖完毕,但是Tomcat并不知道一样,需要将他们都注册一下。
2)初始化Server对象:注册Server对象
接下来看看Server真正的初始化过程。
StandardServer#initialize():
public void initialize()
throws LifecycleException
{
if (initialized) {
log.info(sm.getString("standardServer.initialize.initialized"));
return;
}
lifecycle.fireLifecycleEvent(INIT_EVENT, null);
initialized = true;
// Server对象已经创建完毕了,现在将作为Tomcat组件其注册
if( oname==null ) {
try {
oname=new ObjectName( "Catalina:type=Server");
Registry.getRegistry(null, null)
.registerComponent(this, oname, null );
} catch (Exception e) {
log.error("Error registering ",e);
}
}
// Register global String cache
try {
ObjectName oname2 =
new ObjectName(oname.getDomain() + ":type=StringCache");
Registry.getRegistry(null, null)
.registerComponent(new StringCache(), oname2, null );
} catch (Exception e) {
log.error("Error registering ",e);
}
// Initialize our defined Services
// 在Server下设置初始化多个service,这个依据server.xml中的
3)初始化Service对象:注册 Services、executors对象
StandardService#initialize():
public void initialize()

            throws LifecycleException

    {

        // Service shouldn't be used with embeded, so it doesn't matter

        if (initialized) {

            if(log.isInfoEnabled())

                log.info(sm.getString("standardService.initialize.initialized"));

            return;

        }

        initialized = true;

        if( oname==null ) {

            try {

                // Hack - Server should be deprecated...

                Container engine=this.getContainer();

                domain=engine.getName();

// 注册Service

                oname=new ObjectName(domain + ":type=Service,serviceName="+name);

                this.controller=oname;

                Registry.getRegistry(null, null)

                    .registerComponent(this, oname, null);


// 设置service的executors属性并注册executors

                Executor[] executors = findExecutors();

                for (int i = 0; i < executors.length; i++) {

                    ObjectName executorObjectName =

                        new ObjectName(domain + ":type=Executor,name=" + executors[i].getName());

                    Registry.getRegistry(null, null)

                        .registerComponent(executors[i], executorObjectName, null);

                }


            } catch (Exception e) {

                log.error(sm.getString("standardService.register.failed",domain),e);

            }


        }

        if( server==null ) {

            // Register with the server

            // HACK: ServerFactory should be removed...


            ServerFactory.getServer().addService(this);

        }


        // Initialize our defined Connectors

// 在service下设置多个connector

// 这个要依据service.xml的

        synchronized (connectors) {

            for (int i = 0; i < connectors.length; i++) {

                try {

                    connectors[i].initialize();

                } catch (Exception e) {

                    String message = sm.getString(

                            "standardService.connector.initFailed",

                            connectors[i]);

                    log.error(message, e);


                    if (Boolean.getBoolean("org.apache.catalina.startup.EXIT_ON_INIT_FAILURE"))

                        throw new LifecycleException(message);

                }

            }

        }

    }
4)初始化Connector对象
public void initialize()

        throws LifecycleException

    {

        if (initialized) {

            if(log.isInfoEnabled())

                log.info(sm.getString("coyoteConnector.alreadyInitialized"));

           return;

        }


        this.initialized = true;


        if( oname == null && (container instanceof StandardEngine)) {

            try {

                // 注册连接器Connector

                StandardEngine cb=(StandardEngine)container;

                oname = createObjectName(cb.getName(), "Connector");

                Registry.getRegistry(null, null)

                    .registerComponent(this, oname, null);

                controller=oname;

            } catch (Exception e) {

                log.error( "Error registering connector ", e);

            }

            if(log.isDebugEnabled())

                log.debug("Creating name for connector " + oname);

        }


        // 为当前Connector创建一个CoyoteAdapter适配器

        adapter = new CoyoteAdapter(this);

        protocolHandler.setAdapter(adapter);


        // Make sure parseBodyMethodsSet has a default

        if( null == parseBodyMethodsSet )

            setParseBodyMethods(getParseBodyMethods());


        IntrospectionUtils.setProperty(protocolHandler, "jkHome",

                                       System.getProperty("catalina.base"));


        try {

// 协议初始化

            protocolHandler.init();

        } catch (Exception e) {

            throw new LifecycleException

                (sm.getString

                 ("coyoteConnector.protocolHandlerInitializationFailed", e));

        }

    }
5)ProtocolHandler初始化
协议初始化,根据
public void init() throws Exception {

        endpoint.setName(getName());

        endpoint.setHandler(cHandler);


        // Verify the validity of the configured socket factory

        try {

            if (isSSLEnabled()) {

                sslImplementation =

                    SSLImplementation.getInstance(sslImplementationName);

                socketFactory = sslImplementation.getServerSocketFactory();

                endpoint.setServerSocketFactory(socketFactory);

            } else if (socketFactoryName != null) {

                socketFactory = (ServerSocketFactory) Class.forName(socketFactoryName).newInstance();

                endpoint.setServerSocketFactory(socketFactory);

            }

        } catch (Exception ex) {

            log.error(sm.getString("http11protocol.socketfactory.initerror"),

                      ex);

            throw ex;

        }


        if (socketFactory!=null) {

            Iterator attE = attributes.keySet().iterator();

            while( attE.hasNext() ) {

                String key = attE.next();

                Object v=attributes.get(key);

                socketFactory.setAttribute(key, v);

            }

        }


// endpoint初始化,根据上面的类图就知道,当协议确定时,Endpoint的类型也就确定了。

        try {

            endpoint.init();

        } catch (Exception ex) {

            log.error(sm.getString("http11protocol.endpoint.initerror"), ex);

            throw ex;

        }

        if (log.isInfoEnabled())

            log.info(sm.getString("http11protocol.init", getName()));


    }
6)Endpoint初始化
public void init()

        throws Exception {


        if (initialized)

            return;


        // Initialize thread count defaults for acceptor

        if (acceptorThreadCount == 0) {

            acceptorThreadCount = 1;

        }

        if (serverSocketFactory == null) {

            serverSocketFactory = ServerSocketFactory.getDefault();

        }

        if (serverSocket == null) {

            try {

                if (address == null) {

                    serverSocket = serverSocketFactory.createSocket(port, backlog);

                } else {

                    serverSocket = serverSocketFactory.createSocket(port, backlog, address);

                }

            } catch (BindException orig) {

                String msg;

                if (address == null)

                    msg = orig.getMessage() + " :" + port;

                else

                    msg = orig.getMessage() + " " +

                            address.toString() + ":" + port;

                BindException be = new BindException(msg);

                be.initCause(orig);

                throw be;

            }

        }

        //if( serverTimeout >= 0 )

        //    serverSocket.setSoTimeout( serverTimeout );


        initialized = true;


    }
从这段代码很清楚的看出,Endpoint就代表了服务端的一个Socket端点,endpoint的初始化其实就是创建ServerSocket对象。
上述6个步骤中,不论采用什么协议,前3步都是一样的,至于5)、6)两步要也是需要的,但是由于协议的不同,每一步的内部是如何实现的,这点并不一样。
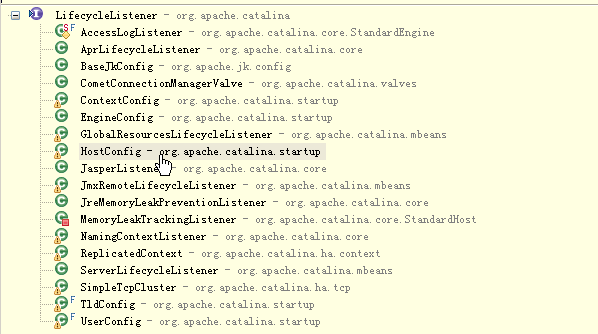
Tomcat官方描述这个过程
到这里,服务器初始化也就介绍的差不多了。这里贴出来tomcat官方文档时如何描述这一过程的:
3、服务器开启
StandardService启动过程说明
可以通过查看StandardServer#start()来了解服务器开启的过程。
如果跟踪代码就会发现:
Catalina#start()--àStandardServer#start()--àStandardService#start()
也就是Catalina对象执行start()期间,会调用StandardServer对象的start()方法。
StandardServer对象执行start()期间,会调用Server下的所有的StandardService对象的start()。
下面就看看StandardService对象的start方法:
public void start() throws LifecycleException {


        // Validate and update our current component state

        if (started) {

            if (log.isInfoEnabled()) {

                log.info(sm.getString("standardService.start.started"));

            }

            return;

        }


        if( ! initialized )

            init();


        // Notify our interested LifecycleListeners

        lifecycle.fireLifecycleEvent(BEFORE_START_EVENT, null);

        if(log.isInfoEnabled())

            log.info(sm.getString("standardService.start.name", this.name));

        lifecycle.fireLifecycleEvent(START_EVENT, null);

        started = true;


        // 启动定义的所有的容器

// Engine、Host、Context都是容器,只要在server.xml中定义了,都会在这里启动

        if (container != null) {

            synchronized (container) {

                if (container instanceof Lifecycle) {

                    ((Lifecycle) container).start();

                }

            }

        }

// 启动执行器Executor

        synchronized (executors) {

            for ( int i=0; i
Service下的Container的启动过程说明
Service下的容器有Engine,Engine下的容器有Host,Host下的容器有Context。
每个容器下都有Pipeline、Value、Realm等等配置。
接下来就看看如何启动这些各个容器的。调试代码的过程中,就会发现,每个容器都会使用到的一个方法是在ContainerBase中定义的start():
public synchronized void start() throws LifecycleException {


        // Validate and update our current component state

        if (started) {

            if(log.isInfoEnabled())

                log.info(sm.getString("containerBase.alreadyStarted", logName()));

            return;

        }


        // Notify our interested LifecycleListeners

        lifecycle.fireLifecycleEvent(BEFORE_START_EVENT, null);


        started = true;


        // Start our subordinate components, if any

        if ((loader != null) && (loader instanceof Lifecycle))

            ((Lifecycle) loader).start();

        logger = null;

        getLogger();

        if ((logger != null) && (logger instanceof Lifecycle))

            ((Lifecycle) logger).start();

        if ((manager != null) && (manager instanceof Lifecycle))

            ((Lifecycle) manager).start();

        if ((cluster != null) && (cluster instanceof Lifecycle))

            ((Lifecycle) cluster).start();

        if ((realm != null) && (realm instanceof Lifecycle))

            ((Lifecycle) realm).start();

        if ((resources != null) && (resources instanceof Lifecycle))

            ((Lifecycle) resources).start();


        // Start our child containers, if any

// 启动子容器,也就是说:

如果this是Engine对象,就会启动Engine下的所有的host来启动。

// 当host执行start()过程,也会执行这个方法,来启动host下的context。

// 也就是说,这里会引起递归调用

        Container children[] = findChildren();

        for (int i = 0; i < children.length; i++) {

            if (children[i] instanceof Lifecycle)

                ((Lifecycle) children[i]).start();

        }


        // Start the Valves in our pipeline (including the basic), if any

// 启动Container下的在pipeline中的value

        if (pipeline instanceof Lifecycle)

            ((Lifecycle) pipeline).start();


        // Notify our interested LifecycleListeners

        lifecycle.fireLifecycleEvent(START_EVENT, null);

// 启动守护线程,用于周期性的检查Session是否超时

        // Start our thread

        threadStart();


        // Notify our interested LifecycleListeners

        lifecycle.fireLifecycleEvent(AFTER_START_EVENT, null);


    }
1)StandardEngine启动过程
public void start() throws LifecycleException {

        if( started ) {

            return;

        }

// 在初始化阶段,并没有初始化容器,所以在启动容器前要先初始化

        if( !initialized ) {

// 容器的初始化和其他组件的初始化类似,都是将其注册为MBean

            init();

        }


        // Look for a realm - that may have been configured earlier.

        // If the realm is added after context - it'll set itself.

        if( realm == null ) {

            ObjectName realmName=null;

            try {

                realmName=new ObjectName( domain + ":type=Realm");

                if( mserver.isRegistered(realmName ) ) {

                    mserver.invoke(realmName, "init",

                            new Object[] {},

                            new String[] {}

                    );

                }

            } catch( Throwable t ) {

                log.debug("No realm for this engine " + realmName);

            }

        }


        // Log our server identification information

        //System.out.println(ServerInfo.getServerInfo());

        if(log.isInfoEnabled())

            log.info( "Starting Servlet Engine: " + ServerInfo.getServerInfo());

        if( mbeans != null ) {

            try {

                Registry.getRegistry(null, null)

                    .invoke(mbeans, "start", false);

            } catch (Exception e) {

                log.error("Error in start() for " + mbeansFile, e);

            }

        }


        // Standard container startup

// 这才是真正的操作。而这个操作是在ContainerBase中定义的,也就是说,所有的Container都可以使用。这个方法上面已经说明。

        super.start();


    }
2)StandardHost启动过程
public synchronized void start() throws LifecycleException {

        if( started ) {

            return;

        }

// 初始化host

        if( ! initialized )

            init();


        // Look for a realm - that may have been configured earlier.

        // If the realm is added after context - it'll set itself.

        if( realm == null ) {

            ObjectName realmName=null;

            try {

                realmName=new ObjectName( domain + ":type=Realm,host=" + getName());

                if( mserver.isRegistered(realmName ) ) {

                    mserver.invoke(realmName, "init",

                            new Object[] {},

                            new String[] {}

                    );

                }

            } catch( Throwable t ) {

                log.debug("No realm for this host " + realmName);

            }

        }


        // Set error report valve, 用于报请求HTML错误码

        if ((errorReportValveClass != null)

            && (!errorReportValveClass.equals(""))) {

            try {

                boolean found = false;

                if(errorReportValveObjectName != null) {

                    ObjectName[] names =

// 添加Value,然后在下面的代码super.start()使用;也就是在调用ContainerBase#start()中使用。

          ((StandardPipeline)pipeline).getValveObjectNames();

                    for (int i=0; !found && i
2.1)Host启动过程中的管道pipeline启动
上面说了容器启动过程中都会执行的方法:ContainerBase#start(),代码在上面。代码中有一个pipeline.start()语句。
public synchronized void start() throws LifecycleException {


        // Validate and update our current component state

        if (started)

            throw new LifecycleException

                (sm.getString("standardPipeline.alreadyStarted"));


        // Notify our interested LifecycleListeners

        lifecycle.fireLifecycleEvent(BEFORE_START_EVENT, null);


        started = true;


        // Start the Valves in our pipeline (including the basic), if any

        Valve current = first;

        if (current == null) {

        current = basic;

        }

        while (current != null) {

            if (current instanceof Lifecycle)

                ((Lifecycle) current).start();

            registerValve(current);

        current = current.getNext();

        }


        // Notify our interested LifecycleListeners

        lifecycle.fireLifecycleEvent(START_EVENT, null);


        // Notify our interested LifecycleListeners

// 通知监听器执行相关处理

        lifecycle.fireLifecycleEvent(AFTER_START_EVENT, null);


    }
2.2)通过事件处理进入到应用程序部署阶段
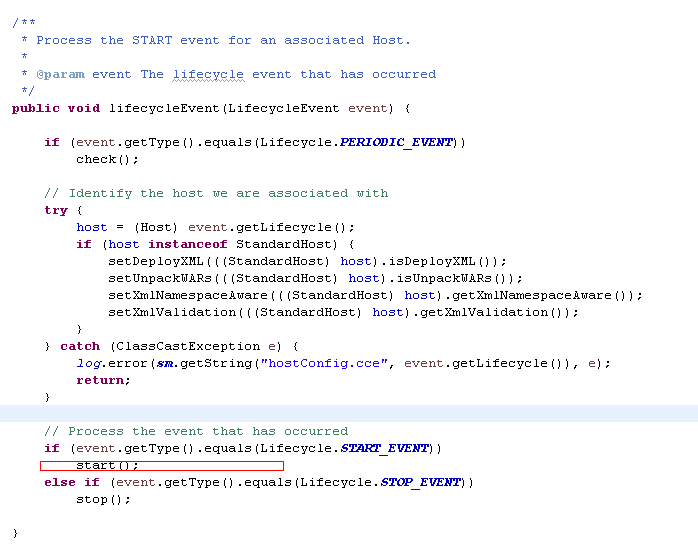
在fireLifecycleEvent方法调用期间,会调用到HostConfig的处理。
从这里就进入了应用程序部署的阶段了。
这个方法中的setDeployXML用于设置部署时是否部署XML,
也就是否部署通过XML方式描述的上下文:
setUnpackWars()是设置是否部署webapps下的war包。
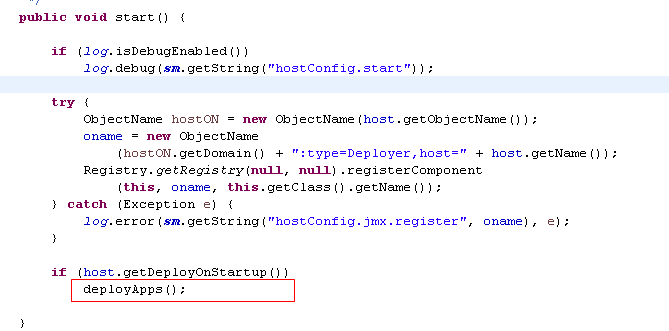
HostConfig#start():
部署Host下所有的Web应用。
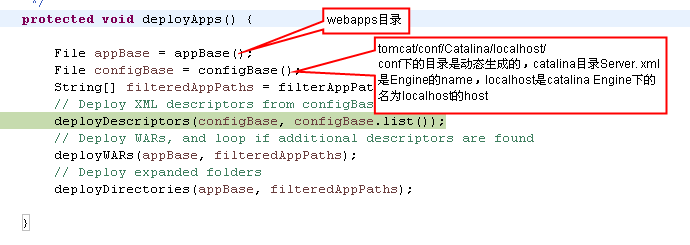
2.3)开始部署应用程序
从这个方法来看,部署时:
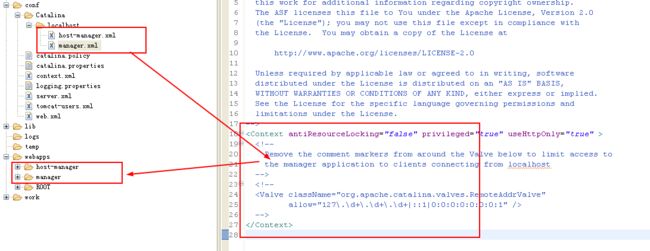
1)穴ky"http://www.it165.net/qq/" target="_blank" class="keylink">qqyv8rwdG9tY2F0L2NvbmbPwrWxx7BFbmdpbmWjqGNhdGFsaW5ho6nPwrXEtbHHsGhvc3SjqGxvY2FsaG9zdKOpxL/CvM/CtcTL+dPQtcR4bWzOxLz+oaPV4sDvtcRYTUzOxLz+vs3Kx9K7uPZjb250ZXh0w+jK9rf7oaM8L3A+CjxwPjIpu+Gyv8rwdG9tY2F0L3dlYmFwcHPPwrXEd2FysPy6zcS/wryhozwvcD4KCjxwPrb4w7/W1rK7zazA4NDNtcTTptPDysfI57rOsr/K8LW9aG9zdM/CtcSjrNXiwO++zc/Isru/tMHLoaM8L3A+Cgo8cD7WwbTLo6xUb21jYXTG9LavtcTV+7j2wfezzKOsy+PKx8HLveK1xLLusru24MHLoaM8L3A+Cgo8aDM+VG9tY2F0udm3vcPoyvbV4rj2uf2zzDwvaDM+CjxwPtTa1eLA76Os0rLM+bP2wLRUb21jYXS52be9zsS1tcqxyOe6zsPoyvbV4tK7uf2zzLXEo7o8L3A+CjxwPiZuYnNwOzxpbWcgc3JjPQ=="http://www.it165.net/uploadfile/files/2014/0928/2014092818483590.png" alt="" />
我在调试时写的流程是和官方的文档是基本上吻合的。通过这个调试,很容易就知道了Tomcat的各个组件的关系。
