MySQL 详细安装(亲测)
本文章向大家介绍Linux的MySQL详细安装及配置。
一、安装前操作
1、检查是否已经安装过mysql,执行命令
我是用的centos7,默认安装的mariadb,而不是mysql
[root@centos-01 ~]# rpm -qa | grep mysql
[root@centos-01 ~]# rpm -qa | grep mariadb
mariadb-libs-5.5.56-2.el7.x86_64
如没有返回任何信息说明没有安装
从执行结果,可以看出默认已经安装了mariadb-libs-5.5.56-2.el7.x86_64,执行删除命令
[root@centos-01 ~]# rpm -e --nodeps mariadb-libs-5.5.56-2.el7.x86_64再次执行查询命令,查看是否删除
2、查询所有mariadb对应的文件夹
[root@centos-01 ~]# find / -name mariadb有则删除相关目录或文件
3、检查mysql用户组和用户是否存在,如果没有,则创建
[root@centos-01 ~]# cat /etc/group | grep mysql
[root@centos-01 ~]# cat /etc/passwd |grep mysql
[root@centos-01 ~]# groupadd mysql
[root@centos-01 ~]# useradd -s /sbin/nologin -M -g mysql mysql
参数说明:
-s表示指定用户所用的shell,此处为/sbin/nologin,表示不登录。-M表示不创建用户主目录。-g表示指定用户的组名为mysql。
最后的mysql表示用户名。
4、从官网下载是用于Linux的Mysql安装包
[root@centos-01 ~]# wget http://dev.mysql.com/get/Downloads/MySQL-5.7/mysql-5.7.22-linux-glibc2.12-x86_64.tar.gz二、安装Mysql
1、在执行wget命令的目录下或你的上传目录下找到Mysql安装包
执行解压操作
[root@centos-01 ~]# tar xzvf mysql-5.7.22-linux-glibc2.12-x86_64.tar.gz
[root@centos-01 ~]# mv mysql-5.7.22-linux-glibc2.12-x86_64 /usr/local/mysql/
2、为msyql创建data目录及日志目录
[root@centos-01 ~]# mkdir -p /data/mysql/data
[root@centos-01 ~]# mkdir -p /data/logs/mysql
3、更改mysql目录下所有的目录及文件夹所属的用户组和用户,授权权限
[root@centos-01 ~]# chown -R mysql:mysql /usr/local/mysql
[root@centos-01 ~]# chown -R mysql:mysql /data/mysql/
[root@centos-01 ~]# chown -R mysql:mysql /data/logs/mysql/
4、修改配置文件
[root@centos-01 ~]# cat> /etc/my.cnf <5、编译安装并初始化mysql并启动,默认密码为空
[root@centos-01 ~]# cd /usr/local/mysql/bin/ && ./mysqld --defaults-file=/etc/my.cnf --initialize-insecure --user=mysql
[root@centos-01 ~]# cd /usr/local/mysql/bin/ && ./mysqld_safe --defaults-file=/etc/my.cnf --user=mysql &
6、将mysqld服务的启动脚本复制到/etc/init.d目录下并授予权限
在/usr/local/mysql/bin目录中,存放着管理mysql服务器的脚本和程序
[root@centos-01 ~]# cd /usr/local/mysql && cp -f support-files/mysql.server /etc/init.d/mysqld
[root@centos-01 ~]# chmod 700 /etc/init.d/mysqld
[root@centos-01 ~]# ln -s /usr/local/mysql/bin/mysql* /usr/bin/
//将其设为系统自启动服务
[root@centos-01 ~]# chkconfig --add mysqld
//临时设置mysql等命令和脚本的路径
[root@centos-01 ~]# export PATH=$PATH:/usr/local/mysql/bin/
//永久的添加搜索路径
[root@centos-01 ~]# echo "PATH=$PATH:/usr/local/mysql/bin/" >> /etc/profile

//添加库文件搜索路径可以通过修改/etc/ld.so.conf文件实现。ldconfig刷新库文件搜索路径,是修改生效。
[root@centos-01 ~]#  echo "/usr/local/mysql/lib/mysql" >> /etc/ld.so.conf
7、mysql启动与关闭
[root@centos-01 ~]# /etc/init.d/mysqld start|restart|stop8、查看3306的端口是否被监听
[root@centos-01 ~]# netstat -tunpl | grep 3306
tcp6       0      0 :::3306                 :::*                    LISTEN      77396/mysqld
到这里说明mysql已经安装成功了!!
下面修改密码
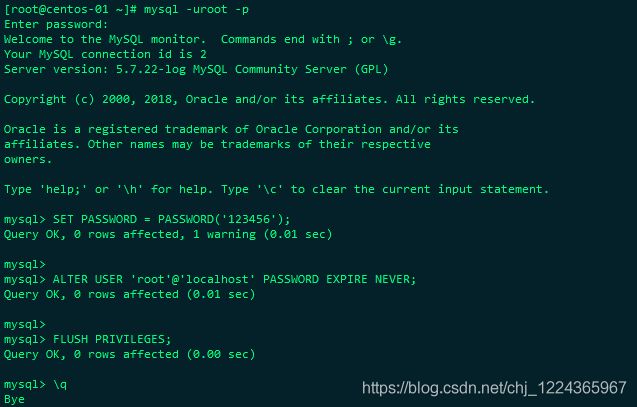
首先登录mysql,默认密码为空。
[root@centos-01 ~]# mysql -uroot -p
Enter password:    //直接回车
Welcome to the MySQL monitor.  Commands end with ; or \g.
Your MySQL connection id is 2
Server version: 5.7.22-log MySQL Community Server (GPL)

Copyright (c) 2000, 2018, Oracle and/or its affiliates. All rights reserved.

Oracle is a registered trademark of Oracle Corporation and/or its
affiliates. Other names may be trademarks of their respective
owners.

Type 'help;' or '\h' for help. Type '\c' to clear the current input statement.
mysql>
再执行下面三步操作,然后重新登录
mysql> SET PASSWORD = PASSWORD('123456');
mysql> ALTER USER 'root'@'localhost' PASSWORD EXPIRE NEVER;
mysql> FLUSH PRIVILEGES;
再次登录需要输入刚才修改的密码才可以登录成功!
MySQL远程连接授权
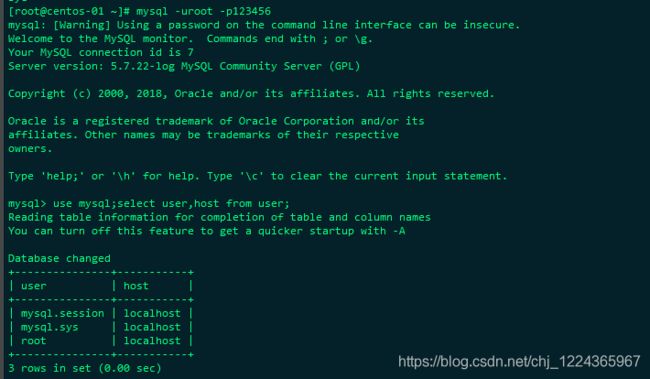
1.查看mysql库中的user表的host字段
- 使用mysql库:use mysql
- 查询信息:select user,host from user
host字段中,localhost表示只允许本机访问,要实现远程连接,可以将root用户的host改为%,%表示允许任意host访问,如果需要设置只允许特定ip访问,则应改为对应的ip。
2.修改root用户的host字段,命令:update user set host="%" where user="root";
3.使本次修改立即生效,命令:flush privileges;
4.为了可以让外部网络访问数据库,需要设置数据库权限,让 非root 用户可以拥有增删改查的权限。
授权命令:grant 权限 on 数据库对象 to 用户
授予 bertram 用户对所有数据库对象的全部操作权限
GRANT ALL PRIVILEGES ON *.* TO 'bertram'@'%' IDENTIFIED BY '1q2w3e4r' WITH GRANT OPTION;命令说明:
ALL PRIVILEGES :表示授予所有的权限,此处可以指定具体的授权权限。
*.* :表示所有库中的所有表
'bertram'@'%' : bertram是数据库的用户名,%表示是任意ip地址,可以指定具体ip地址。
IDENTIFIED BY '1q2w3e4r' :1q2w3e4r 是数据库的密码。
用可视化工具Navicat测试连接数据库
常见错误:
1、如在连接mysql时显示:/tmp/mysql.sock 不存在的解决方法
出现问题原因:
有可能是 my.cnf 配置文件中设置了 [mysqld] 的参数 socket ,而没有设置[client]的参数socket
mysql连接一般有两种方式 TCP/IP 和socket
TCP/IP用于远程连接 客户端和服务端的关系
socket连接用于本地服务和数据之间的 管道连接 每次登陆数据库刷新mysql.sock
mysql.sock 文件有什么用:
mysql 支持 socket 和 TCP/IP 连接。那么 mysql.sock 这个文件有什么用呢?连接localhost通常通过一个Unix域套接字文件进行,一般是/tmp/mysql.sock。如果套接字文件被删除了,本地客户就不能连接。/tmp 文件夹属于临时文件,随时可能被删除。
1.TCP 连接(如果报错 /tmp/mysql.sock,你可以尝试这种方式连接)
mysql -uroot -h 127.0.0.1 -p2.socket 连接
①通过修改/etc/my.cnf文件来修改
添加 [client] 配置项
[client]
socket = /data/mysql/mysql.sock
②建立软连接
ln -s /data/mysql/mysql.sock /tmp/mysql.sock2、启动异常如下
InnoDB: The Auto-extending innodb_system data file './ibdata1' is of a different size 768 pages (rounded down to MB) than specified in the .cnf file: initial 32768 pages, max 0 (relevant if non-zero) pages!
解决方法
# cd /data/mysql/data/
# rm -rf /var/lib/mysql/ib*
主要删除:ibdata1、ib_logfile0、ib_logfile1文件
重启异常解决。
至此mysql源码安装已完成。
——此时不搏何时搏?全力以赴,铸我辉煌!


