Springboot源码分析之Spring循环依赖揭秘
摘要:
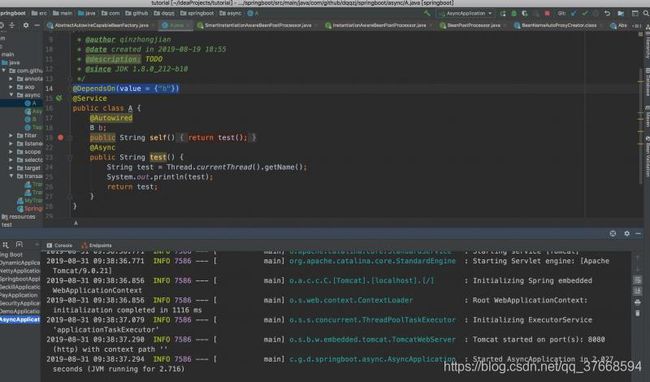
若你是一个有经验的程序员,那你在开发中必然碰到过这种现象:事务不生效。或许刚说到这,有的小伙伴就会大惊失色了。Spring不是解决了循环依赖问题吗,它是怎么又会发生循环依赖的呢?,接下来就让我们一起揭秘Spring循环依赖的最本质原因。
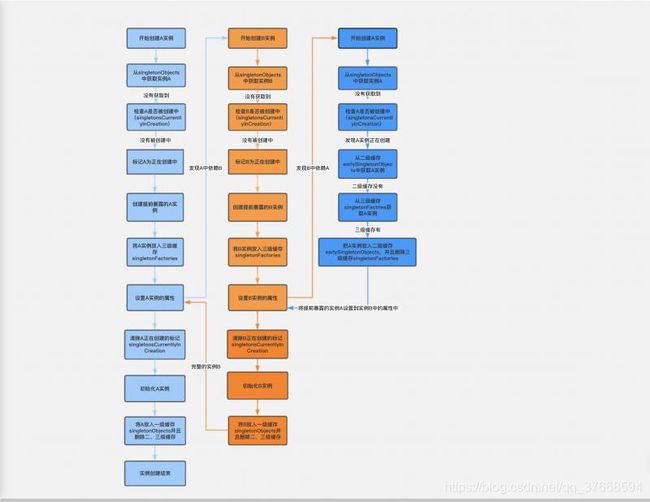
Spring循环依赖流程图
Spring循环依赖发生原因
源码分析揭秘
    protected Object doCreateBean( ... ){
        ...
        boolean earlySingletonExposure = (mbd.isSingleton() && this.allowCircularReferences && isSingletonCurrentlyInCreation(beanName));
        if (earlySingletonExposure) {
            addSingletonFactory(beanName, () -> getEarlyBeanReference(beanName, mbd, bean));
        }
        ...

        // populateBean这一句特别的关键,它需要给A的属性赋值,所以此处会去实例化B~~
        // 而B我们从上可以看到它就是个普通的Bean(并不需要创建代理对象),实例化完成之后,继续给他的属性A赋值,而此时它会去拿到A的早期引用
        // 也就在此处在给B的属性a赋值的时候,会执行到上面放进去的Bean A流程中的getEarlyBeanReference()方法  从而拿到A的早期引用~~
        // 执行A的getEarlyBeanReference()方法的时候,会执行自动代理创建器,但是由于A没有标注事务,所以最终不会创建代理,so B合格属性引用会是A的**原始对象**
        // 需要注意的是:@Async的代理对象不是在getEarlyBeanReference()中创建的,是在postProcessAfterInitialization创建的代理
        // 从这我们也可以看出@Async的代理它默认并不支持你去循环引用,因为它并没有把代理对象的早期引用提供出来~~~(注意这点和自动代理创建器的区别~)

        // 结论:此处给A的依赖属性字段B赋值为了B的实例(因为B不需要创建代理,所以就是原始对象)
        // 而此处实例B里面依赖的A注入的仍旧为Bean A的普通实例对象(注意  是原始对象非代理对象)  注:此时exposedObject也依旧为原始对象
        populateBean(beanName, mbd, instanceWrapper);

        // 标注有@Async的Bean的代理对象在此处会被生成~~~ 参照类:AsyncAnnotationBeanPostProcessor
        // 所以此句执行完成后  exposedObject就会是个代理对象而非原始对象了
        exposedObject = initializeBean(beanName, exposedObject, mbd);

        ...
        // 这里是报错的重点~~~
        if (earlySingletonExposure) {
            // 上面说了A被B循环依赖进去了,所以此时A是被放进了二级缓存的,所以此处earlySingletonReference 是A的原始对象的引用
            // (这也就解释了为何我说:如果A没有被循环依赖,是不会报错不会有问题的   因为若没有循环依赖earlySingletonReference =null后面就直接return了)
            Object earlySingletonReference = getSingleton(beanName, false);
            if (earlySingletonReference != null) {
                // 上面分析了exposedObject 是被@Aysnc代理过的对象, 而bean是原始对象 所以此处不相等  走else逻辑
                if (exposedObject == bean) {
                    exposedObject = earlySingletonReference;
                }
                // allowRawInjectionDespiteWrapping 标注是否允许此Bean的原始类型被注入到其它Bean里面,即使自己最终会被包装(代理)
                // 默认是false表示不允许,如果改为true表示允许,就不会报错啦。这是我们后面讲的决方案的其中一个方案~~~
                // 另外dependentBeanMap记录着每个Bean它所依赖的Bean的Map~~~~
                else if (!this.allowRawInjectionDespiteWrapping && hasDependentBean(beanName)) {
                    // 我们的Bean A依赖于B,so此处值为["b"]
                    String[] dependentBeans = getDependentBeans(beanName);
                    Set actualDependentBeans = new LinkedHashSet<>(dependentBeans.length);

                    // 对所有的依赖进行一一检查~    比如此处B就会有问题
                    // “b”它经过removeSingletonIfCreatedForTypeCheckOnly最终返返回false  因为alreadyCreated里面已经有它了表示B已经完全创建完成了~~~
                    // 而b都完成了,所以属性a也赋值完成儿聊 但是B里面引用的a和主流程我这个A竟然不相等,那肯定就有问题(说明不是最终的)~~~
                    // so最终会被加入到actualDependentBeans里面去,表示A真正的依赖~~~
                    for (String dependentBean : dependentBeans) {
                        if (!removeSingletonIfCreatedForTypeCheckOnly(dependentBean)) {
                            actualDependentBeans.add(dependentBean);
                        }
                    }

                    // 若存在这种真正的依赖,那就报错了~~~  则个异常就是上面看到的异常信息
                    if (!actualDependentBeans.isEmpty()) {
                        throw new BeanCurrentlyInCreationException(beanName,
                                "Bean with name '"   beanName   "' has been injected into other beans ["
                                StringUtils.collectionToCommaDelimitedString(actualDependentBeans)
                                "] in its raw version as part of a circular reference, but has eventually been "
                                "wrapped. This means that said other beans do not use the final version of the "
                                "bean. This is often the result of over-eager type matching - consider using "
                                "'getBeanNamesOfType' with the 'allowEagerInit' flag turned off, for example.");
                    }
                }
            }
        }
        ...
    }
问题简化
- 发生循环依赖时候
Object earlySingletonReference = getSingleton(beanName, false);肯定有值 - 缓存工厂
addSingletonFactory(beanName, () -> getEarlyBeanReference(beanName, mbd, bean));将给实例对象添加SmartInstantiationAwareBeanPostProcessor AbstractAutoProxyCreator是SmartInstantiationAwareBeanPostProcessor的子类,一定记住了,一定记住,SmartInstantiationAwareBeanPostProcessor的子类很关键!!!!!exposedObject = initializeBean(beanName, exposedObject, mbd);进行BeanPostProcessor后置处理,注意是BeanPostProcessor!!!!!
Spring的循环依赖被它的三级缓存给轻易解决了,但是这2个地方的后置处理带来了 循环依赖的问题。
对比AbstractAdvisorAutoProxyCreator和AsyncAnnotationBeanPostProcessor
由于SmartInstantiationAwareBeanPostProcessor的子类会在两处都会执行后置处理,所以前后都会相同的对象引用,不会发生循环依赖问题,异步注解就不行了 ,至于为什么?自己看上面的分析,仔细看哦!
如何解决循环依赖?
- 改变加载顺序
@Lazy注解allowRawInjectionDespiteWrapping设置为true(利用了判断的那条语句)- 别使用相关的
BeanPostProcessor设计到的注解,,哈哈 这不太现实。
@Lazy
@Lazy一般含义是懒加载,它只会作用于BeanDefinition.setLazyInit()。而此处给它增加了一个能力:延迟处理(代理处理)
    // @since 4.0 出现得挺晚,它支持到了@Lazy  是功能最全的AutowireCandidateResolver
    public class ContextAnnotationAutowireCandidateResolver extends QualifierAnnotationAutowireCandidateResolver {
        // 这是此类本身唯一做的事,此处精析
        // 返回该 lazy proxy 表示延迟初始化,实现过程是查看在 @Autowired 注解处是否使用了 @Lazy = true 注解
        @Override
        @Nullable
        public Object getLazyResolutionProxyIfNecessary(DependencyDescriptor descriptor, @Nullable String beanName) {
            // 如果isLazy=true  那就返回一个代理,否则返回null
            // 相当于若标注了@Lazy注解,就会返回一个代理(当然@Lazy注解的value值不能是false)
            return (isLazy(descriptor) ? buildLazyResolutionProxy(descriptor, beanName) : null);
        }

        // 这个比较简单,@Lazy注解标注了就行(value属性默认值是true)
        // @Lazy支持标注在属性上和方法入参上~~~  这里都会解析
        protected boolean isLazy(DependencyDescriptor descriptor) {
            for (Annotation ann : descriptor.getAnnotations()) {
                Lazy lazy = AnnotationUtils.getAnnotation(ann, Lazy.class);
                if (lazy != null && lazy.value()) {
                    return true;
                }
            }
            MethodParameter methodParam = descriptor.getMethodParameter();
            if (methodParam != null) {
                Method method = methodParam.getMethod();
                if (method == null || void.class == method.getReturnType()) {
                    Lazy lazy = AnnotationUtils.getAnnotation(methodParam.getAnnotatedElement(), Lazy.class);
                    if (lazy != null && lazy.value()) {
                        return true;
                    }
                }
            }
            return false;
        }

        // 核心内容,是本类的灵魂~~~
        protected Object buildLazyResolutionProxy(final DependencyDescriptor descriptor, final @Nullable String beanName) {
            Assert.state(getBeanFactory() instanceof DefaultListableBeanFactory,
                    "BeanFactory needs to be a DefaultListableBeanFactory");

            // 这里毫不客气的使用了面向实现类编程,使用了DefaultListableBeanFactory.doResolveDependency()方法~~~
            final DefaultListableBeanFactory beanFactory = (DefaultListableBeanFactory) getBeanFactory();

            //TargetSource 是它实现懒加载的核心原因,在AOP那一章节了重点提到过这个接口,此处不再叙述
            // 它有很多的著名实现如HotSwappableTargetSource、SingletonTargetSource、LazyInitTargetSource、
            //SimpleBeanTargetSource、ThreadLocalTargetSource、PrototypeTargetSource等等非常多
            // 此处因为只需要自己用,所以采用匿名内部类的方式实现~~~ 此处最重要是看getTarget方法,它在被使用的时候(也就是代理对象真正使用的时候执行~~~)
            TargetSource ts = new TargetSource() {
                @Override
                public Class getTargetClass() {
                    return descriptor.getDependencyType();
                }
                @Override
                public boolean isStatic() {
                    return false;
                }

                // getTarget是调用代理方法的时候会调用的,所以执行每个代理方法都会执行此方法,这也是为何doResolveDependency
                // 我个人认为它在效率上,是存在一定的问题的~~~所以此处建议尽量少用@Lazy~~~
                //不过效率上应该还好,对比http、序列化反序列化处理,简直不值一提  所以还是无所谓  用吧
                @Override
                public Object getTarget() {
                    Object target = beanFactory.doResolveDependency(descriptor, beanName, null, null);
                    if (target == null) {
                        Class type = getTargetClass();
                        // 对多值注入的空值的友好处理(不要用null)
                        if (Map.class == type) {
                            return Collections.emptyMap();
                        } else if (List.class == type) {
                            return Collections.emptyList();
                        } else if (Set.class == type || Collection.class == type) {
                            return Collections.emptySet();
                        }
                        throw new NoSuchBeanDefinitionException(descriptor.getResolvableType(),
                                "Optional dependency not present for lazy injection point");
                    }
                    return target;
                }
                @Override
                public void releaseTarget(Object target) {
                }
            };

            // 使用ProxyFactory  给ts生成一个代理
            // 由此可见最终生成的代理对象的目标对象其实是TargetSource,而TargetSource的目标才是我们业务的对象
            ProxyFactory pf = new ProxyFactory();
            pf.setTargetSource(ts);
            Class dependencyType = descriptor.getDependencyType();

            // 如果注入的语句是这么写的private AInterface a;  那这类就是借口 值是true
            // 把这个接口类型也得放进去(不然这个代理都不属于这个类型,反射set的时候岂不直接报错了吗????)
            if (dependencyType.isInterface()) {
                pf.addInterface(dependencyType);
            }
            return pf.getProxy(beanFactory.getBeanClassLoader());
        }
}标注有@Lazy注解完成注入的时候,最终注入只是一个此处临时生成的代理对象,只有在真正执行目标方法的时候才会去容器内拿到真是的bean实例来执行目标方法。
利用allowRawInjectionDespiteWrapping属性来强制改变判断
    @Component
    public class MyBeanFactoryPostProcessor implements BeanFactoryPostProcessor {
        @Override
        public void postProcessBeanFactory(ConfigurableListableBeanFactory beanFactory) throws BeansException {
            ((AbstractAutowireCapableBeanFactory) beanFactory).setAllowRawInjectionDespiteWrapping(true);
        }
}这样会导致容器里面的是代理对象,暴露给其他实例的是原始引用,导致不生效了。由于它只对循环依赖内的Bean受影响,所以影响范围并不是全局,因此当找不到更好办法的时候,此种这样也不失是一个不错的方案。


