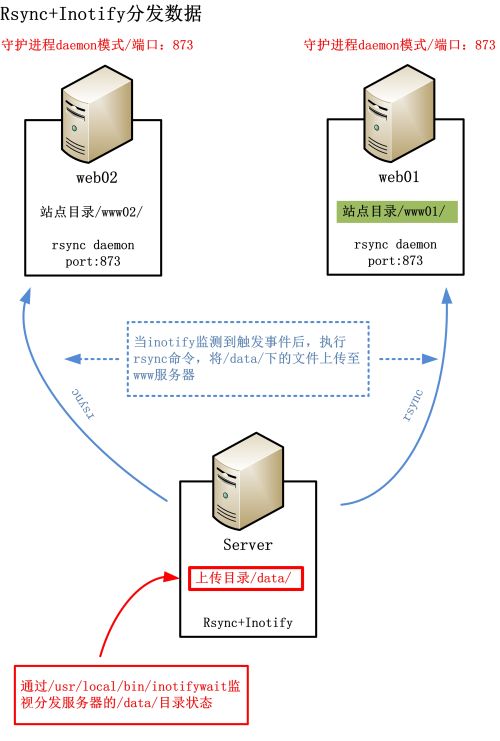
Linux内核从2.6.13开始支持inotify。
Inotify可以监控文件系统的读取,修改,创建等状态。(更多信息请参考网上资料)
通过Rsync+Inotify(inotifywati)可以实现文件的批量分发功能。
1 查看linux是否支持inotify
a) 内核至少是2.6.13
uname -r
b) 存在/usr/include/sys/inotify.h,说明支持
c) 查看/proc/sys/fs/inotify/
total 0
-rw-r--r-- 1 root root 0 Jul 17 10:28max_queued_events
-rw-r--r-- 1 root root 0 Jul 17 10:28max_user_instances
-rw-r--r-- 1 root root 0 Jul 17 10:28max_user_watches
有以上3个文件说明支持
2 下载inotify-tools-3.13.tar并安装
tar zxvf inotify-tools-3.13.tar.gz
cd inotify-tools-3.13
./configure
make&&make install
安装完成后会在/usr/local/bin/下生成2个文件:
ls -l /usr/local/bin/inotify*
-rwxr-xr-x 1 root root 38582 Jul 17 10:37/usr/local/bin/inotifywait
-rwxr-xr-x 1 root root 40353 Jul 17 10:37/usr/local/bin/inotifywatch
3 分发服务器server脚本
#!/bin/bash
Host01=ob_web01
Host02=ob_web02
Src=/data/
Dst01=www01/
Dst02=www02/
User01=tom
User02=tom
/usr/local/bin/inotifywait -mrq -ecreate,modify,delete,attrib $Src |\
while read file
do
rsync -az $Src $User01@$Host01::$Dst01--password-file=/etc/rsync.password
rsync -az $Src $User02@$Host02::$Dst02--password-file=/etc/rsync.password
done
4 web01/02服务器将rsync配置rsync-daemon模式(参考http://szcat.blog.51cto.com/665775/1826733)
5 web01/02服务器rsyncd.conf配置文件
################web01###################
uid = rsync
gid = rsync
max connections = 6
timeout = 300
pid file = /var/run/rsync.pid
lock file = /var/run/rsync.lock
log file = /var/log/rsync.log
ignore errors
read only = false
hosts allow = 192.168.1.0/24
list = false
auth users = tom
secrets file /etc/rsync.password
[www01]
path = /www01
comment = web site
auth users = tom
secrets file = /etc/rsync.password
################web02###################
uid = rsync
gid = rsync
max connections = 6
timeout = 300
pid file = /var/run/rsync.pid
lock file = /var/run/rsync.lock
log file = /var/log/rsync.log
ignore errors
read only = false
hosts allow = 192.168.1.0/24
list = false
auth users = tom
secrets file /etc/rsync.password
[www02]
path = /www02
comment = web site
auth users = tom
secrets file = /etc/rsync.password
